

Dear friend,
In this post I’d like to provide you guidelines for creation of the home lab for CCIE Routing and Switching, Service Provider or Security. Instant access to lab is crucial factor for success in career in overall and at CCIE Lab exam in particular.
History of home labs for CCIE preparations
For decades there was the only way to prepare for CCIE Lab examination, which was the access to real equipment. The luckiest engineers had access to such lab at their workplace. Usually such possibilities had employees of big telecom companies or IT system integrators. All other peoples, who desired to get CCIE, had to buy the used equipment on their own. Thanks to Ebay it was not too difficult, though it led to spending quite large amount of money. Therefore people, who were preparing for CCIE, used to gather together to share prices or refused this idea.
Personally I had such lab at home a couple of years ago as well. It was very good time, as I had 4x Cisco 2600XM Series routers, 2x Cisco Catalyst 3550 switch, 1x Cisco Catalyst 2950 switch and 1x Cisco Catalyst 2958G L3. In total 8 devices provided me possibility to prepare well for CCNP Routing and Switching and for CCIP, though I haven’t got the last one. There was not only about preparation for certain exams, it was more about discovering the very exciting world of network technologies. Days and nights I was working in the lab to understand how things are working. In sake of justice I add that I was not preparing to CCIE in that time and even didn’t have such desire. But the time is passing by and things are changing.
Current situation
Today the networking and computing world is a bit another then 5-10 years ago, what simplifies the preparation for CCIE as well. One of the trends in today’s networking is called NFV, what stand for Network Function Virtualization. In a simple terms it means that functions of such network elements as routers or switches are replaced by virtual machines (VMs) running a special software. And what is very good for everyone, who is preparing for CCIE, Cisco has such software.
Frankly speaking you don’t need to buy the real equipment any more. Everything you need can work in pure virtual environment, what is just awesome due to a number of reasons:
- Features. Such virtual images are fully functional so you are not limited by technologies supported by a certain platform.
- Place and power. For real equipment you have to have a rack at hope, what is not easy to install. Then working equipment produces a lot of noise and consumes a lot of power. Virtual lab requires just your laptop or a server if you have big lab.
- Ease of access. You have it always with you, if it works at your laptop.
So, what is it all about? There are two main solutions, which you can use.
Unified Networking Lab and IOU-WEB<
This solution is the first one from two, which I want to present you. The main its advantage is that it isn’t resource intensive. The first its version is called IOU-WEB and it was capable to launch Cisco IOU images. Cisco IOU Images are full feature Cisco L2 or L3 images, which feature sets are almost equal to real routers and multilayer switches. I’ve heard that at laptop with Intel Core i7-4810QM and 8 GB RAM onboard it was possible to run 30 virtual instances (routers and switches), what is sufficient to build a full-scale CCIE lab from INE courses.
Unfortunately these images have some limitations. For example, Layer 2 image doesn’t support L3 Etherchannel and Layer 3 image doesn’t support fast-reroute for routing protocols (IGP). Information about limitations can be found in Internet, as well as the Cisco IOU images itself, though I don’t have any images on my own as it is illegal.
The link to the solution is here: http://www.unetlab.com/. There you can find all the necessary information, documentation and downloads.
One of the main advantages is that this lab can be launched just as one VM in any virtualization software (Oracle VirtualBox, for example) and you can use it wherever you want: at the work, at home, in train or plane, or even on the beach. This lab is always with you and depending on your laptop you can build very complex lab.
Let’s take a look briefly on its pros and cons:
Pros:
- Low requirements for the resources
- Very good relationship available features / used resources
- Always with you
Cons:
- Process of obtaining Cisco IOU images is not easy
- Some features are not supported
How it works
The journey to this world begins with download of the software. The latest version can be downloaded from the official web-site (http://www.unetlab.com/download/index.html), though I haven’t heard about its usage, so I can’t describe it. What I can describe is the legacy IOW-WEB (http://www.routereflector.com/2014/07/iou-web-interface-1-2-2-23/), which was and is popular right now.
This tool is just VM, which can be launched in any virtualization tool. For example, Oracle Virtual Box is pretty good, as it’s fully official free.
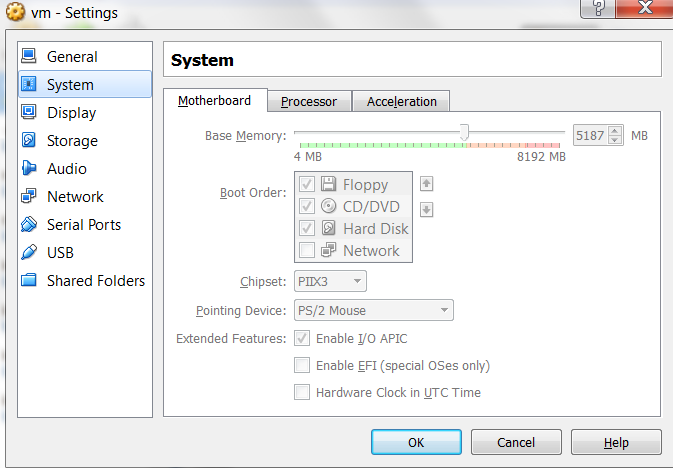
In the settings of VM it’s recommended to set available memory as much as possible, because it influences the possible configuration

In the configuration you should also chose the network connectivity for this VM, so it makes sense to familiarize yourself with the configuration for your VM vendor.
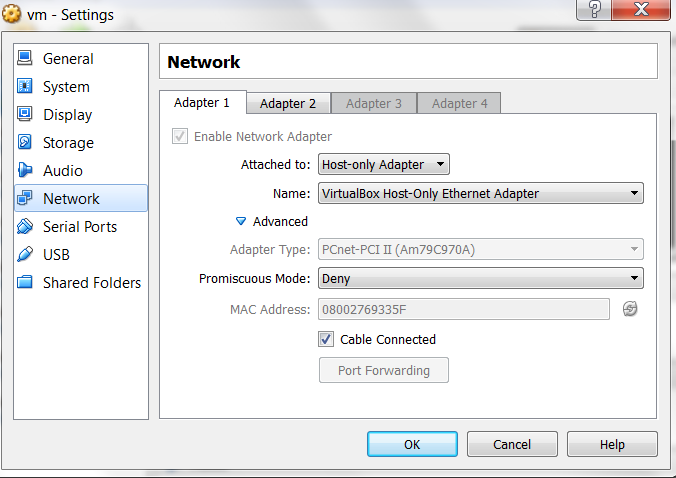

IOU-WEB works as a web application, so you will work with it using web browser. That’s why network connectivity is crucial, because you will establish http session to IOU-WEB.
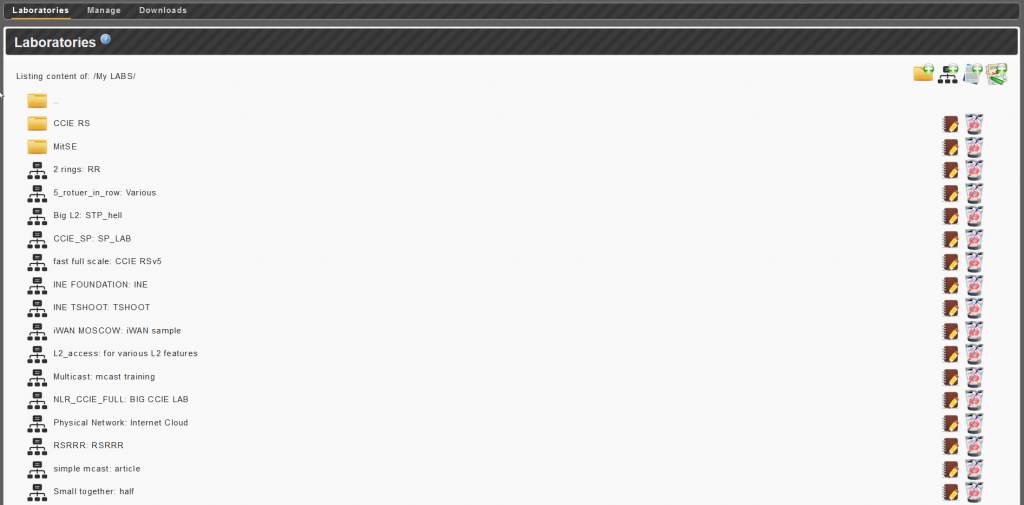

After you have launched IOU-WEB, you access its WEB GUI and get to the Laboratories lab. Here you can create new lab or chose previously created. Take a look on the possible example:
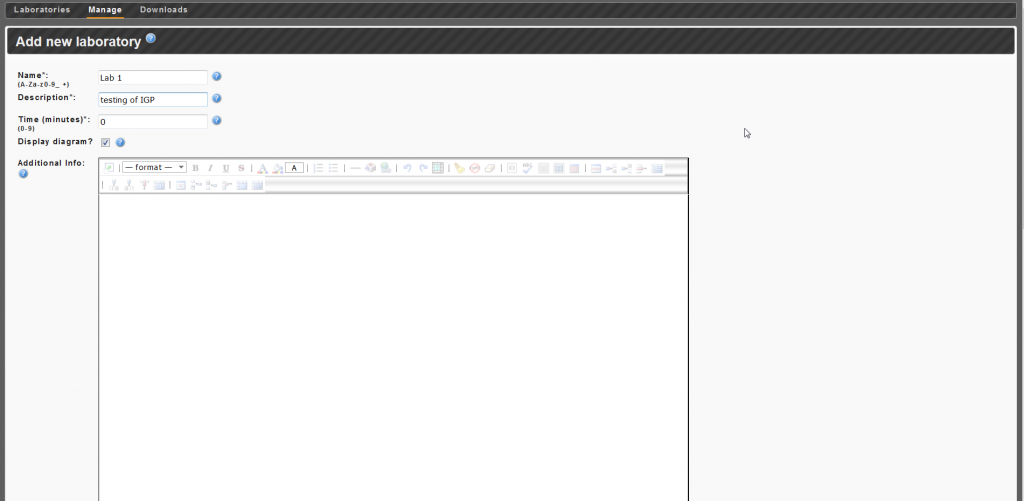

You must enter the name and its description as the first step. Then you scroll down and come to the NETMAP field. It’s the most important part, because here you create the connectivity between your devices. It works as follows:
- Each your network element, except hubs, has a number.
- Each port at your network element has a port as well.
- Serial interfaces at your routers go after the Ethernet interfaces.
- One HWIC or line card at your router or switch has 4 interfaces of the same type in total
- Interfaces have numbers from 0 to 3
- Modules have numbers from 0 till x
The possible topology in the provided example is the following one.
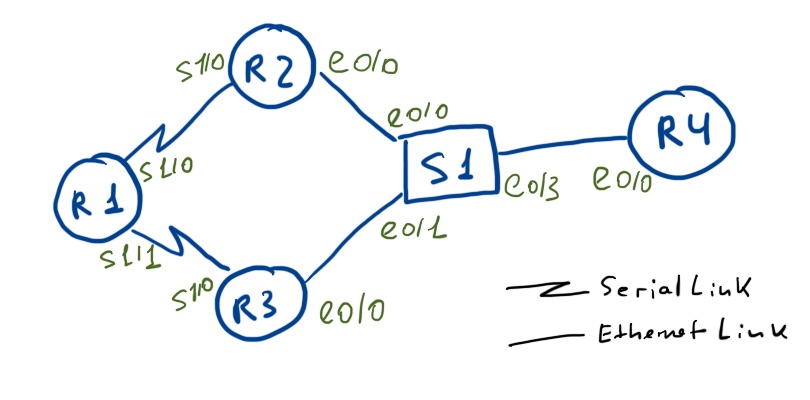

In the NETMAP then you should the following connectivity.


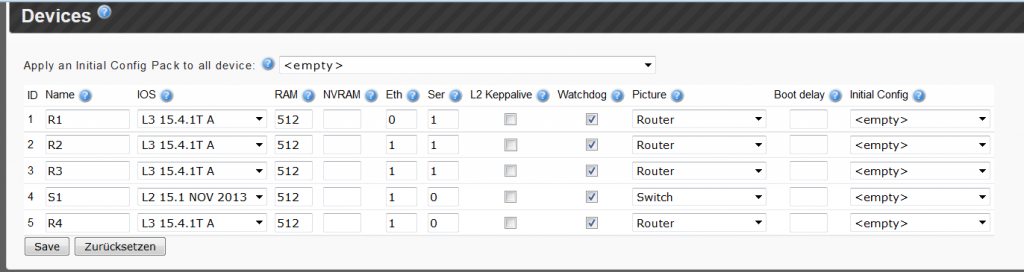
The next step is to add the necessary images to the instances, allocate interfaces, memory and names.
You MUST configure RAM available per router. If you don’t do it, your routers will crash if you will configure NAT or NBAR.

After saving your lab you go to the main “Laboratories” pane again, where you should launch your lab.
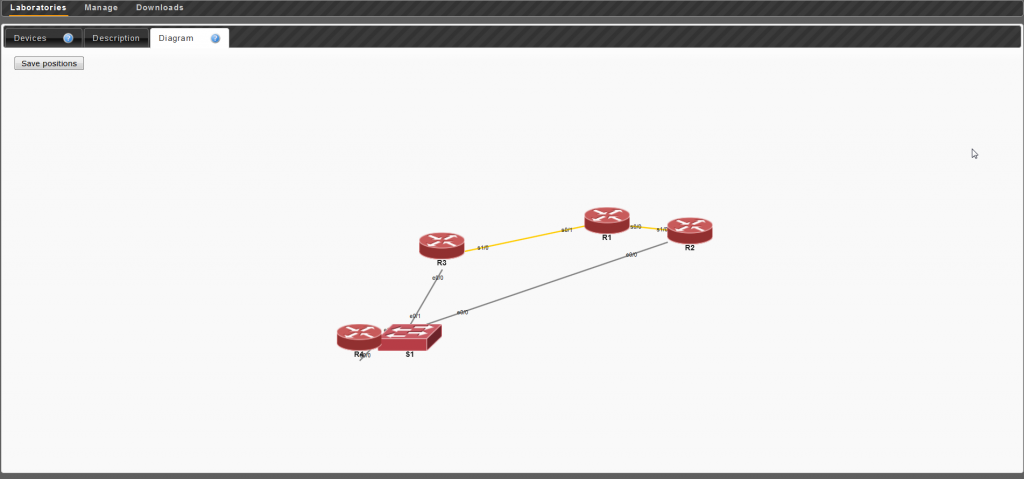

After launch you go to the diagram pane. First of all you see some chaos and red devices. Red color means that they are offline. Before you launch them it makes sense to structure devices according to the provided scheme. You just move them in drag’n’drop manner.
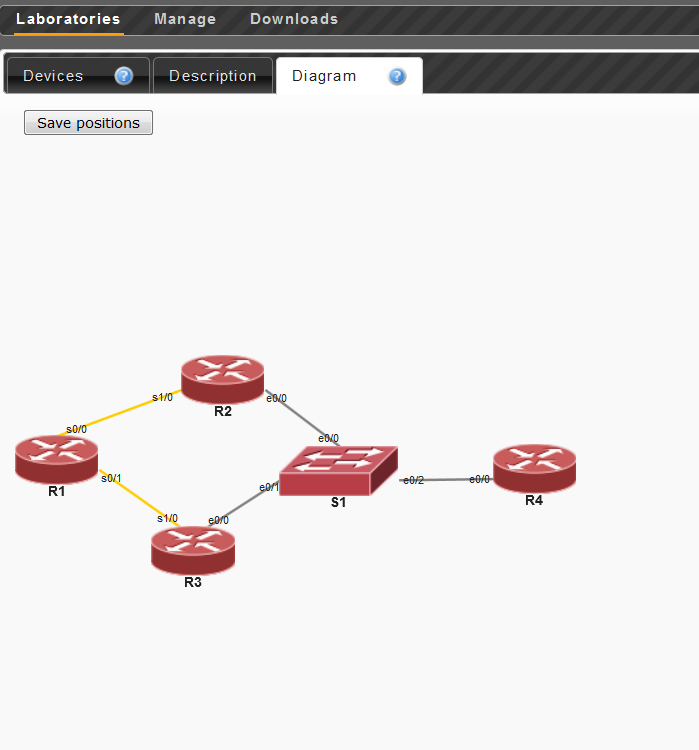

When you are ready just go to the “Devices” tab and press play.
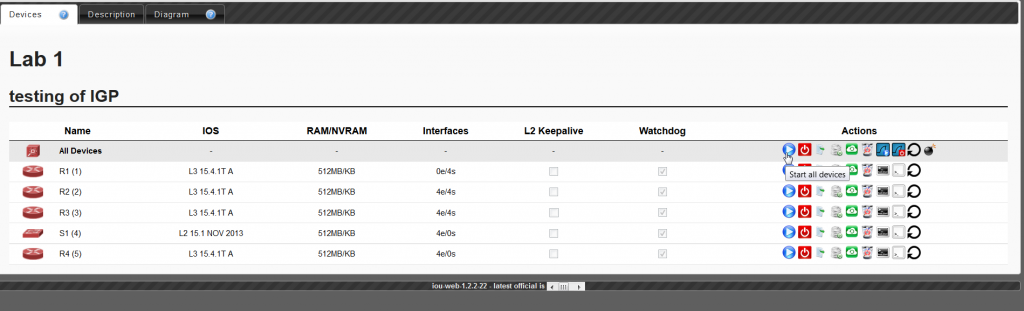

You see on the right side Wireshark images with play and stop buttons. You will use them to start and stop traffic capture in your network. The traffic is captured on all active devices simultaneously and then saved in Downloads/Sniffer per device.
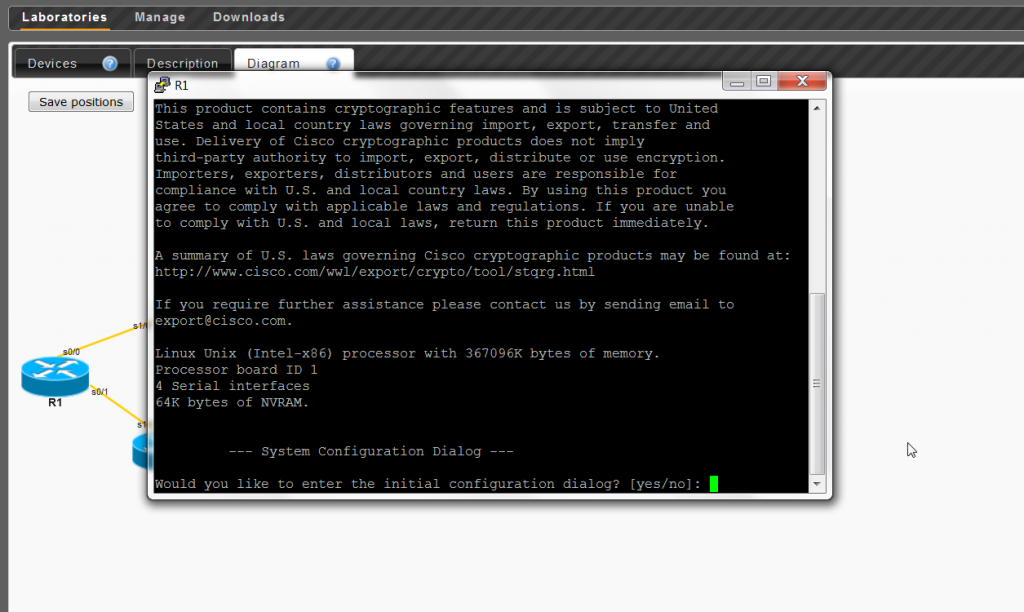
When the devices are launches, go to the “Diagram” tab and make your lab. Just click on the router and you will get into console. That’s it!

If you want, you can add later the new devices through the NETMAP just by changing the existing lab. Also you can delete it if you want.
![]()

Conclusions
This lab is very useful for all type of study. You can always launch it ad hoc and test lots of features not bothering your production network.
Lessons learned
In many cases this tool is just unreplaceable, as you always have access to it. I’ve heard that some people used it to prepare for CCIE even in train or plane, so studying process can be really 24×7. On the other side I don’t know how to obtain images as they fell under Cisco NDA (proof http://www.routereflector.com/2014/07/iou-web-interface-1-2-2-23/), so it might be problematic to obtain them. But if you are Cisco employee or lucky enough, you can get this very powerful tool.
Support us
Best regards,
Anton Karneliuk