

Hello my friend,
In this article I’ll show you how to establish basic virtual network between Alcatel-Lucent (or already Nokia) virtualized service router (VSR) and Cisco IOS XR virtual (IOS XRv). Such installation has three main goals:
- Test interoperability of certain features between popular and respectable vendors before deployment
- Develop best practices design in case of multivendor network
- Learning and education
If you are excited about these ideas how I do, I welcome you to read this article till the end.
Disclaimer
All the thoughts in this article are my own and may not reflect the official position of Nokia.
Introduction
For a long time I’ve been Cisco fan. Almost 10 years ago started my exciting journey in the networking world from learning networks basic in Cisco CCNA course, which was recommended to me by my brother. Year by year I’ve been gathering practical experience in service provider (SP) and enterprise fields as well as preparing to new certification. Besides working, I had a lab at home and my parents had long sleepless nights, when I was learning. At the end my wife inspired me to achieve one of the topmost certification in the networking and IT world – Cisco CCIE, what I’ve done the last year.
On the other hand many times I saw that it is very common for big companies to have so called dual-vendor strategy in their network. Such strategy has both pros and cons, as usual, but the main advantage for the network is to be on the safe side, if there are some problems with one of the vendors. There are a lot causes for such problems, like political, technical or even trust for instance. In such environment the interoperability between different networking vendors becomes a key driver. For sure each vendor tends to increase its presence in the customers network, because it leads to increase of revenue. I fully support this idea, but we must support our customers in all cases. The Greenfield installation is very rare nowadays, so we have to be interoperable in order to satisfy our customers and conqueror their respect and loyalty.
In this year I’ve taken a good chance to join the Nokia team. Being passionate about networking in general and IP and Optical technologies in particular I’m very glad to be part of this company, because in its portfolio joint Nokia and Alcatel-Lucent company provides very solid solution in all the telecommunication field. As I’m now representing Nokia, I’m eager to have at least the same knowledge in Nokia devices as I have in Cisco.
So I decided just to connect the most popular Cisco virtual device in SP segment (Cisco IOS XRv) to the most popular Nokia virtual device in SP segment (Nokia VSR) and try to configure whatever I know at Cisco in such mixed environment. I don’t know how far I can be at the end, but now I’m very excited about this idea and I start.
Getting started
Apparently the installation of Nokia VSR or Cisco XRv is out of scope for this document. What I’ve found to my disappointment is that it’s much more difficult to find information about Nokia Routers in the free access than about Cisco ones. For Cisco Systems you can just type in your browser “Cisco IOSXRv installation” and you get lots of links to official information and forums, where all details are discussed, for Nokia I’ve seen only a couple of links to official documentation. So we need to be more popular, I think J For your reference I place here links to official documents, which help to install virtual routers:
- Nokia VSR: https://infoproducts.alcatel-lucent.com/cgi-bin/dbaccessfilename.cgi/3HE10848AAAATQZZA01_V1_VSR%20Installation%20and%20Setup%20Guide.pdf
- Cisco IOS XRv: http://www.cisco.com/en/US/docs/ios_xr_sw/ios_xrv/install_config/b_xrvr_432_chapter_01.html
I strictly recommend you to read both articles, because I don’t want to repeat them in my article. I will just provide a bridge between them.
Upon reading these articles you will ask yourself about the ways of getting images. Well, if you are employee of the mentioned company, you can get the necessary images and keys. If not, it’s a bit tricky. I know that several old images of Cisco IOS XRv (like 4.3.2) was possible to officially download from Cisco web-site. About Nokia (Alcatel-Licent) VSR I haven’t heard anything about free license, so you have to ask the marketing employees, maybe they have the answer.
Starting from this point let’s assume that you have managed to get both virtual images and licensed for them.
Lab that is always with you
There are multiple ways how you can install and use virtual images. The most powerful way is to install them directly into hypervisor (like VMware ESXi, for instance) at the server. In case if you don’t have the server, you can use your laptop. For a simple installation you should have at least 4 core CPUs and 8 GB RAM. Then you should install any program that can run virtual machines (VM), like Oracle VirtualBox or VMware Player (both are free).
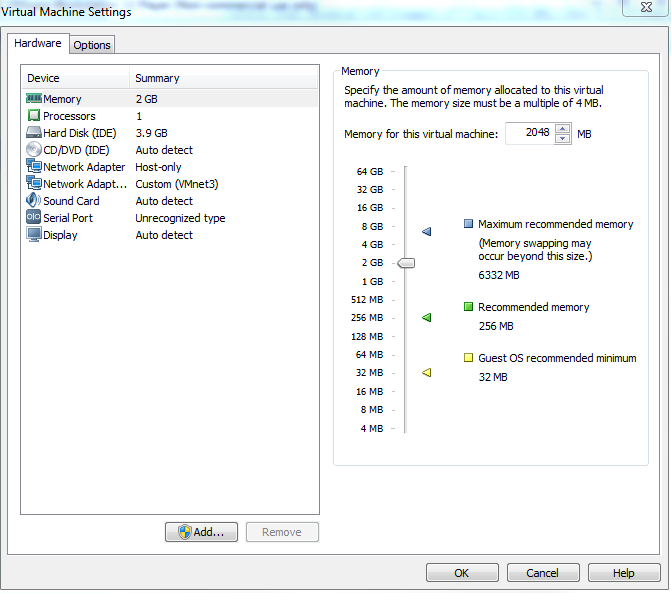
What’s about Cisco IOS XRv, you just launch downloaded image, which usually goes as OVA file and can be just launched in any player. There is a couple of manipulation that should be used with VM’s parameters. You should have configured the following:
- Memory: 2 Gb RAM
- CPU: 1 core
- Network: 2 interfaces
- Serial: it must be configured as network type and mapped to localhost IP/port.

Everything besides the 4th point can be done from GUI. The 4th point can be done in the following way:
- You open .vmx file of your Cisco IOS XRv, which is created automatically in VMware Player
- Add there the following strings:
serial0.present = “TRUE”
serial0.fileType = “network”
serial0.fileName = “telnet://127.0.0.1:9001”
serial0.startConnected = “TRUE”
serial0.yieldOnMsrRead = “TRUE” - Save and close the file
The main issue here is that you can add Serial port from GUI, but you can’t configure its type as network. And this is crucial, if you don’t have physical COM. Several times I’ve faced the issue that named pipe (another type of virtual serial interface) doesn’t work, if you don’t have local COM port at your laptop at all. May be there is another solution, but I know that network console works really well.
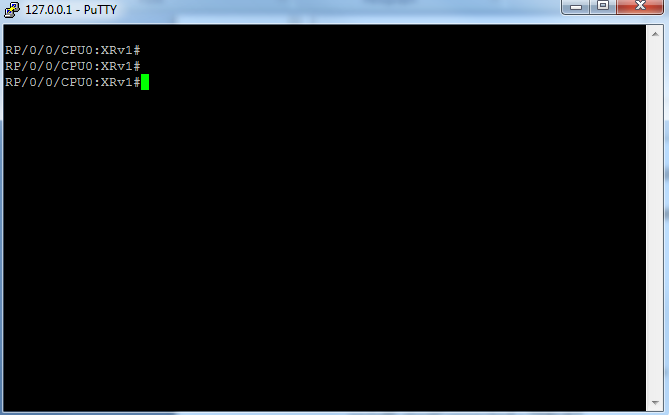
Now you can launch your virtual Cisco IOS XRv and connect to it:


Let’s configure an interface at IOS XRv, which we can further ping from Linux host and from VSR:
|
configure |
The easiest part of our installation is done. Now let’s go to Nokia VSR.
Usually image of Nokia VSR is delivered as .qcow2 file, which used in KVM hypervisor. I’ve seen .ova files as well for Nokia VSR, but I haven’t managed to launch them, so they are not covered in the article. Maybe you are luckier and will manage to launch it. If so, it will significantly simplify your life. If not, just read further.
To launch .qcow2 image of Nokia (ALU) VSR you have to have KVM. The easiest way is to install some Linux OS in VM and there launch VSR. Afterwards the last task will be the establishment of connection between VSR and IOS XRv.
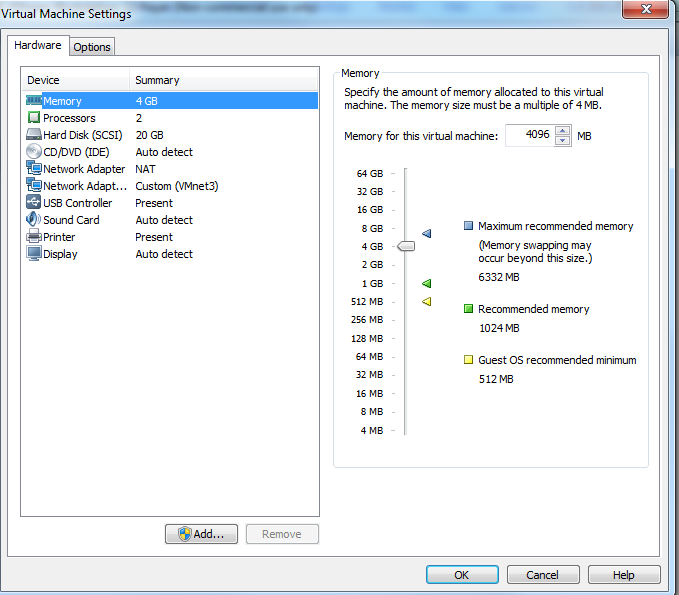
Here is the parameter of VM, as I have them configured:

Let’s assume you have successfully installed CentOS 6.8 (I don’t recommend to install CentOS 7.x version as I haven’t managed to start KVM in VM), or any other Linux. Then you have install QEMU-KVM and all related packets. You can read about it here (https://wiki.centos.org/HowTos/KVM) or here (http://www.cyberciti.biz/faq/kvm-virtualization-in-redhat-centos-scientific-linux-6/). The latter is written very easy and understandable.
Before you install Nokia VSR, I suggest you to prepare the virtual network infrastructure. Then the installation of VSR will be also easy.
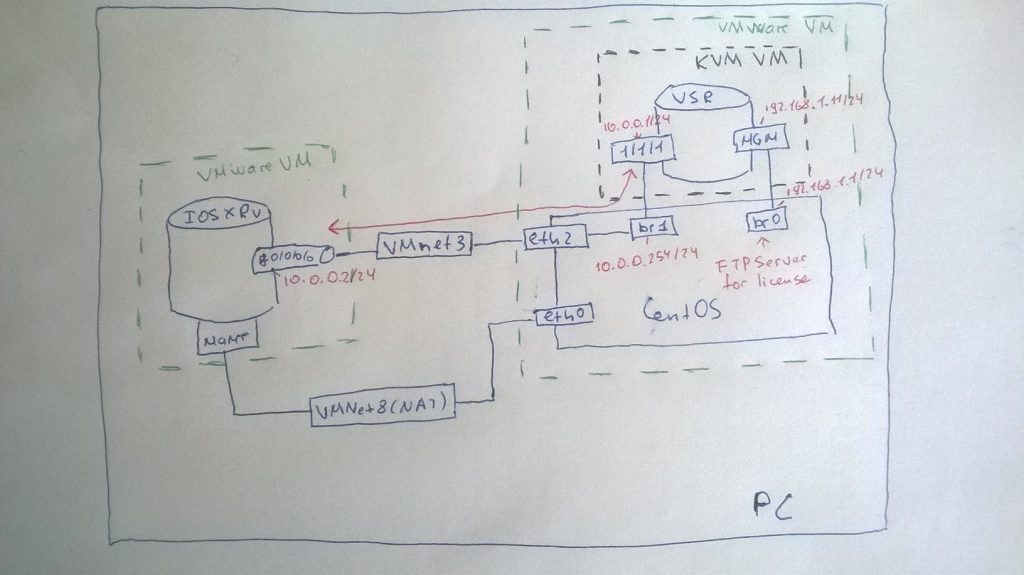

If you carefully looked at provided VM’s configuration, you could notice that in each VM I have interface configured for VMnet3, which will be used as transit network between VSR and Cisco IOS XR. Our CentOS host, which hosts KVM VM with Nokia VSR, will also have interface in this network, which can be used for testing or other services, like syslog, AAA and so on.
Based on the topology we need to configure two bridges at CentOS host, where one will be fully internal and one will be mapped to external interface of VM.
First of all you should configure interface br0, which will be connected to management interface of VSR. Upon its boot VSR will connect to this interface via FTP in order to obtain license file:
|
[root@localhost ~]# vi /etc/sysconfig/network-scripts/ifcfg-br0 |
We don’t map this bridge to any physical interface. Then we should configure the second bridge and its interface:
|
[root@localhost ~]# vi /etc/sysconfig/network-scripts/ifcfg-br1 |
It’s very important to place NM_CONTROLLED=”no”, because at another interface it’s configured as “yes”:
|
[root@localhost ~]# cat /etc/sysconfig/network-scripts/ifcfg-eth0 | grep “NM” |
The reason for such deviation is that NM, what stands for network manager, doesn’t support bridging. More over on that here (https://www.centos.org/forums/viewtopic.php?f=13&t=42080)
Also it makes sense to compare MAC addresses in /etc/sysconfig/network-scripts/ifcfg-eth2 and /etc/udev/rules.d/70-persistent-net.rules. They must be identical, it’s obvious.
After configuring interface at your Linux host you have to restart network services:
|
[root@localhost ~]# service network restart |
Now it’s time prepare Nokia VSR and launch it. I hope you’ve read the documentation provided in the link above. So you have seen that there is an XML file, which must be properly configured and which will be used for VM creation.
I will provide the most important part for our installation:
|
[root@localhost ~]# cd /var/lib/libvirt/images/ |
In “system entry” you configure that license is available at FTP server, with certain credentials. The same user name and password as well as FTP server (service vsftpd at CentOS) must be configured at your Linux host. Then you map first interface of your Nokia (Alcatel-Lucnet) VSR, which is management, to br0 at Linux host and the second interface, which is first data interface, to br1 at Linux host, which actually goes to Cisco XRv further. Other parts of VSR’s XML configuration file are aligned with configuration guidelines provided in link from Nokia (Alcatel-Lucent) web-site above.
If you configure everything correct, you will be able to launch VSR:
|
[root@localhost images]# virsh define sr3.xml |
Now you are able to telnet to its console:
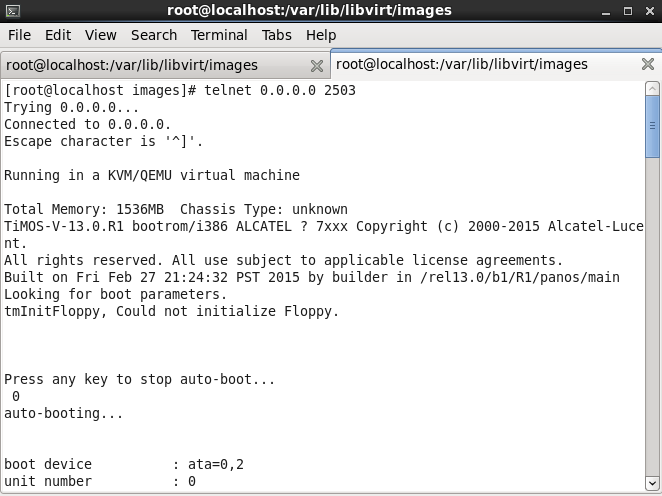

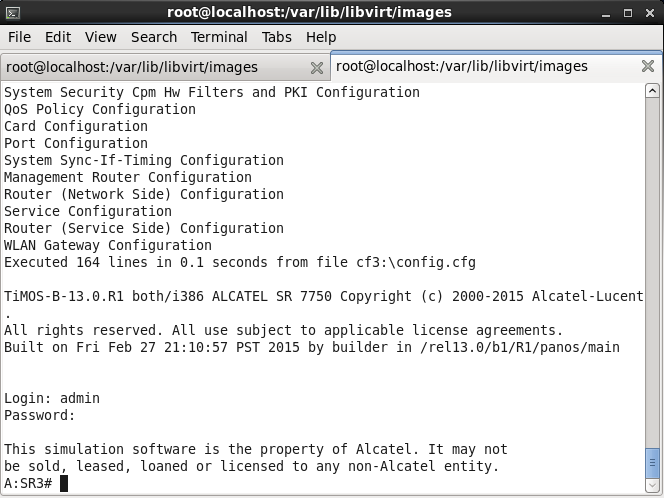
And after it’s booted you can log into it:

That’s it. Now we need to configure interface to ping our XRv1. But in Nokia (Alcatel-Lucent) VSR it is a bit more complex than in Cisco IOS XRv. In contrast to XRv, VSR is fully equal to physical router (actually 7750 SR). It means that you have to provision linecard (called card) and its modules (called MDA – media dependent adapter) even in virtual device. I won’t discuss it in details now, just follow the magic:
|
A:SR3# configure |
Check that you have provisioned this card and module correctly:
|
A:SR3>config>card>mda# show card =============================================================================== |
Actually you will use the same command before configuration, because you need to know, what cards you have installed in box.
To finalize our configuration in the article we configure the physical and logical interface:
|
A:SR3>config# port 1/1/1 |
At the beginning it looks strange for me after Cisco, because here in SR OS we have a strong separation between physical interface (port) and logical interface (router interface)
In other the configuration is just the same. So let’s test, that we’ve established the end-to-end connectivity between Cisco IO XRv and Nokia VSR. Nokia/Alcatel-Lucent side looks as follows:
|
*A:SR3# ping 10.0.0.2 —- 10.0.0.2 PING Statistics —- =============================================================================== |
Cisco side is also very good:
|
RP/0/0/CPU0:XRv1#show arpFri Jun 3 14:07:09.843 UTC ——————————————————————————- |
Lessons learned
The main problems, which I’ve faced, were related to the specifics of VMware player configuration or Linux network interfaces. Also it turns out that KVM operation significantly depends on Linux CentOS version, what wasted many hours. I hope using this article you can avoid it and establish lab much faster.
Conclusion
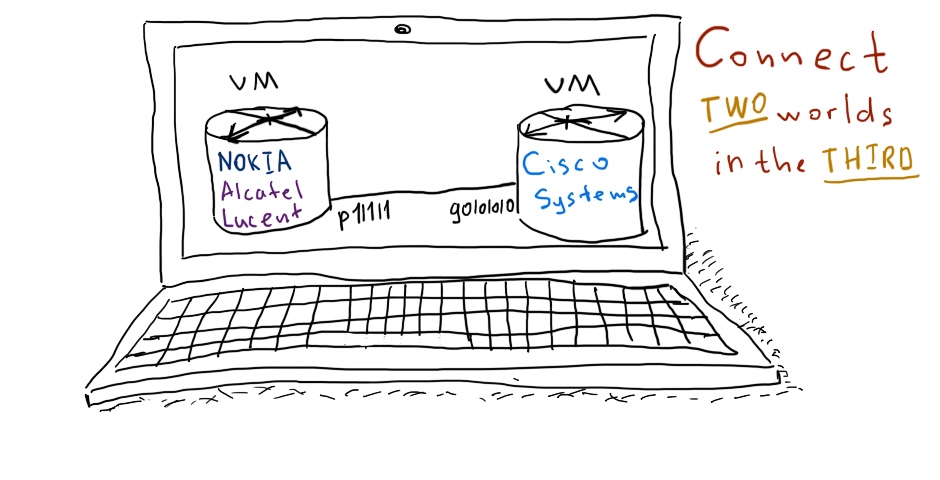
Actually this article is not about configuration of the Cisco or Nokia/Alcatel-Lucent device. It’s about preparation your virtual application (middleware), and configuring connectivity between different layers of virtuality (on one side you have VM in VMware, on another you have KVM VM that is launched in VMware’s VM). The image above covers this fact very good. Actually it shows that you have your own private cloud just at your laptop.
This article is useless if you don’t attend to official documentation, which covers the installation of devices. But on top of them it shows you how you can connect these two powerful vendors (Nokia/Alcatel-Lucent and Cisco Systems) together at your laptop. I think it’s really awesome, because you can learn, test and develop the networking solution wherever you want, even in the train or in plane. I’ve just started my journey in this world of operability and welcome you to follow me.
Support us
BR,
Anton Karneliuk