SDN sandbox 6. NETCONF/YANG for Nokia SR OS and Cisco IOS XR. Part 1
Anton Karneliuk
Hello my friend,
Some time ago I have written few articles about SDN technologies and protocols that you might find now or will find in near future in service provider networks. There is one important technology missing there, and we’ll speak about it now.
1 2 3 4 5
No part of this blogpost could be reproduced, stored in a
retrieval system, or transmitted in any form or by any
means, electronic, mechanical or photocopying, recording,
or otherwise, for commercial purposes without the
prior permission of the author.
Brief overview
NETCONF/YANG is quite often mentioned together, though it isn’t necessity the case. NETCONF is an abbreviation from Network Configuration Protocol, which is described in RFC6241 currently. And it has two major modules to control network elements: XML and YANG. When NETCONF was released, only XML was available as it’s shown in RFC4741.
YANG is a data modelling language and was initially described in RFC6020. Over the years it evolves to a newer version 1.1 covered by RFC7950. Actually YANG is an abstraction that helps create vendor-independent view on the configuration of particular device.
In general, if we think about main idea of NETCONF, it’s about vendor independent configuration. Nowadays each vendor has its own CLI language. Though it’s always English, commands are always different. So we, as a network engineers, must to be trained in all kinds of these languages. For example, I’m writing about two languages in my articles (link):
Cisco IOS XR;
Nokia (Alcatel-Lucent) SR OS.
On top comes the following (just what I have in my mind regarding main vendors in service provider network):
Juniper JUNOS;
Huawei NOS VRP;
When we start speaking about enterprise networking, data centers or security, the number of different CLI languages increases tremendously. So NETCONF’s intention to simplify life of network engineers by overcoming this language barrier and give possibility to configure all devices in the same manner through NETCONF.
What are we going to test?
We’ll configure Nokia (Alcatel-Lucent) VSR and Cisco IOS XRv to support NETCONF. After that we’ll perform some configuration and verification activities using this protocol.
Software version
For Nokia (Alcatel-Lucent) VSR we use the newer version, what was not possible for multicast. There are no changes for Cisco:
Nokia (Alcatel-Lucent) SR OS 15.0.R4
Cisco IOS XRv 6.1.2
Topology
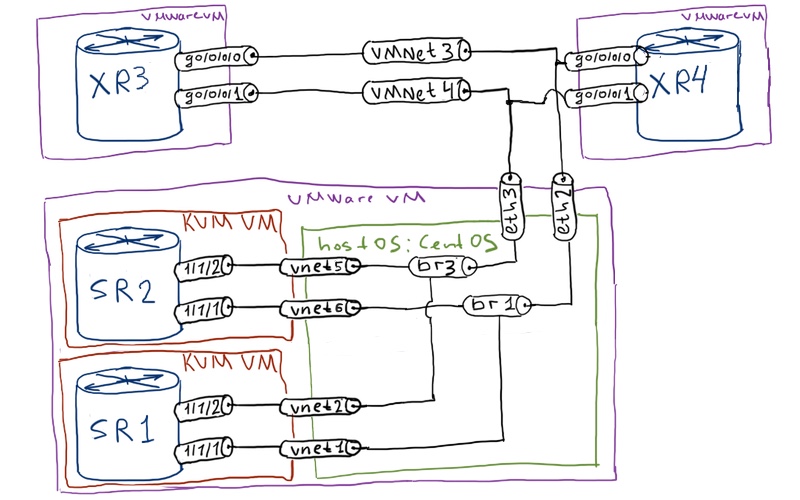
Physical topology is the same as it was previously:
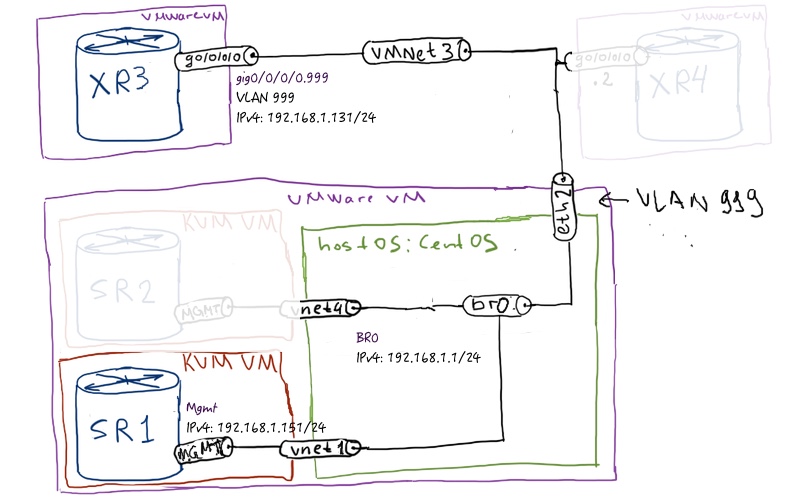
I must admit that I’ll use only two routers: SR1 and XR3. Routers SR2 and XR4 aren’t even launched. For logical topology we have the following:
The initial configuration is quite easy. Actually there is no initial configuration for Nokia (Alcatel-Lucent) VSR router SR1 besides provisioned line cards. For Cisco IOS XRv we just configure interface in order to have connectivity for SSH. For SR1 we use OOB management through BOF, which is done during provisioning of VSR: 096_config_initial_XR3096_config_initial_linux096_config_initial_SR1
Configuration of NETCONF agent
Both for Nokia (Alcatel-Lucent) SR OS and Cisco IOS XR we need to make sure that following steps are done to get NETCONG working:
SSH server is enabled
Corresponsing user has rights to utilize NETCONF
NETCONF agent is enabled and associated with SSH
As I’m taking the default configuration, I will show only necessary steps for each vendor. For example, in Cisco IOS XR default user has NETCONF access, and in Nokia (Alcatel-Lucent) SR OS SSH server is enabled:
Nokia (Alcatel-Lucent) SR OS
Cisco IOS XR
SR1
XR3
A:VSR>edit-cfg# candidate view
=========================
configure
system
netconf
no shutdown
exit
security
user “admin”
access netconf
exit
exit
exit
=========================
RP/0/0/CPU0:ios#show run
!
netconf-yang agent
ssh
!
ssh server v2
ssh server netconf vrf default
!
end
Actually, that’s it. We have enabled NETCONF at our Nokia (Alcate-Lucent) SR OS router SR1 and Cisco IOS XR router XR3.
Connecting to NETCONF agent at Nokia (Alcatel-Lucent) SR OS
Now we need to make sure that NETCONF is working. By default, NETCONF is working on TCP port 830, so we need to establish SSH to this port with mentioning keyword “NETCONF”. Let’s try how it’s working on Nokia (Alcatel-Lucent) VSR (SR 7750) router SR1:
[root@localhost ~]# ssh admin@192.168.1.151 -p 830 -s netconf
The authenticity of host ‘[192.168.1.151]:830 ([192.168.1.151]:830)’ can’t be established.
RSA key fingerprint is 31:8e:dc:05:3f:7b:6e:4e:33:ce:18:f0:ae:53:95:d9.
Are you sure you want to continue connecting (yes/no)? yes
Warning: Permanently added ‘[192.168.1.151]:830’ (RSA) to the list of known hosts.
TiMOS-B-15.0.R4 both/x86_64 Nokia 7750 SR Copyright (c) 2000-2017 Nokia.
All rights reserved. All use subject to applicable license agreements.
Built on Fri Jul 28 11:55:49 PDT 2017 by builder in /builds/150B/R4/panos/main
.
admin@192.168.1.151’s password:
!
!
!
<?xml version=”1.0″ encoding=”UTF-8″?>
<hello xmlns=”urn:ietf:params:xml:ns:netconf:base:1.0″>
<capabilities>
<capability>urn:ietf:params:netconf:base:1.0</capability>
<capability>urn:ietf:params:netconf:base:1.1</capability>
<capability>urn:ietf:params:netconf:capability:writable-running:1.0</capability>
<capability>urn:ietf:params:netconf:capability:candidate:1.0</capability>
<capability>urn:ietf:params:netconf:capability:validate:1.0</capability>
<capability>urn:ietf:params:netconf:capability:validate:1.1</capability>
<capability>urn:ietf:params:netconf:capability:startup:1.0</capability>
<capability>urn:ietf:params:netconf:capability:url:1.0?scheme=ftp,tftp,file</capability>
<capability>urn:ietf:params:netconf:capability:with-defaults:1.0?basic-mode=explicit&also-supported=report-all</capability><capability>urn:ietf:params:xml:ns:netconf:base:1.0?module=ietf-netconf&revision=2011-06-01&features=writable-running,validate,startup,url&deviations=alu-netconf-deviations-r13</capability>
<capability>urn:alcatel-lucent.com:sros:ns:yang:netconf-deviations-r13?module=alu-netconf-deviations-r13&revision=2015-01-23</capability>
<capability>urn:alcatel-lucent.com:sros:ns:yang:cli-content-layer-r13?module=alu-cli-content-layer-r13&revision=2015-01-23</capability>
…
</capabilities>
<session-id>8</session-id>
</hello>
]]>]]>
I have reduced the output, because it was just unreal big. For sure, if you develop NETCONF application, you need to see them all to understand, what you need use. SR1. To start working, we need to send hello from our side to the router
Now the SR1 is ready to be configured through NETCONF, using XM.
Connecting to NETCONF agent at Cisco IOS XR router
The same is true for Cisco IOS XR router XR3, as we haven’t modified TCP port for NETCONF:
[root@localhost ~]# ssh cisco@192.168.1.131 -p 830 -s netconf
.
.
.
IMPORTANT: READ CAREFULLY
Welcome to the Demo Version of Cisco IOS XRv (the “Software”).
The Software is subject to and governed by the terms and conditions
of the End User License Agreement and the Supplemental End User
License Agreement accompanying the product, made available at the
time of your order, or posted on the Cisco website at
www.cisco.com/go/terms (collectively, the “Agreement”).
As set forth more fully in the Agreement, use of the Software is
strictly limited to internal use in a non-production environment
solely for demonstration and evaluation purposes. Downloading,
installing, or using the Software constitutes acceptance of the
Agreement, and you are binding yourself and the business entity
that you represent to the Agreement. If you do not agree to all
of the terms of the Agreement, then Cisco is unwilling to license
the Software to you and (a) you may not download, install or use the
Software, and (b) you may return the Software as more fully set forth
in the Agreement.
.
.
Please login with any configured user/password, or cisco/cisco
.
.
cisco@192.168.1.131’s password:
!
!
<hello xmlns=”urn:ietf:params:xml:ns:netconf:base:1.0″>
<capabilities>
<capability>urn:ietf:params:netconf:base:1.1</capability>
<capability>urn:ietf:params:netconf:capability:candidate:1.0</capability>
<capability>urn:ietf:params:netconf:capability:rollback-on-error:1.0</capabili
ty>
<capability>urn:ietf:params:netconf:capability:validate:1.1</capability>
<capability>urn:ietf:params:netconf:capability:confirmed-commit:1.1</capabilit
y>
<capability>http://cisco.com/ns/yang/Cisco-IOS-XR-aaa-lib-cfg?module=Cisco-IOS
-XR-aaa-lib-cfg&revision=2015-11-09</capability>
…
<capability>http://openconfig.net/yang/vlan?module=openconfig-vlan&revisio
n=2015-10-09&deviation=cisco-xr-openconfig-vlan-deviations</capability>
</capabilities>
<session-id>2684042494</session-id>
</hello>
The structure of HELLO message from Cisco IOS XRv is the same as we’ve just seen for Nokia. The difference is on the capabilities, which refer to Cisco modules. In the same way we send our HELLO back to XR3:
You might see the difference. Here we send capability for NETCONF 1.1, rather than 1.0, because based on my tests Cisco IOS XRv 6.1.2 supports only this capability.
Configuring Nokia (Alcatel-Lucent) SR OS using NETCONF
We continue this sub-chapter from the point, when we have connected through SSH to Nokia (Alcatel-Lucent) VSR (SR 7750) SR1, received HELLO and sent our HELLO back to it.
The first essential task is to grab the existing configuration and analyse it. The first message is or request and the second one is the output from the router:
Use this output ant get-config message as a basis for reverse engineering by writing edit-config commands!
This output is especially important for us. As it’s stated above, I’ve used this output to writing my own edit-config messages. Probably you can find good description of all trees and commands in this XML. I haven’t found it, though I must admit that I haven’t spent a lot of time on this task. So I’ve used reverse engineering approach to define what I need.
As you see, we don’t have any L3 interface configured. Brief double check in CLI confirms that:
A:VSR# show router interface
===============================================================================
Interface Table (Router: Base)
===============================================================================
Interface-Name Adm Opr(v4/v6) Mode Port/SapId
IP-Address PfxState
——————————————————————————-
system Up Down/Down Network system
– –
——————————————————————————-
Interfaces : 1
===============================================================================
OK. In order to make our example more useful and interesting, let’s create the following simple topology:
Let’s start doing it. First of all, we create the following message, which configures IPv4 and IPv6 addresses at interface system:
If your request is correct and successfully applied. The verification of implemented config I show from Nokia (Alcatel-Lucent) SR OS CLI at SR1:
*A:VSR# show router interface
===============================================================================
Interface Table (Router: Base)
===============================================================================
Interface-Name Adm Opr(v4/v6) Mode Port/SapId
IP-Address PfxState
——————————————————————————-
system Up Up/Up Network system
10.0.0.11/32 n/a
fc00::10:0:0:11/128 PREFERRED
——————————————————————————-
Interfaces : 1
===============================================================================
Hurray! It works. I’m quite impressed, and what about you?
Now we create another L3 interface, which will point to Cisco IOS XR router XR3. So we also need to make proper configuration of physical port and add proper mapping to each other:
Looks promising. Now we check in Nokia (Alcatel-Lucent) SR OS CLI at SR1 again the status of ISIS:
*A:VSR# show router isis status
===============================================================================
Rtr Base ISIS Instance 0 Status
===============================================================================
ISIS Cfg System Id : 0000.0000.0000
ISIS Oper System Id : 0100.0000.0011
ISIS Cfg Router Id : 0.0.0.0
ISIS Oper Router Id : 10.0.0.11
ASN : 0
Admin State : Up
Oper State : Up
Ipv4 Routing : Enabled
Ipv6 Routing : Enabled, Multi-Topology
Mcast Ipv4 Routing : Enabled, Native
Mcast Ipv6 Routing : Disabled
Last Enabled : 11/28/2017 07:16:19
Level Capability : L2
…
New ISIS process is up and running now.
Basic configuration of SR1 is done and we switch further to Cisco IOS XR router XR3…
Configuring Cisco IOS XR using NETCONF
… which will be covered in the next article, as current article is already quite long.
Here are Nokia (Alcatel-Lucent) NETCONF XML messages, which we have used to configure SR1: 096_config_Nokia_NETCONF
Lessons learned
Reverse engineering is tool that always helps all type of engineers, especially if there is lack of documentation. So, try, modify and try again!
Conclusion
For sure the main advantage of NETCONF comes, when you develop your own NETCONF client/plugin as part of your NMS (or just basic scripts) or use existing one. Because the ultimate goal is to make the life of network engineers easier through automatisation and abstraction, which is reachable only in conjunction with proper scripting. But I hope you understand the overall idea, how NETCONF is working Nokia (Alcatel-Lucent) SR OS, so you might already have ideas how to use it for your tasks. Cisco IOS XR will be covered in the next article Take care and good bye!
P.S.
If you have further questions or you need help with your networks, I’m happy to assist you, just send me message.