Site icon Karneliuk

NETCONF/YANG with Ansible to Nokia (Alcatel-Lucent) SR OS and Cisco IOS XR

Hello my friend,

In the last month before New Year we were discussing how NETCONF/YANG can be used to control the network device, like Nokia (Alcatel-Lucent) VSR (SR 7750) or Cisco IOS XRv (ASR 9000). Let’s see how we can use Ansible to utilize NETCONF connection to mentioned routers.

1
2
3
4
5
No part of this blogpost could be reproduced, stored in a
retrieval system, or transmitted in any form or by any
means, electronic, mechanical or photocopying, recording,
or otherwise, for commercial purposes without the
prior permission of the author.

Brief description

As you remember, we have discussed in general how to connect to Nokia (Alcatel-Lucent) SR OS and Cisco IOS XR router using NETCONF and how to configure them using YANG data model. The main issue was that we have to send fully framed XML messages to the network device.

Normally NETCONF exists between SDN controller (like commercial Nokia NSP and Cisco NSO or free OpenDaylight). Nevertheless, we can do something on our own, especially when we use corresponding netconf_config module from Ansible, which is available since Ansible 2.2 and has evolved in 2.4

I don’t say that it’s easier to configure network devices using NETCONF/YANG rather than using Ansible per-vendor modules. It’s just another way and it’s up to you to choose what you need or like more.

So, what does this module do? If you follow the link provided above, you will reach the official documentation, which is good. There are a couple of mandatory parameters, like username and password for the account, which has NETCONF capabilities at the router. There is only one mandatory parameter more, which is called “host” and defines the host, where you want to connect. The rest of the parameters might be mentioned, might be not, depending on the behaviour of NETCONF at the particular router. Also in the documentation it’s mentioned one dependency on the external module called ncclient, what is a python NETCONF client. In the previous article I have explained how to install it.

In the “Lessons learned” section you might find some useful information as well.

What we are going to test?

The idea of this lab to test the following things:

From the use case point of view, we’ll perform two simple actions:

Software version

Comparing to the articles, I have written previously, now we are more bundled with “controller” part of the network, so the following setup is used:

See the previous article to get details how to build the lab.

Topology

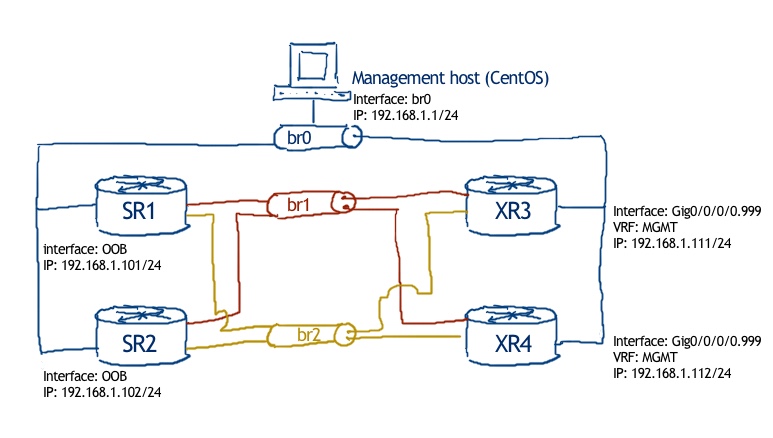
From now on we’ll heavily use Ansible, because I think it makes the life easier in certain cases and I want to master new skills besides routers’ configuration J Therefore, physical topology now includes management host as well, though the rest is the same:

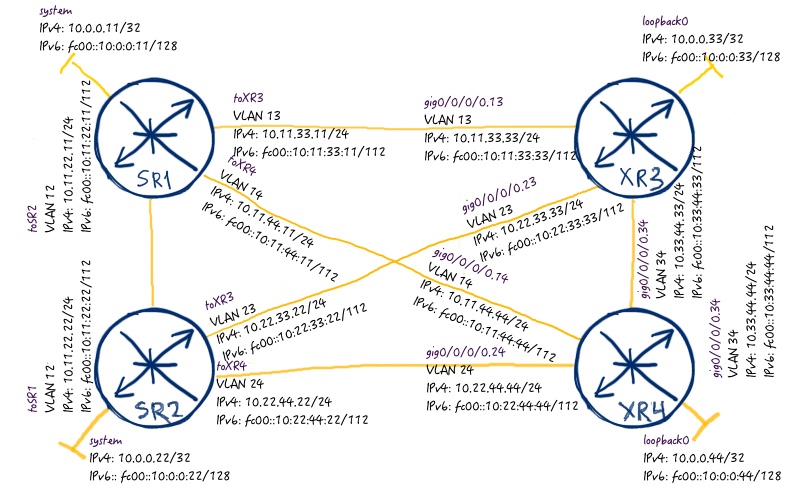
There is no particular physical topology, as I won’t deploy any specific technology to Nokia (Alcatel-Lucent) SR OS or Cisco IOS XR routers. But in order to reuse, what I have done just before new year for automation of my lab’s creation (link), let’s assume we have full mesh, created automatically by Ansible playbook:

Here are the initial configuration files of the routers: 102_config_initial_SR1 102_config_initial_SR2 102_config_initial_XR3 102_config_initial_XR4.

Basically there is default configuration of Nokia (Alcatel-Lucent) VSR with just BOF configured to be reachable (details here), whereas for Cisco IOS XR I have created just interface to reach management host and launched SSH server there. After that you use the Ansible playbooks and per-node date from attached archive to create the lab: 102_lab_initial.tar

Preparation for NETCONF usage on Nokia (Alcatel-Lucent) VSR (SR 7750)

When we started discussion about NETCONF relating to our vendors, I have shown you how to configure routers to accept NETCONF. In order to make our job more efficient, I have created a couple of Ansible (playbooks), which configures routers properly.

Let’s start with Nokia (Alcatel-Lucent). The following playbook enables NETCONF at SR OS router:

$ cat netconf_nokia_enable.yml
.—
.- hosts: nokia
.  gather_facts: no
.  connection: local
.
.vars_files:
.  – login/nokia_host.yml
.
.tasks:
.  – name: READ AUTH DATA
.    include_vars:
.      file: login/nokia_provider.yml
.
.  – name: READ PER-NODE PARAMETERS
.    include_vars:
.      file: nodes/{{ inventory_hostname }}.yml
.
.  – name: ENABLE NETCONF // GLOBAL
.    sros_config:
.      lines:
.          – no shutdown
.      parents:
.          – configure
.          – system
.          – netconf
.      provider: “{{ cli }}”
.
.  – name: ENABLE NETCONF // PROFILE
.    sros_config:
.      lines:
.          – lock
.      parents:
.          – configure
.          – system
.          – security
.          – profile administrative
.          – netconf
.          – base-op-authorization
.      provider: “{{ cli }}”
.
.  – name: ENABLE NETCONF // USER
.    sros_config:
.      lines:
.          – access console netconf
.      parents:
.          – configure
.          – system
.          – security
.          – user admin
.      provider: “{{ cli }}”
….

This playbook will work fully OK, if you have built the lab using Ansible playbooks initially, otherwise you’ll get error.

This playbook is equivalent to the following configuration from CLI:

*A:SR1#
configure
#————————————————–
system
netconf
no shutdown
exit
security
user “admin”
access console netconf
exit
profile “administrative”
netconf
base-op-authorization
lock
exit
exit
exit
exit
exit
#————————————————–

It’s important to configure lock option, because it’s how Ansible works. Otherwise you will get error later during execution of the NETCONF playbooks. So, just launch the playbook or copy-paste the configuration to the CLI.

Check “Lessons learned” section for more details

Now our Nokia (Alcatel-Lucent) SR OS routers are ready to be controlled by NETCONF, so just do it.

Configuring Nokia (Alcatel-Lucent) VSR (SR 7750) by Ansible through NETCONF

Create interface

First of all, we check which interfaces are created on SR1 and SR2:

*A:SR1# show router interface
=======================================================
Interface Table (Router: Base)
=======================================================
Interface-Name      Adm       Opr(v4/v6) Mode     Port/SapId
IP-Address                                        PfxState
——————————————————-
system              Up        Up/Up      Network  system
10.0.0.11/32                                      n/a
fc00::10:0:0:11/128                               PREFERRED
toSR2               Up        Up/Up      Network  1/1/1:12
10.11.22.11/24                                    n/a
fc00::10:11:22:11/112                             PREFERRED
fe80::11/64                                       PREFERRED
toXR3               Up        Up/Up      Network  1/1/1:13
10.11.33.11/24                                    n/a
fc00::10:11:33:11/112                             PREFERRED
fe80::11/64                                       PREFERRED
toXR4               Up        Up/Up      Network  1/1/1:14
10.11.44.11/24                                    n/a
fc00::10:11:44:11/112                             PREFERRED
fe80::11/64                                       PREFERRED
——————————————————-
Interfaces : 4
=======================================================
!
!
*A:SR2# show router interface
=======================================================
Interface Table (Router: Base)
=======================================================
Interface-Name      Adm       Opr(v4/v6) Mode     Port/SapId
IP-Address                                        PfxState
——————————————————-
system              Up        Up/Up      Network  system
10.0.0.22/32                                      n/a
fc00::10:0:0:22/128                               PREFERRED
toSR1               Up        Up/Up      Network  1/1/1:12
10.11.22.22/24                                    n/a
fc00::10:11:22:22/112                             PREFERRED
fe80::22/64                                       PREFERRED
toXR3               Up        Up/Up      Network  1/1/1:23
10.22.33.22/24                                    n/a
fc00::10:22:33:22/112                             PREFERRED
fe80::22/64                                       PREFERRED
toXR4               Up        Up/Up      Network  1/1/1:24
10.22.44.22/24                                    n/a
fc00::10:22:44:22/112                             PREFERRED
fe80::22/64                                       PREFERRED
——————————————————-
Interfaces : 4
=======================================================

Then we see, what we have in per-node date for Ansible playbook. Only relevant part is shown:

$ cat nodes/SR1.yml
.—
.node_var:
.  if4:
.    name: NETCONF_LOOBACK
.    port: loopback
.    vlan:
.    ipv4: 10.0.1.11/32
.    ipv6_ula: fc00::10:0:1:11/128
.    ipv6_lla: fe80::11
.    state: true
….
!
!
$ cat nodes/SR2.yml
.—
.node_var:
.  if4:
.    name: NETCONF_LOOBACK
.    port: loopback
.    vlan:
.    ipv4: 10.0.1.22/32
.    ipv6_ula: fc00::10:0:1:22/128
.    ipv6_lla: fe80::221
.    state: true
….

Accoding to this information we’ll create the following loopback interface:

In its turn this data is conveyed to NETCONF Ansible playbooks, when it’s executed. Here is the playbook itself:

$ cat netconf_nokia_create.yml
.—
.- hosts: nokia
.  gather_facts: no
.  connection: local
.
.  vars_files:
.    – login/nokia_host.yml
.
.  tasks:
.    – name: READ AUTH DATA
.      include_vars:
.        file: login/nokia_provider.yml
.
.    – name: READ PER-NODE PARAMETERS
.      include_vars:
.        file: nodes/{{ inventory_hostname }}.yml
.
.    – name: NETCONF TEST
.      netconf_config:
.        host: “{{ inventory_hostname }}”
.        username: “{{ cli.username }}”
.        password: “{{ cli.password }}”
.        datastore: running
.        xml: |
.            <config>
.              <configure xmlns=”urn:alcatel-lucent.com:sros:ns:yang:conf-r13″>
.                <router>
.                  <interface>
.                    <interface-name>{{ node_var.if4.name }}</interface-name>
.                    <loopback>true</loopback>
.                    <address>
.                      <ip-address-mask>{{ node_var.if4.ipv4 }}</ip-address-mask>
.                    </address>
.                    <ipv6>
.                      <address>
.                        <ipv6-address-prefix-length>{{ node_var.if4.ipv6_ula }}</ipv6-address-prefix-length>
.                      </address>
.                    </ipv6>
.                    <shutdown>false</shutdown>
.                  </interface>
.                </router>
.              </configure>
.            </config>
….

Remove leading dot in each line. I’ve inserted it manually to preserve formatting as spaces are important in YAML (language used by Ansible).

The XML structure is similar to one, we have already explored. The crucial point here is that we use variables, which are fetched from per-node date read in the second action of the playbook. This playbooks is equal to the following code for SR1 (keeping in mind that per-node data is inserted):

*A:SR1#
configure
#————————————————–
router Base
interface “NETCONF_LOOBACK”
address 10.0.1.11/32
loopback
ipv6
address fc00::10:0:1:11/128
exit
no shutdown
exit
exit
#————————————————–

Let’s execute it:

$ ansible-playbook netconf_nokia_create.yml
PLAY [nokia] ***************************************
TASK [READ AUTH DATA] ******************************
ok: [SR2]
ok: [SR1]
TASK [READ PER-NODE PARAMETERS] ********************
ok: [SR2]
ok: [SR1]
TASK [NETCONF TEST] ********************************
changed: [SR2]
changed: [SR1]
PLAY RECAP *****************************************
SR1 : ok=3 changed=1 unreachable=0 failed=0
SR2 : ok=3 changed=1 unreachable=0 failed=0

How do you think the interfaces’ table at SR1 and SR2 looks like? I will show only relevant part:

*A:SR1# show router interface
=======================================================
Interface Table (Router: Base)
=======================================================
Interface-Name      Adm       Opr(v4/v6) Mode     Port/SapId
IP-Address                                        PfxStat
——————————————————-
NETCONF_LOOBACK     Up        Up/Up      Network  loopback
10.0.1.11/32                                      n/a
fc00::10:0:1:11/128                               PREFERRED
fe80::65:ffff:fe00:0/64                           PREFERRED
.
——————————————————-
Interfaces : 5
=======================================================
!
!
*A:SR2# show router interface
=======================================================
Interface Table (Router: Base)
=======================================================
Interface-Name      Adm       Opr(v4/v6) Mode     Port/SapId
IP-Address                                        PfxStat
——————————————————-
NETCONF_LOOBACK     Up        Up/Up      Network  loopback
10.0.1.22/32                                      n/a
fc00::10:0:1:22/128                               PREFERRED
fe80::66:ffff:fe00:0/64                           PREFERRED
.
——————————————————-
Interfaces : 5
=======================================================

As you can see, the number of interfaces has increased up to 5 from 4 and each router has its own IP addresses, which we have defined in per-node data.

Delete interface

For sure, during operation of the routers we not only create configuration, but we also remove it sometimes. The following Ansible playbook removes from Nokia (Alcatel-Lucent) SR OS routers through NETCONF the interfaces, we have created in the previous point:

$ cat netconf_nokia_delete.yml
.—
.- hosts: nokia
.  gather_facts: no
.  connection: local
.
.  vars_files:
.    – login/nokia_host.yml
.
.  tasks:
.    – name: READ AUTH DATA
.      include_vars:
.        file: login/nokia_provider.yml
.
.    – name: READ PER-NODE PARAMETERS
.      include_vars:
.        file: nodes/{{ inventory_hostname }}.yml
.
.    – name: NETCONF TEST
.      netconf_config:
.        host: “{{ inventory_hostname }}”
.        username: “{{ cli.username }}”
.        password: “{{ cli.password }}”
.        datastore: running
.        xml: |
.            <config>
.              <configure xmlns=”urn:alcatel-lucent.com:sros:ns:yang:conf-r13″>
.                <router>
.                  <interface>
.                    <interface-name>{{ node_var.if4.name }}</interface-name>
.                    <shutdown>true</shutdown>
.                  </interface>
.                  <interface operation=”remove”>
.                    <interface-name>{{ node_var.if4.name }}</interface-name>
.                  </interface>
.                </router>
.              </configure>
.            </config>

Don’t forget to delete leading dot in each line.

I’m pretty sure you know that in Nokia (Alcatel-Lucent) we need to disable interfaces before we delete them. That’s why this playbook is equal to the following CLI commands:

*A:SR1#
configure
#————————————————–
router Base
interface “NETCONF_LOOBACK”
shutdown
exit
no interface “NETCONF_LOOBACK”
exit
#————————————————–

Now we execute the Ansible playbook:

$ ansible-playbook netconf_nokia_delete.yml
PLAY [nokia] ***************************************
TASK [READ AUTH DATA] ******************************
ok: [SR2]
ok: [SR1]
TASK [READ PER-NODE PARAMETERS] ********************
ok: [SR2]
ok: [SR1]
TASK [NETCONF TEST] ********************************
changed: [SR2]
changed: [SR1]
PLAY RECAP *****************************************
SR1 : ok=3 changed=1 unreachable=0 failed=0
SR2 : ok=3 changed=1 unreachable=0 failed=0

When we check the status of interfaces, we see that there are only 4 interfaces per router:

*A:SR1# show router interface
=======================================================
Interface Table (Router: Base)
=======================================================
.
——————————————————-
Interfaces : 4
=======================================================
!
!
*A:SR2# show router interface
=======================================================
Interface Table (Router: Base)
=======================================================
.
——————————————————-
Interfaces : 4
=======================================================

So far we have covered the configuration of the Nokia (Alcatel-Lucent) SR OS routers using NETCONF module in Ansible and YANG data, which VSR understands. Now we continue with another important vendor.

Preparation for NETCONF usage on Cisco IOS XRv (ASR 9000)

As we have just discussed for Nokia (Alcatel-Lucent) SR OS, we need to enable NETCONF agent at Cisco IOS XR as well. To do it quicker I have created similar Ansible playbook, which enables NETCONF agent there:

$ cat netconf_cisco_enable.yml
.—
.- hosts: cisco
.  gather_facts: no
.  connection: local
.
.  vars_files:
.    – login/cisco_host.yml
.
.  tasks:
.    – name: READ AUTH DATA
.      include_vars:
.        file: login/cisco_provider.yml
.
.    – name: READ PER-NODE PARAMETERS
.      include_vars:
.        file: nodes/{{ inventory_hostname }}.yml
.
.    – name: ENABLE NETCONF OVER SSH
.      iosxr_config:
.        lines:
.            – ssh server netconf vrf default
.        provider: “{{ cli }}”
.
.    – name: ENABLE NETCONF
.      iosxr_config:
.        lines:
.            – ssh
.        parents:
.            – netconf-yang agent
.        provider: “{{ cli }}”
….

It’s quite small, because it’s equal to the following code in CLI:

RP/0/0/CPU0:XR3(config)#show conf
Building configuration…
!! IOS XR Configuration 6.1.2
netconf-yang agent
ssh
!
ssh server netconf vrf default
end

In the same manner as I’ve explained for Nokia (Alcatel-Lucent) VSR, just play the playbook or copy-paste this code to the CLI of Cisco IOS XRv and commit it.

Configuring Cisco IOS XRv (ASR 9000) by Ansible through NETCONF

Create interface

After you ready, it’s time to check the per-node date for IOS XR:

$ cat nodes/XR3.yml
.—
.node_var:
.  if4:
.    name: NETCONF_LOOPBACK
.    port: Loopback10
.    vlan:
.    ipv4:
.      address: 10.0.1.33
.      netmask: 255.255.255.255
.    ipv6_ula:
.      address: fc00::10:0:1:33
.      prefix: 128
.    ipv6_lla: fe80::33
.    state: true
….
!
!
$ cat nodes/XR4.yml
.—
.node_var:
.  if4:
.    name: NETCONF_LOOPBACK
.    port: Loopback10
.  vlan:
.    ipv4:
.      address: 10.0.1.44
.      netmask: 255.255.255.255
.    ipv6_ula:
.      address: fc00::10:0:1:44
.      prefix: 128
.    ipv6_lla: fe80::44
.    state: true
….

Pay attention that structure of this part is different to the one we’ve seen in Nokia, and even created for other interface. This difference is caused by different structure of YANG model for interfaces for Nokia (Alcatel-Lucent) SR OS and Cisco IOS XR. By the end of the day, after execution of the policy we should get the following interfaces created:

Before we speak further about NETCONF playbook for Cisco IOS XR routers, let’s check the interfaces:

RP/0/0/CPU0:XR3#show ipv4 int br
Interface                    IP-Address      Status     Protocol  Vrf-Name
Loopback0                    10.0.0.33       Up         Up        default
MgmtEth0/0/CPU0/0            unassigned      Shutdown   Down      default
GigabitEthernet0/0/0/0       unassigned      Up         Up        default
GigabitEthernet0/0/0/0.13    10.11.33.33     Up         Up        default
GigabitEthernet0/0/0/0.23    10.22.33.33     Up         Up        default
GigabitEthernet0/0/0/0.34    10.33.44.33     Up         Up        default
GigabitEthernet0/0/0/0.999   192.168.1.111   Up         Up        default
!
!
RP/0/0/CPU0:XR4#show ipv4 int br
Interface                    IP-Address      Status     Protocol  Vrf-Name
Loopback0                    10.0.0.44       Up         Up        default
MgmtEth0/0/CPU0/0            unassigned      Shutdown   Down      default
GigabitEthernet0/0/0/0       unassigned      Up         Up        default
GigabitEthernet0/0/0/0.14    10.11.44.44     Shutdown   Down      default
GigabitEthernet0/0/0/0.24    10.22.44.44     Up         Up        default
GigabitEthernet0/0/0/0.34    10.33.44.44     Up         Up        default
GigabitEthernet0/0/0/0.999   192.168.1.112   Up         Up        default

No, we check the Ansible playbook, which aim is to configure Cisco IOS XR routers through NETCONF:

$ cat netconf_cisco_create.yml
.—
.- hosts: cisco
.  gather_facts: no
.  connection: local
.
.  vars_files:
.    – login/cisco_host.yml
.
.  tasks:
.    – name: READ AUTH DATA
.      include_vars:
.        file: login/cisco_provider.yml
.
.    – name: READ PER-NODE PARAMETERS
.      include_vars:
.        file: nodes/{{ inventory_hostname }}.yml
.
.    – name: NETCONF TEST
.      netconf_config:
.        host: “{{ inventory_hostname }}”
.        username: “{{ cli.username }}”
.        password: “{{ cli.password }}”
.        hostkey_verify: false
.        look_for_keys: false
.        xml: |
.            <config type=”subtree”>
.              <interface-configurations xmlns=”http://cisco.com/ns/yang/Cisco-IOS-XR-ifmgr-cfg”>
.                <interface-configuration>
.                  <active>act</active>
.                  <interface-name>{{ node_var.if4.port }}</interface-name>
.                  <interface-virtual/>
.                  <description>{{ node_var.if4.name }}</description>
.                  <ipv4-network xmlns=”http://cisco.com/ns/yang/Cisco-IOS-XR-ipv4-io-cfg”>
.                    <addresses>
.                      <primary>
.                        <address>{{ node_var.if4.ipv4.address }}</address>
.                        <netmask>{{ node_var.if4.ipv4.netmask }}</netmask>
.                      </primary>
.                    </addresses>
.                  </ipv4-network>
.                  <ipv6-network xmlns=”http://cisco.com/ns/yang/Cisco-IOS-XR-ipv6-ma-cfg”>
.                    <addresses>
.                      <regular-addresses>
.                        <regular-address>
.                          <address>{{ node_var.if4.ipv6_ula.address }}</address>
.                          <prefix-length>{{ node_var.if4.ipv6_ula.prefix }}</prefix-length>
.                          <zone>0</zone>
.                        </regular-address>
.                      </regular-addresses>
.                    </addresses>
.                  </ipv6-network>
.                </interface-configuration>
.              </interface-configurations>
.            </config>
….

If you have questions to the usage of YANG data model for Cisco, refer to this article.

The good advantage of the Ansible NETCONF module (probably, it comes from python ncclient) is that we don’t need to calculate the number of the characters in the message (link) to frame the XML message. Let’s execute this playbook:

$ ansible-playbook netconf_cisco_create.yml
PLAY [cisco] ******************************************
TASK [READ AUTH DATA] *********************************
ok: [XR4]
ok: [XR3]
TASK [READ PER-NODE PARAMETERS] ***********************
ok: [XR3]
ok: [XR4]
TASK [NETCONF TEST] ***********************************
changed: [XR4]
changed: [XR3]
PLAY RECAP ********************************************
XR3 : ok=3 changed=1 unreachable=0 failed=0
XR4 : ok=3 changed=1 unreachable=0 failed=0

From this output we see that playbook was played successful, so we can check the status of the interfaces again:

RP/0/0/CPU0:XR3#show ipv4 int br
Interface                    IP-Address      Status     Protocol  Vrf-Name
Loopback0                    10.0.0.33       Up         Up        default
Loopback10                   10.0.1.33       Up         Up        default
MgmtEth0/0/CPU0/0            unassigned      Shutdown   Down      default
GigabitEthernet0/0/0/0       unassigned      Up         Up        default
GigabitEthernet0/0/0/0.13    10.11.33.33     Up         Up        default
GigabitEthernet0/0/0/0.23    10.22.33.33     Up         Up        default
GigabitEthernet0/0/0/0.34    10.33.44.33     Up         Up        default
GigabitEthernet0/0/0/0.999   192.168.1.111   Up         Up        default
!
!
RP/0/0/CPU0:XR4#show ipv4 int br
Interface                    IP-Address      Status     Protocol  Vrf-Name
Loopback0                    10.0.0.44       Up         Up        default
Loopback10                   10.0.1.44       Up         Up        default
MgmtEth0/0/CPU0/0            unassigned      Shutdown   Down      default
GigabitEthernet0/0/0/0       unassigned      Up         Up        default
GigabitEthernet0/0/0/0.14    10.11.44.44     Shutdown   Down      default
GigabitEthernet0/0/0/0.24    10.22.44.44     Up         Up        default
GigabitEthernet0/0/0/0.34    10.33.44.44     Up         Up        default
GigabitEthernet0/0/0/0.999   192.168.1.112   Up         Up        default

Hurray, we are done!

Delete interface

The procedure to remove something in Cisco IOS XR seems a bit more complex than in Nokia (Alcatel-Lucent) SR OS. Let’s go straight to the playbook:

$ cat netconf_cisco_delete.yml
.—
.- hosts: cisco
.gather_facts: no
.connection: local
.
.vars_files:
.- login/cisco_host.yml
.
.tasks:
.- name: READ AUTH DATA
.include_vars:
.file: login/cisco_provider.yml
.
.- name: READ PER-NODE PARAMETERS
.include_vars:
.file: nodes/{{ inventory_hostname }}.yml
.
.- name: NETCONF TEST
.netconf_config:
.host: “{{ inventory_hostname }}”
.username: “{{ cli.username }}”
.password: “{{ cli.password }}”
.hostkey_verify: false
.look_for_keys: false
.xml: |
.<config xmlns:nc=”urn:ietf:params:xml:ns:netconf:base:1.0″>
.<interface-configurations xmlns=”http://cisco.com/ns/yang/Cisco-IOS-XR-ifmgr-cfg”>
.<interface-configuration nc:operation=”delete”>
.<active>act</active>
.<interface-name>{{ node_var.if4.port }}</interface-name>
.<interface-virtual/>
.<description>{{ node_var.if4.name }}</description>
.<ipv4-network xmlns=”http://cisco.com/ns/yang/Cisco-IOS-XR-ipv4-io-cfg”>
.<addresses>
.<primary>
.<address>{{ node_var.if4.ipv4.address }}</address>
.<netmask>{{ node_var.if4.ipv4.netmask }}</netmask>
.</primary>
.</addresses>
.</ipv4-network>
.<ipv6-network xmlns=”http://cisco.com/ns/yang/Cisco-IOS-XR-ipv6-ma-cfg”>
.<addresses>
.<regular-addresses>
.<regular-address>
.<address>{{ node_var.if4.ipv6_ula.address }}</address>
.<prefix-length>{{ node_var.if4.ipv6_ula.prefix }}</prefix-length>
.<zone>0</zone>
.</regular-address>
.</regular-addresses>
.</addresses>
.</ipv6-network>
.</interface-configuration>
.</interface-configurations>
.</config>
….

So, for Nokia (Alcatel-Lucent) SR OS I have taken the example from description of netconf_config module from Ansible docs. Unfortunately, the same approach doesn’t work for Cisco IOS XR, so I have to dig into documentation deeper. At Cisco website I have found one article, which shows how to delete something using another approach. Therefore, I have highlighted with bold necessary modifications into initial XML. Probably it’s possible to limit the number of lines, just as it was in Nokia (Alcatel-Lucent), but until now my tests have shown that we need to keep all the lines. If anybody will show me shorter example, I’ll be happy.

So, we play the book:

$ ansible-playbook netconf_cisco_delete.yml
PLAY [cisco] ******************************************
TASK [READ AUTH DATA] *********************************
ok: [XR4]
ok: [XR3]
TASK [READ PER-NODE PARAMETERS] ***********************
ok: [XR3]
ok: [XR4]
TASK [NETCONF TEST] ***********************************
changed: [XR4]
changed: [XR3]
PLAY RECAP ********************************************
XR3 : ok=3 changed=1 unreachable=0 failed=0
XR4 : ok=3 changed=1 unreachable=0 failed=0

And created interfaces are removed:

RP/0/0/CPU0:XR3#show ipv4 int br
Interface                    IP-Address      Status     Protocol  Vrf-Name
Loopback0                    10.0.0.33       Up         Up        default
MgmtEth0/0/CPU0/0            unassigned      Shutdown   Down      default
GigabitEthernet0/0/0/0       unassigned      Up         Up        default
GigabitEthernet0/0/0/0.13    10.11.33.33     Up         Up        default
GigabitEthernet0/0/0/0.23    10.22.33.33     Up         Up        default
GigabitEthernet0/0/0/0.34    10.33.44.33     Up         Up        default
GigabitEthernet0/0/0/0.999   192.168.1.111   Up         Up        default
!
!
RP/0/0/CPU0:XR4#show ipv4 int br
Interface                    IP-Address      Status     Protocol  Vrf-Name
Loopback0                    10.0.0.44       Up         Up        default
MgmtEth0/0/CPU0/0            unassigned      Shutdown   Down      default
GigabitEthernet0/0/0/0       unassigned      Up         Up        default
GigabitEthernet0/0/0/0.14    10.11.44.44     Shutdown   Down      default
GigabitEthernet0/0/0/0.24    10.22.44.44     Up         Up        default
GigabitEthernet0/0/0/0.34    10.33.44.44     Up         Up        default
GigabitEthernet0/0/0/0.999   192.168.1.112   Up         Up        default

Well done, by friend!

The final configuration files for routers in the state, when new interfaces were created are here: 102_config_final_XR4 102_config_final_XR3 102_config_final_SR2 102_config_final_SR1

Also in the following article there are all Ansible playbooks, which I have used in this article: 102_lab_final.tar

Lessons learned

Two most important lessons learned.

The first one is caused by the environment. I’ve stuck at some point, when one of my Cisco IOS XR routers was operated by Ansible and another is not. I’ve redo all the usual tasks, like clearing SSH keys, checking Linux hosts and Ansible hosts tables. Nothing has helped. Then I’ve suspected that XR4 has no single entry about SSH connectivity attempt, though it was reachable from Linux host. After some time for troubleshooting I’ve just disabled converted SE mode in Linux to permissive (temporary disable FW configuration):

$ sudo setenforce permissive

After that connectivity between Ansible host and Cisco IOS XRv router XR4 was restored. So, the main outcome here is that now we have much more components to take care about therefore troubleshooting become more complex. But, if we understand the whole process and involved components, it’s manageable.

The second item in “lessons learned” is related to Ansible. It has very reach capabilities for debugging, which I have extensively used during writing the article. If you have some problems with the execution, just launch playbook in the following way:

$ ansible-playbook netconf_nokia_create.yml –vvvv

You will see all the detailed information, how the data is fetched from the variables, how the data is structured, what is send in the message to the module and what is received. Probably you will have to tune some module parameters (you might spot, that Nokia and Cisco has different set of keys in NETCONF playbook, which is the result of the troubleshooting).

Conclusion

As a general conclusion I must say that creating of the automation takes a lot of time. It took me hours to troubleshoot different problems related to the Linux. Well, I’m not so familiar with Linux as I do with Nokia (Alcatel-Lucent) SR OS or Cisco IOS XR. On the other hand, such exercises allow me to think about network and its issues from the different angle. About our concrete topic, which is NETCONF/YANG, I understand it more now, after some trials. In conjunction with Ansible it can be quite good, though you still need to know per vendor YANG model in order to make it efficient. That’s why usage of Ansible network modules I still think a good idea. Take and good bye!

P.S.

If you have further questions or you need help with your networks, I’m happy to assist you, just send me message.

Support us


BR,

Anton Karneliuk

Exit mobile version