


Hello my friend,
I hope you have begun the new year very good and is back to work, study, researches or just enjoying the life. I have spent some time over new year holidays (and after them as well) to rebuild by lab and now I’d like to share with you my notices.

1 2 3 4 5 | No part of this blogpost could be reproduced, stored in a retrieval system, or transmitted in any form or by any means, electronic, mechanical or photocopying, recording, or otherwise, for commercial purposes without the prior permission of the author. |
Brief description
In the very first article about connectivity Nokia (Alcatel-Lucent) VSR with Cisco IOS XRv I have shown some modification, which needs to be done in Linux with bridge and network interface configurations in order routers can reach each other. But I haven’t shown you the full picture how to establish the lab from the very beginning. And that’s actually what this article is about.
What we are going to test?
We will build the lab with CentOS 7 Linux, Nokia (Alactel-Lucent) VSRs and Cisco IOS XRv from scratches with the installation of all the related modules and their configuration.
Software version
The most important is the software version of the Linux host:
- CentOS 7
I have downloaded the latest version from the official website.
For the rest, we use the following versions of Nokia (Alcatel-Lucent) and Cisco routers:
- Nokia (Alcatel-Lucent) SR OS 14.0.R4
- Nokia (Alcatel-Lucent) SR OS 15.0.R4
- Cisco IOS XRv 6.1.2
What needs to be done
The following list of activities shows what we need to do in order to get working lab. Later I’ll show in details what exactly you need to type:
- Create VM
- Install CentOS7
- Update yum, install epel-repository and telnet
- Install and configure FTP server
- Install and configure KVM
- Create appropriate network connections
- Create appropriate VMs
- Install and configure Ansible
- Install vconfig:
- Install and configure ncclient (optional)
Let’s go step by step now.
All information provided can be used on “as is” basis, meaning your HW (server, PC, laptop) and even installed CentOS might have deviations. So, keep calm and troubleshoot then.
#1. Create VM
In general, the create process of VM is quite straightforward: you allocate as much resources as you can (or as you like). In order to have 2 VSRs running you need to allocate at least 4 GB RAM and 2CPU. There are two important points that you must take into account.
The first one is that you need to create 3 virtual NICs and assign them to the proper media. Typically, I use the first NIC for internet connectivity, that’s why it’s connected to NAT, whereas the rest two are connected according to my topology two vnet3 and vmnet4:
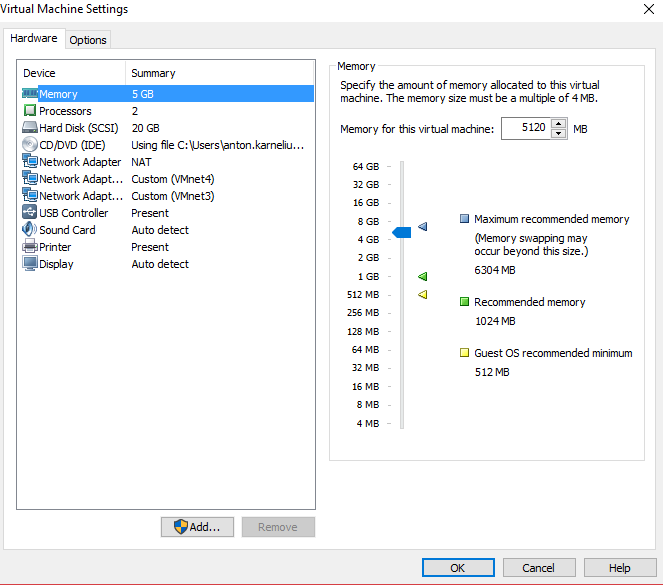

The second one is that we need to enable virtualization of CPU:


As soon as both these points are fulfilled, you start with installation of CentOS itself.
#2. Install CentOS7
I advise you to configure your NIC that is connected to NAT in order to provide Internet connectivity. This will help to configure proper time based on NTP just right now and for future it’s necessary as we’ll need to download a lot of packages from Internet.
In terms of installation package I have chosen “Server with GUI”, but I haven’t chosen any package to be installed:
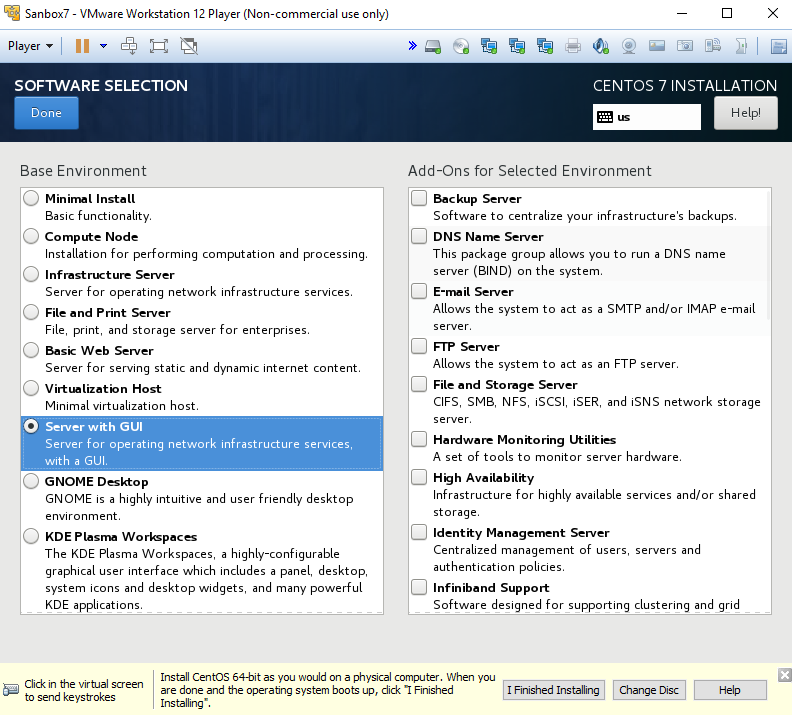

I always chose GUI, because then I can surf in internet directly from VM when I need it without necessity to switch between host and VM. Also it eases process of copying files between VM and host, because quite often feature “shared folders” in VMWare player doesn’t work.
One important point: I have created a user called “aaa” with administrative rights and all the further configuration (and ansible plabooks) are done based on the assumption that we have “/home/aaa/” as a working folder, where it its related.
At my laptop it takes 5-10 minutes to install CentOS in VM, so you can take a coffee, tea, bear or whatever you prefer in this time of day. Just take your time J
#3. Update yum, install epel-repository and telnet
After installation is done you boot for the first time and ready to work. From what I have seen, CentOS performs update of the yum automatically on the first boot. It also takes some time, so I chose in menu restart with option “finalize installation and reboot”. I assume, if you haven’t configured connectivity to internet initially, you will need to perform this step manually after you do it:
|
$ sudo yum update |
I’d recommend to issue this command in any case, just to avoid unpleasant surprises in future, if something haven’t been updated.
Then we install epel repository. A lot of useful programs (i.e. Ansible) is reachable through it, so do it. Also telnet isn’t installed by default, what is necessary to connect to Nokia (Alcatel-Lucent) VSRs on console port:
|
$ sudo yum install -y epel-release |
“-y” is added in order to avoid manually confirming installation of each and every package.
After each package is installed, you will get notification
|
Complete successfully! |
If you don’t get it for whatever reason, troubleshoot what is wrong.
#4. Install and configure FTP server
I use FTP server to store license files for Nokia (Alcatel-Lucent) VSRs. Also you could save it locally to the disk of each VSR, but I find FTP much more convenient. So, let’s install it:
|
$ sudo yum install -y vsftpd ftp |
When it’s installed, we need to configure it in such a way that local Linux accounts are allowed to be used to access FTP server, whereas no anonymous are allowed:
|
$ sudo vim /etc/vsftpd/vsftpd.conf |
In my case I have changed value of “anonymous_enable” to “NO”, uncommented “chroot_local_user” and added two last strings.
We have already started speaking about accounts. So, you can choose to use your user or create new one for VPN. I have decided the new latest option:
|
$ sudo useradd -d ‘/var/ftp/nokia’ -s /sbin/nologin nokia |
I have configured very easy password “nokianokia” for this user.
After the folder is created we need to put files with Nokia (Alcatel-Lucent) SR OS license there:
|
$ sudo copy /home/aaa/temp/sros14.lic /var/ftp/nokia/sros14.lic |
As we do all the actions using “sudo”, the owner of the files is put as root. In order VSR can use this license, we need to change the owner and rights to this license file, so that it’s associated with “nokia” user. Here we go:
|
$ sudo chown -R nokia nokia ‘/var/ftp/nokia’ |
The configuration of the FTP server in our CentOS Linux server is almost done, so we need just to make sure FTP starts automatically during boot and launch it. There are some difference in syntax from CentOS 6 to CentOS 7, so you need to pay attention. The last thing is also to allow FTP service in firewall, which is enabled by default in our Linux:
|
$ sudo systemctl enable vsftpd |
FTP configuration is done and we move to the next point.
#5. Install and configure KVM
Probably this is the quickest and the easiest chapter of the preparation of our lab. We tell CentOS 7 to install using yum all packages related to KVM/QEMU:
|
sudo yum install -y qemu-kvm qemu-img virt-manager libvirt libvirt-python libvirt-client virt-install virt-viewer |
There should be definitely a lot of possibilities to fine tune something in this packages, but I haven’t changed anything and left default parameters
#6. Create appropriate network connections
This step will be always “setup” specific and you need to check your local setup. You remember, we have created 3 network connections. They names start with “ens” and then comes the number. I have tried to install CentOS 7 twice and both times I got different “ens” numbers. So first of all we check their names and associated MAC addresses:
|
$ ifconfig | grep “ens\|ether” |
Then we properly tune configuration files of the interfaces and create corresponding bridges. For bridge 1 we have the following configuration:
|
$ cd /etc/sysconfig/network-scripts/ |
You remember, the first interface (ens33) has an IP address and used to connect our VM to internet.
For bridge 2 we deploy almost the same configuration, just changes IP, MAC and bridge ID:
|
$ sudo vim ifcfg-br2 IPV4_FAILURE_FATAL=yes |
We also create one bridge that won’t have any physical interfrace attached in roder to provide out of band (OOB) communication for Nokia (Alcatel-Lucent) VSR routers through interface on CPM (BOF configuration):
|
$ sudo vim ifcfg-br0 |
After you have made all the necessary configuration changes, restart network services in order to bring them in use and go to next point:
|
$ sudo systemctl restart network |
#7. Create appropriate VMs
When we have done all the previous steps, like FTP, KVM and network connections, we define VM I will show you the most important parts of it. First of all, we go to the folder, where all KVM VMs should be located and create new VM:
|
$ cd /var/lib/libvirt/images/ |
You must do “sudo” here, as the folder belongs to root.
In product configuration you can see the link to the FTP server/folder we have created in sub chapter 4. In order to login there, we have used created account and password. On the network side we map the first interface to bridge “br0”, because the first interface is the interface located on CPM, so it’s OOB. The rest of the interfaces we map to two bridges, so we can later play with network/access ports.
Also you see the name of the VM file (qcow2), so you need to put it to the same directory and make sure its name correct. I have changed the name from the standard one to make it readable and to distinguish between different VMs.
Now, when we have definied all the parameters in XML file of the VM, we create it:
|
$ sudo virsh define vsr14-r1.xml |
In the same manner we create the second VM, just changes the name. IP, MAC, source file (you can duplicate initial one) and tcp port for console.
#8. Install and configure Ansible
If you have done previous tasks, the installation of the Ansible will be straightforward:
|
$ sudo yum install -y ansible |
I have don installation just the last Friday, and I got the following version of Ansible:
|
$ ansible –version |
In config file I uncomment two strings, so that we Ansible works properly with Nokia (Alcatel-Lucent) VSR routers and Cisco IOS XRv routers:
|
$ sudo vim /etc/ansible/ansible.cfg |
After that, as I have done in the previous article (link), when I have create automation for launching my lab, we check the Ansible host file and “ordinary” linux host file:
|
$ sudo vim /etc/ansible/hosts |
The last action in this sub chapter is to unpack those playbooks to your home directory and update localhost.yml from folder “nodes” with proper names of your network interfaces: change eth2 to ensXX.
#9. Install vconfig:
The last point in the main program is to install the package that helps us to create VLANs and sub interfaces:
|
$ sudo yum install -y vconfig |
#10. Install and configure ncclient (optional)
I have put this module as optional, because I haven’t it used before, but this module will be used in the later articles, because it’s used by Ansible to utilize NETCONF interface to routers. The installation is done in the following way:
|
$ sudo yum -y install python-pip |
Verification of installation
Once we are done, we have created the following lab:
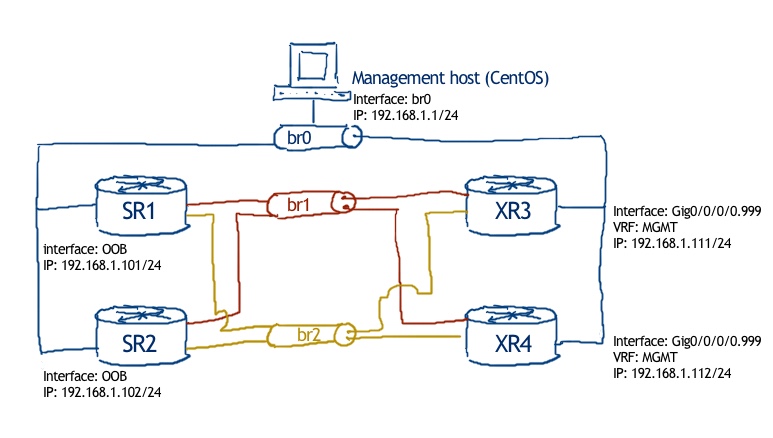

On management host we have all our services up and running (FTP, Ansible, KVM, etc). SR1 and SR2 are KVM VM and will be started on this host, wheres XR3 and XR4, which are Cisco IOS XRv routers, are VMWare VMs and are connected through external interfaces “ens34” and “ens35” to the proper Linux bridges
If you have done everything correct, your lab will start working:
|
/home/aaa/ansible |
I have reduced the output of the playbook’s execution, because it’s really huge. Important is that VMs are created and sub interfaces with bridges as well.
Just when the KVM VMs are created, we can connect to it:
|
$ telnet 0.0.0.0 2511 |
If FTP server and XML of the router is configured properly, the VSR will be able to obtain license:
|
A:vRR# show bof |
That’s it. Our lab is ready:
The updated version of Ansible-playbooks is here: ansibl7.tar
Lessons learned
I have to rebuild Ansible playbooks, because in the version 2.4 (https://docs.ansible.com/ansible/2.4/porting_guide_2.4.html) and 2.3 (http://docs.ansible.com/ansible/latest/porting_guide_2.3.html) there are some changes in the modules. Refer to official documentation (http://docs.ansible.com/ansible/latest/modules_by_category.html).
Conclusion
Now I have updated lab with new Ansible, Python and other instruments, which is necessary to continue our journey into networking world. One of the reasons for updating CentOS was the problem with installation of OVS (link), which is interesting for me to play with. If I have positive experinse with it, I’ll wright some articles about it and I’ll replace my brctl with it. Take and good bye!
P.S.
If you have further questions or you need help with your networks, I’m happy to assist you, just send me message.
Support us
BR,
Anton Karneliuk