


Hello my friend,
In the previous article we have described the implementation of Cumulus Linux OS for the data center environment. Today we’ll provide you two approaches, how you can automate the deployment of your Cumulus Linux in the network.
1 2 3 4 5 | No part of this blogpost could be reproduced, stored in a<br> retrieval system, or transmitted in any form or by any<br> means, electronic, mechanical or photocopying, recording,<br> or otherwise, for commercial purposes without the<br> prior permission of the author.<br> |
Disclaimer
In this article we will focus on Cumulus Linux automation solely, as we have thoroughly tested the automation of Nokia (Alcatel-Lucent) SR OS and Cisco IOS XR in the variety of articles: beginner, advanced, pro. Regarding Cumulus, there we aren’t inventing something on our own, but rather a bit extending existing Cumulus Linux guidelines.
Brief description
So, the first and the most important fact about Cumulus you need to recap, is that it it’s Linux (Hello, @Rama!). What does it mean for us? Well, on the one hand it means that all automation tools and plugins for Ansible we have available for Linux are also available for Cumulus Linux. This type of automation is based on the manipulation of different files within Linux and restart of the daemons.
On the other hand, it might seem to be quite complicated for pure networking gents, who have small experience with Linux and therefore feel themselves not very fit with traditional Linux automation. For them we’ll provide more traditional approach using NCLU (CLI in Cumulus Linux) automation, much the same way we have used previously for Nokia (Alcatel-Lucent) SR OS and Cisco IOS XR.
What we are going to test?
We’ll test both type of automation:
- Interfaces will be created and brought to operation using traditional Linux automation approach using manipulation of the configuration files
- BGP will be configured using NCLU automation
Software version
The following infrastructure is used in my lab:
- CentOS 7 with python 2.7.
- Ansible 2.4.2
- Cumulus Linux VX 3.5.3
See the previous article to get details how to build the lab
Topology
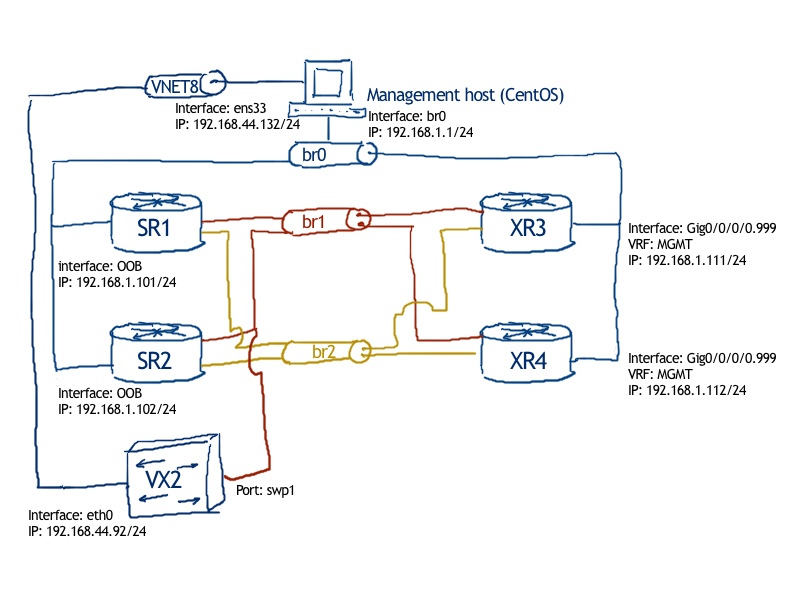
We are going to use the same topology as we have used in the previous lab for physical connectivity:

For logical connectivity we are using also the topology from the previous lab:

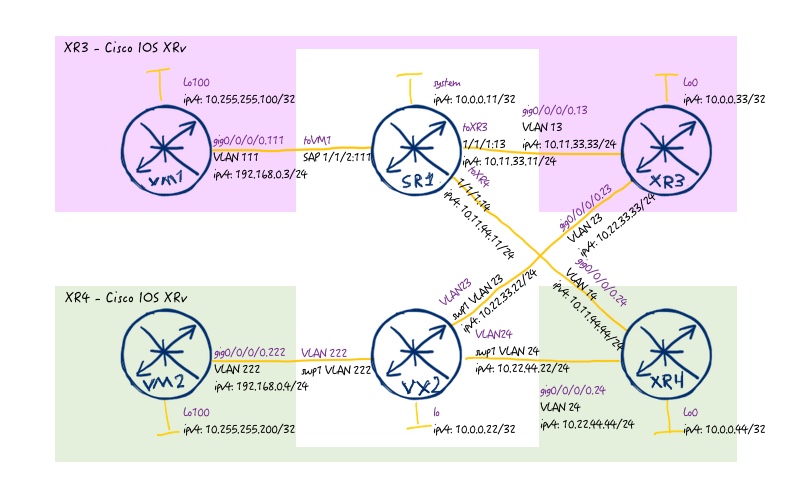
As we are focusing solely on Cumulus Linux, we don’t need to do anything with Nokia (Alcatel-Lucent) SR OS or Cisco IOS XR therefore we provide just final configuration files from them from the previous lab, whereas for Cumulus Linux we have only management interface configured (shown later in the article): 118_config_initial_linux 118_config_final_XR3 118_config_final_SR1 118_config_final_XR4
Preparation for Cumulus
As a basis for this article we take the Ansible structure with roles and templates we shared with you some time ago, that’s why we’ll omit description of role’s structure.
The following structure of files and folders we have for this lab:
IMG-ANSIBLE-STRUCTURE
On our management host (CentOS), we do the following steps:
#1. Update of Ansible host
1 2 3 4 5 6 | $ sudo vim /etc/ansible/hosts<br> [cumulus]<br> VX1<br> VX2<br> VX3<br> VX4<br> |
#2. Update of Linux hosts
1 2 3 4 5 | $ sudo vim /etc/hosts<br> 192.168.44.91 VX1<br> 192.168.44.92 VX2<br> 192.168.44.93 VX3<br> 192.168.44.94 VX4<br> |
#3. Test connectivity
1 2 3 4 5 6 | $ ping VX2 -c 1<br> PING VX2 (192.168.44.92) 56(84) bytes of data.<br> 64 bytes from VX2 (192.168.44.92): icmp_seq=1 ttl=64 time=0.827 ms<br> --- VX2 ping statistics ---<br> 1 packets transmitted, 1 received, 0% packet loss, time 0ms<br> rtt min/avg/max/mdev = 0.827/0.827/0.827/0.000 ms<br> |
#4. Create file with authentication data for Cumulus
1 2 3 4 5 6 7 8 9 | $cd ~/ansible/<br> $ mkdir group_vars/cumulus<br> $ touch group_vars/cumulus/cumulus_host.yml<br> $ vim group_vars/cumulus/cumulus_host.yml<br> ---<br> ansible_user: cumulus<br> ansible_pass: CumulusLinux!<br> ansible_become_pass: CumulusLinux!<br> ...<br> |
#5. Create new role and sub-structure for Cumulus
1 2 3 4 5 6 7 8 | $ touch 118_lab.yml<br> $ cd ~ansible/roles/<br> $ mkdir cumulus<br> $ cd ~ansible/roles/cumulus<br> $ mkdir 118_lab<br> $ mkdir tasks templates vars<br> $ touch tasks/main.yml<br> $ touch templates/iface.j2<br> |
#6. Create Ansible playbook to launch the role
1 2 3 4 5 6 7 | $ cat 118_lab.yml<br> ---<br> - hosts: cumulus<br> tags: cumulus_part<br> roles:<br> - { role: cumulus/118_lab }<br> ...<br> |
Mega important! Don’t put “connection: local”, as we did in all our previous Ansible playbooks. We don’t do things local, but we rather connect to remote Linux host!
We’ve created role in a way so that it’s possible to extend the playbook for further automation, if we decide to bring Nokia (Alcatel-Lucent) SR OS, Cisco IOS XR or Linux to this lab automation as well.
The basic preparation is done and we can start with automation.
Linux-like automation of Cumulus
Linux stores all its configuration in different configuration files. In order to change something in its operation, you just need to do two things:
- Change corresponding configuration file
- Restart the service.
The configuration of interfaces (logical ones) in Cumulus Linux is stored in “/etc/network/interfaces”. Let’s see what we have there:
1 2 3 4 5 6 7 8 9 10 11 12 13 14 15 16 17 | .cumulus@VX2:mgmt-vrf:~$ cat /etc/network/interfaces<br> .# This file describes the network interfaces available on .your system<br> .# and how to activate them. For more information, see interfaces(5)<br> .<br> .source /etc/network/interfaces.d/*.intf<br> .<br> .# The primary network interface<br> .auto eth0<br> .iface eth0<br> . address 192.168.44.92/24<br> . vrf mgmt<br> .<br> .auto mgmt<br> .iface mgmt<br> . address 127.0.0.1/8<br> . vrf-table auto<br> .<br> |
So, in order to create the connectivity of our Cumulus Linux VX2 to the rest of the devices in our data centre fabric, we need to do create new entries in this file in the same way and then restart the interfaces so that information from this file is reapplied to the VX2 again. How do we achieve that? There are some easy steps to success:
- Create files with variables so that our Anisble playbooks are easy adaptable
- Create templates, which can be used for creating any number of interfaces
- Create playbook with tasks to execute configuration
- Add the interface reload procedure in the playbook
Let’s start with first point.
#1. Creating file with variables
That isn’t something new. We have done it even more than year ago, so I just provide variables I have created for this lab. Partially such structure was used earlier for Nokia (Alcatel-Lucent) SR OS and Cisco IOS XR (link), but that time I didn’t know how to create dictionaries and use jinja2 templates, so it is updated now:
1 2 3 4 5 6 7 8 9 10 11 12 13 14 15 16 17 18 19 20 21 22 23 24 25 26 27 28 29 30 31 32 33 34 35 36 37 38 39 40 41 42 43 44 45 46 47 48 49 50 51 52 53 54 55 56 57 58 59 60 61 62 63 64 65 66 67 68 69 70 71 72 73 74 75 76 77 78 79 80 81 82 83 84 85 | .$ pwd<br> ./home/aaa/ansible<br> .$ cat roles/cumulus/118_lab/vars/VX2.yml<br> .---<br> .node_var:<br> . hostname: VX2<br> . chassis_mode: x<br> . card1:<br> . id: 1<br> . type: iom3-xp-b<br> . state: true<br> . mda1:<br> . id: 1<br> . type: m5-1gb-sfp-b<br> . state: true<br> . port1:<br> . id: 1<br> . type: network<br> . enc: dot1q<br> . mtu: 1518<br> . state: true<br> . interfaces:<br> . - id: 0<br> . name: lo<br> . port:<br> . vlan:<br> . ipv4: 10.0.0.22/32<br> . ipv6_ula: fc00::10:0:0:22/128<br> . ipv6_lla: fe80::22<br> . state: true<br> . - id: 1<br> . name: vlan12<br> . port: swp1<br> . vlan: 12<br> . ipv4: 10.22.22.22/24<br> . ipv6_ula: fc00::10:22:22:22/112<br> . ipv6_lla: fe80::22<br> . state: true<br> . - id: 2<br> . name: vlan23<br> . port: swp1<br> . vlan: 23<br> . ipv4: 10.22.33.22/24<br> . ipv6_ula: fc00::10:22:33:22/112<br> . ipv6_lla: fe80::22<br> . state: true<br> . - id: 3<br> . name: vlan24<br> . port: swp1<br> . vlan: 24<br> . ipv4: 10.22.44.22/24<br> . ipv6_ula: fc00::10:22:44:22/112<br> . ipv6_lla: fe80::22<br> . state: true<br> . routing:<br> . bgp:<br> . asn: 65012<br> . router_id: 10.0.0.22<br> . as_path_relax: true<br> . neighbors:<br> . - id: 0<br> . peer_ip: 10.22.33.33<br> . peer_asn: 65001<br> . password: FABRIC<br> . ebgp_multihop: not_defined<br> . update_source: not_defined<br> . ipv4: true<br> . evpn: false<br> . - id: 1<br> . peer_ip: 10.22.44.44<br> . peer_asn: 65002<br> . password: FABRIC<br> . ebgp_multihop: not_defined<br> . update_source: not_defined<br> . ipv4: true<br> . evpn: false<br> . - id: 2<br> . peer_ip: 10.0.0.11<br> . peer_asn: 65011<br> . password: OVERLAY<br> . ebgp_multihop: 5<br> . update_source: lo<br> . ipv4: false<br> . evpn: true<br> ....<br> |
As you see, here we have all the information, which is needed for this part (interfaces) and the next one (BGP config).
#2. Creating templates
Much the same way we described in roles and templates, we heavily using repetitive cycles (for-logic of the programming) and conditions (if-then-logic of the programming) to build the proper configuration file:
1 2 3 4 5 6 7 8 9 10 11 12 13 14 15 16 17 18 19 20 21 22 23 24 25 26 27 28 29 30 | .$ cat roles/cumulus/118_lab/templates/iface.j2<br> .auto swp1<br> .iface swp1<br> . bridge-vids {% for int in node_var.interfaces %}{% if int.vlan is defined %}{{ int.vlan }} {% endif %}{% endfor %}<br> .<br> .<br> .auto bridge<br> .iface bridge<br> . bridge-ports swp1<br> . bridge-vlan-aware yes<br> . bridge-vids {% for int in node_var.interfaces %}{% if int.vlan is defined %}{{ int.vlan }} {% endif %}{% endfor %}<br> .<br> .<br> .{% for int in node_var.interfaces %}<br> .{% if int.state %}<br> .auto {{ int.name }}<br> .{% endif %}<br> .iface {{ int.name }} {% if int.name == 'lo' %}inet .loopback{% endif %}<br> .<br> .{% if int.ipv4 is defined %}<br> . address {{ int.ipv4 }}<br> .{% endif %}{% if int.ipv6_ula is defined %}<br> . address {{ int.ipv6_ula }}<br> .{% endif %}<br> .{% if int.vlan is defined and int.name != 'lo' %}<br> . vlan-id {{ int.vlan }}<br> . vlan-raw-device bridge<br> .{% endif %}<br> .<br> .{% endfor %}<br> |
So, we now that our switch is connected on port swp1 to the network, so all the VLANs for interconnections must be configured on this port. Also, as we are using VLANs, port swp1 must be in general assigned to the bridge logic and then VLANs are created as L3 interfaces with IPv4/IPv6 addresses defined previously in file with variables.
#3. Creating tasks’ file to update the configuration on Cumulus Linux switch
Now we need to put all these things together and reload the interfaces. The tasks file is quite simple; we must admit:
1 2 3 4 5 6 7 8 9 10 11 12 13 14 15 16 | .$ cat roles/cumulus/118_lab/tasks/main.yml<br> .---<br> .- name: IMPORTING TASK-SPECIFIC DATA<br> . include_vars:<br> . file: "{{ inventory_hostname }}.yml"<br> .<br> .- name: PUSHING CONFIGURATION TO {{ ansible_hostname }} // BASIC IP CONNECIVITY<br> . blockinfile:<br> . block: "{{ lookup ('template', 'iface.j2') }}"<br> . path: /etc/network/interfaces<br> . become: yes<br> .<br> .- name: APPLYING ON REMOTE HOST<br> . shell: ifreload -a<br> . become: yes<br> ....<br> |
In the first task we just import per-device variables, which are used in template later on. The second task is probably the core of this playbook. We use module “blockinfile”, which actually alters any existing file in a way to add or remove configuration. As we don’t specify any particular action, it adds information there. In the file “block” we either write the content of template directly or just refer to external file, what we did in our case. The first word “template” in this case means, that the lookup for the file with template is done in the “xxx/template” folder of the role. The field “path” points to the file to be modified.
If you have by mistake added “connection: local” previously, the playbook will modify file locally on your management host (CentOS in our case).
The last task is to reload interfaces configured as auto (all in our case) using sudo mode.
Verification of Linux-like automation
Let’s launch this Ansible playbook and then verify the results:
1 2 3 4 5 6 7 8 9 10 11 12 13 14 15 16 17 18 19 20 21 22 23 24 25 26 | .$ ansible-playbook 118_lab.yml --ask-pass<br> .SSH password:<br> .<br> .PLAY [cumulus] ******************************************************************<br> .<br> .TASK [Gathering Facts] **********************************************************<br> .ok: [VX2]<br> .fatal: [VX4]: UNREACHABLE! => {"changed": false, "msg": "Failed to connect to the host via ssh: ssh: connect to host vx4 port 22: No route to host\r\n", "unreachable": true}<br> .fatal: [VX1]: UNREACHABLE! => {"changed": false, "msg": "Failed to connect to the host via ssh: ssh: connect to host vx1 port 22: No route to host\r\n", "unreachable": true}<br> .fatal: [VX3]: UNREACHABLE! => {"changed": false, "msg": "Failed to connect to the host via ssh: ssh: connect to host vx3 port 22: No route to host\r\n", "unreachable": true}<br> .<br> .TASK [cumulus/118_lab : IMPORTING TASK-SPECIFIC DATA] ***************************<br> .ok: [VX2]<br> .<br> .TASK [cumulus/118_lab : PUSHING CONFIGURATION TO VX2 // BASIC IP CONNECIVITY] ***<br> .changed: [VX2]<br> .<br> .TASK [cumulus/118_lab : APPLYING ON REMOTE HOST] ********************************<br> .changed: [VX2]<br> . to retry, use: --limit @/home/aaa/ansible/118_lab.retry<br> .<br> .PLAY RECAP **********************************************************************<br> .VX1 : ok=0 changed=0 unreachable=1 failed=0<br> .VX2 : ok=4 changed=2 unreachable=0 failed=0<br> .VX3 : ok=0 changed=0 unreachable=1 failed=0<br> .VX4 : ok=0 changed=0 unreachable=1 failed=0<br> |
Import note: we launch the playbook with option “–ask-pass”.
Without this attribute we’ll got the following error:
1 | fatal: [VX2]: UNREACHABLE! => {"changed": false, "msg": "Failed to connect to the host via ssh: Permission denied (publickey,password).\r\n", "unreachable": true} |
We have found some possible solutions based on the implementation on public keys, but it adds additional complexity in this particular lab so it’s easier to type the password.
When the playbook is executed, let’s verify what we do have on the Cumulus Linux VX:
1 2 3 4 5 6 7 8 9 10 11 12 13 14 15 16 17 18 19 20 21 22 23 24 25 26 27 28 29 30 31 32 33 34 35 36 37 38 39 40 41 42 43 44 45 46 47 48 49 50 51 52 53 54 55 | .cumulus@VX2:mgmt-vrf:~$ cat /etc/network/interfaces<br> .# This file describes the network interfaces available on your system<br> .# and how to activate them. For more information, see interfaces(5).<br> .<br> .source /etc/network/interfaces.d/*.intf<br> .<br> .# The primary network interface<br> .auto eth0<br> .iface eth0<br> . address 192.168.44.92/24<br> . vrf mgmt<br> .<br> .auto mgmt<br> .iface mgmt<br> . address 127.0.0.1/8<br> . vrf-table auto<br> .<br> .# BEGIN ANSIBLE MANAGED BLOCK<br> .auto swp1<br> .iface swp1<br> . bridge-vids 12 23 24<br> .<br> .auto bridge<br> .iface bridge<br> . bridge-ports swp1<br> . bridge-vlan-aware yes<br> . bridge-vids 12 23 24<br> .<br> .auto lo<br> .iface lo inet loopback<br> . address 10.0.0.22/32<br> . address fc00::10:0:0:22/128<br> .<br> .auto vlan12<br> .iface vlan12<br> . address 10.22.22.22/24<br> . address fc00::10:22:22:22/112<br> . vlan-id 12<br> . vlan-raw-device bridge<br> .<br> .auto vlan23<br> .iface vlan23<br> . address 10.22.33.22/24<br> . address fc00::10:22:33:22/112<br> . vlan-id 23<br> . vlan-raw-device bridge<br> .<br> .auto vlan24<br> .iface vlan24<br> . address 10.22.44.22/24<br> . address fc00::10:22:44:22/112<br> . vlan-id 24<br> . vlan-raw-device bridge<br> .<br> .# END ANSIBLE MANAGED BLOCK<br> |
It looks nice, isn’t it? We see our commands alongside with information, that this particular block is managed by Ansible, what makes it very easy to understand, what should be managed.
But this is just the configuration file, and we need to make sure that our configuration is applied and being used:
1 2 3 4 5 6 7 8 9 10 11 12 13 14 | .cumulus@VX2:mgmt-vrf:~$ net show interface<br> . Name Master Speed MTU Mode Remote Host Remote Port Summary<br> .----- ------ -------- ------- ----- ------------- ------------- ------------- -----------------------------------------<br> .UP lo N/A 65536 Loopback IP: 127.0.0.1/8, 10.0.0.22/32,<br> . fc00::10:0:0:22/128, ::1/128<br> .UP eth0 mgmt 1G 1500 Mgmt IP: 192.168.44.92/24<br> .UP swp1 bridge 1G 1500 Access/L2<br> .ADMDN swp2 N/A 1500 NotConfigured<br> .ADMDN swp3 N/A 1500 NotConfigured<br> .UP bridge N/A 1500 Bridge/L2<br> .UP mgmt N/A 65536 Interface/L3 IP: 127.0.0.1/8<br> .UP vlan12 N/A 1500 Interface/L3 IP: 10.22.22.22/24, fc00::10:22:22:22/112<br> .UP vlan23 N/A 1500 Interface/L3 IP: 10.22.33.22/24, fc00::10:22:33:22/112<br> .UP vlan24 N/A 1500 Interface/L3 IP: 10.22.44.22/24, fc00::10:22:44:22/112<br> |
So our configuration is applied properly and interfaces are up and running. As a small additional check, let’s make sure we can reach any of connected spine switches (XR4 for instance):
1 2 3 4 5 6 | cumulus@VX2:mgmt-vrf:~$ ping 10.22.44.44 -c 1<br> PING 10.22.44.44 (10.22.44.44) 56(84) bytes of data.<br> 64 bytes from 10.22.44.44: icmp_seq=1 ttl=255 time=0.719 ms<br> --- 10.22.44.44 ping statistics ---<br> 1 packets transmitted, 1 received, 0% packet loss, time 0ms<br> rtt min/avg/max/mdev = 0.719/0.719/0.719/0.000 ms<br> |
So traditional Linux-like automation is done and we can move further.
CLI-like automation of Cumulus
In this part we’ll review usage of Cumulus-specific CLU module from Ansbile. Actually, Cumulus has several modules in Ansible , and some of them could be even easier to use, if we need solve specific tasks. But for networking guys and for people, who aren’t afraid to get hands dirty and create real automation, I’d recommend to go for NCLU module. What it does, it allows you to enter just NCLU commands in a sequence as you do into the Cumulus Linux CLI and that’s it. For sure, all advantages of Jinja2 templates are also relevant here. To be honest, Cumulus encourages to use this module.
To recap, what we are going to do with this automation, we will deploy configuration of BGP, which is necessary to create overlay and underlay in our data centre fabric. The underlay network and its BGP peering is shown at the following image:
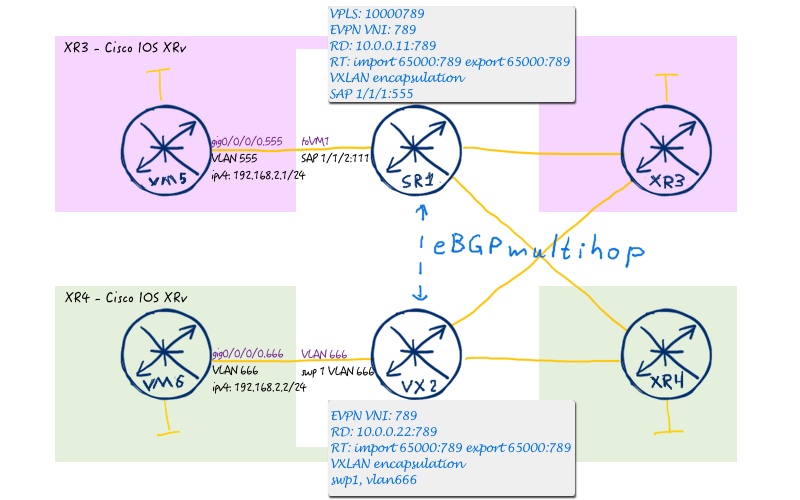
To show BGP peering for overlay we provide the L2 EVPN topology:
To achieve that we create a separated Ansible playbook:
1 2 3 4 5 6 7 8 9 10 11 12 13 14 15 16 17 18 19 20 21 22 23 24 25 26 27 28 29 30 31 32 33 34 35 36 37 38 39 40 41 42 43 44 45 46 47 48 49 50 51 52 53 54 55 56 57 | .$ cat roles/cumulus/118_lab/tasks/bgp.yml<br> .---<br> .- name: BGP // CREATING PROCESS<br> . nclu:<br> . commands:<br> . - add bgp autonomous-system {{ node_var.routing.bgp.asn }}<br> . - add bgp router-id {{ node_var.routing.bgp.router_id }}<br> . atomic: true<br> .<br> .- name: BGP // APLYING AS_PATH RELAX<br> . nclu:<br> . template: |<br> . {% if node_var.routing.bgp.as_path_relax %}<br> . add bgp bestpath as-path multipath-relax<br> . {% endif %}<br> . atomic: true<br> .<br> .- name: BGP // CONFIGURING NEIGHBOR<br> . nclu:<br> . template: |<br> . {% for nei in node_var.routing.bgp.neighbors %}<br> . add bgp neighbor {{ nei.peer_ip }} remote-as {{ nei.peer_asn }}<br> . add bgp neighbor {{ nei.peer_ip }} password {{ nei.password }}<br> . {% if nei.ebgp_multihop != 'not_defined' %}<br> . add bgp neighbor {{ nei.peer_ip }} ebgp-multihop {{ nei.ebgp_multihop }}<br> . {% endif %}<br> . {% if nei.update_source != 'not_defined' %}<br> . add bgp neighbor {{ nei.peer_ip }} update-source {{ nei.update_source }}<br> . {% endif %}<br> . {% if nei.ipv4 %}<br> . add bgp ipv4 unicast neighbor {{ nei.peer_ip }} activate<br> . {% else %}<br> . del bgp ipv4 unicast neighbor {{ nei.peer_ip }} activate<br> . {% endif %}<br> . {% if nei.evpn %}<br> . add bgp l2vpn evpn neighbor {{ nei.peer_ip }} activate<br> . {% else %}<br> . del bgp l2vpn evpn neighbor {{ nei.peer_ip }} activate<br> . {% endif %}<br> . {% endfor %}<br> . atomic: true<br> .<br> .- name: BGP // ADVERTISING IPV4 LOOPBACK<br> . nclu:<br> . commands:<br> . - add bgp ipv4 unicast network {{ node_var | json_query(loopback_address) | join }}<br> . atomic: true<br> . vars:<br> . loopback_address: "interfaces[?name=='lo'].ipv4"<br> .<br> .- name: BGP // PREPARING L2VPN EVPN AFI/SAFI<br> . nclu:<br> . commands:<br> . - add bgp l2vpn evpn advertise-all-vni<br> . - add bgp l2vpn evpn advertise-default-gw<br> . atomic: true<br> ....<br> |
As you see, there are two options to enter commands: either using “commands” keyword and then we put normal commands (variable are allowed, for sure) or using “template” keyword and that we put jinja2-formatted template. In this playbook we are heavily using variables from initial file with variables, though we don’t call them explicitly. How can they be used then? We don’t use this Ansible playbook as standalone entity, but rather we include it in “main.yml”:
1 2 3 4 5 6 7 8 9 10 11 12 13 14 15 16 17 18 19 | .$ cat roles/cumulus/118_lab/tasks/main.yml<br> .---<br> .- name: IMPORTING TASK-SPECIFIC DATA<br> . include_vars:<br> . file: "{{ inventory_hostname }}.yml"<br> .<br> .- name: PUSHING CONFIGURATION TO {{ ansible_hostname }} // BASIC IP CONNECIVITY<br> . blockinfile:<br> . block: "{{ lookup ('template', 'iface.j2') }}"<br> . path: /etc/network/interfaces<br> . become: yes<br> .<br> .- name: APPLYING ON REMOTE HOST<br> . shell: ifreload -a<br> . become: yes<br> .<br> .- name: CONFIGURING BGP<br> . include_tasks: bgp.yml<br> ....<br> |
In such scenario the variables are available in child playbook.
Verification of CLI-like automation
To check, if our Ansible playbook is working properly, we need to launch it again:
1 2 3 4 5 6 7 8 9 10 11 12 13 14 15 16 17 18 19 20 21 22 23 24 25 26 27 28 29 30 31 32 33 34 35 36 37 38 39 40 41 42 43 44 | $ ansible-playbook 118_lab.yml --ask-pass<br> SSH password:<br> .<br> PLAY [cumulus] ******************************************************************<br> .<br> TASK [Gathering Facts] **********************************************************<br> ok: [VX2]<br> fatal: [VX1]: UNREACHABLE! => {"changed": false, "msg": "Failed to connect to the host via ssh: ssh: connect to host vx1 port 22: No route to host\r\n", "unreachable": true}<br> fatal: [VX4]: UNREACHABLE! => {"changed": false, "msg": "Failed to connect to the host via ssh: ssh: connect to host vx4 port 22: No route to host\r\n", "unreachable": true}<br> fatal: [VX3]: UNREACHABLE! => {"changed": false, "msg": "Failed to connect to the host via ssh: ssh: connect to host vx3 port 22: No route to host\r\n", "unreachable": true}<br> .<br> TASK [cumulus/118_lab : IMPORTING TASK-SPECIFIC DATA] ***************************<br> ok: [VX2]<br> .<br> TASK [cumulus/118_lab : PUSHING CONFIGURATION TO VX2 // BASIC IP CONNECIVITY] ***<br> ok: [VX2]<br> .<br> TASK [cumulus/118_lab : APPLYING ON REMOTE HOST] ********************************<br> changed: [VX2]<br> .<br> TASK [cumulus/118_lab : CONFIGURING BGP] ****************************************<br> included: /home/aaa/ansible/roles/cumulus/118_lab/tasks/bgp.yml for VX2<br> .<br> TASK [cumulus/118_lab : BGP // CREATING PROCESS] ********************************<br> changed: [VX2]<br> .<br> TASK [cumulus/118_lab : BGP // APLYING AS_PATH RELAX] ***************************<br> changed: [VX2]<br> .<br> TASK [cumulus/118_lab : BGP // CONFIGURING NEIGHBOR] ****************************<br> changed: [VX2]<br> .<br> TASK [cumulus/118_lab : BGP // ADVERTISING IPV4 LOOPBACK] ***********************<br> changed: [VX2]<br> .<br> TASK [cumulus/118_lab : BGP // PREPARING L2VPN EVPN AFI/SAFI] *******************<br> changed: [VX2]<br> . to retry, use: --limit @/home/aaa/ansible/118_lab.retry<br> .<br> PLAY RECAP **********************************************************************<br> VX1 : ok=0 changed=0 unreachable=1 failed=0<br> VX2 : ok=10 changed=6 unreachable=0 failed=0<br> VX3 : ok=0 changed=0 unreachable=1 failed=0<br> VX4 : ok=0 changed=0 unreachable=1 failed=0<br> |
The playbook has been executed, now we need to check the state of BGP peering at Cumulus Linux:
1 2 3 4 5 6 7 8 9 10 11 12 13 14 15 16 17 18 19 20 21 22 23 | cumulus@VX2:mgmt-vrf:~$ net show bgp ipv4 unicast summary<br> BGP router identifier 10.0.0.22, local AS number 65012 vrf-id 0<br> BGP table version 3<br> RIB entries 5, using 760 bytes of memory<br> Peers 3, using 59 KiB of memory<br> .<br> Neighbor V AS MsgRcvd MsgSent TblVer InQ OutQ Up/Down State/PfxRcd<br> 10.22.33.33 4 65001 0 0 0 0 0 never Connect<br> 10.22.44.44 4 65002 135 138 0 0 0 00:06:28 2<br> .<br> Total number of neighbors 2<br> !<br> !<br> cumulus@VX2:mgmt-vrf:~$ net show bgp l2vpn evpn summary<br> BGP router identifier 10.0.0.22, local AS number 65012 vrf-id 0<br> BGP table version 0<br> RIB entries 7, using 1064 bytes of memory<br> Peers 3, using 59 KiB of memory<br> .<br> Neighbor V AS MsgRcvd MsgSent TblVer InQ OutQ Up/Down State/PfxRcd<br> 10.0.0.11 4 65011 135 134 0 0 0 00:06:04 22<br> .<br> Total number of neighbors 1<br> |
BGP neighbour Cisco IOS XR XR3 is down because VM with it is down state as I don’t have sufficient resources at my laptop.
BGP is up and running properly. Though we haven’t shown BGP routing table explicitely to check if loopback of VX2 is advertised, it’s working, otherwise EVPN peering between Cumulus VX2 and Nokia (Alcatel-Lucent) SR1 won’t come up
Here is Ansible files for this lab: 118_lab.tar
Lessons learned
I spent some time trying to modify interfaces files on my management host without knowing, what exactly I’m doing. So knob “connection: local” works fine for lots of networking modules, because we specify there host/login/password, what is not the case for standard Linux modules. I believe, there is update the playbook so that it works without adding “–ask-pass”, but for now I don’t find it too dramatic.
Conclusion
I’m very happy that there are various ways, how we can automate Cumulus Linux. Because it broads the possible auditorium of the users of the Cumulus Linux platform as both Linux-guys and network-guys can find the way to make it working. Though I haven’t provided way to create VPN service, it should be easy for you, if you understood NCLU automation and Jinja2 templates. Take care and good bye!
P.S.
If you have further questions or you need help with your networks, I’m happy to assist you, just send me message. Also don’t forget to share the article on your social media, if you like it.
Support us
BR,
Anton Karneliuk