


Hello my friend,
In one of the previous articles we have introduced new vendor to our interoperability tests, which is Arista. Its virtual router vEOS has shown good capabilities for data center activities, especially in context EVPN/VXLAN. In this article we’ll take a look on how to automate its deployment.
1 2 3 4 5 | No part of this blogpost could be reproduced, stored in a<br> retrieval system, or transmitted in any form or by any<br> means, electronic, mechanical or photocopying, recording,<br> or otherwise, for commercial purposes without the<br> prior permission of the author.<br> |
Disclaimer
In this article we’ll review solely automation of Arista EOS configuration using Ansible. Automation of network deployment for other vendors, like Nokia (Alcatel-Lucent) SR OS, Cisco IOS XR and Cumulus Linux, have been provided recently in separated article.
Brief description
Frankly speaking. there are several options, how Arista EOS can be automated. Arista EOS can be configured in total using these 3 main approaches:
- JSON scripts through HTTP
- CLI using SSH
- OpenConfig using NETCONF or RESTCONF.
It means any of these interfaces can be used to automate Arista EOS products. In this article we’ll focus on the 2nd option, which is CLI using SSH. For that we’ll use Ansible with corresponding templates, which add this necessary degree of automation.
OpenConfig seems to be the most advanced and future proof, therefore we’ll cover it in separate article for all the vendors
Regarding Ansible and Arista, there are plenty of modules developed to configure various aspects of Arista EOS and they can be good, especially if you deploy single new customers. But in this article I’ll use single module, which in nutshell accepts all the configuration commands. In conjunction with proper jinja2 templates, I believe, it’s the best way for deploying infrastructure.
What we are going to test?
Following the same approach, we did for automation of Cumulus Linux, we’ll deploy playbooks for:
- Configuration of network interfaces to interconnect routers within data centre IP fabric
- Configuration of BGP both for undelay and overlay
Software version
The following infrastructure is used in my lab:
- CentOS 7 with python 2.7.
- Ansible 2.6 (NEW!)
- Arista EOS 4.20.5F
See the previous article to get details how to build the lab
I have auto updates turned on in my CentOS Linux, that’s why somewhere recently Ansible has been updated from 2.4.2 to 2.6. I don’t when it happened as it was done automatically. So, be aware of the changes.
Topology
Following the same approach, we’ve done recently for Cumulus Linux, we add new node to our automation lab:


The logical topology comes from the previous lab about joint data center operation of Nokia (Alcatel-Lucent) SR OS and Arista EOS:

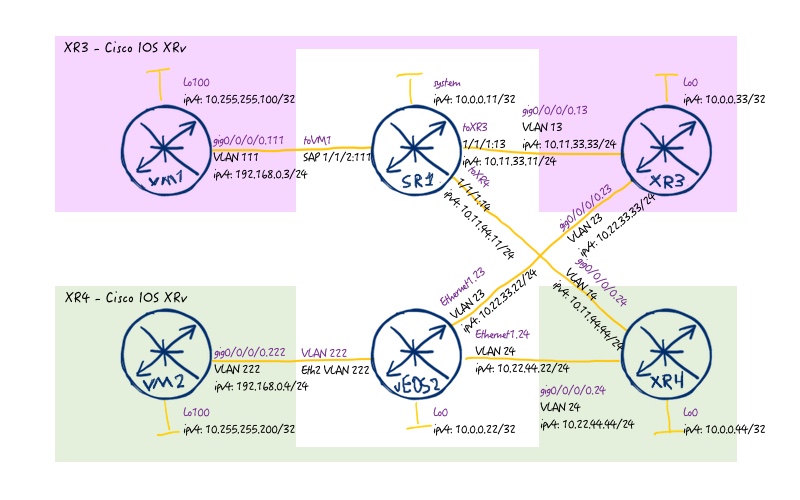
As we mentioned previously, we deal only with automation of Arista EOS in this lab, therefore we provide the final configuration files for the rest vendors from the previous lab, and for the Arista we provide just simple pre-configuration with configured management interface and user for remote access:
Preparing environment for Ansible playbooks
As a basis for this article we take the Ansible structure with roles and templates we shared with you some time ago, that’s why we’ll omit description of role’s structure.
The structure of the interrelated folders and files are just the same as in the case of Cumulus’s automation:

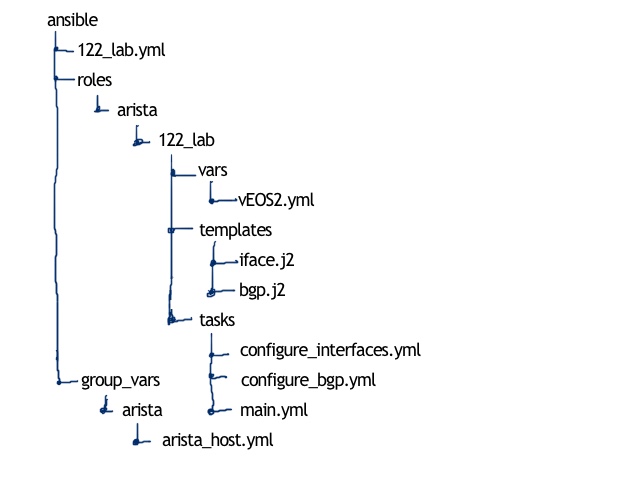
Knowing how the structure looks like, we need to create it and update some other information:
#1. Update of Ansible host
1 2 3 4 5 | <br> $ sudo vim /etc/ansible/hosts<br> [arista]<br> vEOS1<br> vEOS2<br> |
#2. Update of Linux hosts
1 2 3 4 | <br> $ sudo vim /etc/hosts<br> 192.168.44.81 vEOS1<br> 192.168.44.82 vEOS2<br> |
#3. Test connectivity
1 2 3 4 5 6 7 | <br> [aaa@sandbox ansible]$ ping vEOS2 -c 1<br> PING vEOS2 (192.168.44.82) 56(84) bytes of data.<br> 64 bytes from vEOS2 (192.168.44.82): icmp_seq=1 ttl=64 time=3.21 ms<br> --- vEOS2 ping statistics ---<br> 1 packets transmitted, 1 received, 0% packet loss, time 0ms<br> rtt min/avg/max/mdev = 3.211/3.211/3.211/0.000 ms<br> |
#4. Create file with authentication data for Arista EOS
If you are following my series (link), you can see some more commands comparing to file for Cumulus Linux (link). Here, for Arista EOS, it’s more extended I believe, so I’ll update it for Cumulus Linux later on as well to fix some authentication workarounds:
1 2 3 4 5 6 7 8 9 10 11 12 13 | <br> $ cd ~/ansible/<br> $ mkdir group_vars/arista<br> $ touch group_vars/arista/arista_host.yml<br> $ vim group_vars/arista/arista_host.yml<br> ---<br> ansible_connection: network_cli<br> ansible_network_os: eos<br> ansible_user: aaa<br> ansible_ssh_pass: aaa<br> ansible_become: yes<br> ansible_become_method: enable<br> ...<br> |
As we use Ansible 2.6, we don’t create separated file for providers. Since 2.5 it’s deprecated and we follow new guidelines.
#5. Create new role and sub-structure for Arista EOS
1 2 3 4 5 6 7 8 9 10 | <br> $ touch 122_lab.yml<br> $ cd ~ansible/roles/<br> $ mkdir arista<br> $ cd ~ansible/roles/arista<br> $ mkdir 122_lab<br> $ mkdir tasks templates vars<br> $ touch tasks/main.yml<br> $ touch templates/iface.j2<br> $ touch templates/bgp.j2<br> |
#6. Create Ansible playbook to launch the role
1 2 3 4 5 6 7 8 | <br> ---<br> - hosts: arista<br> tags: arista_part<br> connection: network_cli<br> roles:<br> - { role: arista/122_lab }<br> ...<br> |
As proposed in the module description, we put here connection type “network_cli”. Though it might be not necessary, as we mentioned it initially in group variables.
Let’s start filling in our jinja2 templates and Ansible playbooks with life.
General approach for automation for Arista (and not only)
We have used such approach earlier in different articles, so here we’ll just recap all the pieces together:
- Creating files with per-node variables
- Creating appropriate templates
- Creating files with tasks
As we follow the same approach both for configuration of interfaces and BGP, we won’t split them here and we’ll show together.
#1. Creating files with per-node variables
Such structure was used many times (earlier and recent examples). We focus here on interfaces and BGP part mainly, as virtual Arista EOS router doesn’t have cards, models and so on:
1 2 3 4 5 6 7 8 9 10 11 12 13 14 15 16 17 18 19 20 21 22 23 24 25 26 27 28 29 30 31 32 33 34 35 36 37 38 39 40 41 42 43 44 45 46 47 48 49 50 51 52 53 54 55 56 57 58 59 60 61 62 63 64 65 66 67 68 69 70 71 72 73 74 75 76 77 78 79 80 81 82 83 84 85 86 87 88 89 90 91 92 93 94 95 | <br> .[aaa@sandbox ansible]$ pwd<br> ./home/aaa/ansible<br> .[aaa@sandbox ansible]$ cat .roles/arista/122_lab/vars/vEOS2.yml<br> .---<br> .node_var:<br> . hostname: vEOS2<br> . chassis_mode: not_defined<br> . card1:<br> . id: not_defined<br> . type: not_defined<br> . state: false<br> . mda1:<br> . id: not_defined<br> . type: not_defined<br> . state: false<br> . port1:<br> . id: not_defined<br> . type: not_defined<br> . enc: not_defined<br> . mtu: not_defined<br> . state: false<br> . interfaces:<br> . - id: 0<br> . name: system<br> . port: loopback 0<br> . vlan: 0<br> . ipv4: 10.0.0.22/32<br> . ipv6_ula: fc00::10:0:0:22/128<br> . ipv6_lla: fe80::22<br> . state: true<br> . - id: 1<br> . name: to_SR1<br> . port: Ethernet1<br> . vlan: 12<br> . ipv4: 10.11.22.22/24<br> . ipv6_ula: fc00::10:11:22:22/112<br> . ipv6_lla: fe80::22<br> . state: true<br> . - id: 2<br> . name: to_XR3<br> . port: Ethernet1<br> . vlan: 23<br> . ipv4: 10.22.33.22/24<br> . ipv6_ula: fc00::10:22:33:22/112<br> . ipv6_lla: fe80::22<br> . state: true<br> . - id: 3<br> . name: to_XR4<br> . port: Ethernet1<br> . vlan: 24<br> . ipv4: 10.22.44.22/24<br> . ipv6_ula: fc00::10:22:44:22/112<br> . ipv6_lla: fe80::22<br> . state: true<br> . routing:<br> . bgp:<br> . configured: true<br> . asn: 65012<br> . router_id: 10.0.0.22<br> . as_path_relax: true<br> . neighbors:<br> . - id: 0<br> . peer_ip: 10.11.22.11<br> . peer_asn: 65011<br> . password: FABRIC<br> . ebgp_multihop: not_defined<br> . update_source: not_defined<br> . ipv4: true<br> . evpn: false<br> . - id: 1<br> . peer_ip: 10.22.33.33<br> . peer_asn: 65001<br> . password: FABRIC<br> . ebgp_multihop: not_defined<br> . update_source: not_defined<br> . ipv4: true<br> . evpn: false<br> . - id: 2<br> . peer_ip: 10.22.44.44<br> . peer_asn: 65002<br> . password: FABRIC<br> . ebgp_multihop: not_defined<br> . update_source: not_defined<br> . ipv4: true<br> . evpn: false<br> . - id: 3<br> . peer_ip: 10.0.0.11<br> . peer_asn: 65011<br> . password: OVERLAY<br> . ebgp_multihop: 5<br> . update_source: loopback 0<br> . ipv4: false<br> . evpn: true<br> ....<br> |
The BGP part is tailored for our deployment, in terms of defined address families, but it’s quite easy to extended it to any other one.
#2. Creating appropriate templates
As we have two major tasks, we create two templates: for interfaces and for BGP.
The first one is for creation of interfaces:
1 2 3 4 5 6 7 8 9 10 11 12 13 14 15 16 17 18 19 20 21 22 23 24 25 26 27 | <br> .[aaa@sandbox templates]$ pwd<br> ./home/aaa/ansible/roles/arista/122_lab/templates<br> .[aaa@sandbox templates]$ cat iface.j2<br> .ip routing<br> .ip routing vrf mgmt<br> .!<br> .{% for int in node_var.interfaces %}<br> .interface {{ int.port }}<br> .{% if int.state %} no shutdown {% endif %}<br> .<br> .{% if "loopback" not in int.port %} no switchport {% endif %}<br> .<br> .exit<br> .!<br> .interface {{ int.port }}{% if int.vlan != 0 %}.{{ int.vlan }} {% endif %}<br> .<br> .{% if int.vlan != 0 %} encapsulation dot1q vlan {{ int.vlan }} {% endif %}<br> .<br> . ip address {{ int.ipv4 }}<br> . ipv6 address {{ int.ipv6_ula }}<br> . logging event link-status<br> .{% if int.state %} no shutdown {% endif %}<br> .<br> .exit<br> .!<br> .{% endfor %}<br> |
Jinja2 is awesome, isn’t it? We don’t define any exact number of ports; the template automatically multiplies configuration to the number of interfaces defined in the files with variables. There are also some additional tweaks, like putting “switchport” on interfaces besides loopback or “encapsulation” only if VLAN besides 0 is configured.
These things are very simple and useful, to make deployment really automated and makes script “thinking instead of you”.
The second one is for the BGP configuration:
1 2 3 4 5 6 7 8 9 10 11 12 13 14 15 16 17 18 19 20 21 22 23 24 25 26 27 28 29 30 31 32 33 34 35 36 37 38 39 40 41 42 43 44 45 46 47 48 49 50 51 52 | <br> .[aaa@sandbox templates]$ pwd<br> .home/aaa/ansible/roles/arista/122_lab/templates<br> .[aaa@sandbox templates]$ cat bgp.j2<br> .service routing protocols model multi-agent<br> .!<br> .{% if node_var.routing.bgp.configured %}<br> .router bgp {{ node_var.routing.bgp.asn }}<br> . router-id {{ node_var.routing.bgp.router_id }}<br> .{% if node_var.routing.bgp.as_path_relax %}<br> . bgp bestpath as-path multipath-relax<br> .{% endif %}<br> . !<br> .{% for nei in node_var.routing.bgp.neighbors %}<br> . neighbor {{ nei.peer_ip }} remote-as {{ nei.peer_asn }}<br> . neighbor {{ nei.peer_ip }} timers 5 15<br> . neighbor {{ nei.peer_ip }} password {{ nei.password }}<br> .{% if nei.ebgp_multihop != "not_defined" %}<br> . neighbor {{ nei.peer_ip }} ebgp-multihop {{ nei.ebgp_multihop }}<br> .{% endif %}<br> .{% if nei.update_source != "not_defined" %}<br> . neighbor {{ nei.peer_ip }} update-source {{ nei.update_source }}<br> .{% endif %}<br> .{% if nei.ipv4 %}<br> . !<br> . address-family ipv4<br> . neighbor {{ nei.peer_ip }} activate<br> . !<br> .{% else %}<br> . !<br> . address-family ipv4<br> . no neighbor {{ nei.peer_ip }} activate<br> . !<br> .{% endif %}<br> .{% if nei.evpn %}<br> . neighbor {{ nei.peer_ip }} send-community extended<br> . !<br> . address-family evpn<br> . neighbor {{ nei.peer_ip }} activate<br> . !<br> .{% else %}<br> . !<br> . address-family evpn<br> . no neighbor {{ nei.peer_ip }} activate<br> . !<br> .{% endif %}<br> .{% endfor %}<br> . address-family ipv4<br> . network {{ node_var.interfaces[0].ipv4 }}<br> . !<br> .exit<br> .{% endif %}<br> |
In the BGP template we define some basic parameters (like ASN and router id) and then, based on the neighbour parameters, we configure them and activate for corresponding address families. One tweak I added for future, the whole this part configured only if BGP is configured, otherwise the whole template will be skipped. If we’d like to have any other underlay routing protocol, we can easily extend the template.
#3. Creating files with tasks
When the variables and templates are defined, we just need to put them together for execution it tasks’ files. To make things more manageable, I will create configuration-specific files in addition to “main.yml”. But first of all, let’s start with “main.yml” itself:
1 2 3 4 5 6 7 8 9 10 11 12 13 14 15 16 17 18 19 20 | <br> .[aaa@sandbox tasks]$ pwd<br> ./home/aaa/ansible/roles/arista/122_lab/tasks<br> .[aaa@sandbox tasks]$ ls -l<br> .total 12<br> .-rwxr-xr-x. 1 aaa aaa 416 May 20 19:38 configure_bgp.yml<br> .-rwxr-xr-x. 1 aaa aaa 433 May 20 18:59 .configure_interfaces.yml<br> .-rwxr-xr-x. 1 aaa aaa 236 May 20 19:08 main.yml<br> .[aaa@sandbox tasks]$ cat main.yml<br> .---<br> .- name: IMPORTING TASK-SPECIFIC DATA<br> . include_vars:<br> . file: "{{ inventory_hostname }}.yml"<br> .<br> .- name: CONFIGURING INTERFACES<br> . include_tasks: configure_interfaces.yml<br> .<br> .- name: CONFIGURING BGP<br> . include_tasks: configure_bgp.yml<br> ....<br> |
In the main file with tasks we only import variable and call the specific configuration sub tasks. These configuration subtasks are almost identical:
1 2 3 4 5 6 7 8 9 10 11 12 13 14 15 16 17 18 19 20 21 22 23 24 25 26 27 28 29 30 31 32 33 34 35 36 37 38 39 | <br> .[aaa@sandbox tasks]$ cat configure_interfaces.yml<br> .---<br> .- name: CREATING TEMPORARY CONFIG FILE // INTERFACES<br> . template:<br> . src: iface.j2<br> . dest: /tmp/{{ inventory_hostname }}_iface.conf<br> .<br> .- name: APPLYING CONFIGURATION TO DEVICE // INTERFACES<br> . eos_config:<br> . match: none<br> . src: /tmp/{{ inventory_hostname }}_iface.conf<br> . save_when: modified<br> .<br> .- name: DELETING TEMPORARY CONFIG FILE // INTERFACES<br> . file:<br> . path: /tmp/{{ inventory_hostname }}_iface.conf<br> . state: absent<br> ....<br> !<br> !<br> .[aaa@sandbox tasks]$ cat configure_bgp.yml<br> .---<br> .- name: CREATING TEMPORARY CONFIG FILE // ROUTING<br> . template:<br> . src: bgp.j2<br> . dest: /tmp/{{ inventory_hostname }}_bgp.conf<br> .<br> .- name: APPLYING CONFIGURATION TO DEVICE // ROUTING<br> . eos_config:<br> . match: none<br> . src: /tmp/{{ inventory_hostname }}_bgp.conf<br> . save_when: modified<br> .<br> .- name: DELETING TEMPORARY CONFIG FILE // ROUTING<br> . file:<br> . path: /tmp/{{ inventory_hostname }}_bgp.conf<br> . state: absent<br> ....<br> |
Frankly speaking, they are absolutely identical. What differs is the template now and name of the temporary file to store config. They logic is very straightforward:
- Create temporary configuration file based on template and variables
- Update the configuration of the network element
- Delete temporary file
Let’s review how our automation works
Verification
There is the single way to verify if your automation is working: test it. So, we just launch this Ansible role and check the vEOS2 data centre leaf based on Arista EOS afterwards:
1 2 3 4 5 6 7 8 9 10 11 12 13 14 15 16 17 18 19 20 21 22 23 24 25 26 27 28 29 30 31 32 33 34 35 36 37 38 39 40 | <br> .[aaa@sandbox ansible]$ ansible-playbook 122_lab.yml<br> .<br> .PLAY [arista] ******************************************************************<br> .<br> .TASK [Gathering Facts] *********************************************************<br> .fatal: [vEOS1]: FAILED! => {"msg": "[Errno None] Unable to connect to port 22 on 192.168.44.81"}<br> ok: [vEOS2]<br> .<br> .TASK [arista/122_lab : IMPORTING TASK-SPECIFIC DATA] ***************************<br> .ok: [vEOS2]<br> .<br> .TASK [arista/122_lab : CONFIGURING INTERFACES] *********************************<br> .included: /home/aaa/ansible/roles/arista/122_lab/tasks/configure_interfaces.yml for vEOS2<br> .<br> .TASK [arista/122_lab : CREATING TEMPORARY CONFIG FILE // INTERFACES] ***********<br> .changed: [vEOS2]<br> .<br> .TASK [arista/122_lab : APPLYING CONFIGURATION TO DEVICE // INTERFACES] *********<br> .changed: [vEOS2]<br> .<br> .TASK [arista/122_lab : DELETING TEMPORARY CONFIG FILE // INTERFACES] ***********<br> .changed: [vEOS2]<br> .<br> .TASK [arista/122_lab : CONFIGURING BGP] ****************************************<br> .included: /home/aaa/ansible/roles/arista/122_lab/tasks/configure_bgp.yml for vEOS2<br> .<br> .TASK [arista/122_lab : CREATING TEMPORARY CONFIG FILE // ROUTING] **************<br> .changed: [vEOS2]<br> .<br> .TASK [arista/122_lab : APPLYING CONFIGURATION TO DEVICE // ROUTING] ************<br> .changed: [vEOS2]<br> .<br> .TASK [arista/122_lab : DELETING TEMPORARY CONFIG FILE // ROUTING] **************<br> .changed: [vEOS2]<br> . to retry, use: --limit @/home/aaa/ansible/122_lab.retry<br> .<br> .PLAY RECAP *********************************************************************<br> .vEOS1 : ok=0 changed=0 unreachable=0 failed=1<br> .vEOS2 : ok=10 changed=6 unreachable=0 failed=0<br> |
Don’t pay attention to vEOS1 failures, as it isn’t launched
After the configuration is applied, we review the configuration file from vEOS2 (in the Ansible playbook, we have mentioned that config should we saved if modified, that’s why we check the startup-config):
1 2 3 4 5 6 7 8 9 10 11 12 13 14 15 16 17 18 19 20 21 22 23 24 25 26 27 28 29 30 31 32 33 34 35 36 37 38 39 40 41 42 43 44 45 46 47 48 49 50 51 52 53 54 55 56 57 58 59 60 61 62 63 64 65 66 67 68 69 70 71 72 73 74 75 76 77 78 79 80 81 82 83 84 85 86 87 88 89 90 91 92 93 94 95 96 97 98 99 100 | <br> .vEOS2#show startup-config<br> .! Command: show startup-config<br> .! Startup-config last modified at Sun May 20 22:54:00 2018 by aaa<br> .! device: vEOS2 (vEOS, EOS-4.20.1F)<br> .!<br> .! boot system flash:/vEOS-lab.swi<br> .!<br> .transceiver qsfp default-mode 4x10G<br> .!<br> .service routing protocols model multi-agent<br> .!<br> .logging console debugging<br> .!<br> .hostname vEOS2<br> .!<br> .spanning-tree mode mstp<br> .!<br> .no aaa root<br> .!<br> .username aaa privilege 15 secret sha512 $6$FVYaM.FQCFKZcbT8$Mp.ru.eKEqDGCZTecqzCLQPcf1ns0GBuJ0d3Y2eTs5457jHh5nFQkZ.eHxHy4Kuw3lUeahArRklizxzGEKSPq0<br> .!<br> .vrf definition mgmt<br> .!<br> .interface Ethernet1<br> . no switchport<br> .!<br> .interface Ethernet1.12<br> . logging event link-status<br> . encapsulation dot1q vlan 12<br> . ip address 10.11.22.22/24<br> . ipv6 address fc00::10:11:22:22/112<br> .!<br> .interface Ethernet1.23<br> . logging event link-status<br> . encapsulation dot1q vlan 23<br> . ip address 10.22.33.22/24<br> . ipv6 address fc00::10:22:33:22/112<br> .!<br> .interface Ethernet1.24<br> . logging event link-status<br> . encapsulation dot1q vlan 24<br> . ip address 10.22.44.22/24<br> . ipv6 address fc00::10:22:44:22/112<br> .!<br> .interface Ethernet2<br> .!<br> .interface Ethernet3<br> .!<br> .interface Loopback0<br> . logging event link-status<br> . ip address 10.0.0.22/32<br> . ipv6 address fc00::10:0:0:22/128<br> .!<br> .interface Management1<br> . vrf forwarding mgmt<br> . ip address 192.168.44.82/24<br> .!<br> .ip routing<br> .ip routing vrf mgmt<br> .!<br> .router bgp 65012<br> . router-id 10.0.0.22<br> . neighbor 10.0.0.11 remote-as 65011<br> . neighbor 10.0.0.11 update-source Loopback0<br> . neighbor 10.0.0.11 ebgp-multihop 5<br> . neighbor 10.0.0.11 timers 5 15<br> . neighbor 10.0.0.11 password 7 8Xbh/6JDYtBVMFZp5Rg2jw==<br> . neighbor 10.0.0.11 send-community extended<br> . neighbor 10.0.0.11 maximum-routes 12000<br> . neighbor 10.11.22.11 remote-as 65011<br> . neighbor 10.11.22.11 timers 5 15<br> . neighbor 10.11.22.11 password 7 nUxMAXN9N7Rhha91NYr6LA==<br> . neighbor 10.11.22.11 maximum-routes 12000<br> . neighbor 10.22.33.33 remote-as 65001<br> . neighbor 10.22.33.33 timers 5 15<br> . neighbor 10.22.33.33 password 7 UGzc2IyRG9lbnB4yCZcWzg==<br> . neighbor 10.22.33.33 maximum-routes 12000<br> . neighbor 10.22.44.44 remote-as 65002<br> . neighbor 10.22.44.44 timers 5 15<br> . neighbor 10.22.44.44 password 7 EbNvHEPAdc7fwCWEz1jbxQ==<br> . neighbor 10.22.44.44 maximum-routes 12000<br> . !<br> . address-family evpn<br> . neighbor 10.0.0.11 activate<br> . no neighbor 10.11.22.11 activate<br> . no neighbor 10.22.33.33 activate<br> . no neighbor 10.22.44.44 activate<br> . !<br> . address-family ipv4<br> . no neighbor 10.0.0.11 activate<br> . neighbor 10.11.22.11 activate<br> . neighbor 10.22.33.33 activate<br> . neighbor 10.22.44.44 activate<br> . network 10.0.0.22/32<br> .!<br> .management ssh<br> . vrf mgmt<br> .!<br> .end<br> |
Ansible playbook have been executed successfully, so our automation works!
Ansible roles and all other files we have created during this lab you will wind here: 122_lab.tar
Lessons learned
User guide for Arista EOS for Ansible has pointed me some possible solutions for problem with authentication in Cumulus Linux, which I have encountered and haven’t solves still. So, you never know which synergy effect we can achieve during troubleshooting of small things. It can be really big.
Another lesson learned is that we need to play with parameters of the Ansible modules. Used “eos_config” have failed many times, until I have added “match: none”. Though it was a best guess, it worked. So, try, try and try.
Conclusion
If you have seen some previous articles you might notice that I’m following more or less the same model all the time. I’m not saying it’s perfect, as I just don’t know that. But it’s actually the advantage of automation: we can just change the template from vendor A to vendor B and deploy new network element without changing the data model. For sure YANG gives even mode advantages (link), and we will try to step into really vendor-agnostic configuration model in the next article, when we’ll talk about OpenConfig. Take care and good bye!
Support us
P.S.
If you have further questions or you need help with your networks, I’m happy to assist you, just send me message. Also don’t forget to share the article on your social media, if you like it.
BR,
Anton Karneliuk