


Hello my friend,
There was a small pause with the blogposts caused by heavy load I had with the ongoing projects. However, I hope you enjoyed watching some videos I have prepared for you with the awesome guests. Today we are going to discuss some details about REST API using Digital Ocean NetBox and Docker as examples.
2
3
4
5
retrieval system, or transmitted in any form or by any
means, electronic, mechanical or photocopying, recording,
or otherwise, for commercial purposes without the
prior permission of the author.
Brief description
The REST API was already extensively used in my previous articles about the Data Centre Fabric project such as NetBox integration with the Infrastructure Enabler Stack, monitoring of the network infrastructure using Telegraf/InfluxDB/Grafana or closed-loop automation with Kapacitor. Nevertheless, we haven’t discussed how to work with the REST API itself.
In terms of using the Web applications, there are four main action types forming CRUD abbreviation:
- C – CREATE is an action type, which creates the entry within the application database.
- R – READ is an action type, which extract the existing information out of the application database.
- U – UPDATE is an action type, which modifies the existing data entry within the application database.
- D – DELETE is an action type, which removes the data entry from the database.
REST API operates over HTTPS, what means it uses HTTP request types. The following table allows you to understand, how CRUD relates to HTTP requests:
- CREATE – POST
- READ – GET
- UPDATE – PATCH / PUT
- DELETE – DELETE
As I typically avoid describing the theory, in this blogpost we’ll focus on the practical part, such as how to interact with the REST API using the most widely used tools and languages for the network automation nowadays (Ansible, Bash, Postman, and Python). Therefore, you will learn how to extract the data using the REST API from the application and how to set it.
What are we going to test?
In this article, you will learn how to use the GET request.
POST request will be covered in the next blogpost.
Though there are much more request types exist, dealing with these two will give you already good understanding and feeling how REST API works.
To put the context, Digital Ocean NetBox and Docker are the applications, which we will manage over the REST API.
Software version
The following software components are used in this lab.
Management host:
- CentOS 7.5.1804 with python 2.7.5
- Ansible 2.8.0
- Docker-CE 18.09
- Containerized NetBox
Enabler and monitoring infrastructure:
- Base Linux image for container: Alpine Linux 3.9
- DHCP: ISC DHCP 4.4.1-r2
- DNS: ISC BIND 9.12.3_p4-r2
- FTP: VSFTPD 3.0.3-r6
- HTTP: NGINX 1.14.2-r1
- InfluxData Telegraf: 1.10.3
- InfluxData TSDB: 1.7.6
- Grafana: 6.1.6
- InfluxData Kapacitor: 1.5.1
The Data Centre Fabric:
- Nokia SR OS 16.0.R7 [guest VNF]
- Arista EOS 4.21.1.1F [guest VNF]
- Cisco IOS XR 6.5.1 [guest VNF]
- Cumulus Linux 3.7.5 [guest VNF]
More details about Data Centre Fabric you may find in the previous articles.
Topology
As this article is about the communication between the applications and management of the applications, we’d focus only on the management topology:
2
3
4
5
6
7
8
9
10
11
12
13
14
15
16
17
18
19
20
21
22
23
24
25
26
27
28
29
30
31
| /\/\/\/\/\/\/\/\/\/\/\/\/\/\/\/\ |
| +-----------------+ +-----------------+ / +------+ +------+ Docker cloud \ |
| | de+bln+spine+101| (c)karneliuk.com // Data Centre Fabric | de+bln+spine+201| / |TELEG1| |TELEG2| +------+ \ |
| | (Cisco IOS XRv) | | (Nokia VSR) | \ +------+ +------+ +---+ DHCP | / |
| | Lo0: .1 | | system: .2 | / |.8 |.9 | .2+------+ \ |
| | BGP AS: 65000 | | BGP AS: 65000 | \ +-------------+ / |
| +-------+---------+ IP^4: 192.168.1.0/24 +--------+--------+ \ 172.17.0.0/16 | +------+ \ |
| | IPv6: fc00:de:1:ffff::/64 | \+------------+ +---+ DNS | / |
| | MgmtEth0/CPU0/0 | MgmtEth0/CPU0/0| Management +----+ .3+------+ \ |
| | .25/:25 | .26/:26 | host |.1 | / |
| | | +------+-----+ | +------+ \ |
| | | | \ +---+ FTP | / |
| | | | ens33\ | .4+------+ \ |
| +-------------------+--------------+---------------------------------+-------------+-------------------+---+ .137 \ | / |
| | | | | :137 / | +------+ \ |
| | | | | \ +---+ HTTP | / |
| | | | | \ | .5+------+ \ |
| | eth0 | eth0 | Management1 | Management1/ | / |
| | .21/:21 | .22/:22 | .23/:23 | .24/:24 \ | +------+ \ |
| | | | | / +---+INFLUX| / |
| +------------------+ +---------+--------+ +---------+--------+ +---------+--------+ \ | .6+------+ \ |
| | de+bln+leaf+111 | | de+bln+leaf+112 | | de+bln+leaf+211 | | de+bln+leaf+212 | / | / |
| | (Cumulus VX) | | (Cumulus VX) | | (Arista vEOS) | | (Arista vEOS) | \ | +------+ \ |
| | lo: .101 | | lo: .102 | | Lo0: .104 | | Lo0: .105 | / +---+GRAFAN| / |
| | BGP AS: 65101 | | BGP AS: 65102 | | BGP AS: 65104 | | BGP AS: 65105 | \ | .7+------+ \ |
| +------------------+ +------------------+ +------------------+ +------------------+ / | +------+ / |
| \ +---+KAPACI| \ |
| \ .10+------+ / |
| \/\/\/\/\/\/\/ |
+--------------------------------------------------------------------------------------------------------------------------------------------------+
You can use any hypervisor of your choice (KVM, VMWare Player/ESXI, etc) to run guest VNFs. For KVM you can use corresponding cheat sheet for VM creation.
We don’t touch the BGP IP fabric or any other part of the underlay/overlay topology itself.
The topologies and initial configuration files you can find on my GitHub.
Preparation of the applications
As said, we are going to use two separate applications: Digital Ocean NetBox and Docker. The reason for that is to show you, how flexible and poplar REST API is. You will also learn that REST API is equally awesome both in managing the infrastructure and particular applications.
In terms of NetBox, you need to look through one of the previous articles, where you can see the explanation of the REST API for this app. Basically, you just need to know the TCP port, where NetBox frontend operates:
2
8080/tcp -> 0.0.0.0:32768
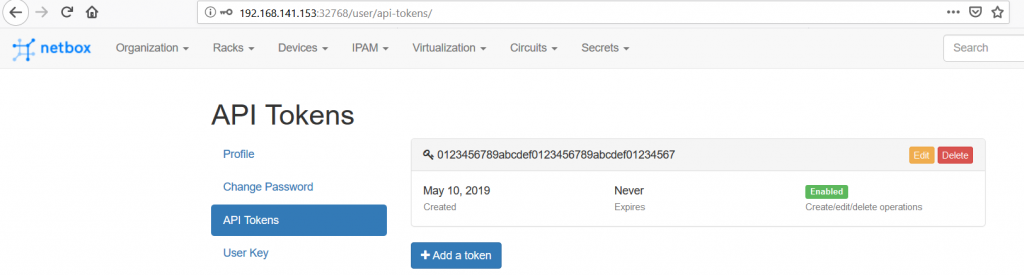
The crucial point here is to get the proper token, as the REST API is enabled by default:

For Docker, the situation is a bit different. By default, the REST API is not available and you need to configure it first within the Docker daemon configuration:
2
ExecStart=/usr/bin/dockerd -H tcp://0.0.0.0:2375 -H fd:// --containerd=/run/containerd/containerd.sock
The added configuration is “-H tcp://0.0.0.0:2375”, which instructs the daemon to expose the API over HTTP. Once it’s added, you need to restart the Docker daemon as follows:
2
$ sudo systemctl restart docker.service
After a couple of moments, you can check the status of the service as well:
2
3
4
5
6
7
8
9
10
11
12
13
14
15
16
17
18
19
20
21
22
● docker.service - Docker Application Container Engine
Loaded: loaded (/usr/lib/systemd/system/docker.service; disabled; vendor preset: disabled)
Active: active (running) since Thu 2019-07-11 07:56:40 CEST; 4s ago
Docs: https://docs.docker.com
Main PID: 5871 (dockerd)
Tasks: 10
Memory: 34.6M
CGroup: /system.slice/docker.service
└─5871 /usr/bin/dockerd -H tcp://0.0.0.0:2375 -H fd:// --containerd=/run/containerd/containerd.sock
Jul 11 07:56:39 sand9.karneliuk.com dockerd[5871]: time="2019-07-11T07:56:39.838840027+02:00" level=info msg="[graphdriver] using p...rlay2"
Jul 11 07:56:39 sand9.karneliuk.com dockerd[5871]: time="2019-07-11T07:56:39.857855813+02:00" level=info msg="Graph migration to co...conds"
Jul 11 07:56:39 sand9.karneliuk.com dockerd[5871]: time="2019-07-11T07:56:39.858783208+02:00" level=info msg="Loading containers: start."
Jul 11 07:56:40 sand9.karneliuk.com dockerd[5871]: time="2019-07-11T07:56:40.680352965+02:00" level=info msg="Default bridge (docke...dress"
Jul 11 07:56:40 sand9.karneliuk.com dockerd[5871]: time="2019-07-11T07:56:40.887947116+02:00" level=info msg="Loading containers: done."
Jul 11 07:56:40 sand9.karneliuk.com dockerd[5871]: time="2019-07-11T07:56:40.931262781+02:00" level=info msg="Docker daemon" commit...8.09.7
Jul 11 07:56:40 sand9.karneliuk.com dockerd[5871]: time="2019-07-11T07:56:40.931369875+02:00" level=info msg="Daemon has completed ...ation"
Jul 11 07:56:40 sand9.karneliuk.com dockerd[5871]: time="2019-07-11T07:56:40.945231728+02:00" level=info msg="API listen on /var/ru....sock"
Jul 11 07:56:40 sand9.karneliuk.com dockerd[5871]: time="2019-07-11T07:56:40.945276408+02:00" level=info msg="API listen on [::]:2375"
Jul 11 07:56:40 sand9.karneliuk.com systemd[1]: Started Docker Application Container Engine.
Hint: Some lines were ellipsized, use -l to show in full.
You can see that modified configuration are applied. You can also check that API is exposed within the Docker itself:
2
3
4
5
6
7
Containers: 15
! THE OUTPUT IS OMITTED
WARNING: API is accessible on http://0.0.0.0:2375 without encryption.
Access to the remote API is equivalent to root access on the host. Refer
to the 'Docker daemon attack surface' section in the documentation for
more information: https://docs.docker.com/engine/security/security/#docker-daemon-attack-surface
The warning is important, as it briefs you about the potential security issue. For the testing purposes, such a configuration is fine, but for the production environment, you would need SSL certificates and PKI to protect your environment.
#1. GET request with Ansible
Previously, we have used Ansible a lot in the Data Centre Fabric project, so it’s essential to start with Ansible the interaction with the REST API. Ansible has a specific module called uri, which is used for the management of the resources over HTTP, what is exactly the REST API case.
Let’s start with the easy example, which is acquiring the information from the Docker. It’s easy, because it doesn’t have an authorization mechanism, which the NetBox has. Hence, the GET request towards Docker has less headers. The following playbook intends to send GET request and then show the collected information:
2
3
4
5
6
7
8
9
10
11
12
13
14
15
16
17
18
19
20
21
22
23
24
25
26
27
---
- hosts: localhost
connection: local
gather_facts: no
# Setting vars for this App
vars:
destination_host: localhost
destination_port: 2375
# Running tasks
tasks:
- name: REST API CALL / GET
uri:
url: http://{{ destination_host }}:{{ destination_port }}/{{ resource_path }}
method: GET
register: rest_get
vars:
resource_path: info
- name: DEBUG / GOT INFO
debug:
msg: "{{ rest_get.json }}"
...
For more details about the Ansible read the Ansible basics, templates and roles articles.
The request itself consists of the resource path url and the method type. We also have two types of variables: global, which are applicable for all the tasks, and per-task. There are no particular advices; just use whatever makes sense for you. We save the output of the uri execution into register function, what creates new variable. In the second task we print collected info. Let’s launch this Ansible playbook:
2
3
4
5
6
7
8
9
10
11
12
13
14
15
16
17
18
19
20
21
22
23
24
25
26
27
28
29
30
31
32
33
34
35
36
37
38
39
40
41
42
43
44
45
46
47
48
49
50
51
52
53
54
55
56
57
58
59
60
61
62
63
64
65
66
67
68
69
70
71
72
73
74
75
76
77
78
79
80
81
82
83
84
85
86
87
88
89
90
91
92
93
94
95
96
97
98
99
100
101
102
103
104
105
106
107
108
109
110
111
112
113
114
115
116
117
118
119
120
121
122
123
124
125
126
127
128
129
130
131
132
133
134
135
136
137
138
139
140
141
142
143
144
145
146
147
148
149
150
PLAY [localhost] ********************************************
TASK [REST API CALL / GET] **********************************
ok: [localhost]
TASK [DEBUG / GOT INFO] *************************************
ok: [localhost] => {
"msg": {
"Architecture": "x86_64",
"BridgeNfIp6tables": true,
"BridgeNfIptables": true,
"CPUSet": true,
"CPUShares": true,
"CgroupDriver": "cgroupfs",
"ClusterAdvertise": "",
"ClusterStore": "",
"ContainerdCommit": {
"Expected": "894b81a4b802e4eb2a91d1ce216b8817763c29fb",
"ID": "894b81a4b802e4eb2a91d1ce216b8817763c29fb"
},
"Containers": 15,
"ContainersPaused": 0,
"ContainersRunning": 5,
"ContainersStopped": 10,
"CpuCfsPeriod": true,
"CpuCfsQuota": true,
"Debug": false,
"DefaultRuntime": "runc",
"DockerRootDir": "/var/lib/docker",
"Driver": "overlay2",
"DriverStatus": [
[
"Backing Filesystem",
"xfs"
],
[
"Supports d_type",
"true"
],
[
"Native Overlay Diff",
"true"
]
],
"ExperimentalBuild": false,
"GenericResources": null,
"HttpProxy": "",
"HttpsProxy": "",
"ID": "CWEW:3RTD:5L3H:3WCB:EYRM:2ECN:M2AS:DFVD:7SQG:JPBY:N5LS:WQIM",
"IPv4Forwarding": true,
"Images": 34,
"IndexServerAddress": "https://index.docker.io/v1/",
"InitBinary": "docker-init",
"InitCommit": {
"Expected": "fec3683",
"ID": "fec3683"
},
"Isolation": "",
"KernelMemory": true,
"KernelVersion": "3.10.0-957.21.3.el7.x86_64",
"Labels": [],
"LiveRestoreEnabled": false,
"LoggingDriver": "json-file",
"MemTotal": 10295980032,
"MemoryLimit": true,
"NCPU": 2,
"NEventsListener": 0,
"NFd": 63,
"NGoroutines": 72,
"Name": "sand9.karneliuk.com",
"NoProxy": "",
"OSType": "linux",
"OomKillDisable": true,
"OperatingSystem": "CentOS Linux 7 (Core)",
"Plugins": {
"Authorization": null,
"Log": [
"awslogs",
"fluentd",
"gcplogs",
"gelf",
"journald",
"json-file",
"local",
"logentries",
"splunk",
"syslog"
],
"Network": [
"bridge",
"host",
"macvlan",
"null",
"overlay"
],
"Volume": [
"local"
]
},
"ProductLicense": "Community Engine",
"RegistryConfig": {
"AllowNondistributableArtifactsCIDRs": [],
"AllowNondistributableArtifactsHostnames": [],
"IndexConfigs": {
"docker.io": {
"Mirrors": [],
"Name": "docker.io",
"Official": true,
"Secure": true
}
},
"InsecureRegistryCIDRs": [
"127.0.0.0/8"
],
"Mirrors": []
},
"RuncCommit": {
"Expected": "425e105d5a03fabd737a126ad93d62a9eeede87f",
"ID": "425e105d5a03fabd737a126ad93d62a9eeede87f"
},
"Runtimes": {
"runc": {
"path": "runc"
}
},
"SecurityOptions": [
"name=seccomp,profile=default"
],
"ServerVersion": "18.09.7",
"SwapLimit": true,
"Swarm": {
"ControlAvailable": false,
"Error": "",
"LocalNodeState": "inactive",
"NodeAddr": "",
"NodeID": "",
"RemoteManagers": null
},
"SystemStatus": null,
"SystemTime": "2019-07-11T18:00:55.036780312+02:00",
"Warnings": [
"WARNING: API is accessible on http://0.0.0.0:2375 without encryption.\n Access to the remote API is equivalent to root access on the host. Refer\n to the 'Docker daemon attack surface' section in the documentation for\n more information: https://docs.docker.com/engine/security/security/#docker-daemon-attack-surface"
]
}
}
PLAY RECAP **************************************************
localhost: ok=2 changed=0 unreachable=0 failed=0 skipped=0 rescued=0 ignored=0
ansible_hosts.yml is file with the Ansible hosts, which is necessary to run the playbook.
In the collected output, you see the information about the Docker in a JSON format. It provides absolutely the same information, as the docker info shell command. On the other hand, being a dictionary it gives you opportunity to take any particular key/value pair and use it further as you need.
Probably, the info is not the most exciting resource_path, so try to replace it with:
- images/json to see all available Docker images on the host (REST API analogue to docker image ls)
- containers/json?all=1 to see all ever created and not deleted Docker containers, even which are not running (REST API analogue to docker container ls –all)
If you do some lab tests alongside this lab yourself, you see how just the change of a single per-task variable resource_path significantly changes the collected information.
So far so good, and we can make a step further to add the authorization to the GET request using the token authorization, which is very popular these days in the web applications. Actually, the authorization is required on the application side, so we need to add it to the task as shown in the following snippet:
2
3
4
5
6
7
8
9
10
11
12
13
14
15
16
17
18
19
20
21
22
23
24
25
26
27
28
29
30
---
- hosts: localhost
connection: local
gather_facts: no
# Setting vars for this App
vars:
destination_host: localhost
destination_port: 32768
netbox_token: 0123456789abcdef0123456789abcdef01234567
# Running tasks
tasks:
- name: REST API CALL / GET
uri:
url: http://{{ destination_host }}:{{ destination_port }}/{{ resource_path }}
method: GET
headers:
Authorization: "Token {{ netbox_token }}"
register: rest_get
vars:
resource_path: api/dcim/devices/
- name: DEBUG / GOT INFO
debug:
msg: "{{ rest_get.json }}"
...
The token was provided earlier in this article.
The new part of the request is the headers. It could contain various details including Content-Type or, like in this case, Authorization. The authorization header contains the token value, needed to authenticate the call. If we execute this Ansible playbook, we got an information from the NetBox:
2
3
4
5
6
7
8
9
10
11
12
13
14
15
16
17
18
19
20
21
22
23
24
25
26
27
28
29
30
31
32
33
34
35
36
37
38
39
40
PLAY [localhost] *************************************************
TASK [REST API CALL / GET] ***************************************
ok: [localhost]
TASK [DEBUG / GOT INFO] **********************************************
ok: [localhost] => {
"msg": {
"count": 7,
"next": null,
"previous": null,
"results": [
{
"asset_tag": null,
"cluster": null,
"comments": "",
"created": "2019-05-11",
"custom_fields": {},
"device_role": {
"id": 2,
"name": "server oob",
"slug": "server-oob",
"url": "http://localhost:32768/api/dcim/device-roles/2/"
},
"device_type": {
"display_name": "HP ProLiant DL380 G6",
"id": 4,
"manufacturer": {
"id": 4,
"name": "HP",
"slug": "hp",
"url": "http://localhost:32768/api/dcim/manufacturers/4/"
},
"model": "ProLiant DL380 G6",
"slug": "proliant-dl380-g6",
"url": "http://localhost:32768/api/dcim/device-types/4/"
},
! FURTHER OUTPUT IS OMITTED
Such a piece of code is used in the Data Centre Fabric Enabler Stack (link) for the templating of the configuration files for the Docker containers and the network functions.
#2. GET request with Bash
The same two cases will be covered now in conjunction with Bash, which is the default automation language in Linux. In its body Bash relies on the Linux tools, and curl is one of the most popular and handy Linux tools to work with Web resources.
In the same way we’ve just did for Ansible, we start with the simplest GET request to the Docker. The Bash script will look like as follows:
2
3
4
5
6
7
8
9
10
11
12
#!/bin/bash
# Variables
URL=localhost
PORT=2375
METHOD=GET
RESOURCE=images/json
# BODY
RESULT=$(curl -X ${METHOD} ${URL}:${PORT}/${RESOURCE})
echo ${RESULT}
Its structure is very much the same, as it was in the Ansible. The core command curl gets variables with the request type and the path to the managed resource. The output of the command is stored to the variable, which is printed in the end. You might have spotted, that the RESOURCE is the image/json, not the info, as it was in the Ansible part. Let’s execute this Bash script:
2
3
4
5
6
$ ./rest_get.sh
% Total % Received % Xferd Average Speed Time Time Time Current
Dload Upload Total Spent Left Speed
100 5167 0 5167 0 0 335k 0 --:--:-- --:--:-- --:--:-- 360k
[{"Containers":-1,"Created":1557533223,"Id":"sha256:055936d3920576da37aa9bc460d70c5f212028bda1c08c0879aedf03d7a66ea1","Labels":null,"ParentId":"","RepoDigests":["alpine@sha256:769fddc7cc2f0a1c35abb2f91432e8beecf83916c421420e6a6da9f8975464b6"],"RepoTags":["alpine:latest"],"SharedSize":-1,"Size":5533135,"VirtualSize":5533135},{"Containers":-1,"Created":1557525846,"Id":"sha256:952b18a03e6b64e7477ccde5de2ae38260542fb5dc756ef51fb0cfe987e2a87f","Labels":{"NETBOX_DOCKER_PROJECT_VERSION":"snapshot","SRC_URL":"https://github.com/digitalocean/netbox/archive/master.tar.gz"},"ParentId":"sha256:c976728eb5cae73e9e1bb921bf829eccfca76d5835c65a6497d0815e4331a1f9","RepoDigests":null,"RepoTags":["netboxcommunity/netbox:latest"],"SharedSize":-1,"Size":527241055,"VirtualSize":527241055},{"Containers":-1,"Created":1557301181,"Id":"sha256:fe8df18c6c19a7c6679b2e4c4e0de47ec5215bd77b5fe2cabe43d181642c65b2","Labels":null,"ParentId":"","RepoDigests":["telegraf@sha256:d0c8630602cf85c5cba47903516c35d3f3d27d99f2e230c3c4a7e12ac0c37965"]
The output is provided in the same manner, with the small difference: it isn’t split per line.
The next step is to extend the Bash script to include the Authorization header to curl:
2
3
4
5
6
7
8
9
10
11
12
13
#!/bin/bash
# Variables
URL=localhost
PORT=32768
METHOD=GET
RESOURCE=api/dcim/devices/
TOKEN=0123456789abcdef0123456789abcdef01234567
# BODY
RESULT=$(curl -X ${METHOD} ${URL}:${PORT}/${RESOURCE} --header "Authorization: Token ${TOKEN}")
echo ${RESULT}
In curl the header is added using the –header keyword followed by the argument value. The rest of the script is the same, as the previous one. The output of its execution looks as follows:
2
3
4
5
6
% Total % Received % Xferd Average Speed Time Time Time Current
Dload Upload Total Spent Left Speed
100 10945 100 10945 0 0 117k 0 --:--:-- --:--:-- --:--:-- 117k
{"count":7,"next":null,"previous":null,"results":[{"id":8,"name":"de-bln-infra-srv","display_name":"de-bln-infra-srv","device_type":{"id":4,"url":"http://localhost:32768/api/dcim/device-types/4/","manufacturer":{"id":4,"url":"http://localhost:32768/api/dcim/manufacturers/4/","name":"HP","slug":"hp"},"model":"ProLiant DL380 G6","slug":"proliant-dl380-g6","display_name":"HP ProLiant DL380 G6"},"device_role":{"id":2,"url":"http://localhost:32768/api/dcim/device-roles/2/","
! FURTHER OUTPUT IS OMITTED
There are further possibilities, how to convert collected JSON dictionary to Bash associative array.
Once you understand the logic, how the GET request looks like and what should be included, it’s matter to find the proper syntax, isn’t it? Let’s go further to fix the result!
#3. GET request with Postman
Postman is one of the most popular REST API developer tools. Probably, it is the most popular one. It doesn’t give you opportunity to automate in terms of building scripts, where you collect data over the REST API and then utilize it. However, it provides you opportunity to explore the output of the GET commands as well as to test any other request type (POST, PATCH, PUT, DELETE, etc) and check the behaviour of the app.
Typically, the development process flows in the way, that you test all you REST calls with the Postman, and then implement them in Ansible/Bash/Python for automation.
The Postman is a GUI tool, so you need to have a terminal, which provides you GUI (not only CLI). On the other hand, it connects to the application over HTTP or HTTPS, hence your development host with the Postman could be anywhere.
Following the approach we had in two previous points, let’s start with the simplest request towards the Docker REST API:


In this example, we execute GET request towards the URL of the Docker REST API. The Postman interfaces is relatively simple: you provide request type and URL. Optionally you can provide authorization, headers and body, if you need them. In the bottom part of the pane, you can see the response message, what is the primary focus for GET responses.
There is an opportunity to use variables in Postman as well. To do that, we need to utilize the concept of environment. First of all, we create the environment (set of variables):

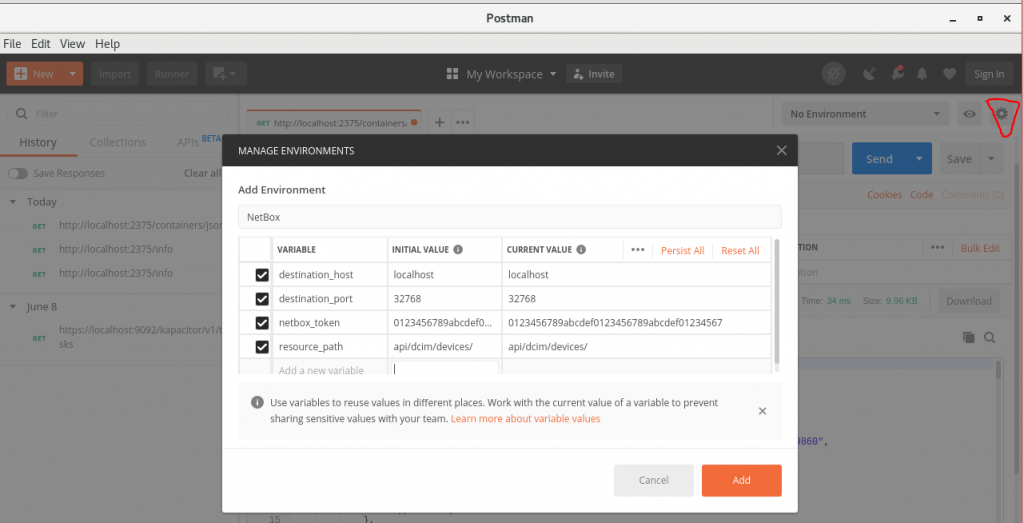
Once the environment is created, it must be applied using drop-down menu:


The concept of the environment is fairly the same as we had earlier for variables inside the Bash or Ansible. Now we can construct the resource path for the NetBox app including the proper authorization headers using created variables:

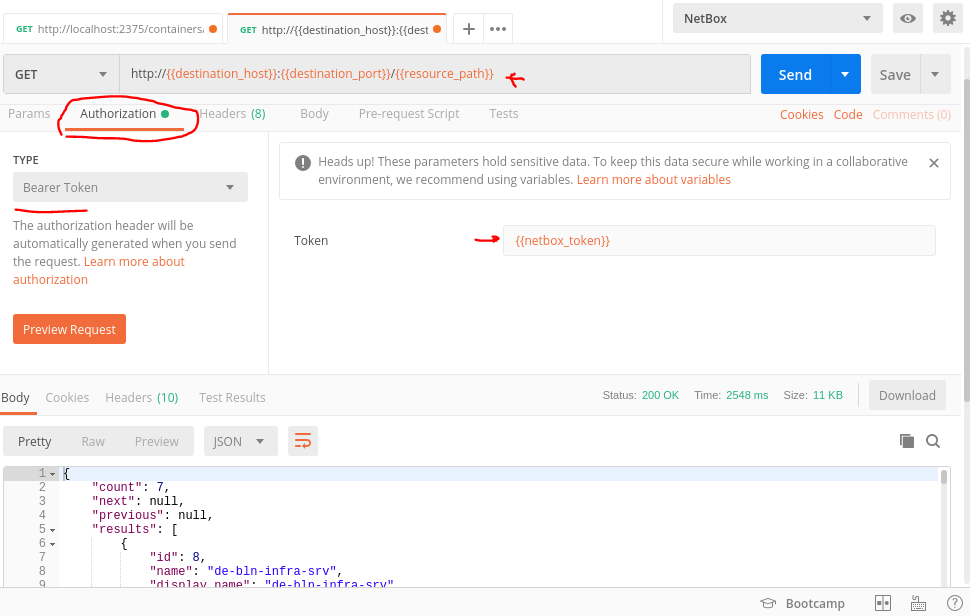
The URL now looks pretty the same as in the Ansible/Bash scripts. What is important here, there is an Authorization tab, where you can provide the relevant information. It automatically generates the proper authorization header for the GET request.
After you have sent the request, you see the output provided in the bottom part of the screen. This JSON output is always provided in a structured format, what makes it really useful for development of further automation scripts, as you can discover the dictionary/list content and hierarchy.
#4. GET request with Python
Finally, we got to the most powerful language for the network automation; hence, it is very important and useful for our current article about REST API. Python is used today in many applications, because it’s very flexible and very fast. Once you learn how it works. You can do whatever you like with your network or IT infrastructure, in whatever way you need.
Much in the same way like Ansible relies on the modules, Python relies on its modules or libraries. There are many various general or specific ones, but for this task we need to have just one called requests, which is responsible for HTTP requests.
To cover the case with the simple GET request with the Python, we would use the following script:
2
3
4
5
6
7
8
9
10
11
12
13
14
15
16
17
18
19
20
21
22
# Modules
import requests
# Varibles
destination_url = 'localhost'
destination_port = 2375
resource_path = 'info'
# Functions
def rest_api_get(active_url, active_port, active_resource):
resource_path = "http://%s:%s/%s" % (active_url, active_port, active_resource)
rest_response = requests.get(url=resource_path)
return rest_response.json()
# Body
if __name__ == '__main__':
reply = rest_api_get(destination_url, destination_port, resource_path)
print(reply)
What we do here, we just import the necessary library (requests), define variables and create a function, which relies on the requests for its operation. The key component is this created function called rest_api_get. Within it we create a full URL using three variables, then we call requests.get function from the imported module and returns the response of the execution.
Let’s execute this Python script:
2
3
{'ID': 'CWEW:3RTD:5L3H:3WCB:EYRM:2ECN:M2AS:DFVD:7SQG:JPBY:N5LS:WQIM', 'Containers': 15, 'ContainersRunning': 5, 'ContainersPaused': 0, 'ContainersStopped': 10, 'Images': 34, 'Driver': 'overlay2', 'DriverStatus': [['Backing Filesystem', 'xfs'], ['Supports d_type', 'true'], ['Native Overlay Diff', 'true']],
! FURTHER OUTPUT IS OMITTED FOR BREVITY
Though you see this output for the 4th time in this blogpost, you get it from the other angle that is the Python angle. You can further use keys directly out of this JSON dictionary in your further applications.
The next step is to improve the Python script to accommodate the Authorization header, what is needed to access the NetBox. The updated script looks like as follows:
2
3
4
5
6
7
8
9
10
11
12
13
14
15
16
17
18
19
20
21
22
23
24
25
# Modules
import requests
# Varibles
destination_url = 'localhost'
destination_port = 32768
resource_path = 'api/dcim/devices/'
netbox_token = '0123456789abcdef0123456789abcdef01234567'
# Functions
def rest_api_get(active_url, active_port, active_resource, active_token):
resource_path = "http://%s:%s/%s" % (active_url, active_port, active_resource)
authorization_header = {'Authorization': 'Token %s' % active_token}
rest_response = requests.get(url=resource_path, headers=authorization_header)
return rest_response.json()
# Body
if __name__ == '__main__':
reply = rest_api_get(destination_url, destination_port, resource_path, netbox_token)
print(reply)
As usual, you see the additional variable with the netbox_token value. The call requests.get is extended with the headers variable, which contains the authorization information. The rest is the same in this Python script. So, let’s launch it to see the results:
2
3
{'count': 7, 'next': None, 'previous': None, 'results': [{'id': 8, 'name': 'de-bln-infra-srv', 'display_name': 'de-bln-infra-srv', 'device_type': {'id': 4, 'url': 'http://localhost:32768/api/dcim/device-types/4/', 'manufacturer':
! FURTHER OUTPUT IS OMITTED
The output should be pretty familiar to you as you see it the 4th time already.
All the provided Python/Bash scripts and Ansible playbooks you can find on my GitHub page.

Lessons learned
The idea to show you various approaches to work with REST API come to me, when I was developing some recent applications. The point is that there are no good or bad tools: everything depends on the context. I’m using Postman or curl (with or without Bash), when I develop the applications. On the other hand, Ansible/Python is used in the production deployment of the network automation.
Conclusion
“All you need is a REST” can the one say, rephrasing the famous song. The REST API is one of the most widely used APIs these days and it’s actively used in the network automation and programmability. In the following posts you will learn about some other REST API request types as well as other features. Take care and good bye!
Support us
P.S.
If you have further questions or you need help with your networks, I’m happy to assist you, just send me message. Also don’t forget to share the article on your social media, if you like it.
BR,
Anton Karneliuk