

Hello my friend,
The visualisation of the network graph is an important part of the network development and management, but we need to move on. Today we will focus on the configuration for Microsoft SONiC running as Docker containers.
2
3
4
5
retrieval system, or transmitted in any form or by any
means, electronic, mechanical or photocopying, recording,
or otherwise, for commercial purposes without the
prior permission of the author.
Network automation training – boost your career
To be able to understand and, more important, to create such a solutions, you need to have a holistic knowledge about the network automation. Come to our network automation training to get this knowledge and skills.
At this training we teach you all the necessary concepts such as YANG data modelling, working with JSON/YAML/XML data formats, Linux administration basics, programming in Bash/Ansible/Python for multiple network operation systems including Cisco IOS XR, Nokia SR OS, Arista EOS and Cumulus Linux. All the most useful things such as NETCONF, REST API, OpenConfig and many others are there. Don’t miss the opportunity to improve your career.
Brief description
As we pointed out in one of the previous blogposts from the Hyper Scale series, one of the ideas for this project is to automatically generate the network with the necessary amount of the network element (switches and servers) interconnected with each other following the certain topology rules. In this context the generation of the network consist of the several steps. Based on the developed network graph, we are going to:
- Create the configuration files used by the containerised or virtualised network functions.
- Create the Linux bridges with will be used for point-to-point links between the network functions.
- Launch the network functions and make sure they are working properly.
Earlier we already followed these steps manually, but this time we want to implement them automatically. Therefore, we split these steps in two chunks, what will allows us to focus on them separately. Today we will focus on the generation of the configuration files.
As you have seen earlier, the configuration files are either the JSON files for config_db or the text for Quagga/FRR. They are used by the Docker containers with the Microsoft Azure SONiC at the time they boot, so we can prepare them in advance of the topology launch. As such, we can easily template them using the Jinja2.
What are we going to test?
Jinja2 and its usage by the Python 3.8 is in focus today, as well as further work with the data centre graph:
- Create a data structure out of the network graph, which can be used by the Jinja2 to template the configuration files.
- Generate the configuration files for each network function using Jinja2 and the data structure created out of the network graph.
Software version
By this series, we continue the development of the solution in the Python 3.8 leveraging the topics covered in the Code EXpress (CEX) series.
Each session we are adding more Python libraries, hence we added the Jinja2 today:
- CentOS 7.7.1908
- Bash 4.2.26
- Python 3.8.2
- Docker-CE 19.03.8
- Graphviz 2.30.1
- NetworkX 2.4
- Jinja2 2.11.2
Topology
So far our topology is stabilised and we are using the network topology graph created by NetworkX and Graphviz the last time:

On the GitHub you can take a look on the file in the full size, as it is exceptionally huge. The graph so far contains the information about:
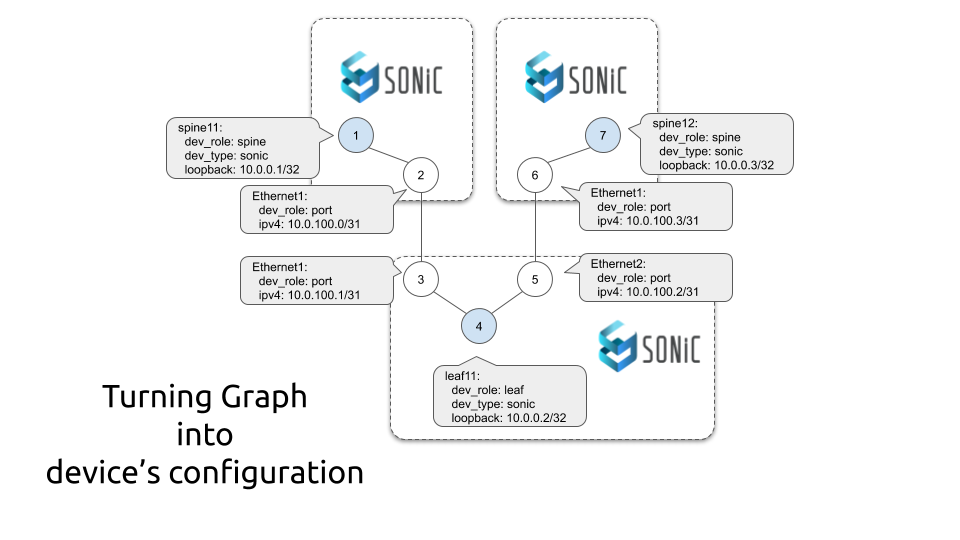
- devices’ hostnames, loopback IP addresses and BGP AS numbers
- devices’ interfaces and their ip addresses
- interconnections between the devices and interfaces
If you are interested in the full code, you are welcome to take a look at the code in our GitHub repository.
Solution development
First of all let’s take a look on the files structure which we need to create for each Docker container with the Microsoft Azure SONiC on top:
2
3
4
5
6
7
8
9
10
11
12
13
14
+--sonic_hostname
+--etc
| +--config_db
| | +--vlan_config.json
| +--quagga
| | +--bgpd.conf
| | +--daemons
| | +--zebra.conf
| +--swss
| +--config.d
| +--00-copp.config.json
+--scripts
+--startup.sh
There are some files, which have a static content from the standpoint of our lab:
- daemons
- zebra.conf
- 00-copp.config.json
Therefore, we need just to copy them to the target directory and that’s it. However, there are also other files, which content is dynamic:
- vlan_config.json
- bgpd.conf
- startup.sh
These files should be generated using the Jinja2 templates as they will reflect the network graph (e.g. IP addresses, connections, BGP AS numbers, etc).
#1. Modification of the primitives and templates
To start solving the task, we need find out where we will store the templates and how we can call them.
In the previous post we have created a new concept named primitives. In a nutshell, the primitives contains the vendor-specific information such as the name of the interfaces, IDs and so on. The templates are also vendor-specific; therefore, we can use these files to store the information about the templates:
2
3
4
5
6
7
8
9
10
11
12
13
14
15
16
17
18
19
20
21
22
23
24
25
---
iface:
name: Ethernet
start: 0
templates:
- source: 00-copp.config.json
destination: etc/swss/config.d
type: static
- source: zebra.conf
destination: etc/quagga
type: static
- source: daemons
destination: etc/quagga
type: static
- source: bgpd.conf.j2
destination: etc/quagga
type: dynamic
- source: vlan_config.json.j2
destination: etc/config_db
type: dynamic
- source: startup.sh.j2
destination: scripts
type: dynamic
...
As potentially there might be any number of the templates associated with the network function, we create a list structure. Once converted into the Python’s list, it will give us opportunity to easily process it using for-loop code flow control. Each template’s entry has the following information:
- source contains the source filename;
- destination instructs the processing, where the is the final file should be put into;
- type highlights, whether the template is static or dynamic.
Assuming that each vendor might have their own templates, we expand the primitives directory in a way it contains the templates as well:
2
3
4
5
6
7
8
9
+--vendor_a.yaml
+--vendor_b.yaml
+--templates
+--vendor_a
| +--template1.j2
| +--template2.j2
+--vendor_b
+--template1.j2
This approach allows us separate the generic primitive’s information from the templates, so that we can create or not the templates based the network function need.
The content of the templates is shown later on in this blogpost.
#2. Building a data structure for the Jinja2 templates out of the network graph
All the details needed for the network provisioning are contained in the graph created in the NetworkX. The Jinja2 can’t work with the graphs directly, though it can work with the Python’s variables, lists and dictionaries. Therefore, we will create a temporary object containing all the information. As this information is in the vendor-independent format, we thought to extend the main.py Python 3.8 script with the functionality to generate such a data
Later we will add support for other containerised and virtualised network functions from other vendors.
Just right after we complete the generation of the Graph in NetworkX and before the visualisation in Graphviz, we add the config build step:
2
3
4
5
6
7
8
9
10
11
12
13
14
15
16
17
18
19
20
21
22
23
24
25
26
27
28
29
30
31
32
33
34
35
36
37
38
39
40
41
42
43
44
45
46
47
48
49
#!/usr/bin/env python
# Modules
from bin.localfunctions import *
import networkx
import netaddr
import os
import re
import jinja2
! Some information is truncated for brevity
# Building the lab topology
for node_entry in DG.nodes.data():
if node_entry[1]['dev_type'] != 'port':
templating_data = {}
templating_data['hostname'] = node_entry[0]
templating_data['general'] = node_entry[1]
# Creating list of the interfaces
templating_data['interfaces'] = []
for port_entry in DG.adj[node_entry[0]]:
port_dict = DG.nodes[port_entry]
if node_entry[1]['dev_type'] == 'microsoft-sonic':
port_id = 10 + int(re.sub(f'{primitives[node_entry[1]["dev_type"]]["iface"]["name"]}','', port_dict['label'].split('\n')[0]))
port_dict['vlan'] = port_id
for connected_item in DG.adj[port_entry]:
for abc in DG.adj[connected_item].items():
if abc[1]['phy'] == 'wire':
if abc[1]['role'] == 'customer':
port_dict['customer'] = True
elif abc[1]['role'] == 'dc':
port_dict['customer'] = False
for nested_abc in DG.adj[abc[0]].items():
if nested_abc[1]['phy'] == 'wire':
port_dict['bgp_peer'] = DG.nodes[nested_abc[0]]['ipv4'].split('/')[0]
for nested_nested_abc in DG.adj[nested_abc[0]].items():
if nested_nested_abc[1]['phy'] == 'port':
port_dict['bgp_asn'] = DG.nodes[nested_nested_abc[0]]['bgp_asn']
templating_data['interfaces'].append(port_dict)
! Further information is truncated for brevity
Using the methods we have to work with the Graph in NetworkX, we collect the information about the nodes and edges and store them in the Python’s dictionary, which will be later on used in Jinja2 templates:
- We run the collection of the attributes needed for Jinja2 templates for all the nodes using for-loop. Then we filter all interfaces out using if-conditional, so that we have only the network functions’ nodes.
- The for-loop is run over the Graph.nodes.data(), what allows us to collect the attributes associated with those nodes.
- The outcome of that command is a tuple, where the first element is the node’s id and the second its attribute.
- We save both these elements into a new dictionary templating_data, which will be used later on in the Jinja2.
- Using the method Graph.adj[node_id] we collect the information about the nodes connected to node_id and the attributes of the associated edges in the format of the tuple (connected_node, {edge_attributes}).
- For microsoft-sonic device-type we create a VLAN id. It is sort of hack to make it properly working.
- Using multiple nested Graph.nodes(node_id) and Graph.adj(node_id) calls controlled by for-loop and if-conditional Python code flow control, we augment the dictionary templating_data with the information about the interfaces, and connected BGP peers or customers.
As you might spot, some variables have weird names, such as abc, nested_abc and nested_nested_abc. At that point my creativity has run away, so I’ve just added some random easy names.
#3. Creating configuration files for Microsoft Azure SONiC using Jinja2
The previous part was the most complex one in this blogpost. Because, once the data structure is built, we can perform the templating of the configuration for the Microsoft Azure SONiC Docker containers.
The Python’s code is simple. Just right after the previous code we insert this snippet :
2
3
4
5
6
7
8
9
10
11
12
13
14
15
16
17
18
19
20
21
22
23
! Some output is truncated for brevity
# Templating the configuration files
if not os.path.exists(f'{path_infra}/{node_entry[0]}'):
os.makedirs(f'{path_infra}/{node_entry[0]}')
if primitives[node_entry[1]['dev_type']]['templates']:
for temp_entry in primitives[node_entry[1]['dev_type']]['templates']:
if not os.path.exists(f'{path_infra}/{node_entry[0]}/{temp_entry["destination"]}'):
os.makedirs(f'{path_infra}/{node_entry[0]}/{temp_entry["destination"]}')
if temp_entry['type'] == 'static':
os.popen(f'cp primitives/templates/{node_entry[1]["dev_type"]}/{temp_entry["source"]} {path_infra}/{node_entry[0]}/{temp_entry["destination"]}/{temp_entry["source"]}')
elif temp_entry['type'] == 'dynamic':
with open(f'{path_primitives}/templates/{node_entry[1]["dev_type"]}/{temp_entry["source"]}', 'r') as template_file:
template = jinja2.Template(template_file.read())
with open(f'{path_infra}/{node_entry[0]}/{temp_entry["destination"]}/{re.sub(".j2", "", temp_entry["source"])}', 'w') as target_config:
target_config.write(template.render(temp_data=templating_data))
! Further output is truncated for brevity
In the provided piece of the Python’s code:
- We create a directory with the network function’s hostname in the infrastructure directory.
- Then we check if there are any templates associated with this vendor.
- If yes, then we create a destination folder based on the logic shared in the 1st paragraph.
- For the static template’s type, we just copy the original file from the primitives/templates/vendor/ directory to the infrastructure/node_hostname/{destination}/ using Python’s os built-in package. We can use something more suitable such as shutil.copy(), but we already used os package to create the directories, so we continue using it.
- For the dynamic template’s type, we open the Jinja2 template from the primitives/templates/vendor/ directory and using the templating_data dictionary render the configuration into the infrastructure/node_hostname/{destination}/.
The described logic is straightforward; however, you might need to spend some time studying the structure of the paths, as they are created using the formatted-string and contains lots of variables.
The core component in the templating is, obviously, the template itself. Let’s take a look on the one by one. The config_db template is:
2
3
4
5
6
7
8
9
10
11
12
13
14
15
16
17
18
19
20
21
22
23
24
25
26
27
28
{
"VLAN": {
{%- for iface_entry in temp_data.interfaces %}
{%- if loop.index0 > 0 %},{% endif %}
"Vlan{{ iface_entry.vlan }}": {
"members": [
"{{ iface_entry.dev_name }}"
],
"vlanid": "{{ iface_entry.vlan }}"
}
{%- endfor %}
},
"VLAN_MEMBER": {
{%- for iface_entry in temp_data.interfaces %}
{%- if loop.index0 > 0 %},{% endif %}
"Vlan{{ iface_entry.vlan }}|{{ iface_entry.dev_name }}": {
"tagging_mode": "untagged"
}
{%- endfor %}
},
"VLAN_INTERFACE": {
{%- for iface_entry in temp_data.interfaces %}
{%- if loop.index0 > 0 %},{% endif %}
"Vlan{{ iface_entry.vlan }}|{{ iface_entry.ipv4 }}": {}
{%- endfor %}
}
}
In a nutshell, we generate there the VLAN/Interface mapping and associate the IP addresses with the VLANs for each interfaces we have generated in our network graph.
Take a look in the first blogpost in the series for the explanation of the file resulting content.
The bgpd.conf template is:
2
3
4
5
6
7
8
9
10
11
12
13
14
15
16
17
18
19
20
21
22
23
24
25
hostname bgpd
password zebra
enable password zebra
log file /var/log/quagga/bgpd.log
!
router bgp {{ temp_data.general.bgp_asn }}
bgp router-id {{ temp_data.general.loopback.split('/')[0] }}
bgp bestpath as-path multipath-relax
{%- for iface_entry in temp_data.interfaces %}
{%- if iface_entry.customer is defined and iface_entry.customer %}
network {{ iface_entry.ipv4 }}
{%- endif %}
{%- endfor %}
{%- for iface_entry in temp_data.interfaces %}
{%- if iface_entry.customer is defined and not iface_entry.customer and iface_entry.bgp_peer is defined %}
neighbor {{ iface_entry.bgp_peer }} remote-as {{ iface_entry.bgp_asn }}
neighbor {{ iface_entry.bgp_peer }} timers 1 3
neighbor {{ iface_entry.bgp_peer }} send-community
neighbor {{ iface_entry.bgp_peer }} allowas-in
{%- endif %}
{%- endfor %}
maximum-paths 64
!
access-list all permit any
This template defines the BGP configuration of the Microsoft Azure SONiC container. Predominantly, to allow us fill in this template we did complex nesting lookup in the previous paragraph. We provide here:
- the BGP AS number and loopback IP for BGP RID from the local node;
- the adjacent data centre switch’s IP address and its BGP AS number for BGP peers’ configuration;
- the IP address of the customers’ interfaces to add them to the BGP advertisements.
The last template is the startup.sh:
2
3
4
5
6
7
8
9
10
11
12
13
14
15
16
17
18
19
[ -d /etc/sonic ] || mkdir -p /etc/sonic
SYSTEM_MAC_ADDRESS={{ temp_data.general.mac }}
ip link add eth0 addr $SYSTEM_MAC_ADDRESS type dummy
if [ -f /etc/sonic/config_db.json ]; then
sonic-cfggen -j /etc/sonic/config_db.json -j /sonic/scripts/vlan_config.json --print-data > /tmp/config_db.json
mv /tmp/config_db.json /etc/sonic/config_db.json
else
sonic-cfggen -j /sonic/etc/config_db/vlan_config.json --print-data > /etc/sonic/config_db.json
fi
cp -f /sonic/etc/swss/config.d/00-copp.config.json /etc/swss/config.d/default_config.json
cp -rf /sonic/etc/quagga /etc/
{%- for iface_entry in temp_data.interfaces %}
ip netns exec sw_net ip link set dev sw_port{{ iface_entry.vlan - 10 }} addr $SYSTEM_MAC_ADDRESS
{%- endfor %}
supervisord
Here we template the system MAC address, which is unique per the network function and provide the proper port mapping with the name spaces and MAC addresses.
#4. Validation.
It seems that we are done. Let’s run our Python 3 code:
It may take some seconds for code to complete as it templates a lot of files:
2
3
4
5
6
7
8
9
10
11
12
13
14
15
16
17
18
19
20
21
22
23
24
25
26
aggs1 aggs3 host1 host3 host5 host7 leaf11 leaf13 leaf21 leaf23 spine11 spine13 spine21 spine23
aggs2 aggs4 host2 host4 host6 host8 leaf12 leaf14 leaf22 leaf24 spine12 spine14 spine22 spine24
$ ls -R infrastructure/leaf11/
infrastructure/leaf11/:
etc scripts
infrastructure/leaf11/etc:
config_db quagga swss
infrastructure/leaf11/etc/config_db:
vlan_config.json
infrastructure/leaf11/etc/quagga:
bgpd.conf daemons zebra.conf
infrastructure/leaf11/etc/swss:
config.d
infrastructure/leaf11/etc/swss/config.d:
00-copp.config.json
infrastructure/leaf11/scripts:
startup.sh
All the necessary files are created and the last part what we need to do is to check their content:
2
3
4
5
6
7
8
9
10
11
12
13
14
15
16
17
18
19
20
21
22
23
24
25
26
27
28
29
30
31
32
33
34
35
36
37
38
39
40
41
42
43
44
45
46
47
48
49
50
51
52
53
54
55
56
57
58
59
{
"VLAN": {
"Vlan10": {
"members": [
"Ethernet0"
],
"vlanid": "10"
},
"Vlan11": {
"members": [
"Ethernet1"
],
"vlanid": "11"
},
"Vlan12": {
"members": [
"Ethernet2"
],
"vlanid": "12"
},
"Vlan13": {
"members": [
"Ethernet3"
],
"vlanid": "13"
},
"Vlan14": {
"members": [
"Ethernet4"
],
"vlanid": "14"
}
},
"VLAN_MEMBER": {
"Vlan10|Ethernet0": {
"tagging_mode": "untagged"
},
"Vlan11|Ethernet1": {
"tagging_mode": "untagged"
},
"Vlan12|Ethernet2": {
"tagging_mode": "untagged"
},
"Vlan13|Ethernet3": {
"tagging_mode": "untagged"
},
"Vlan14|Ethernet4": {
"tagging_mode": "untagged"
}
},
"VLAN_INTERFACE": {
"Vlan10|192.168.10.0/31": {},
"Vlan11|10.0.0.17/31": {},
"Vlan12|10.0.0.25/31": {},
"Vlan13|10.0.0.33/31": {},
"Vlan14|10.0.0.41/31": {}
}
}
All the VLANs, interfaces and IP addresses are generated as they should be. Moving further:
2
3
4
5
6
7
8
9
10
11
12
13
14
15
16
17
18
19
20
21
22
23
24
25
26
27
28
29
hostname bgpd
password zebra
enable password zebra
log file /var/log/quagga/bgpd.log
!
router bgp 65012
bgp router-id 10.0.255.12
bgp bestpath as-path multipath-relax
network 192.168.10.0/31
neighbor 10.0.0.16 remote-as 65004
neighbor 10.0.0.16 timers 1 3
neighbor 10.0.0.16 send-community
neighbor 10.0.0.16 allowas-in
neighbor 10.0.0.24 remote-as 65005
neighbor 10.0.0.24 timers 1 3
neighbor 10.0.0.24 send-community
neighbor 10.0.0.24 allowas-in
neighbor 10.0.0.32 remote-as 65006
neighbor 10.0.0.32 timers 1 3
neighbor 10.0.0.32 send-community
neighbor 10.0.0.32 allowas-in
neighbor 10.0.0.40 remote-as 65007
neighbor 10.0.0.40 timers 1 3
neighbor 10.0.0.40 send-community
neighbor 10.0.0.40 allowas-in
maximum-paths 64
!
access-list all permit any
If you carefully compare this file with the previous one, you will see that all the BGP neighbour’s IP addresses are from the local interfaces’ subnets. That validates that this file is generated accurately.
You can also use the network graph generated by NetworkX and visualised by Graphviz for validation.
The last templated file looks like:
2
3
4
5
6
7
8
9
10
11
12
13
14
15
16
17
18
19
20
[ -d /etc/sonic ] || mkdir -p /etc/sonic
SYSTEM_MAC_ADDRESS=00:dc:5e:01:01:0c
ip link add eth0 addr $SYSTEM_MAC_ADDRESS type dummy
if [ -f /etc/sonic/config_db.json ]; then
sonic-cfggen -j /etc/sonic/config_db.json -j /sonic/scripts/vlan_config.json --print-data > /tmp/config_db.json
mv /tmp/config_db.json /etc/sonic/config_db.json
else
sonic-cfggen -j /sonic/etc/config_db/vlan_config.json --print-data > /etc/sonic/config_db.json
fi
cp -f /sonic/etc/swss/config.d/00-copp.config.json /etc/swss/config.d/default_config.json
cp -rf /sonic/etc/quagga /etc/
ip netns exec sw_net ip link set dev sw_port0 addr $SYSTEM_MAC_ADDRESS
ip netns exec sw_net ip link set dev sw_port1 addr $SYSTEM_MAC_ADDRESS
ip netns exec sw_net ip link set dev sw_port2 addr $SYSTEM_MAC_ADDRESS
ip netns exec sw_net ip link set dev sw_port3 addr $SYSTEM_MAC_ADDRESS
ip netns exec sw_net ip link set dev sw_port4 addr $SYSTEM_MAC_ADDRESS
Now we are ready to take off, with the topology launch.
GitHub repository
This project has evolved is continuously evolving. Stay tuned with the updates in our GitHub repository.
Many of the concepts from this blogpost (and much more) you can study at our network automation training. This is a unique product and environment created from the practical experience of high-scale network automation and providing holistic approach to the topic from the basics till the advanced network programming:


Lessons learned
Working with the graph using NetworkX requires some preparation. Not that it is difficult, but it requires two things from you:
- basic understanding of the graph theory;
- understating how NetworkX functions are working.
I was breaking my head in the beginning trying to compose the proper object for the Jinja2 template, as was not fully understanding the output of the Graph.adj[node_id] method. Reading the documentation helps.
Conclusion
Step by step our project is getting the proper functionality, and that is the most exciting feeling. We have a math model of the network as a graph, we have nice visualisation of the graph and the configuration files dynamically created based on the graph. In the next blogpost we will try to boot it up. Also in the automated way, obviously. Take care and good bye.
Support us
P.S.
If you have further questions or you need help with your networks, I’m happy to assist you, just send me message. Also don’t forget to share the article on your social media, if you like it.
BR,
Anton Karneliuk