

Hello my friend,
Some time ago we have covered in-depth OpenConfig with NETCONF configuration as well as the OpenConfig telemetry with NETCONF. Today we want to make a next step and start discussion about another approach to manage the network elements in a programmatic way, which is gNMI.
2
3
4
5
retrieval system, or transmitted in any form or by any
means, electronic, mechanical or photocopying, recording,
or otherwise, for commercial purposes without the
prior permission of the author.
Network automation training – self-paced and live online
Following your asks we open a new format for the network automation training – self-paced format:
- It doesn’t matter what your timezone is.
- It doesn’t matter how much hours weekly do you have to study.
- It doesn’t matter how solid is your current background in automation, scripting and software development.
You decide on your own when, how often and how quickly you can learn.
However, if you want to join groups, that is something we are happy to offer you as well.
At this training we teach you all the necessary concepts such as YANG data modelling, working with JSON/YAML/XML data formats, Linux administration basics, programming in Bash/Ansible/Python for multiple network operation systems including Cisco IOS XR, Nokia SR OS, Arista EOS and Cumulus Linux. All the most useful things such as NETCONF/RESTCONF, REST API, OpenConfig and many others are there. Don’t miss the opportunity to improve your career.
Disclaimer
Recently we have covered the open networking hyper scale data centre project, which was all about development of the math model in form of network graph, which was used to visualise the network, template the configuration and launch network emulation with with Docker. Later on we plan to add some more network functions (different vendors) to that project. But for now we park it to cover something else interesting.
Brief description
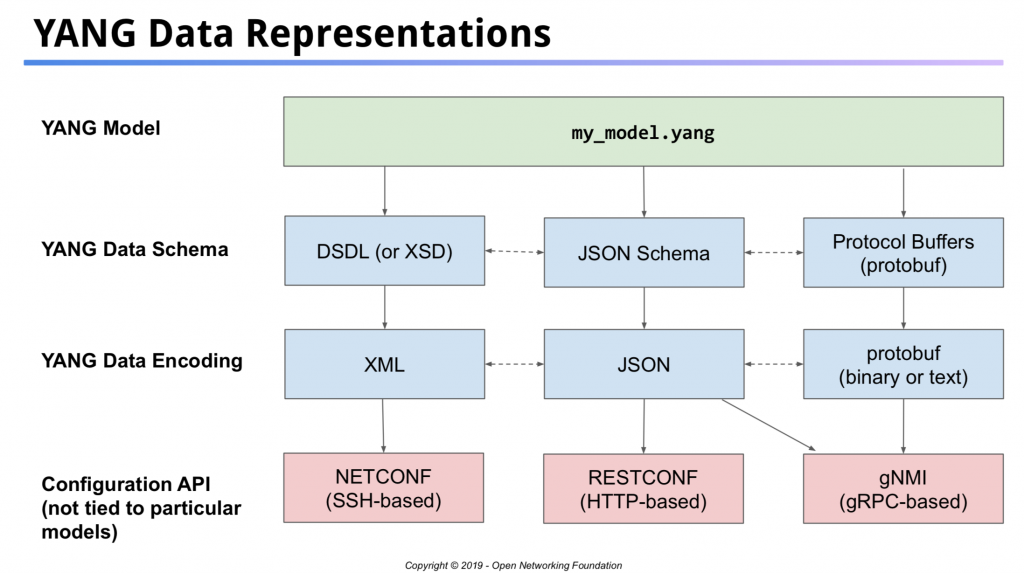
We believe that the proper way of starting the discussion about the gNMI is to show you the full context of what is called model-driven automation:

To learn how effectively use YANG, XML, JSON, Protobuf, NETCONF, RESTCONF and gNMI join our network automation training.
In a nutshell, the YANG is a data modelling language, which is used to create an protocol abstract definition of the device or the service. However, it is not used to encode the data itself. To do that, there are major data encoding types are used:
- XML (used in the NETCONF)
- JSON (used in the RETSCONF)
- Protobuf (used in gNMI)
NETCONF is one of the most popular APIs these days, which is used to managed the network elements. As we have covered it earlier, we encourage you look for the corresponding articles in our blog for an examples. RESTCONF, despite it is very user-friendly, isn’t widely distributed in the network elements. You can think about RESTCONF as an extension of the REST API and its application for the network elements’ management. And now the gNMI is comes to the stage…
gNMI stands for gRPC network management interface. Per the official webpage, the gRPC is:
A high-performance, open source universal RPC framework
Some search across the Internet shows that it was created by Google and then contributed to the open source community, so that everyone can benefit from it. As it was created by Google, it was created with a purposed to solve Google’s problems. In the context of the networking, the Google has one of the biggest data centres and interconnects worldwide. Hence, their problem is to manage the enormously huge fleet of the multi vendor network equipment in a programmatic way.
The one part of the solution is the OpenConfig YANG modules, which allows to managed all the vendors (e.g. Cisco, Nokia, Arista, and Juniper) using the same YANG modules. Another part of the solution is the gNMI, what main task is to manage all the network elements in the same way using the same protocol.
At this stage, neither gRPC nor gNMI is an RFC standard. However, their adoption in the world is quite a speedy.
You can ask, why Google just don’t use NETCONF/YANG for that. We believe, that the key requirement is speed, and that is where the Protobuf comes to the stage.
Protobuf (short of Protocol Buffers), per the official web-site:
Protocol buffers are Google’s language-neutral, platform-neutral, extensible mechanism for serialising structured data – think XML, but smaller, faster, and simpler.
Let’s try to compare the Protobuf with what we know about JSON/XML.
| XML | JSON | Protobuf |
|---|---|---|
| Human-friendly | Human-friendly | NOT for humans |
| NETCONF | RESTCONF / REST API | gNMI |
| usable without schema | usable without schema | NOT usable without schema |
| Text | Text | Binary |
| Sparse output | Sparse output | Very dense output |
| Additional processing overhead | Additional processing overhead | Very fast processing |
As you can see, the Protobuf is all about the performance and the efficiency. That’s why the historically the first usage of the gRPC/Protobuf in the networking field was in the telemetry area, where there is a need to send huge amounts of the informations constantly.
You might have spotted, that there are a couple of the key Characteristics, which significantly differs in Protobuf from the XML/JSON. First of all, it is binary. It means, you can’t easily read the content of the created message, as you will see only binary data without understanding what is encoded there. The second, Protobuf message conveys only values, whereas the XML/JSON transfers key/value parameters. That is the reason, why the Protobuf is meaningless without the schema: once the tool deserialise the binary data into values, they need to be mapped against some schema. On the other hand, sending only the encoded values makes the Protobuf message way smaller comparing to XML/JSON, as a lot of space is saved.
We won’t judge, whether Protobuf is good or bad. We would rather cover it in our blog so that you can learn and find is application on your own.
And if you want to be really good in the network automation with Protobuf or other techniques, join our network automation training.
What are we going to test?
The gNMI/Protobuf is not an easy topic. Mainly this is caused by the fact that that there is not that many information in the Internet (e.g. it is roughly 10 times less topics about the Protobuf than about JSON at StackOverflow). Hence, we will do the introduction step by step and focus today on the Protobuf only. So today we:
- Create the Protobuf file for an OpenConfig YANG module.
- Compile it into a data structure usable by Python.
- Create a Protobuf message and save it as a file.
Software version
As in the hyper scale data centre articles, we focus on the Python application for the network automation. Hence, the basic setup is the same as in the Code EXpress (CEX) series.
Here are the list of the tools we need for this blogpost:
- Python 3.7.6
- Protobuf 3.11.4
- VS Code 1.45.0
At our network automation training we teach you how to efficiently use VS Code for the development of your automation tools.
Topology
We don’t have any specific topology yet, just a laptop with a Python3 and VS Code.
Solution development
To get to the created message in the Protobuf format using Python 3 today we are going to do the following steps:
- Install Protobuf for your operation system.
- Create in the format proto3 the file for the OpenConfig modules openconfig-interfaces.yang.
- Compile the Python meta classes from that files using protoc tool.
- Create a Python script, which utilises the generated meta classes and creates the binary Protobuf message.
There are a lot to do and you might thing, what’s that for me, the network engineer? Well, the automation is what you need. So you need to understand these things. You just have to. And we help you with that.
#1. Installing Protobuf
Protobuf is a Google developed open source set of libraries. As such, you can get them from the GitHub. There are multiple available runtime environments, so there are multiple different packages available. However, I’m yet not a professional developer. Hence, it doesn’t ring a bell for me. As I have an opportunity to install the Protobuf either on my Mac directly or inside the VM on any Linux, I decided to install it on the Mac to get a better performance and ease the automation development. Hence, I installed it using brew:
It took some time to download and install it, so be patient. Once this is done, you can check if you have the necessary tool protoc available:
2
libprotoc 3.11.4
This tool is playing a crucial role in work with the Protobuf, as you will see later.
I haven’t installed that on the VM with Linux yet, but that is in the pipeline. I have found quite an easy guide, which I plan to test.
#2. Creating the .proto file
The Protobuf is a programmatic language agnostic model. That is good, as we can use it in any programming language, including Python 3. On the other hand, being agnostic, it has its own syntax covered in the official guide and the content of created files is stored in the separate files with the .proto extension.
The official guide provides a lot of details with the examples, so you should use it for reference. However, for a sake of this article, we summarise here the key points:
- The building units in the Protobuf looks are one string entries with the following format:
, where data_type defines the format (digit, string, boolean), key_name is a unique key name (interface_name) and id is a unique id within a grouping called message.1data_type key_name = id
- Message is a grouping of the entries. It can be a single, or there can be a lot of them. From the YANG perspective, you can think that Protobuf message is a YANG container.
- There might be any levels of the nested messages to create a proper hierarchy.
- If there are multiple similar entries needed (e.g. list), then the key or the message shall be used with the keyword repeated.
With this knowledge in mind, we can take a look on the YANG module, which we want to convert:
2
3
4
5
6
7
8
9
10
11
12
13
14
15
16
17
18
19
20
21
22
23
module: openconfig-interfaces
+--rw interfaces
+--rw interface* [name]
+--rw name -> ../config/name
+--rw config
| +--rw name? string
| +--rw type identityref
| +--rw mtu? uint16
| +--rw loopback-mode? boolean
| +--rw description? string
| +--rw enabled? boolean
+--rw hold-time
| +--rw config
| | +--rw up? uint32
| | +--rw down? uint32
+--rw subinterfaces
+--rw subinterface* [index]
+--rw index -> ../config/index
+--rw config
+--rw index? uint32
+--rw description? string
+--rw enabled? boolean
Want to learn how to use pyang like a pro for the network automation software development, join our network automation class.
We have intentionally removed the read-only part of the tree to make it smaller and more consumable for conversion. Taking look into the official Protobuf guide and the Python getting started guide, we compose the .proto file:
2
3
4
5
6
7
8
9
10
11
12
13
14
15
16
17
18
19
20
21
22
23
24
25
26
27
28
29
30
31
32
33
34
35
36
37
38
39
40
41
42
43
44
45
46
47
48
49
50
51
52
53
54
// Test of the encoding of openconfig-interfaces into Protobuf
syntax = "proto3";
package openconfig_interfaces;
// Custom Data Types
enum InterfaceType {
ethernetCsmcsd = 0;
softwareLooback = 1;
}
// Main Data Structure
message Interfaces {
message Interface {
string name = 1;
message Config {
string name = 1;
InterfaceType type = 2;
uint64 mtu = 3;
bool loopback_mode = 4;
string description = 5;
bool enabled = 6;
}
Config config = 2;
message HoldTime {
message Config {
uint64 up = 1;
uint64 down = 2;
}
Config config = 1;
}
HoldTime holdtime = 3;
message Subinterfaces {
message Subinterface {
uint64 index = 1;
message Config {
uint64 index = 1;
string description = 2;
bool enabled = 3;
}
Config config = 2;
}
repeated Subinterface subinterface = 2;
}
Subinterfaces subinterfaces = 4;
}
repeated Interface interface = 1;
}
Spend some time on comparing the .proto encoding with YANG format:
- The first think you might see, that the name of the key are the message (YANG containers or lists) are in the CamelCase (EachWordStartsWithCapitalWithoutSpaces) per the Protobuf convention.
- The content of the message is framed by { and } symbols.
- After each message is created, you see its being called in the upper level associated with its key.
- The name of the field (key/value pair -> Yang leaf or list-leaf) is provided in small register.
- Left to the field’s name you can see its type and right to it you see its ID.
- The IDs are unique inside the level of the message nesting.
Within the OpenConfig repository there is a toolkit called YGOT, what stand for YANG Go Tools. This is a Go written set of programs to work with YANG, and it includes the tool, which automatically coverts are YANG model into Protobuf format. We intentionally don’t use it to get the understanding of the Protobuf details, which is a mandatory to be able to develop the high-quality network automation solutions.
#3. Compiling the Python meta classes
So far we have a nice Protobuf schema. However, we can’t use it directly in Python, unfortunately. To be able to do that, we need to do some more steps. In the Python’s guide for Protobuf it is explained that we need to use the protoc tool, which was installed as part of the Protobuf package we installed earlier. This tool will convert the Protobuf schema in a set of Python meta classes, which we can use inside our Python program, which will create a binary Protobuf message ultimately:
- protoc is the way how the tool is called in the Mac/Linux CLI.
- -I is a key containing the parts to the source director. As we are already there, we put its value to “.”.
- –python_out provide the path to the generated Python meta classes. So we put “.” again to put the generated file in the same directory.
- openconfig-interfaces.proto is the name of the file with the schema in the Protobuf format.
After you have executed the tool, you will see the generated file, which names is based on the original Protobuf one:
2
3
openconfig-interfaces.proto
openconfig_interfaces_pb2.py
Its content is quite a heavy, pretty much like any other automatically generated Python meta class:
2
3
4
5
6
7
8
9
10
11
12
13
14
15
16
17
18
19
20
21
22
23
24
25
26
27
28
29
30
31
32
33
34
# -*- coding: utf-8 -*-
# Generated by the protocol buffer compiler. DO NOT EDIT!
# source: openconfig-interfaces.proto
from google.protobuf.internal import enum_type_wrapper
from google.protobuf import descriptor as _descriptor
from google.protobuf import message as _message
from google.protobuf import reflection as _reflection
from google.protobuf import symbol_database as _symbol_database
# @@protoc_insertion_point(imports)
_sym_db = _symbol_database.Default()
DESCRIPTOR = _descriptor.FileDescriptor(
name='openconfig-interfaces.proto',
package='openconfig_interfaces',
syntax='proto3',
serialized_options=None,
serialized_pb=b'\n\x1bopenconfig-interfaces.proto\x12\x15openconfig_interfaces"\xfd\x03\n\nInterfaces\x12>\n\tinterface\x18\x01 \x03(\x0b\x32+.openconfig_interfaces.Interfaces.Interface\x1a\xae\x03\n\tInterface\x12\x0c\n\x04name\x18\x01 \x01(\t\x1a\x94\x01\n\x06\x43onfig\x12\x0c\n\x04name\x18\x01 \x01(\t\x12\x32\n\x04type\x18\x02 \x01(\x0e\x32$.openconfig_interfaces.InterfaceType\x12\x0b\n\x03mtu\x18\x03 \x01(\x04\x12\x15\n\rloopback_mode\x18\x04 \x01(\x08\x12\x13\n\x0b\x64\x65scription\x18\x05 \x01(\t\x12\x0f\n\x07\x65nabled\x18\x06 \x01(\x08\x1a.\n\x08HoldTime\x1a"\n\x06\x43onfig\x12\n\n\x02up\x18\x01 \x01(\x04\x12\x0c\n\x04\x64own\x18\x02 \x01(\x04\x1a\xcb\x01\n\rSubinterfaces\x12\\\n\x0csubinterface\x18\x01 \x03(\x0b\x32\x46.openconfig_interfaces.Interfaces.Interface.Subinterfaces.Subinterface\x1a\\\n\x0cSubinterface\x12\r\n\x05index\x18\x01 \x01(\x04\x1a=\n\x06\x43onfig\x12\r\n\x05index\x18\x01 \x01(\x04\x12\x13\n\x0b\x64\x65scription\x18\x02 \x01(\t\x12\x0f\n\x07\x65nabled\x18\x03 \x01(\x08*8\n\rInterfaceType\x12\x12\n\x0e\x65thernetCsmcsd\x10\x00\x12\x13\n\x0fsoftwareLooback\x10\x01\x62\x06proto3'
)
_INTERFACETYPE = _descriptor.EnumDescriptor(
name='InterfaceType',
full_name='openconfig_interfaces.InterfaceType',
filename=None,
file=DESCRIPTOR,
values=[
!
! Further output is truncated for brevity
!
The good thing, is that we don’t necessary need to dig into its details, as we can refer to the examples and our Protobuf scheme to work on our Python 3 code.
#4. Creating a Python code to work with Protobuf
Finally we come to the point, where we can try to test the Protobuf itself. We have just a last small step, create a Python 3 script, which will do that. To be honest, we decided not to reinvent the wheel, but rather to reapply the logic of the official example to our use case: create a Protobuf encode message.
However, first of all we create a Python dictionary with the interfaces, we want to put to the message:
2
3
4
5
6
7
8
9
10
11
12
13
14
15
16
17
18
19
20
21
22
23
24
25
26
27
28
29
30
31
32
33
34
35
36
37
38
39
40
41
42
43
44
45
46
47
48
49
50
51
52
53
54
55
56
57
58
#!/usr/bin/env python
# Modules
import openconfig_interfaces_pb2
import sys
# Variable
intend = {
'interfaces': {
'interface': [
{
'name': 'Ethernet1',
'config': {
'name': 'Ethernet1',
'type': 'ethernetCsmcsd',
'mtu': 1514,
'description': 'Test Interface',
'enabled': True
},
'subinterfaces': {
'subinterface': [
{
'index': 0,
'config': {
'index': 0,
'description': 'Test Subinterface',
'enabled': True
}
}
]
}
},
{
'name': 'Ethernet2',
'config': {
'name': 'Ethernet2',
'type': 'ethernetCsmcsd',
'mtu': 1514,
'description': 'Test Interface',
'enabled': True
},
'subinterfaces': {
'subinterface': [
{
'index': 0,
'config': {
'index': 0,
'description': 'Test Subinterface',
'enabled': True
}
}
]
}
}
]
}
}
The variable follows the OpenConfig interfaces format.
To be honest, the variable is the biggest part of the code. The rest of the Python’s program looks like as follows:
2
3
4
5
6
7
8
9
10
11
12
13
14
15
16
17
18
19
20
21
22
23
24
25
26
27
28
29
30
31
32
33
34
35
36
37
38
39
!
! SOME OUTPUT IS TRUNCATED FOR BREVITY
!
# User-defined functions
def build_protobuf(data):
obj = openconfig_interfaces_pb2.Interfaces()
for interface_entry in data['interfaces']['interface']:
iface = obj.interface.add(name=interface_entry['name'])
iface.config.name = interface_entry['config']['name']
if interface_entry['config']['type'] == 'ethernetCsmcsd':
iface.config.type = openconfig_interfaces_pb2.InterfaceType.ethernetCsmcsd
iface.config.mtu = interface_entry['config']['mtu']
iface.config.description = interface_entry['config']['description']
iface.config.enabled = interface_entry['config']['enabled']
for sif_entry in interface_entry['subinterfaces']['subinterface']:
siface = iface.subinterfaces.subinterface.add(index=sif_entry['index'])
siface.config.index = sif_entry['config']['index']
siface.config.description = sif_entry['config']['description']
siface.config.enabled = sif_entry['config']['enabled']
return obj
# Body
if __name__ == '__main__':
if len(sys.argv) != 2:
print(f'Using {sys.argv[0]} as file.')
sys.exit(-1)
oc_if = build_protobuf(intend)
with open(sys.argv[1], "wb") as f:
f.write(oc_if.SerializeToString())
In the main part, which is staring in from the #Body comment, we:
- Check if we have provided the argument to the program upon launch. The argument shall contain name of the file, which we will create for a Protobuf encoded data. If not provided, then our Python program exits with the code “-1“.
- We run the user-defined function build_protobuf, which return the built object. The result of this function is stored to the variable oc_if.
- The content of the oc_if is serialised using ProtoBuf rules and saved in the file with the name provided in argv. Point out that the file is written as a byte stream “wb”, rather than text “w”.
From the Google Developers’ guide:
2
3
Note that the bytes are binary, not text;
we only use the str type as a convenient container.
So far there is no explanation regarding the Protobuf, besides the serialisation process. The main job is undertaken by the user-defined function build_protobuf:
- We create the object with the name obj out of generated Python file openconfig_interfaces_pb2 meta class Interfaces. This corresponds to the path in the OpenConfig interfaces YANG module: /openconfig-interfaces:interfaces.
- Then we add the interface entry for each interface in the provided variable using the for-loop.
- The overall logic is straightforward: we put the value for each (or almost each) variable following the original Protobuf schema including its naming convention.
- Once the obj is complete its returned as a result of the function’s execution
Verification
So far our Python tool to work with Protobuf is ready and we can start with testing :
2
3
4
Python 3.7.6
$ python create_protobuf.py oc_if.bin
$
If we don’t see anything in the CLI, it means that the execution was successful. Otherwise, we will see errors, which we see a lot during the preparation of the article. As such, we should have created the files oc_if.bin with the binary data:
2
-rw-r--r-- 1 aaa aaa 26 10 May 22:08 oc_if.bin
GitHub repository
We are yet in the early stages, so we don’t put the results to the GitHub. We will do that as soon as we have at least working demo end-to-end. However, you can take a look on some other our outstanding repositories.

Lessons learned
There are some technology, which is easier to start with, and there are some, which is not. The Protobuf (and gNMI in general) is more developers’ oriented things, rather then network engineers. However, as they are quite popular in a hyper scalers’ environment, and we have written about hyper scale data centres, it is important to understand and to be able to use them. Even if that is not an easy task.
The second key observation is that there is way less information about the Protobuf. Hence, when we faced some issues, it took us a long time to troubleshoot them ourselves, as we were not about to find any solution in the Internet.
Conclusion
We are taking the careful steps to cover for you the Protobuf, as it way more complex comparing to the NETCONF/XML or RESTCONF/JSON due to the nature of the Protobuf. In the next article we will cover how to read and parse the Protobuf messages using Python to verify that the file we have created contains the appropriate information. Take care and good bye.
Support us
P.S.
If you have further questions or you need help with your networks, I’m happy to assist you, just send me message. Also don’t forget to share the article on your social media, if you like it.
BR,
Anton Karneliuk