

Hello my friend,
In the previous blogpost we started the discussion about the gNMI/Protobof approach to network automation by creating the Protobuf message. Today we continue it showing read the Protobuf messages.
2
3
4
5
retrieval system, or transmitted in any form or by any
means, electronic, mechanical or photocopying, recording,
or otherwise, for commercial purposes without the
prior permission of the author.
Network automation training – self-paced and live online
Network automation is a must-have technology set in all the industries these days. It is no more the matter of innovation, it is a matter of normal business operation. And we are happy to help you and your company with automation by providing the necessary holistic knowledge, skills and tools to make your automation journey successful:
At this training we teach you all the necessary concepts such as YANG data modelling, working with JSON/YAML/XML/Protobuf data formats, Linux administration basics, programming in Bash/Ansible/Python for multiple network operation systems including Cisco IOS XR, Nokia SR OS, Arista EOS and Cumulus Linux. All the most useful things such as NETCONF/RESTCONF, REST API, gNMI, OpenConfig and many others. Don’t miss the opportunity to improve your career.
Brief description
One of the biggest advantages the Protobuf has over others data formats, such as XML or JSON, is the performance. The Protobuf messages are much smaller (10-40 times) comparing to the XML or JSON messages; hence, the efforts to transmit and decode them is much smaller too.
You might think “sounds cool, but where the efficiency is coming from?” Indeed, the bytes are bytes and bits are bits. So if the Protobuf message is shorter, it must somehow be explained. The abstract explanation you can see in the following image:
2
3
4
5
6
7
8
9
10
{
"key1": "value1",
"key2": "value2",
..
"keyN": "valueN"
}
Protobuf Data:
binary(tag1,length1,value1,tag2,length2,value2,..,tagN,lengthN,valueN)
The nice overview of the Protobuf encoding you can find in that blog.
The main difference, is that Protobuf message:
- contains only values; the mapping of data to key is done using tags and length;
- is binary encoded (it is not text);
As such, the Protbuf message loose its sense out of the context of the Protobuf schema, which establishes the relations between the tag and the key in the processing application. Hence, the major drawback of the Protobuf message is that it is not the self-descriptive. However, in the context of the network automation, where the communication is done between the network function and the network controller, it is up to controllers’ developers to implement the necessary Protobuf schemas and make sure that all the messages, which are sent and received, are processed according to the schemas.
Interested in the real usage of XML/JSON/Protobuf? Want to be able to create them yourself? Join our network automation training and master your data format knowledge.
What are we going to test?
In the previous blogpost we explained how to create the message in the Protobuf format. So today we will show how to read and parse it to get the written values back:
- Read the Protobuf message created earlier.
- Parse the message using the Protobuf schema.
Software version
There is nothing new about our development host setup, so we are continuing to use the one from the Code EXpress (CEX) series.
In today articles we use the following toolkit:
- Python 3.7.6
- Protobuf 3.11.4
- VS Code 1.45.0
Network automation development is an interesting yet challenging process. In our network automation training we explain how to use VS Code to make the process more efficient.
Topology
Yet we don’t interact with the network functions. Hence, we are using just the automation development host.
Solution development
Despite we have created the necessary framework in the previous session, we will show here all the necessary steps assuming you are building the receiving part from scratches:
- Install the Protobuf package on your receiving host.
- Have the same Protobuf schema (.proto file) as the host creating the message.
- Generate the Python meta classes out of the Protobuf schema.
- Decode the Protobuf message using the generated meta classes with Python.
The installation of the Protobuf is explained in-depth in the previous blogpost; hence, we don’t repeat it here. The Protobuf schema (.proto file) is the following:
2
3
4
5
6
7
8
9
10
11
12
13
14
15
16
17
18
19
20
21
22
23
24
25
26
27
28
29
30
31
32
33
34
35
36
37
38
39
40
41
42
43
44
45
46
47
48
49
50
51
52
53
54
// Test of the encoding of openconfig-interfaces into Protobuf
syntax = "proto3";
package openconfig_interfaces;
// Custom Data Types
enum InterfaceType {
ethernetCsmcsd = 0;
softwareLooback = 1;
}
// Main Data Structure
message Interfaces {
message Interface {
string name = 1;
message Config {
string name = 1;
InterfaceType type = 2;
uint64 mtu = 3;
bool loopback_mode = 4;
string description = 5;
bool enabled = 6;
}
Config config = 2;
message HoldTime {
message Config {
uint64 up = 1;
uint64 down = 2;
}
Config config = 1;
}
HoldTime holdtime = 3;
message Subinterfaces {
message Subinterface {
uint64 index = 1;
message Config {
uint64 index = 1;
string description = 2;
bool enabled = 3;
}
Config config = 2;
}
repeated Subinterface subinterface = 2;
}
Subinterfaces subinterfaces = 4;
}
repeated Interface interface = 1;
}
Read the previous blogpost to get the detailed explanation of the Protobuf schema.
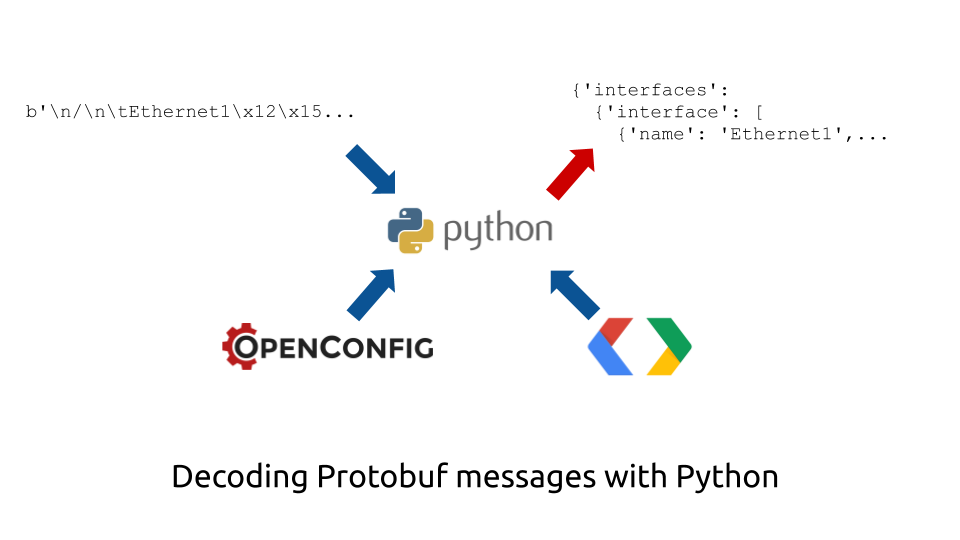
#1. Reading the Protobuf message
As the message in the Protobuf format is stored in the file we need just to read it. However, the message is a binary, not text. So we need to read binary data:
2
3
4
5
6
7
8
9
10
11
12
13
14
15
16
17
#!/usr/bin/env python
# Modules
import sys
# Variable
path_messages = 'messages'
# Body
if __name__ == '__main__':
if len(sys.argv) != 2:
print(f'Using {sys.argv[0]} as file.')
sys.exit(-1)
with open(f'{path_messages}/{sys.argv[1]}', "rb") as f:
print(f.read())
As this Python 3 code is very simple, there is not that much we can explain: we read the content of the file provided as an argument to the script and print its content. The result of the execution likes like as follows:
2
b'\n/\n\tEthernet1\x12\x15\n\tEthernet1\x18\xea\x0b*\x03ABC0\x01"\x0b\x12\t\x12\x07\x12\x03DEF\x18\x01\n/\n\tEthernet2\x12\x15\n\tEthernet2\x18\xea\x0b*\x031230\x01"\x0b\x12\t\x12\x07\x12\x03456\x18\x01'
Despite we ca see some substrings, such as “Ethernet1” or “ABC“, the vast majority of the data is not understandable. And even the data, which is understandable, can’t be used somehow. So, we are moving to the next step.
#2. Parsing the Protobuf message
In the Google’s Protobuf developers’s guide for Python, there is a description of an important function:
This function allows to convert the binary data from the string into a manageable Python structure, assuming you have a Protobuf schema. Hence, we import the same Python meta classes we created in the previous blogpost and create an object out of that class. The object is a Python representation of the Protobuf schema; hence, the data is parsed into a Protobuf object:
2
3
4
5
6
7
8
9
10
11
12
13
14
15
16
17
18
19
20
21
22
#!/usr/bin/env python
# Modules
import bin.openconfig_interfaces_pb2 as openconfig_interfaces_pb2
import sys
# Variable
path_messages = 'messages'
# Body
if __name__ == '__main__':
if len(sys.argv) != 2:
print(f'Using {sys.argv[0]} as file.')
sys.exit(-1)
oc_if = openconfig_interfaces_pb2.Interfaces()
with open(f'{path_messages}/{sys.argv[1]}', "rb") as f:
oc_if.ParseFromString(f.read())
print(oc_if)
Now, once the message is parsed using the appropriate Protobuf schema, we can read its content:
2
3
4
5
6
7
8
9
10
11
12
13
14
15
16
17
18
19
20
21
22
23
24
25
26
27
28
29
30
31
32
33
34
35
interface {
name: "Ethernet1"
config {
name: "Ethernet1"
mtu: 1514
description: "ABC"
enabled: true
}
subinterfaces {
subinterface {
config {
description: "DEF"
enabled: true
}
}
}
}
interface {
name: "Ethernet2"
config {
name: "Ethernet2"
mtu: 1514
description: "123"
enabled: true
}
subinterfaces {
subinterface {
config {
description: "456"
enabled: true
}
}
}
}
We can use this data calling them as a class’s properties, or we can reconstruct the Python’s dictionary out of it adding the user-defined function parse_protobuf, which will do such translation for us:
2
3
4
5
6
7
8
9
10
11
12
13
14
15
16
17
18
19
20
21
22
23
24
25
26
27
28
29
30
31
32
33
34
35
36
37
38
39
40
41
42
43
44
45
46
47
48
49
50
51
52
53
54
55
56
#!/usr/bin/env python
# Modules
import bin.openconfig_interfaces_pb2 as openconfig_interfaces_pb2
import sys
# Variable
path_messages = 'messages'
# User-defined functions
def parse_protobuf(obj):
temp_dict = {}
temp_dict.update({'interfaces': {'interface': []}})
for interface_entry in obj.interface:
temp_cont = {}
temp_cont['name'] = interface_entry.name
temp_cont['config'] = {}
temp_cont['config']['name'] = interface_entry.config.name
temp_cont['config']['type'] = interface_entry.config.type
temp_cont['config']['mtu'] = interface_entry.config.mtu
temp_cont['config']['description'] = interface_entry.config.description
temp_cont['config']['enabled'] = interface_entry.config.enabled
temp_cont['config']['subinterfaces'] = {'subinterface': []}
for siface_entry in interface_entry.subinterfaces.subinterface:
temp_sub_cont = {}
temp_sub_cont['index'] = siface_entry.index
temp_sub_cont['config'] = {}
temp_sub_cont['config']['index'] = siface_entry.config.index
temp_sub_cont['config']['description'] = siface_entry.config.description
temp_sub_cont['config']['enabled'] = siface_entry.config.enabled
temp_cont['config']['subinterfaces']['subinterface'].append(temp_sub_cont)
temp_dict['interfaces']['interface'].append(temp_cont)
return temp_dict
# Body
if __name__ == '__main__':
if len(sys.argv) != 2:
print(f'Using {sys.argv[0]} as file.')
sys.exit(-1)
oc_if = openconfig_interfaces_pb2.Interfaces()
with open(f'{path_messages}/{sys.argv[1]}', "rb") as f:
oc_if.ParseFromString(f.read())
parsed_data = parse_protobuf(oc_if)
print(parsed_data)
There result of the execution of this Python 3 script is the dictionary:
2
{'interfaces': {'interface': [{'name': 'Ethernet1', 'config': {'name': 'Ethernet1', 'type': 0, 'mtu': 1514, 'description': 'ABC', 'enabled': True, 'subinterfaces': {'subinterface': [{'index': 0, 'config': {'index': 0, 'description': 'DEF', 'enabled': True}}]}}}, {'name': 'Ethernet2', 'config': {'name': 'Ethernet2', 'type': 0, 'mtu': 1514, 'description': '123', 'enabled': True, 'subinterfaces': {'subinterface': [{'index': 0, 'config': {'index': 0, 'description': '456', 'enabled': True}}]}}}]}}
The might be not obvious practical value converting the Protobuf object into the dictionary. The reason for that, as you might spotted from the provided code’s snippet, is that we might call the objet’s properties directly and get their values. However, if you integrate the management of the network functions’ management with the controller function, it is highly likely that other parts of the applications, such as data bases, might be available over REST API. Hence, you need to know how to covert one data format into another.
GitHub repository
Finally we have added the repository for this blog series so you can find all the code explained in this and the previous blogpost in our GitHub.

Lessons learned
Working on the parsing part allowed my to much better understand the writing part, as the original Python script covered in the previous article contained some flaws. And the flaws were coming from not properly understanding the structure of the Protobuf schema (.proto file).
So extensive testing of your created Python tools is an essential part of the DevOps and NetDevOps approach.
Conclusion
Today we’ve completed the basics of the Protobuf by showing the read and parsing of the binary Protobuf messages using the Protobuf schema with Python. We advise you to spend some time creating and reading various Protobuf messages to get better understanding using the script framework we have provided so far. Take care and good bye.
Support us
P.S.
If you have further questions or you need help with your networks, I’m happy to assist you, just send me message. Also don’t forget to share the article on your social media, if you like it.
BR,
Anton Karneliuk