

Hello my friend,
Finally we approached the point where we start dealing with the network functions again, now at a high scale. After we have successfully generated the configuration files for our Microsoft Azure SONiC network functions, it is a time to boot them, span them and get the emulated data centre up and running.
2
3
4
5
retrieval system, or transmitted in any form or by any
means, electronic, mechanical or photocopying, recording,
or otherwise, for commercial purposes without the
prior permission of the author.
Network automation training – now as a self-paced course as well
Following your asks we open a new format for the network automation training – self-paced format:
- It doesn’t matter what your timezone is.
- It doesn’t matter how much hours weekly do you have to study.
- It doesn’t matter how solid is your current background in automation, scripting and software development.
Because you decide on your own when, how often and how quickly you can learn.
At this training we teach you all the necessary concepts such as YANG data modelling, working with JSON/YAML/XML data formats, Linux administration basics, programming in Bash/Ansible/Python for multiple network operation systems including Cisco IOS XR, Nokia SR OS, Arista EOS and Cumulus Linux. All the most useful things such as NETCONF/RESTCONF, REST API, OpenConfig and many others are there. Don’t miss the opportunity to improve your career.
Brief description
Earlier we have already brought the emulated data centre network with the Microsoft Azure SONiC running P4 switch created by Mellanox. Therefore, we will follow the same approach here. The major difference is that we won’t create the Bash file, which is used to run the topology. Instead of that, we will managed the launch and interaction with the containerised network functions using Python 3. More precisely, we will extend our program with the following functionality:
- Launch of the Docker containers based on the network graph nodes.
- Configure the Microsoft Azure SONiC or Ubuntu Linux inside the Docker containers with the necessary commands to allow the communicate outside and interconnect to each other.
- Build the Linux bridges and map containers to these bridges based on the network graph edges.
All these activities are necessary to fulfil one of the fundamental goals we have settled earlier:
Deploy the network emulation using Docker or KVM including nodes and necessary links.
All the necessary information in terms of the network model is already existing in the data centre graph. Hence, we need only use this information properly to fulfil the mentioned tasks. It might look easy, but in reality it requires good understanding of the graph as such and how the NetworkX operates.
As these series all about building tool in Python for networking, follow our free Python classes to get better understanding on what is going on.
What are we going to test?
Today we focus on the management of the Docker containers with Python 3.8, as well as the performing the Linux shell commands to manage the Linux bridge tool:
- Usage of the Docker SDK for Python to create and manage the Docker containers.
- Usage of the low-level API fo Docker SDK for Python to get the detailed information about the Docker containers, such as Linux process ID (PID) associated with the container.
- Usage of built-in OS package for Python to interact with the Linux shell managed the Linux bridges accordingly
Software version
By this series, we continue the development of the solution in the Python 3.8 leveraging the topics covered in the Code EXpress (CEX) series.
Each session we are adding more Python libraries, hence we added the Jinja2 today:
- CentOS 7.7.1908
- Bash 4.2.26
- Python 3.8.2
- Docker-CE 19.03.8
- Graphviz 2.30.1
- NetworkX 2.4
- Jinja2 2.11.2
- Docker-py 4.2.0
- Microsoft SONiC P4 switch [guest CNF]
- Ubuntu 14.04 [guest CNF]
Learn more about CNF (containerised network functions) in the first blogpost in the series.
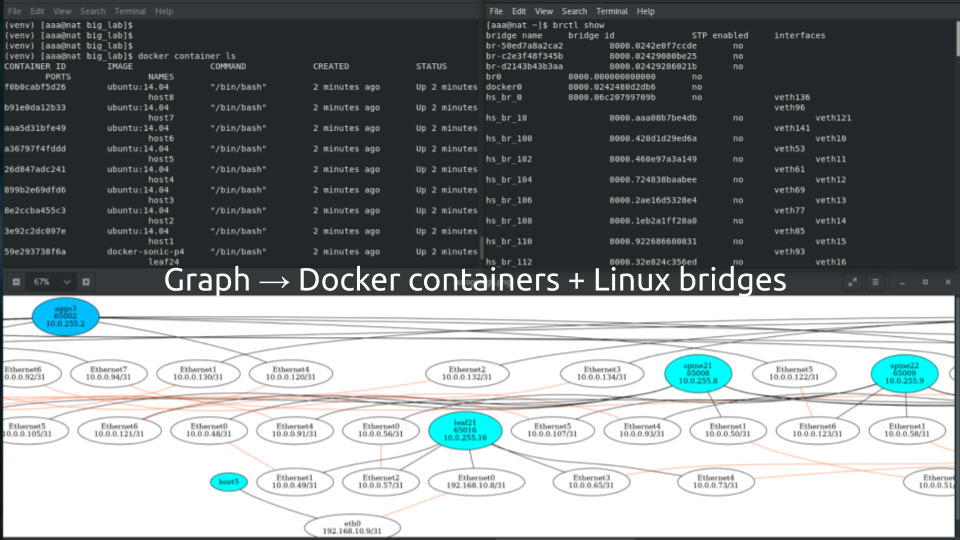
Topology
The logical topology we are using in this network were build earlier in the series by NetworkX and Graphviz:

However, this topology doesn’t explain the details about the physical setup. Here they are:
- Each network element (represented by the node with the network function itself and the nodes with the interfaces) is a separate Docker container.
- Each link between the node with interfaces is a separate Linux bridge interconnecting two containers.
As such, we have the following physical resources in our lab:
- 20 Docker containers with the Microsoft SONiC-P4 software switch creating our hyper scale data centre fabric.
- 8 Docker containers with the Ubuntu creating our customers’ hosts.
- 72 Linux bridges forming point-to-point links between the containerised network functions.
If you are interested in the full code, you are welcome to take a look at the code in our GitHub repository.
Solution development
Back in the days in this hyper scale series we created the Bash script, which was used to bring the data centre up. Below we put its key components with the comments to simplify your understanding:
2
3
4
5
6
7
8
9
10
11
12
13
14
15
16
17
18
19
20
21
22
23
24
25
26
27
28
29
30
31
32
33
34
35
36
37
38
39
40
41
42
43
#!/bin/bash
# Starting Docker
sudo systemctl start docker.service
# Launching the Docker container with Microsoft SONIC-P4 switch and with Ubuntu host
sudo docker run --net=none --privileged --entrypoint /bin/bash --name leaf11 -it -d -v $PWD/ref_config/leaf11:/sonic docker-sonic-p4:latest
sudo docker run --net=none --privileged --entrypoint /bin/bash --name host11 -it -d ubuntu:14.04
# Getting the process ID of the container in Linux
LEAF11=$(sudo docker inspect --format '{{ .State.Pid }}' leaf11)
HOST11=$(sudo docker inspect --format '{{ .State.Pid }}' host11)
# Creating the Linux bridge end interconnecting the containers
sudo brctl addbr host11_leaf11
sudo ip link set host11_leaf11 up
sudo ip link add sw_port0 type veth
sudo ip link set veth8 up
sudo brctl addif host11_leaf11 veth8
sudo ip link set netns ${LEAF11} dev sw_port0
sudo ip link add eth1 type veth
sudo ip link set veth9 up
sudo brctl addif host11_leaf11 veth9
sudo ip link set netns ${HOST11} dev eth1
# Configuring the network parameters inside the Docker container with Ubuntu host
sudo docker exec -d host11 sysctl net.ipv6.conf.eth1.disable_ipv6=1
sudo docker exec -d host11 ifconfig eth1 192.168.1.2/24 mtu 1400
sudo docker exec -d host11 ip route replace default via 192.168.1.1
# Configuring the network parameters inside the Docker container with Microsoft SONiC-P4 switch
sudo docker exec -d leaf11 ip netns add sw_net
sudo docker exec -d leaf11 ip link set dev sw_port0 netns sw_net
sudo docker exec -d leaf11 ip netns exec sw_net sysctl net.ipv6.conf.sw_port0.disable_ipv6=1
sudo docker exec -d leaf11 ip netns exec sw_net ip link set sw_port0 up
# Running installation script inside the Docker container with Microsoft SONiC-P4 switch
sudo docker exec -d leaf11 sh /sonic/scripts/startup.sh
# Modifying the Linux firewall rules (iptables) to allow the containers to communicate to each other
sudo iptables -I FORWARD 1 -s 10.0.0.0/24 -d 10.0.0.0/24 -j ACCEPT
sudo iptables -I FORWARD 1 -s 192.168.0.0/16 -d 192.168.0.0/16 -j ACCEPT
Using the comments in the snippet above, we have identified the steps which we need to implement in the Python to complete the provisioning of the network. However, we will a bit restructure them to make the algorithm less complex and allow it follow the graph.
#1. Creating Docker container with the network functions using Python
To manage the Docker containers using the Python, we need to have two components:
You also need to be able to manage Docker ad non-root user.
The installation of the Docker is explained in one of the previous blogposts from the Data Centre Fabric series. Hence, we assume you have it like explained there.
To install the Docker SDK for Python, we extend the file with all external Python libraries requirements.txt with the new package docker:
2
3
4
5
6
7
pyyaml
networkx
pygraphviz
netaddr
jinja2
docker
After that we need to rerun the installation of the modules using pip:
From now on we can use the this package in our script. Hence, let’s carry on with the script itself:
2
3
4
5
6
7
8
9
10
11
12
13
14
15
16
17
18
19
20
21
22
23
24
25
26
27
28
29
30
31
32
33
34
35
36
37
38
39
40
41
42
43
44
45
46
47
48
49
50
#!/usr/bin/env python
# Modules
from bin.localfunctions import *
import networkx
import netaddr
import os
import re
import jinja2
import docker
!
! Some output is truncated for brevity
!
# Launching the emulated network
print('Launching the network emulation.')
docker_client = docker.from_env()
temp_current_path = os.getcwd()
for node_entry in DG.nodes.data():
if 'dev_role' in node_entry[1]:
if primitives[node_entry[1]['dev_type']]['image']['type'] == 'docker':
print(f'Creating the Docker container with {node_entry[0]}...')
if node_entry[1]['dev_role'] != 'host':
container_node = docker_client.containers.run(image=primitives[node_entry[1]['dev_type']]['image']['name'],
detach=True,
privileged=True,
tty=True,
stdin_open=True,
network_mode='none',
name=node_entry[0],
entrypoint='/bin/bash',
volumes={f'{temp_current_path}/{path_infra}/{node_entry[0]}': {'bind': '/sonic', 'mode': 'rw'}})
else:
container_node = docker_client.containers.run(image=primitives[node_entry[1]['dev_type']]['image']['name'],
detach=True,
privileged=True,
tty=True,
stdin_open=True,
network_mode='none',
name=node_entry[0],
entrypoint='/bin/bash')
docker_llapi = docker.APIClient(base_url='unix://var/run/docker.sock')
node_entry[1]['pid'] = docker_llapi.inspect_container(node_entry[0])['State']['Pid']
!
! Further output is truncated for brevity
!
In the provided Python 3 code example we do the following things:
- Create an objet docker_client using the installed docker package.
- Run a for-loop for all the nodes in our data centre graph and filter all non-port nodes using if-statement code flow control.
- Using containers.run functions of the created object docker_client we create the Docker container for our network functions.
- The parameters used to create the Docker container are the same shown in the Bash file above. For our Python script, their names are takes out of the corresponding part of the SDK documentation.
- There are two entries to run the docker container: one for Microsoft SONiC-P4, another for Ubuntu. The difference is the mapping of the local volume.
- Once the container is creating, we collect its information (like running docker container inspect container_name) using the Low-level API from SDK.
- Out of the collected information the Process ID (PID) is added to the data centre graph, as it will be used later.
After this part of the code is executed, we will have containers up and running. Hence, we can move to the next step.
#2. Creating Linux bridges and interconnecting containers using Python
Now we need to interconnect the Docker containers with each other using the Linux bridges. After spending some time on looking for the existing modules, we have found a Python wrapper of the brctl tool. Looking through the code, we have though, there is no added vale of using this module; hence, we will use the OS package of the Python to manage the brctl tool used to control the Linux bridges directly. The necessary commands were shared earlier in the Bash script, so we need to make sure they are run automatically in a proper sequence. Here we go:
2
3
4
5
6
7
8
9
10
11
12
13
14
15
16
17
18
19
20
21
22
23
24
25
26
27
28
29
30
31
32
33
34
35
36
!
! Some output is truncated for brevity
!
# Connecting containers
veth_id = 0
for node_entry in DG.nodes.data():
if 'dev_role' in node_entry[1]:
print(f'Building connections for {node_entry[0]} ...')
for iface_id in DG.adj[node_entry[0]]:
for link_data in DG.adj[iface_id].items():
if link_data[1]['phy'] != 'port':
os.system(f'sudo brctl addbr {link_data[1]["linux_bridge"]}')
os.system(f'sudo ip link set {link_data[1]["linux_bridge"]} up')
if node_entry[1]['dev_type'] == 'microsoft-sonic':
os.system(f'sudo ip link add sw_port{DG.nodes[iface_id]["vlan"] - 10} type veth')
else:
os.system(f'sudo ip link add {DG.nodes[iface_id]["dev_name"]} type veth')
os.system(f'sudo ip link set veth{veth_id} up')
os.system(f'sudo brctl addif {link_data[1]["linux_bridge"]} veth{veth_id}')
if node_entry[1]['dev_type'] == 'microsoft-sonic':
os.system(f'sudo ip link set netns {DG.nodes[node_entry[0]]["pid"]} dev sw_port{DG.nodes[iface_id]["vlan"] - 10}')
else:
os.system(f'sudo ip link set netns {DG.nodes[node_entry[0]]["pid"]} dev {DG.nodes[iface_id]["dev_name"]}')
veth_id += 1
!
! Further output is truncated for brevity
!
The general logic of the algorithm itself is somewhat similar to the one we developed in the pervious post, when we were templating the configuration:
- Using bunch of for-loops and if-statements, we creating a logic which collects all the interfaces of each network function node.
- The graph’s edges, which span the interfaces of different devices have an attribute linux_bridge, which contains automatically generated name of the Linux bridge. Each such a bridge interconnects two interfaces only.
- Once the bridge is created, the local interface is connected taking into account all the necessary complications of the namespaces (here on the stage comes the Linux PID collected in the previous paragraph).
- As the script is running for all the nodes, then the linux_bridge will be created two times. Well, it will be attempted to do so. On the second time the bridge is not created, as it is already exits. However, it doesn’t stop the script execution and the second interface is added to the bridge properly.
- There are some small differences between the necessary configuration for Microsoft Azure SONIC-P4 switch and Ubuntu host. Hence we use the if-statement to control that.
- The shell commands are send to the underlying system using the os.system() function, where as the content is templated using the formatted string function f-string.
Execution of this part of the Python’s code will give you the connectivity between your containers.
#3. Running commands inside the Docker containers using Python
The final part of the solution is to modify the configuration of the operation system inside the Docker containers. In the original Bash script we run that separately after the Linux bridges are configured. Now, as we are running the loop over the network functions and their interfaces already, we will integrate these tasks in that loop to save the computational efforts:
2
3
4
5
6
7
8
9
10
11
12
13
14
15
16
17
18
19
20
21
22
23
24
25
26
27
28
29
30
31
32
33
34
35
36
37
38
39
40
41
42
43
44
45
46
47
48
49
50
51
52
!
! Some output is truncated for brevity
!
# Connecting containers
veth_id = 0
for node_entry in DG.nodes.data():
if 'dev_role' in node_entry[1]:
print(f'Building connections for {node_entry[0]} ...')
container_node = docker_client.containers.get(node_entry[0])
container_node.exec_run('ip netns add sw_net', detach=True)
for iface_id in DG.adj[node_entry[0]]:
for link_data in DG.adj[iface_id].items():
if link_data[1]['phy'] != 'port':
os.system(f'sudo brctl addbr {link_data[1]["linux_bridge"]}')
os.system(f'sudo ip link set {link_data[1]["linux_bridge"]} up')
if node_entry[1]['dev_type'] == 'microsoft-sonic':
os.system(f'sudo ip link add sw_port{DG.nodes[iface_id]["vlan"] - 10} type veth')
else:
os.system(f'sudo ip link add {DG.nodes[iface_id]["dev_name"]} type veth')
os.system(f'sudo ip link set veth{veth_id} up')
os.system(f'sudo brctl addif {link_data[1]["linux_bridge"]} veth{veth_id}')
if node_entry[1]['dev_type'] == 'microsoft-sonic':
os.system(f'sudo ip link set netns {DG.nodes[node_entry[0]]["pid"]} dev sw_port{DG.nodes[iface_id]["vlan"] - 10}')
else:
os.system(f'sudo ip link set netns {DG.nodes[node_entry[0]]["pid"]} dev {DG.nodes[iface_id]["dev_name"]}')
if node_entry[1]['dev_type'] == 'microsoft-sonic':
container_node.exec_run(f'ip link set dev sw_port{DG.nodes[iface_id]["vlan"] - 10} netns sw_net', detach=True)
container_node.exec_run(f'ip netns exec sw_net sysctl net.ipv6.conf.sw_port{DG.nodes[iface_id]["vlan"] - 10}.disable_ipv6=1', detach=True)
container_node.exec_run(f'ip netns exec sw_net ip link set sw_port{DG.nodes[iface_id]["vlan"] - 10} up', detach=True)
elif node_entry[1]['dev_type'] == 'ubuntu' and node_entry[1]['dev_role'] == 'hosts':
container_node.exec_run(f'sysctl net.ipv6.conf.{DG.nodes[iface_id]["dev_name"]}.disable_ipv6=1', detach=True)
container_node.exec_run(f'ifconfig {DG.nodes[iface_id]["dev_name"]} {DG.nodes[iface_id]["ipv4"]} mtu 1400', detach=True)
container_node.exec_run(f'ip route replace default via {DG.nodes[link_data[0]]["ipv4"].split("/")[0]}', detach=True)
veth_id += 1
if node_entry[1]['dev_type'] == 'microsoft-sonic':
container_node.exec_run('sh /sonic/scripts/startup.sh', detach=True)
print('sh /sonic/scripts/startup.sh')
!
! Further output is truncated for brevity
!
As you can see, this snippet above is the same script shown in the previous paragraph, augmented with the function container.exec_run(), which allows us to run the commands inside the Docker containers. The commands themselves are templated with the help of the f-string.
Solution verification
Once the code is modified, we are in the position to run it:
2
3
4
5
6
7
8
9
10
11
12
13
14
15
16
17
18
19
20
21
22
23
24
25
26
27
28
29
30
31
32
33
34
Launching the network emulation.
Creating the Docker container with aggs1...
Creating the Docker container with aggs2...
Creating the Docker container with aggs3...
Creating the Docker container with aggs4...
Creating the Docker container with spine11...
Creating the Docker container with spine12...
Creating the Docker container with spine13...
Creating the Docker container with spine14...
Creating the Docker container with spine21...
Creating the Docker container with spine22...
Creating the Docker container with spine23...
Creating the Docker container with spine24...
Creating the Docker container with leaf11...
Creating the Docker container with leaf12...
Creating the Docker container with leaf13...
Creating the Docker container with leaf14...
Creating the Docker container with leaf21...
Creating the Docker container with leaf22...
Creating the Docker container with leaf23...
Creating the Docker container with leaf24...
Creating the Docker container with host1...
Creating the Docker container with host2...
Creating the Docker container with host3...
Creating the Docker container with host4...
Creating the Docker container with host5...
Creating the Docker container with host6...
Creating the Docker container with host7...
Creating the Docker container with host8...
Building connections for aggs1 ...
!
! Further output is truncated for brevity
!
Once the execution of this Python’s script is complete, which may take couple of minutes, depending on the allocated resources, we need to give some minutes for the containers to boot properly (e.g. 5-7 minutes). Meanwhile we can take a look on their list:
2
3
4
5
6
7
8
9
10
11
12
13
14
15
16
17
18
19
20
21
22
23
24
25
26
27
28
29
30
CONTAINER ID IMAGE COMMAND CREATED STATUS PORTS NAMES
3aa7b957b5f5 ubuntu:14.04 "/bin/bash" 6 hours ago Up 6 hours host8
5c57986354f7 ubuntu:14.04 "/bin/bash" 6 hours ago Up 6 hours host7
f1e1b05ed15a ubuntu:14.04 "/bin/bash" 6 hours ago Up 6 hours host6
b5a59efe14d4 ubuntu:14.04 "/bin/bash" 6 hours ago Up 6 hours host5
67e83d1e96aa ubuntu:14.04 "/bin/bash" 6 hours ago Up 6 hours host4
36cb99617c2d ubuntu:14.04 "/bin/bash" 6 hours ago Up 6 hours host3
d55cec2cf5c4 ubuntu:14.04 "/bin/bash" 6 hours ago Up 6 hours host2
edd0dea44b9e ubuntu:14.04 "/bin/bash" 6 hours ago Up 6 hours host1
94c07fd6a1fe docker-sonic-p4 "/bin/bash" 6 hours ago Up 6 hours leaf24
0a520c3078ad docker-sonic-p4 "/bin/bash" 6 hours ago Up 6 hours leaf23
4a89ac91d370 docker-sonic-p4 "/bin/bash" 6 hours ago Up 6 hours leaf22
85f22624afb0 docker-sonic-p4 "/bin/bash" 6 hours ago Up 6 hours leaf21
c6ec4ca403d4 docker-sonic-p4 "/bin/bash" 6 hours ago Up 6 hours leaf14
b9f3cd7828e8 docker-sonic-p4 "/bin/bash" 6 hours ago Up 6 hours leaf13
32de354463dd docker-sonic-p4 "/bin/bash" 6 hours ago Up 6 hours leaf12
65e1aa37306e docker-sonic-p4 "/bin/bash" 6 hours ago Up 6 hours leaf11
f00673f9b1a6 docker-sonic-p4 "/bin/bash" 6 hours ago Up 6 hours spine24
d864b9b6a3a4 docker-sonic-p4 "/bin/bash" 6 hours ago Up 6 hours spine23
f76d3d89888c docker-sonic-p4 "/bin/bash" 6 hours ago Up 6 hours spine22
0ac9c9cc65ff docker-sonic-p4 "/bin/bash" 6 hours ago Up 6 hours spine21
bdb77eaf9d39 docker-sonic-p4 "/bin/bash" 6 hours ago Up 6 hours spine14
22ed6e887cae docker-sonic-p4 "/bin/bash" 6 hours ago Up 6 hours spine13
0f6f0da67d1e docker-sonic-p4 "/bin/bash" 6 hours ago Up 6 hours spine12
ab120bfaf062 docker-sonic-p4 "/bin/bash" 6 hours ago Up 6 hours spine11
56dd6edd24b2 docker-sonic-p4 "/bin/bash" 6 hours ago Up 6 hours aggs4
837a52976b4c docker-sonic-p4 "/bin/bash" 6 hours ago Up 6 hours aggs3
6dc4c066b321 docker-sonic-p4 "/bin/bash" 6 hours ago Up 6 hours aggs2
f50fa11901b2 docker-sonic-p4 "/bin/bash" 6 hours ago Up 6 hours aggs1
The connectivity between the Docker containers are the Linux bridges, as you remember:
2
3
4
5
6
7
8
9
10
11
12
13
14
15
16
17
18
19
bridge name bridge id STP enabled interfaces
br-50ed7a8a2ca2 8000.0242390ee094 no
br-c2e3f48f345b 8000.0242d96d1c0c no
br-d2143b43b3aa 8000.0242bf1ee9f5 no
br0 8000.000000000000 no
docker0 8000.02425c76621b no
hs_br_0 8000.3e9c399bbc13 no veth136
veth96
hs_br_10 8000.5e34886b8766 no veth121
veth141
hs_br_100 8000.1a33a62686f1 no veth10
veth53
hs_br_102 8000.527ff7ced30a no veth11
veth61
hs_br_104 8000.5a65655650f3 no veth12
!
! Further output is truncated for brevity
!
The veth interfaces is somewhat complex concept existing in Linux and allowing the connectivity between the Linux processes, as each process has ultimately its own network stack. Using the example of the Linux bridge hs_br_0, let’s trace the connectivity:
2
3
4
bridge name bridge id STP enabled interfaces
hs_br_0 8000.3e9c399bbc13 no veth136
veth96
You see the names of the virtual interfaces, which can use as input to another Linux networking tool ip link:
2
3
4
5
6
7
8
269: veth96@if270: <BROADCAST,MULTICAST,UP,LOWER_UP> mtu 1500 qdisc noqueue master hs_br_0 state UP mode DEFAULT group default qlen 1000
link/ether 3e:9c:39:9b:bc:13 brd ff:ff:ff:ff:ff:ff link-netnsid 25
$ ip link show dev veth136
356: veth136@if357: <BROADCAST,MULTICAST,UP,LOWER_UP> mtu 1500 qdisc noqueue master hs_br_0 state UP mode DEFAULT group default qlen 1000
link/ether d6:4f:21:c9:49:b4 brd ff:ff:ff:ff:ff:ff link-netnsid 40
You see the IDs associated with each interface: the ID of the veth96 is 269 and it is connected to the interfaces with the ID 270. Likewise, the veth136 has an ID 356 and it is connected to the interfaces with the ID 357.
The connected interfaces you can inside the Docker containers:
2
3
4
5
6
7
8
357: eth0@if356: <BROADCAST,MULTICAST,UP,LOWER_UP> mtu 1400 qdisc noqueue state UP mode DEFAULT group default qlen 1000
link/ether b2:55:71:cc:27:77 brd ff:ff:ff:ff:ff:ff
$ docker container exec -it leaf11 ip netns exec sw_net ip link show dev sw_port0
270: sw_port0@if269: <BROADCAST,MULTICAST,UP,LOWER_UP> mtu 1500 qdisc noqueue state UP mode DEFAULT group default qlen 1000
link/ether 00:dc:5e:01:01:0c brd ff:ff:ff:ff:ff:ff link-netnsid 0
The container with the Ubuntu is straightforward: it has one interface and it is used to connect to the bridge. The Microsoft SONiC-P4 software switch is a complex one, as it uses the multiple namespaces inside it as well.
In fact, the construction of this network function is the most complex setup I have ever seen so far. So you need some patience to understand how it is working.
Anyway, in the output above you can see the MAC addresses, which the containerised network functions have. If we have the connectivity between the containers working, we can see these MAC addresses on the Linux bridge:
2
3
4
5
6
7
8
port no mac addr is local? ageing timer
1 00:dc:5e:01:01:0c no 4.10
1 3e:9c:39:9b:bc:13 yes 0.00
1 3e:9c:39:9b:bc:13 yes 0.00
2 b2:55:71:cc:27:77 no 4.10
2 d6:4f:21:c9:49:b4 yes 0.00
2 d6:4f:21:c9:49:b4 yes 0.00
Both the MAC addresses, which are non-local, are the ones you see in the containers above. That is how the connectivity between the containers are working. The rest is the configuration of the network elements themselves. Let’s check two arbitrary customers’ hosts:
2
3
4
5
6
7
8
9
10
11
default via 192.168.10.0 dev eth0
192.168.10.0/31 dev eth0 proto kernel scope link src 192.168.10.1
$ docker container exec -it host1 ping 192.168.10.0 -c 1
PING 192.168.10.0 (192.168.10.0) 56(84) bytes of data.
64 bytes from 192.168.10.0: icmp_seq=1 ttl=64 time=7.20 ms
--- 192.168.10.0 ping statistics ---
1 packets transmitted, 1 received, 0% packet loss, time 0ms
rtt min/avg/max/mdev = 7.208/7.208/7.208/0.000 ms
The first container has a default route towards its leaf and can reach it. Another host can do that as well:
2
3
4
5
6
7
8
9
10
11
default via 192.168.10.4 dev eth0
192.168.10.4/31 dev eth0 proto kernel scope link src 192.168.10.5
$ docker container exec -it host3 ping 192.168.10.4 -c 1
PING 192.168.10.4 (192.168.10.4) 56(84) bytes of data.
64 bytes from 192.168.10.4: icmp_seq=1 ttl=64 time=9.12 ms
--- 192.168.10.4 ping statistics ---
1 packets transmitted, 1 received, 0% packet loss, time 0ms
rtt min/avg/max/mdev = 9.120/9.120/9.120/0.000 ms
If the networking is properly configured and running on our Microsoft SONiC-P4 switches, we should be able to reach one host from another:
2
3
4
5
6
PING 192.168.10.5 (192.168.10.5) 56(84) bytes of data.
64 bytes from 192.168.10.5: icmp_seq=1 ttl=61 time=16.5 ms
--- 192.168.10.5 ping statistics ---
1 packets transmitted, 1 received, 0% packet loss, time 0ms
rtt min/avg/max/mdev = 16.556/16.556/16.556/0.000 ms
The best way to understand the IP is the network topology graph generated by Graphviz and NetworkX.
The verification of the data centre fabric is mostly related to the check of the BGP. The output from the various devices you can find below:
2
3
4
5
6
7
8
9
10
11
12
13
14
15
16
17
BGP table version is 0, local router ID is 10.0.255.12
Status codes: s suppressed, d damped, h history, * valid, > best, = multipath,
i internal, r RIB-failure, S Stale, R Removed
Origin codes: i - IGP, e - EGP, ? - incomplete
Network Next Hop Metric LocPrf Weight Path
*> 192.168.10.0/31 0.0.0.0 0 32768 i
*= 192.168.10.2/31 10.0.0.40 0 65007 65013 i
*= 10.0.0.32 0 65006 65013 i
*> 10.0.0.16 0 65004 65013 i
*= 192.168.10.4/31 10.0.0.40 0 65007 65014 i
*= 10.0.0.32 0 65006 65014 i
*> 10.0.0.16 0 65004 65014 i
*= 192.168.10.6/31 10.0.0.40 0 65007 65015 i
*= 10.0.0.32 0 65006 65015 i
*> 10.0.0.16 0 65004 65015 i
You can see that leaf sees all the prefixes from the pod A, but no prefixes from the pod B. That might seems suspicious, like if something is wrong with the templates. However, the verification shew that there are no with the templates files, but some devices are not working properly:
2
3
4
5
6
7
8
9
10
11
12
13
14
15
16
17
18
19
20
21
22
23
24
25
26
27
28
29
30
31
32
33
34
35
36
37
38
39
40
41
42
43
44
BGP router identifier 10.0.255.12, local AS number 65012
RIB entries 7, using 784 bytes of memory
Peers 4, using 18 KiB of memory
Neighbor V AS MsgRcvd MsgSent TblVer InQ OutQ Up/Down State/PfxRcd
10.0.0.16 4 65004 23462 23461 0 0 0 06:31:17 3
10.0.0.24 4 65005 8 13 0 0 0 06:31:05 Active
10.0.0.32 4 65006 23464 23466 0 0 0 06:31:16 3
10.0.0.40 4 65007 23460 23465 0 0 0 06:31:15 3
Total number of neighbors 4
$ docker container exec -it spine11 vtysh -c 'show bgp ipv4 unicast summary'
BGP router identifier 10.0.255.4, local AS number 65004
RIB entries 7, using 784 bytes of memory
Peers 8, using 36 KiB of memory
Neighbor V AS MsgRcvd MsgSent TblVer InQ OutQ Up/Down State/PfxRcd
10.0.0.17 4 65012 23477 23481 0 0 0 06:31:35 1
10.0.0.19 4 65013 23474 23475 0 0 0 06:31:29 4
10.0.0.21 4 65014 23468 23469 0 0 0 06:31:23 4
10.0.0.23 4 65015 23464 23468 0 0 0 06:31:22 1
10.0.0.80 4 65000 23463 23464 0 0 0 06:31:18 2
10.0.0.96 4 65001 14 23 0 0 0 06:31:04 Active
10.0.0.112 4 65002 0 0 0 0 0 never Active
10.0.0.128 4 65003 6 11 0 0 0 06:31:20 Active
Total number of neighbors 8
$ docker container exec -it aggs1 vtysh -c 'show bgp ipv4 unicast summary'
BGP router identifier 10.0.255.0, local AS number 65000
RIB entries 7, using 784 bytes of memory
Peers 8, using 36 KiB of memory
Neighbor V AS MsgRcvd MsgSent TblVer InQ OutQ Up/Down State/PfxRcd
10.0.0.81 4 65004 23489 23491 0 0 0 06:31:44 4
10.0.0.83 4 65005 0 0 0 0 0 never Active
10.0.0.85 4 65006 23509 23523 0 0 0 06:32:04 4
10.0.0.87 4 65007 23501 23501 0 0 0 06:31:56 4
10.0.0.89 4 65008 23 33 0 0 0 06:31:30 Active
10.0.0.91 4 65009 28 34 0 0 0 06:31:32 Active
10.0.0.93 4 65010 43 51 0 0 0 06:31:26 Active
10.0.0.95 4 65011 38 50 0 0 0 06:31:27 Active
Total number of neighbors 8
As you see that BGP is partially working, partially not. But in general, the topology is generated and booted properly.
GitHub repository
As you can see over the past posting, the project is in the very active state, so it is changing weekly. You can find the actual state in our GitHub repository.

Lessons learned
Working with the networking between the Linux namespaces is a tough topic, at least for an ordinary network engineer like myself. In the same time, the key success factor is:
- Try to investigate the known concepts, such as brctl;
- Start learning adjacent areas, such as veth;
- Coming to unknowns, such as network stack in different Linux PID and multi namespace inside SONIC.
As a side note, the key tool I used to investigate issues was the tcpdump:
- You can run it inside the Linux.
- You can run it inside the Docker host (Microsoft Azure SONIC).
- You can run it inside the Docker for dedicated namespace.
Conclusion
Despite the lab didn’t boot fully, all the configuration files were generated properly, the Docker containers were up and were interconnected properly. I did an interesting observation, where there is a different amount of the containers with Microsoft SONIC-P4, which are properly working after the boot. That made me thinking, that there are either some racing conditions or simply not enough resources (CPU, Memory) to get the full topology running inside my VM. Hence, I will try to make some scaling tests in another environment to verify the theory. Take care and good bye.
Support us
P.S.
If you have further questions or you need help with your networks, I’m happy to assist you, just send me message. Also don’t forget to share the article on your social media, if you like it.
BR,
Anton Karneliuk