

Hello my friend,
You know our passion to network automation. We truly believe, that this is the only sustainable way for the network development and operation. In the same time, one the key goals of the automation is to make your network secure and safe. Therefore, the security of the automation and communication channels used by automation is very important. So today we’ll take a look how to build
2
3
4
5
retrieval system, or transmitted in any form or by any
means, electronic, mechanical or photocopying, recording,
or otherwise, for commercial purposes without the
prior permission of the author.
Can automation make your network better?
Automation is the key component of the perpetual engine of your network development and operation. It allows you to run the network quick, stable, and safe. And we are willing you to benefit as much as you can from that.
We have created a new training, which is focused only on the Nornir and you can use it for the network (and not only) automation. It is an organic extension of our network automation training, which assumes you are already OK with Python and looking to learn new things, which can even more improve your automation skills to give you possibility to become the most efficient Engineer, who can automate networks and whole IT infrastructure.
Training includes the integration of Python/Nornir with NetBox, configuration and validation of Cisco, Nokia, Arista, Cumulus Linux and CentOS Linux devices with CLI, NETCONF, gNMI, templating techniques with Jinja2 and many more. In the same way as the original one, it is based on the real experience and real use cases, which will give you insights how to apply them for your networks and IT even during the training. Secure your future with our network automation training.
Brief description
IT Security threats as well as the security measures to mitigate them exist as long as the whole IT industry. All the aspects of the security in regards to networking are landing within the CIA framework:
- C – Confidentiality – the key focus here is to make sure that the sensitive information destined to a particular endpoint (person, application, network element) will be read only by that endpoint. If that is intercepted by the 3rd party, he/she/it shall not be able to decipher the content and steal the information.
- I – Integrity – the key focus here is to make sure that the sensitive information destined to the endpoint comes unaltered. It means that even if intercepted, the information cannot be changed and sent further unnoticeable.
- A – Availability – the key here is to make sure that the information is actually available for the endpoint. Among others that involves build and operation of the secure communication channels with authentication and encryption.
When we deal with the network automation, we extensively rely on the communication channels, as we need to convey the corresponding instructions to the network functions when we want to change their configuration or request the some operational info, when the network elements respond to us back and, for sure, when we have asynchronous communication channels, such as streaming telemetry operation. In the following table you may see the mapping of all the automation approaches to the transport protocols and their security options:
| Automation approach | Transport protocol | Security (Authentication) | Security (Encryption) |
|---|---|---|---|
| SSH/CLI | SSH | credentials, ssh keys | built-in |
| NETCONF/YANG | SSH | credentials, ssh keys | built-in |
| RESTCONF/YANG or REST API | HTTP | credentials, token, SSL certificate | with SSL certificate |
| gNMI/YANG | GRPC | credentials, SSL certificate | with SSL certificate |
As you can see, SSL certificates plays crucial role in providing security in REST API/RESTCONF and gNMI environments. As we are promoting the approach to manage the network elements with gNMI and developing the corresponding Python library for that, we want to make the communication channel for it absolutely secure. In regards to the SSL certificates for the REST API and GNMI, there are two possible options how you can handle them:
- Only for the encryption purposes. In this case you can skip the certification validation part and trust it without any check. That is widely used in labs and development, but not good at all for production.
- Both for the authentication and encryption purpose. This would require you to have a proper PKI (public key infrastructure) setup so that, which will allow you to perform the validation of the endpoints and performing the authentication based on the certificates. This is the most secure and recommended way of having your production (and, to be frank, lab as well).
Simplifying the things, the PKI consists of the two major components:
- CA (Certificate Authority) is a core component which has its own certificate and key, which is used to create the certificates for all the devices/applications in your network and. There might be several levels of the hierarchy depending on the complexity of your network: root CA, sub-root CA, and signing CA. The CA’s certificate shall be installed on all your endpoints, as it will be used as a trust point to validate the other endpoints certificates. However, they CA’s key is super secret and it shall stay only on CA, be protected with the passphrase and not be distributed anywhere.
- Endpoints are the devices/applications, which are communicating to each other. They generate their own private keys, which they use to create the certificate signing requests (CSR), which then converted by the CA into the certificates (in .CRT or .PEM format) using the CA’s certificate/key pair.
Well, introduction was not that brief, but it gives you some context of the aspect of the security, we are willing to focus in regards of the network automation.
Usage
Today we’ll create a combined root/signing CA, which will be used in our lab as a central point for our PKI infrastructure. Our lab has the following topology:

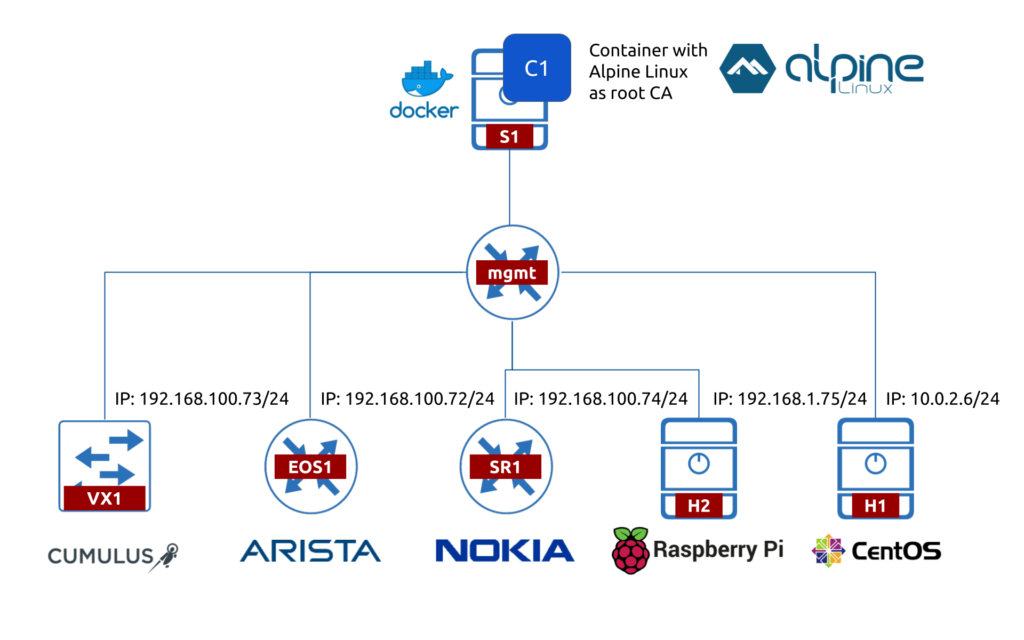
One of the important points about the the root CA, it shall not be online all the time, as it isn’t involved in the active process of the validation. In fact, it is recommended to keep that offline all time and bring it up only when you need to sign a new certificate for your endpoints. Therefore, the micro services architecture relying on Docker containers perfectly matches this usage model.
Finally we can create, our task list for today’s lab:
- Create a Docker container with Alpine Linux having openssl onboard.
- Create the private root CA key in that container. This file stay local inside the container.
- Create the root CA certificate, which will be used for fulfilling the certificate signing requests (CSR) from the endpoints and act as a trust point for them. This file shall be copied on all your endpoints and be added as a trusted certificate in the corresponding channels, tools, etc.
- Make sure the root CA key and certificate are persistent across the container restarts.
Configuration
Before we start, make sure you have the Docker up and running:
2
3
4
5
6
7
$ sudo systemctl status docker.service
● docker.service - Docker Application Container Engine
Loaded: loaded (/usr/lib/systemd/system/docker.service; disabled; vendor preset: disabled)
Active: active (running) since Mon 2021-02-15 21:49:03 GMT; 1min 14s ago
Docs: https://docs.docker.com
Learn more about the Docker, how to install and manage it at our Network Automation Training
#1. Building the Docker container with Alpine Linux to act as root CA
The Alpine Linux is the most tiny full-feature Linux: its full image is just about the 6 MB big. That makes it a perfect candidate to deploy all sort of the infrastructure services. However, such a size comes on the cost: there are no extra packages installed and you need to install everything you might need to use. Therefore, we’d need to instal the openssl package (and all the dependencies it would resolve). The Docker file for our container with root CA will look like as follows:
2
3
4
5
6
7
8
9
10
11
12
13
14
15
# Containerised PKI
# (c)2019-2021, Karneliuk.com
FROM alpine:latest
LABEL maintainer="anton@karneliuk.com"
LABEL updated="2021-02-15"
RUN apk update; apk add openssl
RUN mkdir -p /opt/rootca; mkdir /opt/rootca/local; mkdir /opt/rootca/output; mkdir /opt/rootca/input
WORKDIR /opt/rootca
COPY run.sh /opt/run.sh
So what we do in that file is:
- Take the latest Alpine image.
- Update the packages and install openssl on it.
- Create the following directories:
- /opt/rootca/local to store the key and certificate of the root CA.
- /opt/rootca/input to store the CSRs.
- /opt/rootca/output, which will store the certificates created based on CSRs.
- Copy the script run.sh, which will keep the container busy all the time (see below).
As you might know, by default containers are living only for the duration they perform some activity. Despite in generally it is desired approach, we’d like to be able to bring container up when we need to sign the certification requests and shutdown, when we don’t need that (however, later we could automate this process as well).
To implement this behaviour, we need to make the container thinking that it is super busy all the time. So, we create the basic shell script to make the container busy:
2
3
4
5
6
7
8
9
# Containerised PKI
# (c)2019-2021, Karneliuk.com
#!/bin/sh
while :; do
sleep 1
done
This script do nothing but keeps the container up all the time until you manually shut it down yourself.
Finally, we create a simple Docker compose file to bring our container with root CA up:
2
3
4
5
6
7
8
9
10
11
12
13
14
15
# Containerised PKI
# (c)2019-2021, Karneliuk.com
---
version: '3'
services:
crootca:
build: .
entrypoint: ['/bin/sh', 'run.sh']
volumes:
- "st:/opt/rootca"
hostname: rootca.karneliuk.com
volumes:
st:
...
In this file we instruct the docker-compose tool to create the container out of the local Docker file and launch our busy script upon the container instantiation. Also we create a local volume st, which is a storage persistent across reboots and map the /opt/rootca directory to that, so that we can store all our certificate info.
So brining all together, we have the following files in the directory:
2
3
4
+--Dockerfile
+--docker-compose.yml
+--run.sh
Ok, so at this stage now we are ready to bring our root CA and start our own local PKI business. Looks not that complicated, isn’t it? Let’s do that.
First of all, we need to build our container. The docker-compose can help us with that as:
2
3
4
5
6
7
8
9
10
11
12
13
14
15
16
17
18
19
20
21
22
23
24
25
26
27
28
29
30
31
32
33
34
35
36
37
Building crootca
Step 1/7 : FROM alpine:latest
latest: Pulling from library/alpine
Digest: sha256:08d6ca16c60fe7490c03d10dc339d9fd8ea67c6466dea8d558526b1330a85930
Status: Image is up to date for alpine:latest
---> e50c909a8df2
Step 2/7 : LABEL maintainer="anton@karneliuk.com"
---> Using cache
---> 3dfa22a3103c
Step 3/7 : LABEL updated="2021-02-15"
---> Using cache
---> 2725973d0bc1
Step 4/7 : RUN apk update; apk add openssl
---> Running in 8532d39b69f1
fetch https://dl-cdn.alpinelinux.org/alpine/v3.13/main/x86_64/APKINDEX.tar.gz
fetch https://dl-cdn.alpinelinux.org/alpine/v3.13/community/x86_64/APKINDEX.tar.gz
v3.13.1-121-g2b8f751c60 [https://dl-cdn.alpinelinux.org/alpine/v3.13/main]
v3.13.1-122-g0dcc1eb246 [https://dl-cdn.alpinelinux.org/alpine/v3.13/community]
OK: 13879 distinct packages available
(1/1) Installing openssl (1.1.1i-r0)
Executing busybox-1.32.1-r2.trigger
OK: 6 MiB in 15 packages
Removing intermediate container 8532d39b69f1
---> bc6dc675ec36
Step 5/7 : RUN mkdir -p /opt/rootca; mkdir /opt/rootca/local; mkdir -p /opt/rootca/output
---> Running in b92f7ab18d75
Removing intermediate container b92f7ab18d75
---> 65e1053162ed
Step 6/7 : WORKDIR /opt/rootca
---> Running in aabfe0de5700
Removing intermediate container aabfe0de5700
---> 728766c47a3e
Step 7/7 : COPY run.sh /opt
---> 0512233fa75e
Successfully built 0512233fa75e
Successfully tagged crootca_crootca:latest
You can verify created image using sudo docker image inspect crootca_crootca command.
Now we can bring the container up using the same docker-compose, but this time with different flags:
2
3
4
Creating network "crootca_default" with the default driver
Creating volume "crootca_st" with default driver
Creating crootca_crootca_1 ... done
Once the container is created, you can check if that is up and running:
2
3
CONTAINER ID IMAGE COMMAND CREATED STATUS PORTS NAMES
4ad4c905b8c6 crootca_crootca "/bin/sh /opt/run.sh" 7 seconds ago Up 5 seconds crootca_crootca_1
Hurray! So now we can jump inside and start actually working with PKI:
2
/opt/rootca #
#2. Creating the private root CA key
Once the infrastructure (the Docker container running Alpine Linux with OpenSSL installed) is setup, we can proceed with the root CA tasks. The first step is to generate the root CA private key, which we will store in the /opt/rootca/local directory:
2
3
4
5
6
7
8
-out /opt/rootca/local/rootCA.key 4096
Generating RSA private key, 4096 bit long modulus (2 primes)
......++++
..............................................................................................++++
e is 65537 (0x010001)
Enter pass phrase for /opt/rootca/local/rootCA.key:
Verifying - Enter pass phrase for /opt/rootca/local/rootCA.key:
Once you run this command, you will be asked to type in the passphrase. Keep that secret and don’t skip this phase in the favour of full blown automation. That is the case, where we recommend you to keep the password entered manually.
That step was easy, wasn’t it?
#3. Creating the public root CA certiciate
The next step is not much more complicated, to be honest. You need to create the root CA public certificate, which later shall be installed on all your endpoints (per our lab topology: two different Linux and two network operating systems). So to create the certificate, we do that as follows:
2
3
-sha512 -days 365 -out local/rootCA.pem \
-subj "/C=UK/ST=London/L=London/O=Karneliuk.com/OU=SEC/CN=rootca.karneliuk.com"
Our root CA is set up and we need just validate it.
#4. Validating the setup
First thing first, you can check the content of the created certificate:
2
3
4
5
6
7
8
9
10
11
12
13
14
15
16
17
18
19
20
21
22
23
24
25
26
27
28
29
30
31
32
33
34
35
36
37
38
39
40
41
42
43
44
45
46
47
48
49
50
51
52
53
54
55
56
57
58
59
60
61
62
63
64
65
66
67
68
69
70
71
72
73
74
75
76
77
78
79
80
81
82
83
84
85
86
87
88
89
90
Certificate:
Data:
Version: 3 (0x2)
Serial Number:
22:e6:6a:84:13:b0:d8:93:94:4e:48:20:ad:b5:a9:b1:90:e3:e4:a7
Signature Algorithm: sha512WithRSAEncryption
Issuer: C = UK, ST = London, L = London, O = Karneliuk.com, OU = SEC, CN = rootca.karneliuk.com
Validity
Not Before: Feb 15 23:14:08 2021 GMT
Not After : Feb 15 23:14:08 2022 GMT
Subject: C = UK, ST = London, L = London, O = Karneliuk.com, OU = SEC, CN = rootca.karneliuk.com
Subject Public Key Info:
Public Key Algorithm: rsaEncryption
RSA Public-Key: (4096 bit)
Modulus:
00:b3:36:5c:21:65:22:e6:e2:39:db:13:b9:cb:5c:
ed:c2:bb:71:d0:eb:ec:14:88:67:d6:b5:ae:d2:8e:
78:87:1c:17:c8:f0:cd:1e:ef:e5:d8:1c:fc:42:75:
f4:23:1a:67:08:18:05:cd:52:ee:14:f5:ab:80:e9:
ce:3b:f6:cb:53:e5:cb:3d:fc:ac:01:cc:05:7f:f7:
7a:d2:21:ab:12:73:9b:6b:a1:cd:fa:e1:31:3c:e8:
29:bd:42:e4:53:4b:2c:0f:54:1f:d4:77:4a:96:4c:
2e:28:48:f3:50:91:0c:09:65:90:ec:7c:84:76:3b:
36:52:27:0a:b7:37:c3:e6:41:cd:c9:62:6c:c5:05:
7c:96:80:43:75:10:0a:22:43:d1:51:95:21:f4:37:
ad:20:cc:b9:c8:24:35:ee:eb:c6:57:1f:98:cf:5b:
9b:82:6f:54:00:ea:bb:b5:56:82:d9:11:6f:8d:bc:
fb:3d:da:74:74:0a:a6:4b:1a:1c:e0:76:2c:3f:8a:
4c:ee:6b:2d:cb:61:54:10:ef:51:cf:8f:85:5d:ee:
6c:fe:a1:08:81:d1:41:cf:8a:f8:1b:d0:45:48:c3:
37:29:17:51:a6:66:92:c7:f8:bc:e6:ae:c2:bc:cd:
1e:f7:ba:79:54:44:69:43:75:db:c0:5d:ee:8b:98:
ad:3e:5a:58:26:60:fb:87:10:f2:86:ee:38:41:9b:
d6:45:9f:60:1e:8a:c0:e4:77:22:85:4e:90:ee:f2:
0c:d6:8c:43:eb:47:9c:cd:80:d3:13:95:1a:a6:96:
c9:88:73:5b:ab:ee:0b:0e:67:fd:7c:1a:e3:56:33:
28:45:1d:ae:dc:eb:e7:10:ce:e4:43:cb:4b:71:6d:
af:1c:aa:fe:ce:21:a7:fb:f3:a0:f4:19:a9:05:93:
b7:a3:fe:d3:13:c3:9b:dc:61:16:67:7e:72:9e:8c:
d7:b8:94:6b:58:8f:0a:24:7d:86:0c:07:2d:31:68:
d0:7b:d5:78:a9:1a:85:1f:5b:f3:d5:d6:7f:ee:57:
7b:9c:b1:68:e6:eb:c4:dd:72:22:f5:5e:56:1d:5b:
7c:0d:84:e1:50:e8:a0:18:38:84:fe:b3:2c:3d:fc:
43:81:34:77:51:68:9b:1a:f2:55:ef:b9:86:a3:d1:
4b:ae:7f:b0:b0:44:28:6e:64:dd:ed:8c:59:2f:23:
2c:31:cb:39:35:15:da:ad:57:6f:a9:2f:71:34:a4:
c0:db:99:de:a7:2f:42:0b:4b:34:77:76:d6:28:ea:
78:ed:92:29:2d:e0:d7:63:69:c5:31:f2:6a:44:2b:
db:42:75:22:2b:8d:2e:3e:58:1d:a7:6d:7a:e6:07:
62:33:71
Exponent: 65537 (0x10001)
X509v3 extensions:
X509v3 Subject Key Identifier:
5B:A9:83:A9:14:EA:BA:A4:17:F4:50:16:48:54:1B:09:93:E9:42:2B
X509v3 Authority Key Identifier:
keyid:5B:A9:83:A9:14:EA:BA:A4:17:F4:50:16:48:54:1B:09:93:E9:42:2B
X509v3 Basic Constraints: critical
CA:TRUE
Signature Algorithm: sha512WithRSAEncryption
a7:ca:c5:ca:44:a1:f1:e9:f0:a4:f5:bd:35:f8:8c:67:98:bb:
81:70:76:e1:08:f7:1c:9e:26:3e:ea:d3:5d:b0:9c:91:e5:b7:
4e:ac:88:b3:49:88:06:fd:c6:ae:16:88:74:08:33:66:e1:a6:
2e:52:bc:2c:2a:27:78:e7:44:7e:de:63:b1:d0:05:c8:1f:b7:
e8:81:ea:0d:b5:85:92:e6:ef:7f:57:92:1c:b2:1f:29:23:a8:
ee:a2:10:0a:2a:ca:6e:03:94:a4:23:6d:48:3f:bb:46:88:1f:
78:47:c7:75:f4:9d:31:0c:d0:d9:ec:78:75:8e:68:47:71:15:
90:2b:ab:25:7d:a2:a6:ff:da:28:50:63:af:cb:31:db:c9:7e:
ef:44:3a:7e:e4:3f:66:4e:38:74:b0:e6:74:4e:e9:e8:14:5f:
82:b5:6f:ad:32:dd:8e:a0:9d:b4:bf:87:ea:e5:d2:cc:d7:b8:
52:5e:02:4e:1c:ce:de:5c:3e:5e:d5:16:1e:f6:c8:54:0c:96:
85:90:bc:9a:c3:d1:52:b8:2a:d7:99:f4:23:21:97:c6:6a:64:
38:9b:9b:29:d7:2a:a1:00:58:5a:73:92:ae:c7:31:28:89:ab:
59:aa:cd:12:60:08:c7:69:0e:49:be:2b:cf:8a:08:17:1f:2c:
58:32:3e:b4:fc:e2:93:29:37:2e:3a:ec:35:ce:f6:14:d2:56:
38:56:fc:26:2d:f3:de:6e:da:f6:68:7a:17:69:09:2f:d2:df:
23:19:c2:2f:7d:35:50:0d:fe:11:43:3b:b8:f6:f2:9f:a1:12:
92:f6:ac:6c:b3:c2:9d:ed:63:01:7a:2f:3d:12:90:b4:35:6c:
8d:b5:07:96:3b:35:be:0b:7d:f9:14:5c:d4:3b:e5:a4:2e:da:
24:67:be:39:9f:e2:e9:58:41:70:01:d7:05:28:51:49:7a:84:
f8:ef:79:ef:85:95:50:74:90:53:64:1a:30:e6:ea:82:9e:1d:
6c:05:3b:4b:d4:f4:26:d0:86:0f:c9:1c:49:4e:a7:99:f7:85:
5c:a3:cc:83:47:30:82:c3:ba:a9:0a:5c:d4:01:0c:0f:79:cf:
98:c9:db:a9:5f:3f:5f:72:d8:48:4c:63:60:55:77:f0:33:30:
f5:d0:ee:6c:54:4b:e7:51:e8:d5:9a:77:8e:7b:7e:28:21:0b:
5d:23:2f:0c:16:fe:59:80:da:01:39:8e:b3:d5:45:f1:81:1c:
04:11:f8:cb:72:8a:27:a5:75:d6:21:e7:c0:68:7a:6a:46:b7:
e4:d0:5b:08:5f:cc:7d:4d:88:05:52:51:21:f4:81:f9:d8:73:
2e:b1:1a:0d:5d:6f:0b:35
As you can see, all the details we’ve passed as the -subj argument earlier were properly processed and you can see them in the output. As said earlier, later this file will be distributed to all four our endpoints.
The last point we need to check is that the certificate and key are persistent across reboots. So, we shut our container down:
2
crootca_crootca_1
Check that it is down indeed:
2
40882b1fb004 crootca_crootca "/bin/sh /opt/run.sh" 4 minutes ago Exited (137) 27 seconds ago crootcacrootca_1
Launch it again:
2
crootca_crootca_1
Check the certificate again to make sure it exists and has proper content:
2
3
4
5
6
7
8
9
10
Certificate:
Data:
Version: 3 (0x2)
Serial Number:
22:e6:6a:84:13:b0:d8:93:94:4e:48:20:ad:b5:a9:b1:90:e3:e4:a7
Signature Algorithm: sha512WithRSAEncryption
Issuer: C = UK, ST = London, L = London, O = Karneliuk.com, OU = SEC, CN = rootca.karneliuk.com
!
! Further output is truncated for brevity
That’s it, the setup of the root CA containerised with Docker and based on Alpine Linux and OpenSSL is completed. You can ask us: what is the difference to a standard self-signed certificate? It is indeed a self signed certificate, but once we install it on other devices using it as trusted certificate and sign the CSRs, the PKI will start working.
#5. Ideas for automation
We can add the process of the key and certificate creation as part of the container build. That will remove the steps to be taken manually. However, that may create some inconvenience, as any change of the Docker file done earlier than certificate generation will reflect into the certificate regeneration, which is not what we are willing to have.
Join our network automation training to get more in-depth knowledge about Docker containers and how they can help you in the network automation.
GitHub repository
Find this and other examples in our repository.
Lessons learned
The topics of the network security is often skipped by the network engineers. There are numerous reasons for that, such as desire to do things quicker and focus on the core technologies. However, all the technologies, which are implemented or are to be implemented in the production environment, must be hardened and secured as much as possible. Therefore, we need to consider network security in all the aspects we deal with the network automation. And it is better to learn that lessons as early as possible.
Conclusion
Today you have seen how to create your root CA. We believe you realised that the process is pretty straightforward. This is however just the first step. In the following article we’ll show how to further rely on this infrastructure in your network. Take care and good bye.
Support us
P.S.
If you have further questions or you need help with your networks, I’m happy to assist you, just send me message. Also don’t forget to share the article on your social media, if you like it.
BR,
Anton Karneliuk