

Hello my friend,
In one of the previous blogposts we have share the details how you can build the containerised PKI relying Docker, Alpine Linux and OpenSSL. Today we’ll show how you can use it.
2
3
4
5
retrieval system, or transmitted in any form or by any
means, electronic, mechanical or photocopying, recording,
or otherwise, for commercial purposes without the
prior permission of the author.
How automation can increase the security?
In one of the recent articles dedicated to threats to the national security with respect to 5G caused by the current operation models in the big service providers, one the network automation were named as one of the key mitigation approaches. The reason is very simple: network automation allows you to keep (or even increase) the pace of the network changes with increasing the stability without increasing the size of your network operation teams.
We absolutely agree with this statement. We have observed ourselves that in many cases the key technical competence for service providers is being outsourced and in certain cases the service providers have to rely on the external parties to perform changes in their own network (and even pay the third parties for that). It means that third parties have access to the sensitive customer data and potentially can misuse or even sell that. The solution is simple, do everything on your own. And our network automation training will help you.
In this training we have brought our own experience of end-to-end multi vendor network and IT systems automation. Through this experience we have forged the understand what is working, what is not and what knowledge/skills are key to succeed. Therefore, the training includes the foundation of the infrastructure management (Linux, KVM, Docker, Linux network and Linux firewalls), data encoding (XML, JSON, YAML, Protobuf), automation interfaces (SSH, NETCONF, RESTCONF, gNMI). These technologies are shown in the context of the real uses cases with application to different vendors (Cisco, Nokia, Arista, Cumulus) from various tools (Ansible, Bash, and Python). We live the automation, and are keen to help you to start your journey so that you can improve the stability and security of your network (and, oh boy, the national security).
Brief description
Earlier we have shared how to create your root CA, which is used to issue the root certificate, which shall be used a trust point throughout your network. If all hosts in your network have the same root certificate installed and their own certificates created by that root CA, then they will be able to authenticate each other for the application supporting certificates (e.g., those which based on REST API or gRPC). In fact, as described earlier, the certificate will be used not only to authenticate the peer but also to setup the encrypted communication channel before sending the data, which is particularly important in the era of the cyber security threats.
Usage
Let’s recall the lab topology we have started building the last time:

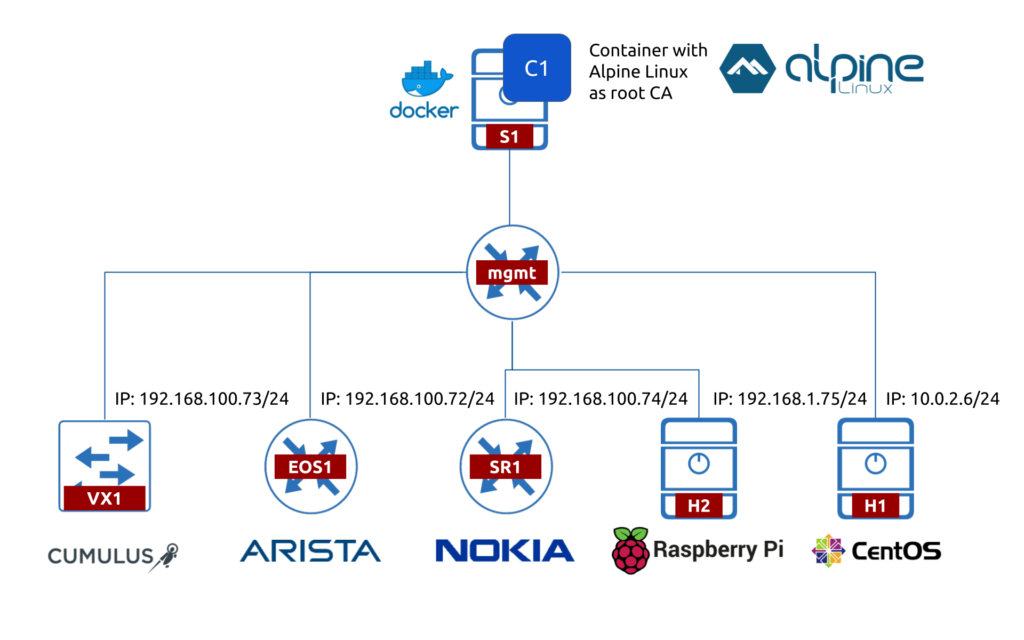
As our root CA is already existing, we need to do the following:
- Install the root CA certificate as trusted on all our systems.
- Generate the private key on each device.
- Generate the certificate signing request (CSR) on each device.
- Sign that request by the private root CA key on the root CA.
- Get the created certificate back on each device.
- Make the configuration so that certificate is used by the corresponding applications.
Generally you would like to have the DNS setup available as well, as you might generate certificates based on the FQDN. However, for the lab purpose the modification of hosts files would be enough.
Let’s start with the implementation of this approach.
#1. Integrating the Linux CentOS with your PKI
#1.1. Installing root CA certificate
First of all, we need to copy the root CA certificate into the /etc/pki/ca-trust/source/anchors/ directory in your host running CentOS Linux. Assuming that 192.168.1.70 is a server running Docker container with rootCA, we can copy the certificate as:
2
3
aaa@192.168.1.70's password:
rootCA.pem 100% 2065 36.3KB/s 00:00
Pay attention that copy shall be done with sudo privileges, as the destination is in /etc, what means that admin permissions are needed.
Once the root certificate is downloaded, you need to install it:
That scans the default folder with root certificates and add the them to the system operation. Once installed, you can validate it is available:
2
3
4
unable to load certificate
140317587957568:error:0909006C:PEM routines:get_name:no start line:crypto/pem/pem_lib.c:745:Expecting: TRUSTED CERTIFICATE
subject=C = UK, ST = London, L = London, O = Karneliuk.com, OU = SEC, CN = rootca.karneliuk.com
If you see the created certificate in the output, it means that it is successfully installed.
#1.2, 1.3. Generating private key and Certificate Signing Request
This step is completed as easy as just one command:
2
3
4
5
6
7
8
-keyout centos.lab.karneliuk.key -out centos.lab.karneliuk.csr \
-subj "/C=UK/ST=London/L=London/O=Karneliuk.com/OU=SEC/CN=centos.lab.karneliuk.com"
Generating a RSA private key
..........................................................................................................+++++
...................................................................................................................................................+++++
writing new private key to 'centos.lab.karneliuk.key'
-----
The CSR is ready and now you need to create the certificate at your root CA.
#1.4. Signing certificate at root CA
Copy the CSR from the Linux CentOS host to the root CA back.
2
3
aaa@192.168.1.70's password:
centos.lab.karneliuk.csr 100% 1025 38.6KB/s 00:00
Then sign it without our Docker container with Alpine Linux and OpenSSL.
2
3
4
5
6
7
8
-CA local/rootCA.pem -CAkey local/rootCA.key \
-CAcreateserial -out output/centos.lab.karneliuk.crt \
-days 365 -sha512
Signature ok
subject=C = UK, ST = London, L = London, O = Karneliuk.com, OU = SEC, CN = centos.lab.karneliuk.com
Getting CA Private Key
Enter pass phrase for local/rootCA.key:
Once you provide the root CA private key passphrase defined in the previous step, the certificate is generated.
#1.5 Getting back the certificate on the node
Copy the certificate back on the host (view from CentOS host):
2
3
aaa@192.168.1.70's password:
centos.lab.karneliuk.crt 100% 1602 30.3KB/s 00:00
Then check its content using openssl:
2
3
4
5
6
7
8
9
10
11
12
13
14
15
16
17
18
19
Certificate:
Data:
Version: 1 (0x0)
Serial Number:
32:ca:a7:9f:4c:1a:66:43:79:df:72:e4:b9:f8:f9:a4:24:6e:cb:d4
Signature Algorithm: sha512WithRSAEncryption
Issuer: C = UK, ST = London, L = London, O = Karneliuk.com, OU = SEC, CN = rootca.karneliuk.com
Validity
Not Before: Mar 1 22:36:20 2021 GMT
Not After : Mar 1 22:36:20 2022 GMT
Subject: C = UK, ST = London, L = London, O = Karneliuk.com, OU = SEC, CN = centos.lab.karneliuk.com
Subject Public Key Info:
Public Key Algorithm: rsaEncryption
RSA Public-Key: (2048 bit)
Modulus:
00:f4:d0:3a:76:d7:38:de:6d:26:6b:b0:7f:cc:8e:
!
! FURTHER OUTPUT IS TRUNCATED FOR BREVITY
The integration of the CentOS Linux host is completed.
#2. Integrating the Raspberry OS with your PKI
The second host we will work with the integration with our PKI is our new Raspberry PI 4 node, which we are actively using for all sort of the IoT and network monitoring activities.
#2.1. Installing root CA certificate
Pretty much in the same way we did it for the CentOS Linux earlier, for the Raspberry OS (which is a Debian, in fact), need to copy the root CA certificate from our Docker container with Alpine/OpenSSL to our system in the corresponding directory, which is /usr/local/share/ca-certificates/.
Do it with sudo.
2
3
aaa@192.168.1.70's password:
rootCA.pem 100% 2065 157.5KB/s 00:00
The interesting thing with Raspbian is that it expects the root certificate to be .crt file, rather then .pem. So you can convert it using the openssl tool at our Raspberry PI:
2
3
-in /usr/local/share/ca-certificates/rootCA.pem \
-outform PEM -out rootCA.crt
Afterwards you need to run the command to re-sync the certificates:
Once the resin is completed (you should see the notification that 1 certificate is added), check if the new root CA certificate is now available for the system:
2
subject=C = UK, ST = London, L = London, O = Karneliuk.com, OU = SEC, CN = rootca.karneliuk.com
The root certificate is now installed in our Raspberry OS.
#2.2, 2.3. Generating private key and Certificate Signing Request
As we are dealing with the Linux (Debain) system, the generation of the certificate signing request and private key is 100% the same as for the CentOS Linux earlier:
2
3
4
5
6
7
8
-keyout pi.lab.karneliuk.key -out pi.lab.karneliuk.csr \
-subj "/C=UK/ST=London/L=London/O=Karneliuk.com/OU=SEC/CN=pi.lab.karneliuk.com"
Generating a RSA private key
..+++++
............+++++
writing new private key to 'pi.lab.karneliuk.key'
-----
#2.4. Signing certificate at root CA
Copy the CSR from the Raspberry PI host to the root CA for further signature.
2
3
aaa@192.168.1.70's password:
pi.lab.karneliuk.csr 100% 1021 42.4KB/s 00:00
And sign by OpenSSL in our Alpine Linux node running on top of Docker:
2
3
4
5
6
7
8
-CA local/rootCA.pem -CAkey local/rootCA.key \
-CAcreateserial -out output/pi.lab.karneliuk.crt \
-days 365 -sha512
Signature ok
subject=C = UK, ST = London, L = London, O = Karneliuk.com, OU = SEC, CN = pi.lab.karneliuk.com
Getting CA Private Key
Enter pass phrase for local/rootCA.key:
#2.5 Getting back the certificate on the node
Copy the certificate back on the host (view from CentOS host):
2
3
aaa@192.168.1.70's password:
pi.lab.karneliuk.crt 100% 1598 253.7KB/s 00:00
Again, as the openssl is a core component for Debain/Raspbian as it is for the CentOS Linux, the validation is exactly the same:
2
3
4
5
6
7
8
9
10
11
12
13
14
15
16
17
18
19
Certificate:
Data:
Version: 1 (0x0)
Serial Number:
32:ca:a7:9f:4c:1a:66:43:79:df:72:e4:b9:f8:f9:a4:24:6e:cb:d6
Signature Algorithm: sha512WithRSAEncryption
Issuer: C = UK, ST = London, L = London, O = Karneliuk.com, OU = SEC, CN = rootca.karneliuk.com
Validity
Not Before: Mar 2 21:49:23 2021 GMT
Not After : Mar 2 21:49:23 2022 GMT
Subject: C = UK, ST = London, L = London, O = Karneliuk.com, OU = SEC, CN = pi.lab.karneliuk.com
Subject Public Key Info:
Public Key Algorithm: rsaEncryption
RSA Public-Key: (2048 bit)
Modulus:
00:c3:7e:5a:b7:19:f7:f8:d3:e1:86:07:4d:cc:ff:
!
! FURTHER OUTPUT IS TRUNCATED FOR BREVITY
This certificate will be used if we host any HTTP based (REST API or GRPC) app on the Raspberry PI.
#3. Integrating the Nokia SR OS with your PKI
Once our Linux devices are being integrated, it is time to look into the network functions. Here we have a lot of various commands as we have a lot of various network operating systems. Let’s start with Nokia SR OS.
#3.1. Installing root CA certificate
Our device is running in the MD-CLI mode, but the certificate commands are not available for it as of SR OS 20.7.
Therefore, we need to switch to the classical CLI and copy the root CA certificate to the local flash (the good thing is that Nokia SR OS supports SCP and we don’t need to do any extra job). The example is how to push the certificate to it from the container with Alpine:
2
3
admin@192.168.100.64's password:
rootCA.pem 100% 2065 30.3KB/s 00:00
The pushed certificate is stored by default in cf3 at Nokia SR OS network device:
2
3
SR1>file cf3:\ # dir | match pem
03/02/2021 10:19p 2065 rootCA.pem
Afterwards, we need to import it in the system using the admin certificate context:
#3.2, 3.3. Generating private key and Certificate Signing Request
Those two steps are accomplished using the same admin certificate context:
2
3
SR1# admin certificate gen-local-cert-req keypair cf3:\sr1.lab.karneliuk.com.key subject-dn C=UK,ST=London,O=Karneliuk.com,OU=SEC,CN=sr1.lab.karneliuk.com ip-addr 192.168.100.64 domain-name sr1.lab.karneliuk.com hash-alg sha512 file cf3:\sr1.lab.karneliuk.com.csr
Those files are now located in the cf3 and we can copy the CSR to the root CA:
2
3
4
5
6
7
03/02/2021 10:09p 1078 sr1.lab.karneliuk.com.csr
03/02/2021 10:06p 1191 sr1.lab.karneliuk.com.key
SR1>file cf3:\ # scp sr1.lab.karneliuk.com.csr aaa@192.168.1.70:. router "management"
aaa@192.168.1.70's password:
sr1.lab.karneliuk.co 100% |*****************************| 1078 00:00
#3.4. Signing certificate at root CA
The signing is already becoming as business as usual, isn’t it?:
2
3
4
5
6
7
8
-CA local/rootCA.pem -CAkey local/rootCA.key \
-CAcreateserial -out output/sr1.lab.karneliuk.com.crt \
-days 365 -sha512
Signature ok
subject=C = UK, ST = London, O = Karneliuk.com, OU = SEC, CN = sr1.lab.karneliuk.com
Getting CA Private Key
Enter pass phrase for local/rootCA.key:
#3.5 Getting back the certificate on the node
Now we need to copy the signed certificate back, pretty much in the same way we did it earlier for the root CA:
2
3
4
admin@192.168.100.64's password:
sr1.lab.karneliuk.com.crt 100% 1578 21.7KB/s 00:00
Now we need to validate the content of the certificate on Nokia SR OS router:
2
3
4
5
6
7
8
9
10
11
12
13
14
15
16
17
18
19
Certificate:
Data:
Version: 1 (0x0)
Serial Number:
32:ca:a7:9f:4c:1a:66:43:79:df:72:e4:b9:f8:f9:a4:24:6e:cb:d8
Signature Algorithm: sha512WithRSAEncryption
Issuer: C=UK, ST=London, L=London, O=Karneliuk.com, OU=SEC, CN=rootca.karneliuk.com
Validity
Not Before: Mar 2 22:34:48 2021 GMT
Not After : Mar 2 22:34:48 2022 GMT
Subject: C=UK, ST=London, O=Karneliuk.com, OU=SEC, CN=sr1.lab.karneliuk.com
Subject Public Key Info:
Public Key Algorithm: rsaEncryption
RSA Public-Key: (2048 bit)
Modulus:
00:b8:83:53:ff:42:c4:bc:03:08:3d:46:94:58:3e:
!
! FURTHER OUTPUT IS TRUNCATED FOR BREVITY
And also we should import it with the key under an alias so that it can be used in applications (e.g., IPSec, REST API, gRPC) with in the Nokia SR OS configuration:
2
3
SR1# admin certificate import type cert input cf3:\sr1.lab.karneliuk.com.crt output sr1.lab.karneliuk.com_cert format pem
#3.6. Integration with application
The final step would be create a PKI configuration within the Nokia SR OS. To do that, we are switching back to the MD-CLI:
2
3
4
5
6
7
8
9
10
11
12
13
14
15
16
17
18
19
20
21
22
23
24
25
A:admin@A-SR1# compare
system {
security {
+ pki {
+ ca-profile "karneliuk_pki" {
+ admin-state enable
+ cert-file "ca_cert"
+ revocation-check crl-optional
+ }
+ }
+ tls {
+ cert-profile "cp_sr1" {
+ admin-state enable
+ entry 1 {
+ certificate-file "sr1.lab.karneliuk.com_cert"
+ key-file "sr1.lab.karneliuk.com_key"
+ }
+ }
+ trust-anchor-profile "anchor_karneliuk_pki" {
+ trust-anchor "karneliuk_pki" { }
+ }
+ }
}
}
Once the configuration is committed, you can use them in your apps. Here are some useful commands for further checks:
2
3
4
5
SR1# show system security tls cert-profile
SR1# show system security tls cert-profile "cp_sr1" entry 1
#4. Integrating the Arista EOS with your PKI
Continuing the integration of our network devices with the our own PKI, we will add the configuration to the Arista EOS device.
#4.1. Installing root CA certificate
Connect to your Arista EOS device and go to the Bash shell. From there, copy the root CA certificate to /persist/secure/ssl/certs/ directory on the Arista EOS network function:
2
3
4
5
6
7
8
EOS1#bash
Arista Networks EOS shell
[aaa@EOS1 ~]$ scp aaa@192.168.1.70:rootCA.pem /persist/secure/ssl/certs/.
Warning: Permanently added '192.168.1.70' (ECDSA) to the list of known hosts.
aaa@192.168.1.70's password:
rootCA.pem 100% 2065 909.9KB/s 00:00
#4.2, 4.3. Generating private key and Certificate Signing Request
Now you need to get back to the Arista EOS CLI:
2
EOS1#
Generate the private key:
There will be no output from the previous command, so no output is show either. The next step is to create a certificate signing request:
2
3
4
5
6
7
8
9
10
11
12
13
14
15
Common Name for use in subject: eos1.lab.karneliuk.com
Two-Letter Country Code for use in subject: UK
State for use in subject: London
Locality Name for use in subject: London
Organization Name for use in subject: Karneliuk.com
Organization Unit Name for use in subject: SEC
Email address for use in subject:
IP addresses (space separated) for use in subject-alternative-name: 192.168.100.62
DNS names (space separated) for use in subject-alternative-name:
Email addresses (space separated) for use in subject-alternative-name:
-----BEGIN CERTIFICATE REQUEST-----
MIIE3TCCAsUCAQAwdjELMAkGA1UEBhMCVUsxDzANBgNVBAgMBkxvbmRvbjEPMA0G
...
-----END CERTIFICATE REQUEST-----
Directly in the CLI you are getting the content of the CSR, so you need to copy that and save in the input directory on the root CA (view from root CA):
2
3
4
5
-----BEGIN CERTIFICATE REQUEST-----
MIIE3TCCAsUCAQAwdjELMAkGA1UEBhMCVUsxDzANBgNVBAgMBkxvbmRvbjEPMA0G
...
-----END CERTIFICATE REQUEST-----
#4.4. Signing certificate at root CA
Sing the certificate by the root CA like in all previous cases:
2
3
4
5
6
7
8
-CA local/rootCA.pem -CAkey local/rootCA.key \
-CAcreateserial -out output/eos1.lab.karneliuk.crt \
-days 365 -sha512
Signature ok
subject=C = UK, ST = London, L = London, O = Karneliuk.com, OU = SEC, CN = eos1.lab.karneliuk.com
Getting CA Private Key
Enter pass phrase for local/rootCA.key:
#4.5 Getting back the certificate on the node
Go back to Bash and copy the certificate back on the host. Once copy complete, exit back to the Arista CLI (view from Arista EOS):
2
3
4
5
Warning: Permanently added '192.168.1.70' (ECDSA) to the list of known hosts.
aaa@192.168.1.70's password:
eos1.lab.karneliuk.crt 100% 1948 1.6MB/s 00:00
[aaa@EOS1 ~]$ exit
Now you can check the content of the created certificate:
2
3
4
5
6
7
8
9
10
11
12
13
14
15
16
17
18
19
20
21
22
23
24
25
26
27
28
Certificate eos1.lab.karneliuk.crt:
Version: 1
Serial Number: 32caa79f4c1a664379df72e4b9f8f9a4246ecbd5
Issuer:
Common name: rootca.karneliuk.com
Organizational unit: SEC
Organization: Karneliuk.com
Locality: London
State: London
Country: UK
Validity:
Not before: Mar 01 23:20:35 2021 GMT
Not After: Mar 01 23:20:35 2022 GMT
Subject:
Common name: eos1.lab.karneliuk.com
Organizational unit: SEC
Organization: Karneliuk.com
Locality: London
State: London
Country: UK
Subject public key info:
Encryption Algorithm: RSA
Size: 4096 bits
Public exponent: 65537
Modulus: c259b430bb52cb8339d2f7b8020f39537b732a6026d67039ac4edca
!
! FURTHER OUTPUT IS TRUNCATED FOR BREVITY
#4.6. Integration with application
Finally we you need to create the a security profile, which will span the certificate and private key, which you would be able then to use for the application such as RESTCONF or gNMI:
2
3
4
5
management security
ssl profile pki_karneliuk
certificate eos1.lab.karneliuk.crt key pki_lab_karneliuk.com_key
trust certificate rootCA.pem
Final validation:
2
3
4
Profile State
------------------- -------------
pki_karneliuk valid
Arista is integrated with PKI as well
#5. Integrating the Cumulus Linux with your PKI
The last in this list but not least is the Cumulus Linux. As that is also Debian Linux, pretty much like Raspberry OS earlier, the process is pretty much the same. The only major difference is that the root CA is reachable via mgmt VRF, what requires some commands to be run from the VRF context.
#5.1. Installing root CA certificate
Copy the root CA certificate via VRF and put to /usr/local/share/ca-certificates/:
2
3
aaa@192.168.100.1's password:
rootCA.pem 100% 2065 1.8MB/s 00:00
You need to change the extension of the file from the .pem to .crt and run the update-ca-certificates:
2
3
4
5
6
cumulus@VX1:mgmt:/usr/local/share/ca-certificates$ sudo update-ca-certificates
Updating certificates in /etc/ssl/certs...
1 added, 0 removed; done.
Running hooks in /etc/ca-certificates/update.d...
done.
Check it is installed:
2
subject=C = UK, ST = London, L = London, O = Karneliuk.com, OU = SEC, CN = rootca.karneliuk.com
Go further if that is installed.
#5.2, 5.3. Generating private key and Certificate Signing Request
As this the Linux device as well, our old good openssl is back with us:
2
3
4
5
6
7
8
> -keyout vx1.lab.karneliuk.key -out vx1.lab.karneliuk.csr \
> -subj "/C=UK/ST=London/L=London/O=Karneliuk.com/OU=SEC/CN=vx1.lab.karneliuk.com"
Generating a RSA private key
.....................+++++
...............................................................+++++
writing new private key to 'vx1.lab.karneliuk.key'
-----
#5.4. Signing certificate at root CA
Copy the generated CSR to the root CA running Alpine Linux on top of the Docker (don’t forget VRF bit).
2
3
aaa@192.168.100.1's password:
vx1.lab.karneliuk.csr 100% 1021 44.4KB/s 00:00
Then sign by root CA:
2
3
4
5
6
7
8
-CA local/rootCA.pem -CAkey local/rootCA.key \
-CAcreateserial -out output/vx1.lab.karneliuk.crt \
-days 365 -sha512
Signature ok
subject=C = UK, ST = London, L = London, O = Karneliuk.com, OU = SEC, CN = vx1.lab.karneliuk.com
Getting CA Private Key
Enter pass phrase for local/rootCA.key:
#2.5 Getting back the certificate on the node
Copy the certificate back on the Cumulus Linux device via the management VRF:
2
3
aaa@192.168.100.1's password:
vx1.lab.karneliuk.crt 100% 1598 1.2MB/s 00:00
Again, as the openssl is a core component for Debain/Raspbian as it is for the CentOS Linux, the validation is exactly the same:
2
3
4
5
6
7
8
9
10
11
12
13
14
15
16
17
18
19
Certificate:
Data:
Version: 1 (0x0)
Serial Number:
32:ca:a7:9f:4c:1a:66:43:79:df:72:e4:b9:f8:f9:a4:24:6e:cb:d9
Signature Algorithm: sha512WithRSAEncryption
Issuer: C = UK, ST = London, L = London, O = Karneliuk.com, OU = SEC, CN = rootca.karneliuk.com
Validity
Not Before: Mar 2 23:11:56 2021 GMT
Not After : Mar 2 23:11:56 2022 GMT
Subject: C = UK, ST = London, L = London, O = Karneliuk.com, OU = SEC, CN = vx1.lab.karneliuk.com
Subject Public Key Info:
Public Key Algorithm: rsaEncryption
RSA Public-Key: (2048 bit)
Modulus:
00:b8:e4:1c:e2:c0:27:ed:dd:db:db:80:87:78:96:
!
! FURTHER OUTPUT IS TRUNCATED FOR BREVITY
This certificate will be used if we host any HTTP based (REST API or GRPC) app on the Cumulus Linux.
GitHub repository
Find this and other examples in our repository.
Lessons learned
Originally I wanted to deploy the PKI within the Data Centre Fabric project back in 2019. It took quite a bit for me since that time. Apparently, there is no that many changes in the principles of the authentication and encryption based on the certificate since then. However, we have now a new use case, the network automation with gNMI and, specifically, development of pyGNMI. We want our and your networks to be be automated securely.
Conclusion
This blogpost appeared to be extra long. However, we believe, you will find it beneficial. Probably, for the Linux administrators it is quite an easy read, but for the network engineers, and especially for those who are willing to build the secure network (IPSec) and secure network management (SSL, HTTP, GRPC), we hope, it would be extremely useful. In the next blogpost you will see how to apply it for the authentication in gNMI based on pygnmi. Take care and good bye.
Support us
P.S.
If you have further questions or you need help with your networks, I’m happy to assist you, just send me message. Also don’t forget to share the article on your social media, if you like it.
BR,
Anton Karneliuk