


Hello my friend,
The new year we start with a new topic, which is a configuration analysis of the multivendor networks. We have a passion both to create our own open source tools and to use existing, creating by other teams and project. Today we will start dive in one of such a tool.
2
3
4
5
retrieval system, or transmitted in any form or by any
means, electronic, mechanical or photocopying, recording,
or otherwise, for commercial purposes without the
prior permission of the author.
Network analysis as part of automation?
In software development we have a concept called CI/CD (Continuous Integration/Continuous Delivery). In a nutshell, it’s a methodology, which incorporates mandatory testing of configuration (code, software version, etc) before bringing it to production. The main idea behind it is that automated testing and validation will make sure that code is stable and fit for purpose. Automated testing? That’s where the automation comes to the stage.
And automation is something what we are experts in. And you can benefit from that expertise as well.
In our network automation training we follow zero to hero approach, where we start with the basics including Linux operation and administration topped with KVM, Docker and Git, and gradually progressing through data models (YANG) and encodings (XML, JSON, YAML, Protobuf) to protocols (SSH, NETCONF, RESTCONF, GNMI) utilisation with Ansible, Bash and Python integrating your scripts with NetBox via REST API. All this happens in context of the real life examples and multi vendor network built with Cisco, Nokia, Arista and Cumulus.
That is the reason why leading service providers and network vendors are training with to learn their staff with the real life network automation knowledge, skills and techniques in the multivendor environment. So you can.
Brief description
Batfish is a purpose-built open source tool, which helps you to analyse the configuration of the network devices (if they are supported). So it’s main intention is to answer questions you would ask it with answers prepared based on the analysis of the configuration files. This is analysis can be as simple as to provide IP address assigned to the interface and BGP peering between devices to validating if the certain routes present in the routing table, to testing if the route policy permits the specific routes to be announced, to verifying if the corresponding flow would be allowed through the access list.
As the analysis is done based on the configuration alone, the Batfish is positioned to be able to validate the configuration change BEFORE committing the change on the production devices, which should prevent the potential outages, which is a good promise and worth to be explored. That’s why we start this blog series.
In contrast, our HAWK takes a real state of the network and makes analysis based on that, which allows to take into account the links which are down or BGP sessions configured but not established.
From the usage perspective, Batfish consists of two major elements:
- Batfish application, which is delivered as a Docker container listening to 3 ports: 8888/TCP, 9996/TCP and 9997/TCP. This part is responsible for analysis.
- Pybatfish, which is a Python library to interact with the application. This Library is used within your Python script to upload the configuration files, ask the questions, receive answers and structure the response data.
Let’s get hands dirty.
Lab setup
Following our mission, we are committed to bringing the truly multivendor networking technologies and automation, which are working. Therefore, to test Batfish we will take the topology consisting of the 3 network devices running:
- Cisco IOS XR
- Arista EOS
- Cumulus Linux
At the time of writing (June 2021), the Nokia SR OS is not supported.
The topology for the lab is looking like as follows:

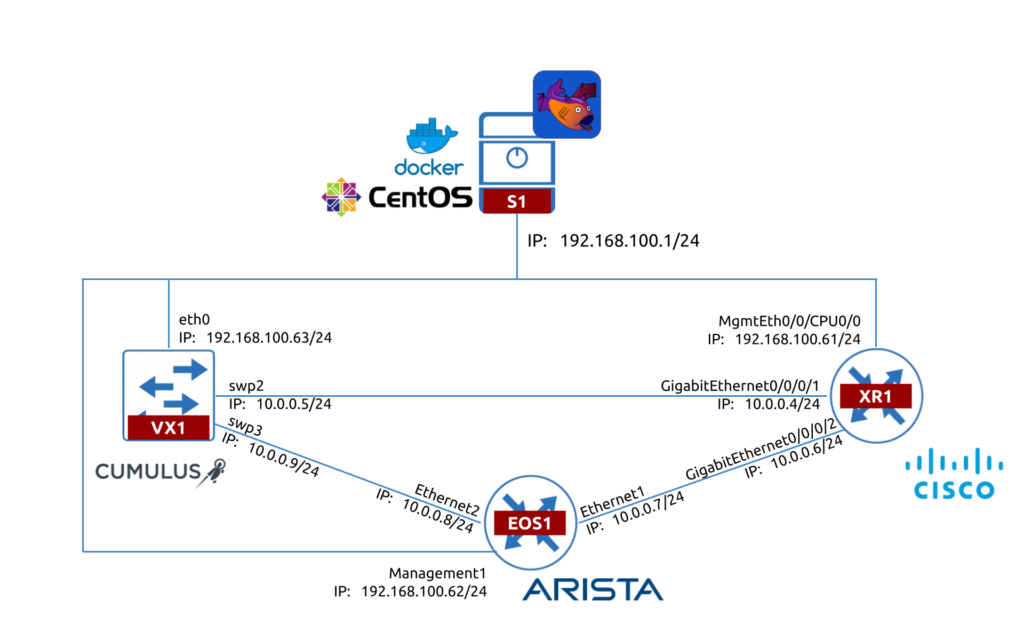
As Batfish is about the Network Analysis, we don’t really need to have active access to the network devices. Therefore, we can just SSH to them from our management host (S1) and copy the configuration files to the Batfish project folder. In same time, What is needed is the TCP connectivity towards the container with the Batfish from host running pybatfish; therefore, we are running the Python script on S1 in our case.
Prerequisites
What is not covered in this blogpost is the setup of Linux and Docker. It is expected you have that already (or at least know how to install them).
Attend our Network Automation Training to learn Linux and Docker administration and operation fundamentals.
Usage
The getting starting guide we are creating consists of several steps, which will include the build of the Batfish infrastructure from scratches. As we haven’t found any detailed step-by-step guide, we will focus on the infrastructure today leaving complicated analysis for further articles.
#1. Batfish installation
First thing first, make sure that on your Linux host Docker is up and running. This is needed to run the Batfish application:
2
3
4
5
6
7
8
● docker.service - Docker Application Container Engine
Loaded: loaded (/usr/lib/systemd/system/docker.service; disabled; vendor preset: disabled)
Active: active (running) since Sat 2021-06-19 20:08:46 BST; 23h ago
Docs: https://docs.docker.com
Main PID: 2527 (dockerd)
!
! FURTHER OUTPUT IS TRUNCATED FOR BREVITY
Once this is confirmed, you should download the Docker image with Batfish:
It may take a bit depending on your internet connectivity, as this image is quite heavy (more than 1 GB). When this process is completed, you can check it in the list of all images you have:
2
batfish/allinone latest f2ba5422a4ef 2 months ago 1.06GB
The last step here is to bring Docker with Batfish up. You can launch it using the following command:
Again, this step may take a few moments based on the resources you have on your host. After than you shall validate if it is up:
2
8f64097bf95f batfish/allinone "./wrapper.sh" 7 days ago Up 24 hours 0.0.0.0:8888->8888/tcp, 0.0.0.0:9996-9997->9996-9997/tcp batfish
The first part of the lab setup is completed.
Learn a lot about Docker, how to manage it and how to create your own containers at our Network Automation Training.
#2. Preparing configuration files
The next step is to bring the configuration files from the lab to your host, where you will be interacting with Batfish using Python.
In our Network Automation Training you will learn Python from Zero to Hero level for multivendor network management.
The file structure in the project folder would the following:
2
3
4
5
6
7
+--snapshot
| +--configs
| +--EOS1.cfg
| +--VX1.cfg
| +--XR1.cfg
+--main.py
Create the directory snapshot and the sub-directory configs in there. It would be a home for the configuration files you are taking from the network devices:
- For Cisco IOS XR and Arista EOS you need to collect output of show running-config command and save in the files hostname.cfg, where hostname is the network device’s hostname.
- For Cumulus Linux collect and put in a single file hostname.cfg the output of 3 commands:
- hostname
- cat /etc/network/interfaces
- cat /etc/cumulus/ports.conf
- cat /etc/frr/frr.conf
For Cumulus Linux, use sudo if required to collect the output.
#3. Building Python script to talk to Batfish
Finally we come to interactions with Batfish with Python. First thing first, create a virtual environment, activate it and install the pybatfish library:
2
3
$ source venv/bin activate
(venv)$ pip install pybatfish
The pybatfish relies on many other libraries, including pandas for data representation. All of them will be installed as dependencies during the installation of the pybatfish, so you don’t need to specify them explicitly. Once installed, go ahead and create the main.py Python file, which will contain the basic script to interact with the Batfish:
2
3
4
5
6
7
8
9
10
11
12
13
14
15
16
17
18
19
20
21
22
23
24
25
26
27
28
29
30
31
# Modules
from pybatfish.client.commands import bf_init_snapshot, bf_session
from pybatfish.question.question import load_questions
from pybatfish.question import bfq
import os
# Variables
bf_address = "127.0.0.1"
snapshot_path = "./snapshot"
output_dir = "./output"
# Body
if __name__ == "__main__":
# Setting host to connect
bf_session.host = bf_address
# Loading confgs and questions
bf_init_snapshot(snapshot_path, overwrite=True)
load_questions()
# Running questions
r = bfq.nodeProperties().answer().frame()
print(r)
# Saving output
if not os.path.exists(output_dir):
os.mkdir(output_dir)
r.to_csv(f"{output_dir}/results.csv")
Let’s go over this script to get some understanding, what we are doing here:
- From the batfish library we are importing a number of functions, which allows us to interact with the Batfish Docker container.
- bf_session is used to provide details for communication with the Batfish application (e.g., IP address, API token, etc).
- bf_init_snapshot is used to upload your configuration files into the Batfish application.
- load_questions is used to initialise the Batfish Questions.
- bfq is used to ask the question and receive the response.
- Besides that we also use the os library from the Python standard distribution, which allows us to work with directories at Linux host.
- After that we create the variables, which we need for our Python script to work:
- bf_address contains the IP address we are using to connect to Batfish. As it is running in the Docker container and its TCP ports are NAT’ed to all interfaces, we can use localhost (127.0.0.1) to connect to it.
- snapshot_path contains the path towards the directory with your snapshots.
- output_dir contains the path to the directory, where we will be storing the results.
- Finally, in the body part we do the basic analysis with Batfish:
- Providing the connectivity data from bf_address to bf_session.host property.
- Loading configuration using bf_init_snapshot() using argument snapshot_path.
- Initialising Batfish questions without arguments using load_questions().
- Collecting the answer() to the question nodeProperties() sent via bfq class, which is converted to Pandas DataFrame using frame() method and stored in a variable r.
- Printing the answer r in the STDOUT with print() function.
- At the end, we store the results in a CSV file to explore the data in a greater details (or just store evidences when we integrate the Batfish in CI/CD pipeline).
As you can see, there are a lot of description is how to interact with a single question being asked at the moment. In further articles we’ll perform more analysis.
Validation
Let’s check what our Python script can do for us now:
2
3
4
5
6
7
8
9
10
11
12
13
14
15
16
17
18
19
20
21
22
23
24
25
26
27
28
29
status: ASSIGNED
.... no task information
status: TERMINATEDNORMALLY
.... 2021-06-20 21:52:22.245000+01:00 Deserializing objects of type 'org.batfish.datamodel.Configuration' from files 3 / 3.
Default snapshot is now set to ss_e41ad7f2-b794-4e41-90ff-83c416f74cba
status: ASSIGNED
.... no task information
status: TERMINATEDNORMALLY
.... 2021-06-20 21:52:22.552000+01:00 Parse environment BGP tables.
Your snapshot was successfully initialized but Batfish failed to fully recognized some lines in one or more input files. Some unrecognized configuration lines are not uncommon for new networks, and it is often fine to proceed with further analysis. You can help the Batfish developers improve support for your network by running:
bf_upload_diagnostics(dry_run=False, contact_info='<optional email address>')
to share private, anonymized information. For more information, see the documentation with:
help(bf_upload_diagnostics)
Successfully loaded 67 questions from remote
Successfully loaded 67 questions from remote
status: ASSIGNED
.... no task information
status: TERMINATEDNORMALLY
.... 2021-06-20 21:52:23.008000+01:00 Begin job.
Node AS_Path_Access_Lists Authentication_Key_Chains Community_Match_Exprs Community_Set_Exprs ... SNMP_Trap_Servers TACACS_Servers TACACS_Source_Interface VRFs Zones
0 xr1 [] [] [] [] ... [] [] None ['default', 'mgmt'] []
1 eos1 [] [] [] [] ... [] [] None ['default'] []
2 vx1 [] [] [] [] ... [] [] None ['default', 'mgmt'] []
[3 rows x 37 columns]
The configuration is loaded to the Batfish, analysed and we are getting in the CLI the output. As you can see the output, it means that Batfish is working properly. You see three lines with each line being dedicated to each network device from our lab.
Once you are analysing the content of those lines, which in our case is predominantly empty as we are using lab devices, it is worth to mention that it is suggested that the output should have 3 rows with 37 columns, whereas we see way less. The reason is that the output is wider that then our terminal screen. Therefore, some part of the output is truncated. That is the reason, why we are storing the data in the CSV, so that we can open and validate what we have there as you can see in the following screenshot:


In CSV al 37 columns are presented so you can have a better overview what you have where in terms of the configuration. Also, you may notice that the data is normalised and is abstracted from any particular vendor format, which simplifies analysis of the multivendor configuration.
GitHub repo
In our GitHub repository you can find the example of the code created during this blogpost as well as the configuration files from lab devices. Happy labbing, dear friend!
Lessons learned
We were thinking, whether we should blog about the Batfish as there are already quite a bit materials existing. However, once we faced the necessity to deploy it ourselves with Python it turned out that there is no useful documentation how to implement it in code without Jupiter notebooks, which was quite an unexpected. As it took us quite a bit to properly get the set up, we decided that it would be a good point to share with the networking community, as definitely someone else may have same questions as we did.
Conclusion
Batfish is so far looking promising, as it was able to parse the configuration of Cisco IOS XR, Arista EOS and Cumulus Linux and normalise it in the vendor-agnostic format. Also the deployment model with the Docker container doing the analysis is relatively conformable as we removes any complexity on the installation of the Batfish directly on the Linux host. You may argue that we haven’t touched yet more complicated configuration analysis. Fair point, and that’s why we will do that in the next blogpost. Take care and good bye.
Support us
P.S.
If you have further questions or you need help with your networks, our team is happy to assist you. Just book a free slot with us. Also don’t forget to share the article on your social media, if you like it.
BR,
Anton Karneliuk