

Hello my friend,
Just the last week we finished our Zero-to-Hero Network Automation Training, which was very intensive and very interesting. The one could think: it is time for vacation now!.. Not quite yet. We decided to use the time wisely and upgrade our lab to bring possibilities for customers to use it. Lab upgrade means a major infrastructure project, which involves brining new hardware, changing topology and new software to simplify its management. Sounds interesting? Jump to details!
2
3
4
5
retrieval system, or transmitted in any form or by any
means, electronic, mechanical or photocopying, recording,
or otherwise, for commercial purposes without the
prior permission of the author.
What is Infrastructure Automation?
Each and every element of your entire IT landscape requires two actions. It shall be monitored and it shall be managed. Being managed means that the element shall be configured and this is the first step for all sort of automations. Configuration management is a perfect use case to start automating your infrastructure, which spans servers, network devices, VMs, containers and much more. And we are here to help you to do this first step.
At our trainings, advanced network automation and automation with Nornir (2nd step after advanced network automation), we give you detailed knowledge of all the technologies relevant:
- Data encoding (free-text, XML, JSON, YAML, Protobuf)
- Model-driven network automation with YANG, NETCONF, RESTCONF, GNMI.
- Full configuration templating with Jinja2 based on the source of truth (NetBox).
- Best automation programming languages (Python, Bash), configuration management tools (Ansible) and automation frameworks (Nornir).
- Network automation infrastructure (Linux, Linux networking, KVM, Docker).
Great class. Anton is top notch. Looking forward to more offerings from Karneliuk.com
Rasheim Myers @ Cisco Systems
Moreover, we put all mentions technologies in the context of the real use cases, which our team has solved and are solving in various projects in the service providers, enterprise and data centre networks and systems across the Europe and USA. That gives you opportunity to ask questions to understand the solutions in-depts and have discussions about your own projects. And on top of that, each technology is provided with online demos and you are doing the lab afterwards to master your skills. Such a mixture creates a unique learning environment, which all students value so much. Join us and unleash your potential.
Brief Description
The rebuild of the lab is a major development milestone in our Automation Trainings. Previously all the labs were conducted by students on their laptops, which sometimes were causing inconvenience for students. We decided to uniform the lab setup for all our students as well as to prepare the scalable infrastructure for further trainings.
As we planned to do a massive rebuild, we started thinking, what are the key requirements for our new infrastructure:
- It MUST be Open Source. We truly believe in the open software and use it everywhere in our projects and training.
- It MUST be Linux based. It is much easier to automate and manage Linux compared to any other OS or OS-based hypervisors.
- It MUST be possible to run VMs (Virtual Machines) and SHOULD be possible to run LXC (Linux Containers).
- It MUST provide maximums possible performance in terms of virtualisation for the hosts with lowest possible overhead.
- It SHOULD be possible to cluster multiple servers to manage it from the single point.
- It SHOULD be possible to easily do backups.
- The environment SHOULD be multi tenant to allow us having multiple students working on the multiple pods simultaneously without interfering to each other.
- The administrative overhead to manage the environment SHOULD be very low.
- There SHOULD be an API to manage all the infrastructure components: VMs, Containers and Networking.
So, let’s go shopping…
We did some survey across the market and figured out a few options. First of all, there are some options, which we ruled out:
- VMware ESX + vSphere. It is a commercial one, whereas managing standalone ESXIs are quite an overhead.
- OpenStack. Being a good solution, there is a massive administrative overhead to build it properly.
You may think: hang on, folks, you have already removed all meaning possibilities to build an environment. Well, not quite sure. We were happy to figure out that there are quite a bit of tools, which pretends to be Open Source and free Cloud (VM/Cotnainers) orchestrators. Here is what we found:
- oVirt is an open-source distributed virtualization solution, designed to manage your entire enterprise infrastructure.
- Proxmox VE is a complete open-source platform for enterprise virtualization.
- OpenNebula is an Open Source Cloud Computing Platform to build and manage Enterprise Clouds.
Thanks to our friend and partner Pau Nadeu Rabat from NetworkHero for sharing his experience on Proxmox VE.
As you can see, all of them pretend to be Open Source. Based on our partners’ input as well as some survey we finalised our choice to be Proxmox. During our initial setup and tests it appeared to meet our requirements.
So what is Proxmox? In a nutshell, it is a Debian Linux with Proxmox packages, which allows to control VMs and Linux Containers from CLI, Web-UI and API. In today’s article we’ll cover the initial installation process.
Lab Topology
For the time being, as we are focusing on the Proxmox/Debian, we built a simple topology:

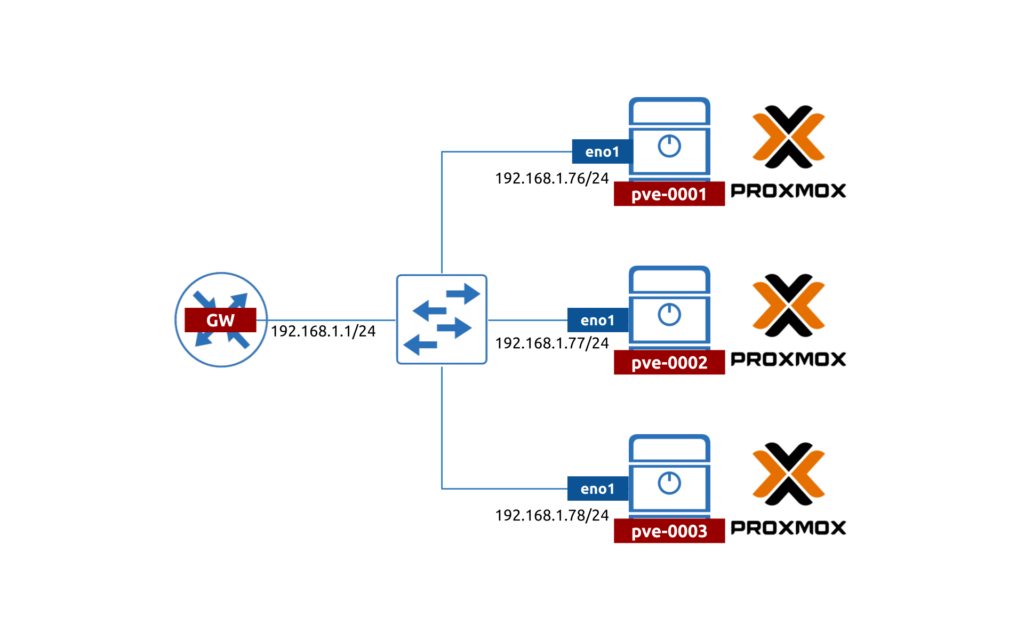
Looking forward we are planning to make the topology much more resilient, but that would a story for a different blogpost.
In the lab topology we have 3 servers: 2x SuperMicro and 1x HP Proliant. All of servers have at least 2 data interfaces and 1x IPMI/ILO port. The IPMI is not used in this topology; therefore, we don’t connect it anywhere.
The data interfaces have a private IP, which is used to communicate between each others and to the Internet.
Thanks for colleagues for kindly assisting us with SuperMicro servers.
Installation Process
Step #1. Preparing Servers
The first thing is prepare the environment to do the server setup. Unless you have the fully prepared PXE server upfront you would have to do some physical interaction with servers, which requires:
- Monitor
- Keyboard and mouse
- DVD-ROM
- Network connectivity
If you are setting that in DC, you may have all the necessary equipment. We were preparing that at home office before shipment of the kit to the DC; so we had to be creative in order to set the up.
Once the server started booting, you need enter the BIOS and do some actions:
- First of all, check that you have the proper amount of memory and CPUs.
- Make sure that virtualisation (VT-x or AMD-v) is enabled.
- Then amend the boot order so that the CD-ROM/DVD-ROM is a first priority.
Save the BIOS settings and reboot the server.
Step #2. Preparing Drives
It is hard to tell upfront how many disk space you may need. In our case we have 20 parallel PODs, and each POD consumes about 20-25G on disk, which requires us to have at least 500G of disk space. For our other projects, e.g. pygnmi development, we need extra topologies; ultimately 1TB is what we landed as an optimum disk space.
We suggest to do the low level formatting of hard drives before you install Proxmox. Generally, Proxmox may do that as well, but it is better to prepare upfront.
If your server has a hardware RAID controller, it shall be configured before you start installation of Proxmox. For us it took about 6 hours to format 2x 1TB drives and then 5 minutes to build RAID 0. You can choice any other RAID format, but we believe that RAID 0 provides good level of redundancy in case we have 2 drives.
Step #3. Installing Proxmox
In order to install the Proxmox we are using the official installation guide. To be frank, it is quite good and detailed. First of all, you need to download the Proxmox image. Once you have it, you have a few options how to install it:
- via PXE boot provided you have PXE boot server, which is a mix of DHCP/TFTP and some other services.
- from USB media.
- from DVD media.
In our cases we went the last route and burned the Proxmox to DVD image. Once ready, just start booting server and choose boot from CD/DVD-ROM. If you have completed the previous steps, the Proxmox will show you GUI, where you need to chose “Install Proxmox VE”.
Refer to the official guide for more screenshots.
The key question to answer is the type of the file system. The simple answer would be:
- Go for ZFS if you don’t have hardware RAID controller.
- If you have hardware RAID controller, use EXT4 of XFS.
Afterwards you will be asked to provide the management IP address, hostname and root password. Once data is provided, the installation process starts and after it completion (for us it took about 10-15 minutes), the server reboots and boots in Debian CLI. Since you see the CLI, it will take another 5 minutes approximately for all components to boot and start the HTTP service. The SSH service starts quicker though.
Step #4. Performing Post-installation Activities
Once the Proxmox was installed, the server is automatically rebooted. It will took a few moments (minutes) for it to boot back and after that you can get to it CLI. By default, SSH is enabled with root username and password you provided during the installation steps above, so you can also SSH to server:
2
3
4
5
6
7
8
9
10
11
12
root@192.168.1.77's password:
Linux pve-0002 5.11.22-1-pve #1 SMP PVE 5.11.22-2 (Fri, 02 Jul 2021 16:22:45 +0200) x86_64
The programs included with the Debian GNU/Linux system are free software;
the exact distribution terms for each program are described in the
individual files in /usr/share/doc/*/copyright.
Debian GNU/Linux comes with ABSOLUTELY NO WARRANTY, to the extent
permitted by applicable law.
root@pve-0002:~#
The next step is to update all the Debian and Proxmox packages to the latest stable releases. Proxmos has a commercial subscription, but we decided to go with a pure community version. As such, we need to modify the list of available repositories in such a way:
2
3
4
5
6
## Commercial
#deb https://enterprise.proxmox.com/debian/pve bullseye pve-enterprise
## Community
deb http://download.proxmox.com/debian/pve bullseye pve-no-subscription
By default only the commercial repository is available. Therefore, we need to add the community repository and comment the commercial one.
Now you are in position to run the upgrade:
Depending on the server performance and also on your internet connection bandwidth, it may take from a few to quite a few minutes. So, you can go and grab a cup of brew or coffee…
Once upgrade is completed, reboot your Debain server with Proxmox again.
If you like vim text editor as we like, don’t forget to install it after reboot: “apt-get install -y vim”
Step #5. Installing Open vSwitch
By default Proxmox uses Linux bridges. As our main goal is to build the create environment, which shall be easy to manage and scale for multiple pods for our students and ourselves, we decided to change the default Linux bridges to Open vSwitch, which significantly simplifies (literally, we don’t need to do anything) management of VLANs to create links between VNF (virtual network functions) with Cisco, Nokia, Arista, Juniper, Cumulus and VyOS routers and switches.
Proxmox supports Open vSwitch, but in order to able to use it, we need to install the corresponding packages on Debian first:
In the version of Proxmox we are using, the package ifupdown2 is installed. Why is that important? Originally in Debian you have to reboot the whole server in order to apply changes to network settings. The ifupdown2 package allows us to apply changes without the reboot.
As such, we will change the network settings to the following:
2
3
4
5
6
7
8
9
10
11
12
13
14
15
16
17
18
19
20
21
22
23
24
25
26
27
28
29
30
31
32
auto lo
iface lo inet loopback
auto eno1
iface eno1 inet manual
ovs_type OVSPort
ovs_bridge vmbr0
ovs_mtu 9000
ovs_options tag=1 vlan_mode=native-untagged
auto eno2
iface eno2 inet manual
ovs_type OVSPort
ovs_bridge vmbr0
ovs_mtu 9000
ovs_options tag=1 vlan_mode=native-untagged
auto vlan1
iface vlan1 inet static
address 192.168.1.77/24
gateway 192.168.1.1
ovs_type OVSIntPort
ovs_bridge vmbr0
ovs_mtu 1500
ovs_options tag=1
auto vmbr0
iface vmbr0 inet manual
ovs_type OVSBridge
ovs_ports eno1 eno2 vlan1
ovs_mtu 9000
We used this configuration guide to set up and configure the Open vSwitch on Proxmox.
To give you a quick overview:
- vmbr0 is an OVSBridge, which you can think as a real switch. It terminates connectivity of physical (NIC) and logical (VLAN) interfaces.
- eno1 and eno2 are OVSPort, which is a physical interface type. We specify belonging of interface to a particular OVSBridge instance and some options: in this case we add VLAN 1 to the interface and make sure it is untagged.
- vlan1 is an OVSIntPort, which is a logical interface type. We associate it with OVSBridge instance, add ip addresses and map it to a particular VLAN ID (1).
Once you have rewritten the content of the /etc/network/interfaces, we need to apply the new configuration:
2
3
warning: vmbr0: moved from being a bridge to a physical interface (non-logical interface).This interface will be downed.
If this was not intentional, please restore the original interface definition and execute ifreload
It is important you have physical access to server with Proxmox at this stage, as the bridge interface may go down and you will loose your SSH connectivity.
If that happened, go to console and run:
Step #6. Launching Web-UI
You are almost done. The last step is to login to Web-UI, where you can start manage your server. For the time being, before we integrate all our Debian/Proxmox nodes in cluster, each of them is managed separately.
To get to UI, open your browser and use the url: https://server.ip:8006/, where server.ip is an IP address of the Proxmox server:

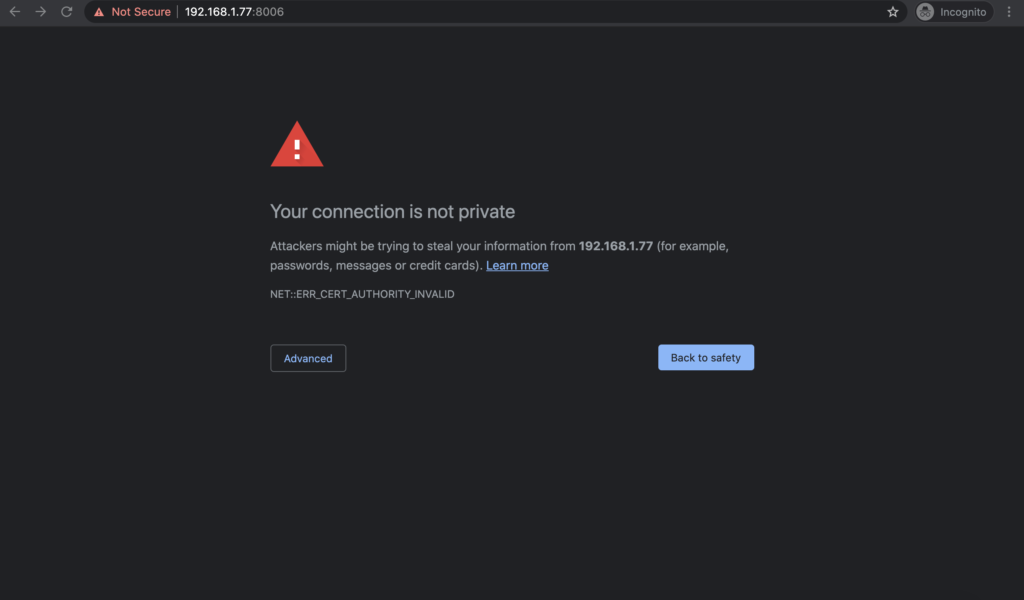
It uses self-signed certificate, so your browser will warn you about that. Choose Advanced and go to login portal:

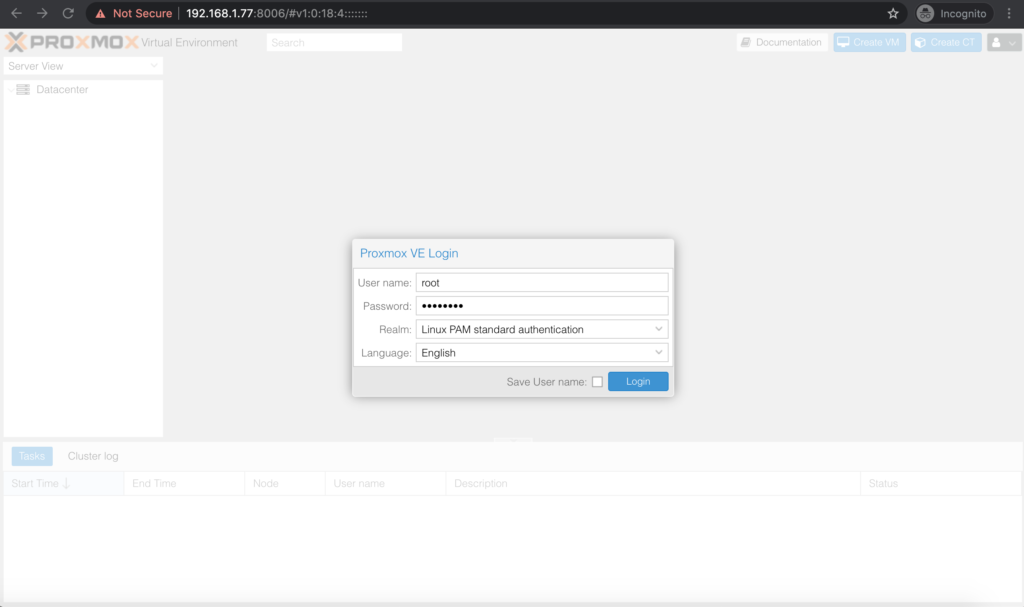
As you can imagine, the login credentials are the same as for the console or SSH.
After you have passed the credentials, you are finally logged in and ready to work start building your VMs and Containers:

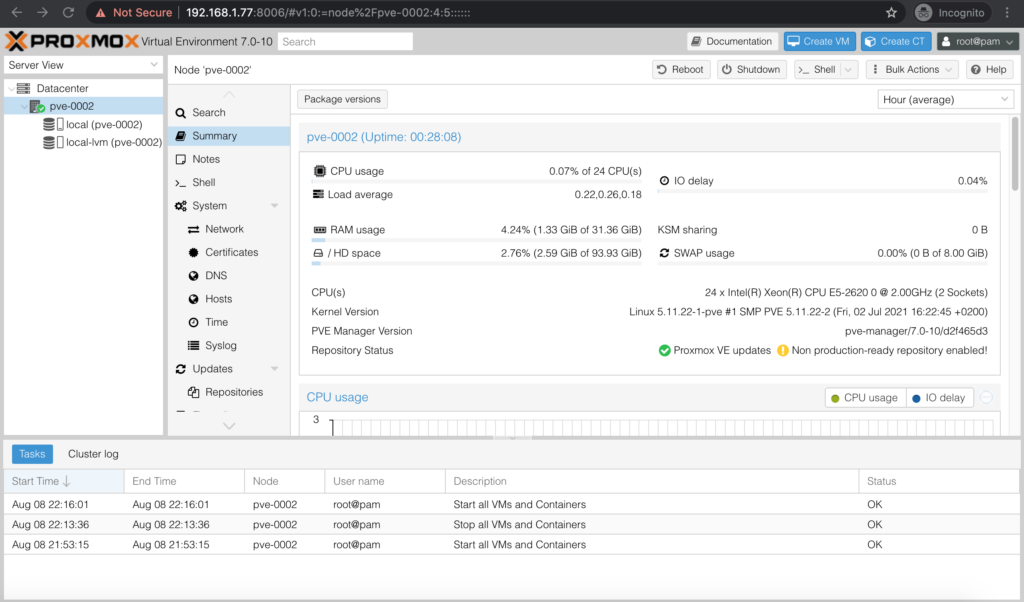
On the default page you would see:
- On the left side the server and its storages
- In centre you will see the main window with server details including available resources and current utilisation
- At the bottom you will see the logs of what was done via UI.
Congratulations, the Proxmox/Debian is setup and you are ready to start building your automation lab.
Lessons Learned
During the build of this lab we’ve got quite a bit of “gotcha”. By far the biggest time consumer for us was the search of the suitable media to install the Proxmox, as our server didn’t have DVD-ROM:
- We didn’t have the PXE server to be able to perform the PXE boot. We’ve reviewed a few articles how to do that, but amount of efforts to deploy that may be quite substantial.
- We tried to prepare a USB drive per official Proxmox documentation; however, when we were inserting the USB in servers, it didn’t work.
- Finally the solution was found: we used external DVD-ROM which connects to server via USB. In all honesty, we were not sure it would work without any drivers being installed, but it worked just. BIOS on Supermicro servers picked it up and we were able to perform the setup.
The second very important lessons learned is that it is not easy to deal with storage. There are so many storage options, which are not always working with underlying hardware. For example, ZFS is generally a good choice, but only if you don’t have hardware RAID controller. In our case, one of our servers has it; therefore, we had to install different file systems for different servers.
Conclusion
In this blogpost you have learned some ideas about Open Source tools for managing the virtual environment. Proxmox is a good choice for a small to medium size business, which wants to have a control over the IT environment and good virtualisation support, yet avoiding huge costs for VMware. That was a reason we’ve chosen it as an orchestration platform for our lab environment. In the following blogposts you will learn how to make clusters and how to create VMs with networking functions as well as Linux Containers. Take care and good bye.
Support Us
P.S.
If you have further questions or you need help with your networks, we are happy to assist you, just send us a message. Also don’t forget to share the article on your social media, if you like it.
BR,
Anton Karneliuk