

Hello my friend,
In the previous blogpost we covered the installation of Proxmox as a core platform for building open source virtualisation environment. Today we’ll continue this discussion and will show how to create a multi server cloud in order to better spread the load and provide resiliency for your applications.
2
3
4
5
retrieval system, or transmitted in any form or by any
means, electronic, mechanical or photocopying, recording,
or otherwise, for commercial purposes without the
prior permission of the author.
How to Automate Infrastructure?
In many cases, Linux is a major driving power behind modern clouds. In fact, if you look across all current big clouds, such as Amazon Web Services, Google Cloud Platform, Microsoft Azure, you will see Linux everywhere: on servers and on network devices (e.g., data centre switches). Therefore, knowledge how to deal with Linux and how to automate it is crucial to be successful in automation current IT systems.
At our trainings, advanced network automation and automation with Nornir (2nd step after advanced network automation), we give you detailed knowledge of all the technologies relevant:
- Data encoding (free-text, XML, JSON, YAML, Protobuf)
- Model-driven network automation with YANG, NETCONF, RESTCONF, GNMI.
- Full configuration templating with Jinja2 based on the source of truth (NetBox).
- Best automation programming languages (Python, Bash), configuration management tools (Ansible) and automation frameworks (Nornir).
- Network automation infrastructure (Linux, Linux networking, KVM, Docker, LXE, container networking).
Top notch and money well-spent.
Scott Netterville @ Kandy Communications
Join our community of network automation enthusiasts. Learn the principles of the system management, software development and its components to be able to utilise the 3rd party and create your own IT and network automation tools.
Brief Description
The resources of each server, no matter how powerful it is, are limited. Moreover, outage of the server, if it is a single worker serving your workload will be a disaster to your business. Therefore, for a resilient systems it is important to have at least one server as a backup. This like for us, network engineers, is obvious, that when we plan and build networks, we shall have redundant paths, switches and routers, to provide the high availability. In the server world, it is a little bit trickier, as besides servers themselves storage also plays a crucial role.
In a nutshell, there are two types of storages:
- Local storage, where each server has its own local storage disks (SDD/HDD) and may have sort of RAID controller for better data resiliency.
- Remote storage, where there is a dedicated device (or devices) connected to the network. You can think about them as a specific purpose-built servers with a lot of disks, which are connected to severer via a fibre channel, which is specific network with dedicated hardware, or iSCSI, which runs on top of standard Ethernet network.
In our setup we are using the local storage, which would require some specific configuration of Proxmox to be able to handle that.
Another useful advantage of having the system clustered is a possibility to have a single management interfaces, both on UI and API level, where we can manage the whole system. Having this two ideas, easy of management and resiliency, we decided to make a single cluster out of our 3 servers.
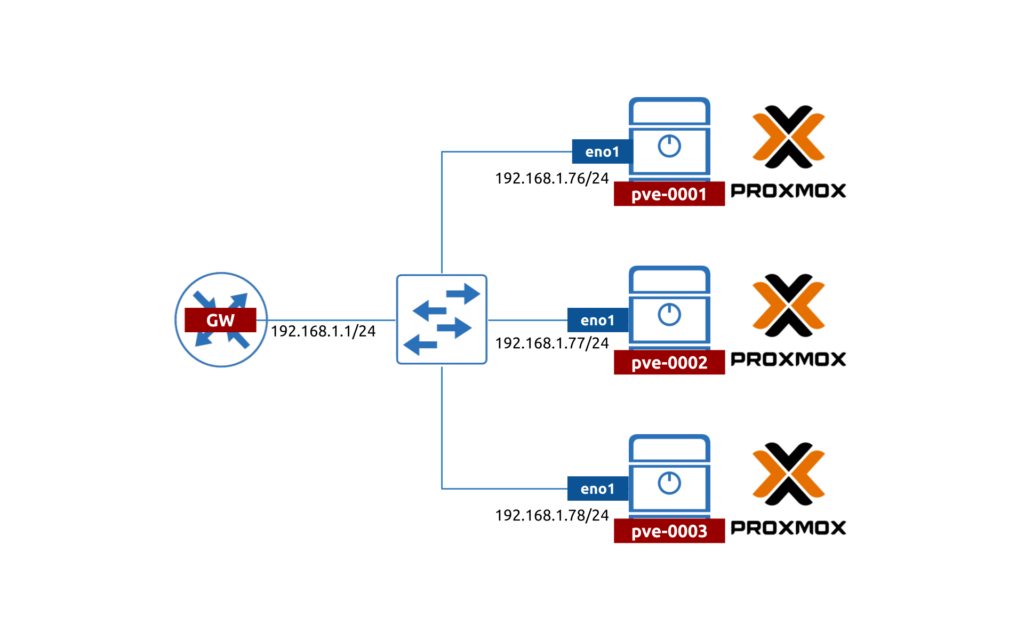
Lab Topology
To refresh in your mind, the topology is looking like as:

We strongly encourage you to read the previous blogpost to get up to speed.
Installation Process
Step #1. Checking the current state
Before we go ahead with building the cluster, let’s connect to each of the servers and make sure they are operational as standalone nodes:


Basically, the main purpose of this step is to check that nodes are available and working fine, as after we unite them in cluster the availability may change. Once verified, move to the next step.
Step #2. Defining Cluster on One Node
Now you need to define, which node will be a main one. In fact, in Proxmox this is a bit blurry term, as they call their system as multi-master, where you can connect to any node and you are able to control all the elements together. Therefore, just think a node, where you will create a cluster config.
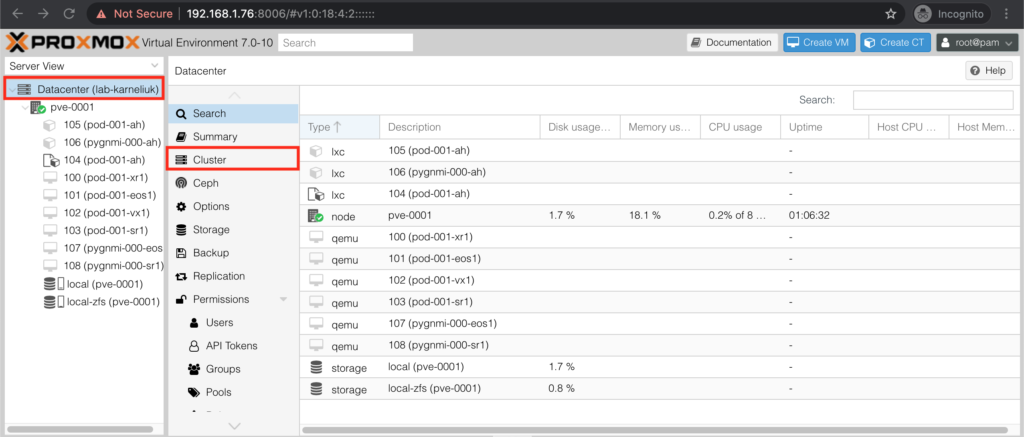
In our example, we take pve-0001 and in its UI go to “Datacenter” -> “Cluster“:

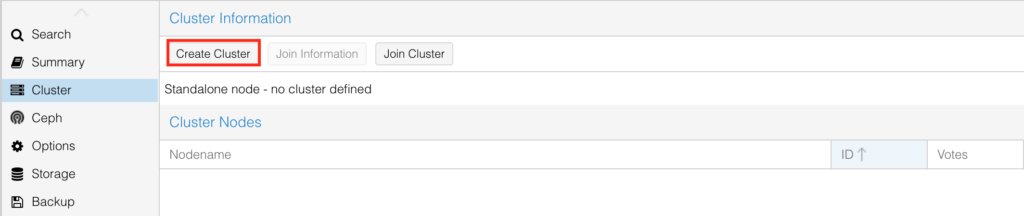
In the opened window, Press the button “Create cluster“:

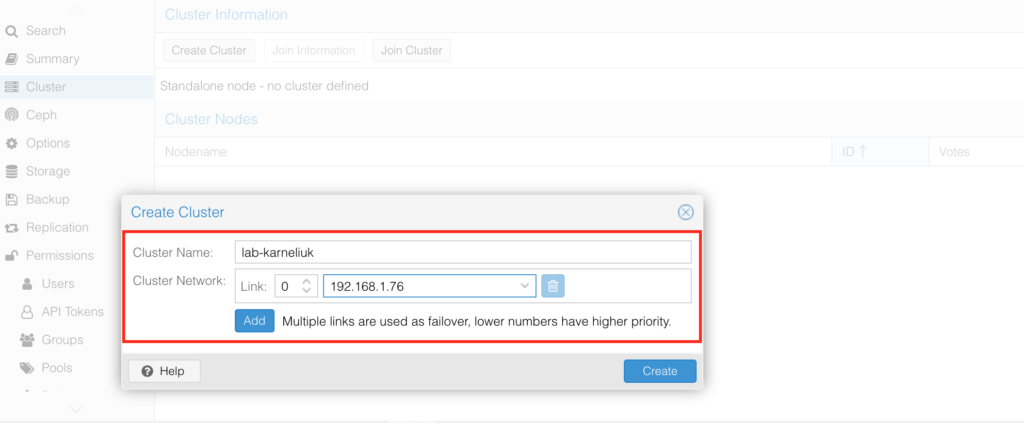
In the opened window, provide the name of the cluster and also the main communication interface. If you have multiple VLANs or a dedicated physical link for the cluster, which is different to your main uplink, you can choose that. In our case we are using a single link both for uplink and downlink; hence, we choose that:

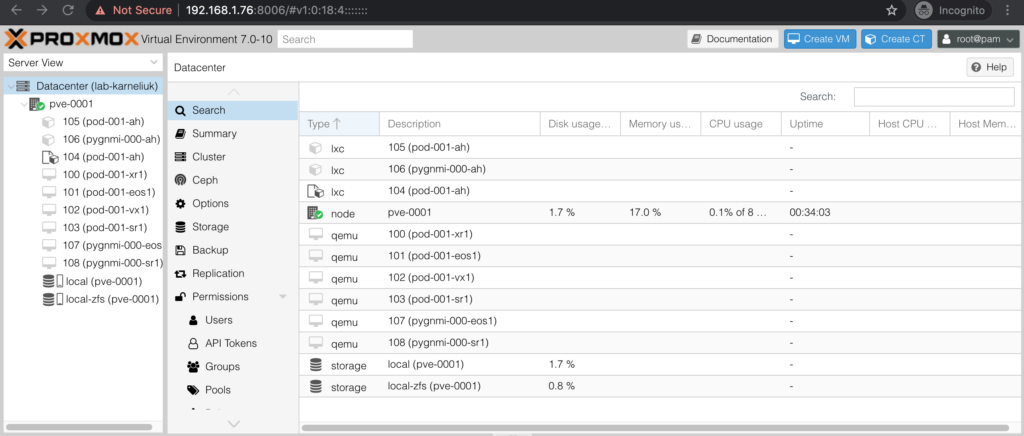
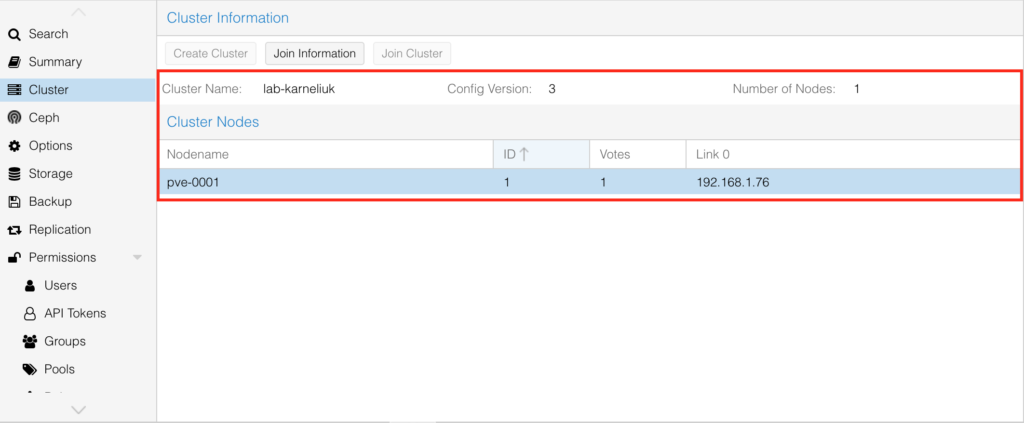
Finally, the cluster is created and you see that host is not a standalone anymore:
Step #3. Connect Another Node to a Cluster
Once the cluster is created on a main node, you shall be able to add other servers. However, the first step to do that is to go on a server, where we have created a cluster and press in “Datacenter” -> “Cluster” tab the “Join Information” button:

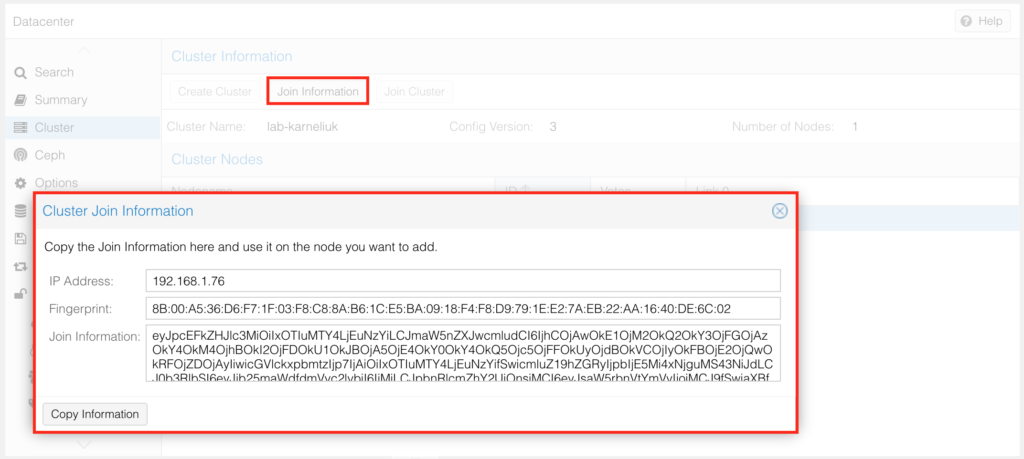
In the opened window, copy the content of the field “Join Information“.
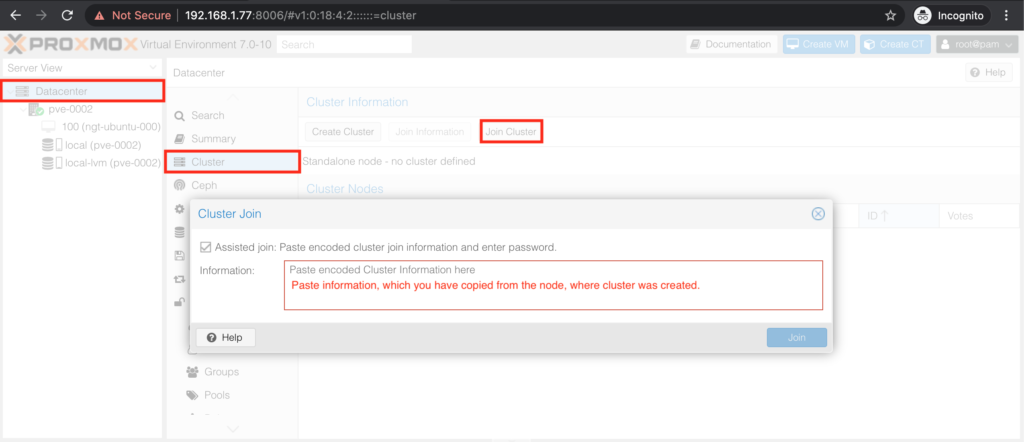
Now go to the node, which you want to add to the cluster. Navigate there to the “Datacenter” -> “Cluster” view as well and press the button “Join Cluster“. In the opened window, paste what you have copied from the previous step in the “Information” field.

When you paste the information, It will be automatically decoded and you will see the details of the first node. In that window you need to provide the root password:

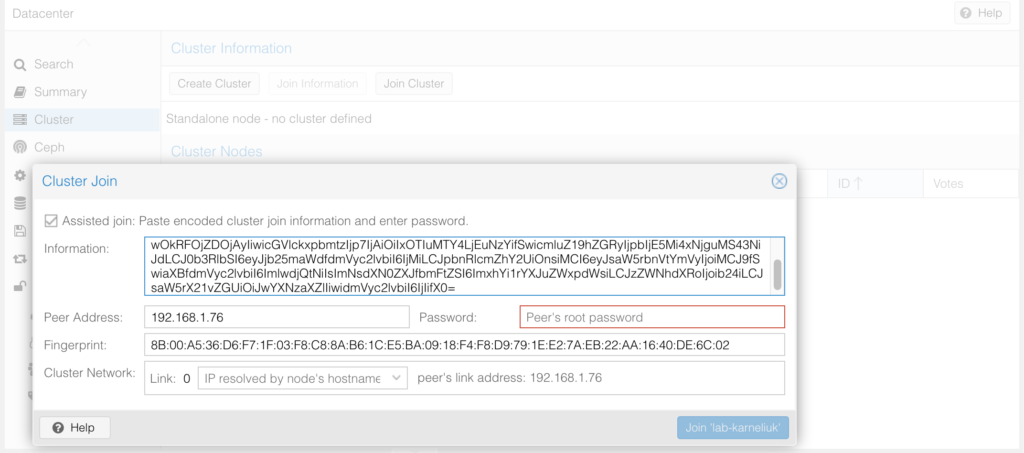
Once password is provided, you just have to press “Join {{ your-cluster_name }}“.
You can add a node to cluster only if the node doesn’t have VMs. If it has, unfortunately, you need to delete them first.
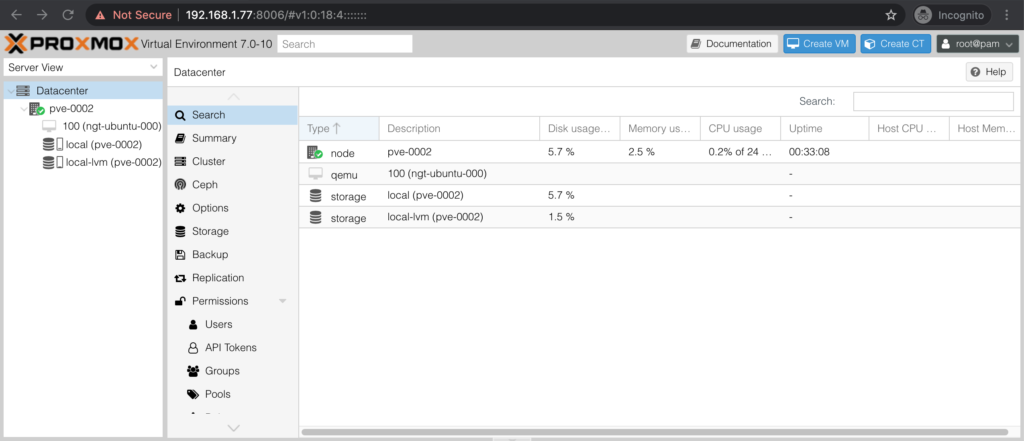
If all went well, you will lose connectivity to your node, which you have been adding to the cluster. At this stage only the original one is available. In the same, time, now the original shows the added one as well:

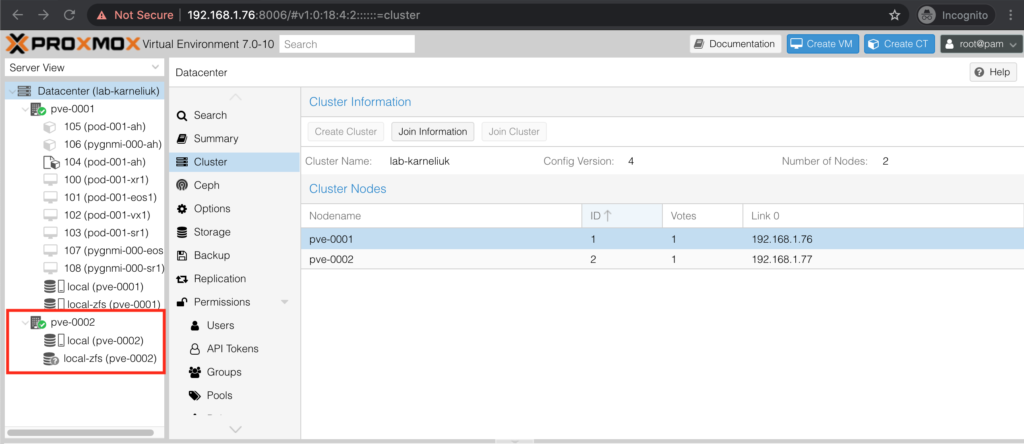
You are now one step away from having fully working cluster.
Step #4. Fix Local Storage Access
In our case we are using local storage. By default, Proxmox tries to stretch the local storage from one host to another. That creates a problem, as each host has its own local storage. However, this can be fixed.
To do that, go to “Datacenter” -> “Storage” tab, choose the storage you would to modify and press “Edit“

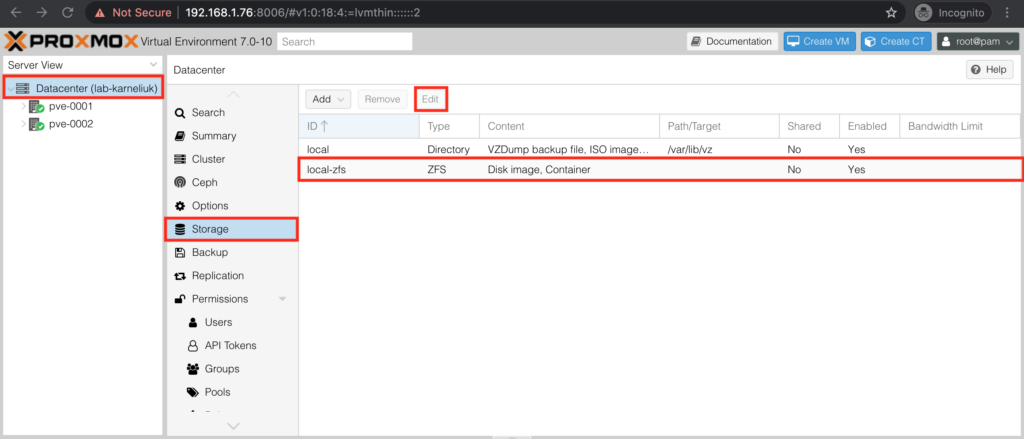
In the opened tab, choose in the field “Nodes” choose which node the storage belongs to. By default, “All nodes” is chosen; however, the local storage is available locally only.

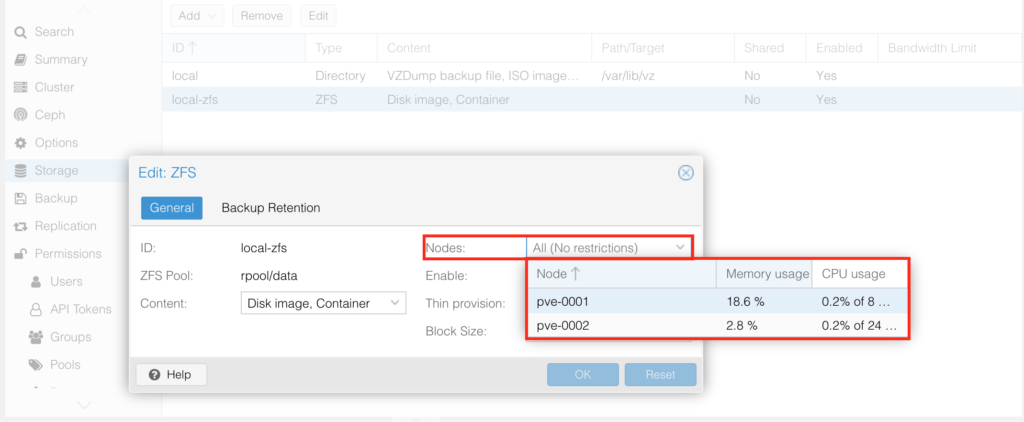
In my case, the local storage for added node was deleted! Be careful!
If you faced the same problem, you need to re-create a storage you had beforehand. Generally, as you don’t have any VMs on destination node, it may be not an issue, but still a worrying thing.
To recreate deleted storage, you need to know what storage it was. In my case, the second storage was LVM-thin, so in the same tab press “Add” and re-create it:

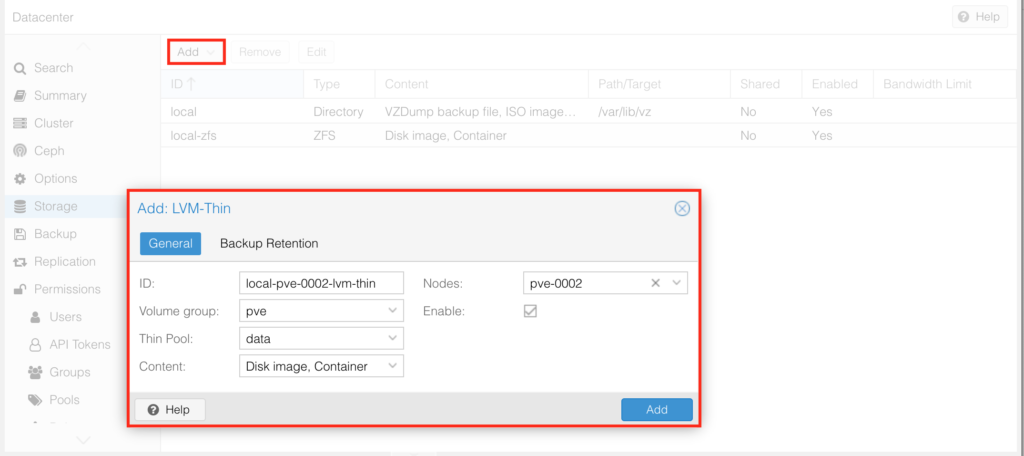
Besides ID, all other fields are coming from drop down menus, so you shall be able to restore deleted now relatively quickly.
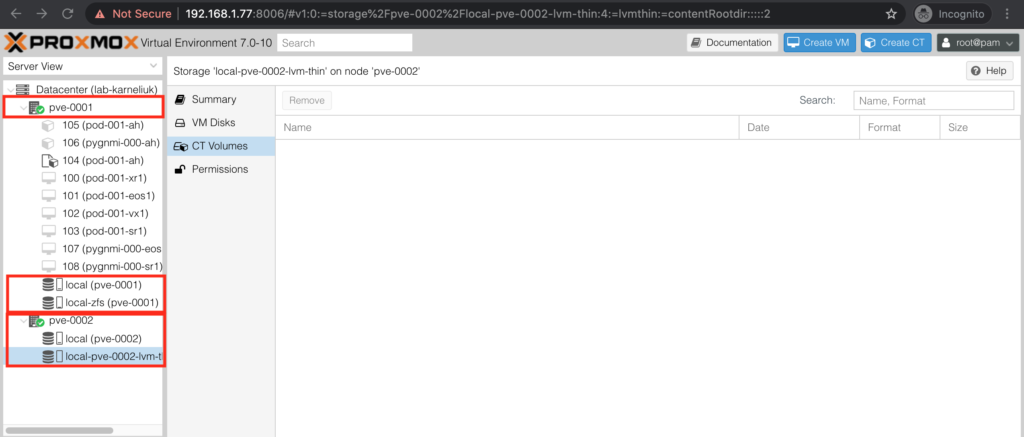
Step #5. Validation in Web UI
Finally, once the the storage is restored, and each local storage mapped to each host, your host is ready to onboard VMs and containers:
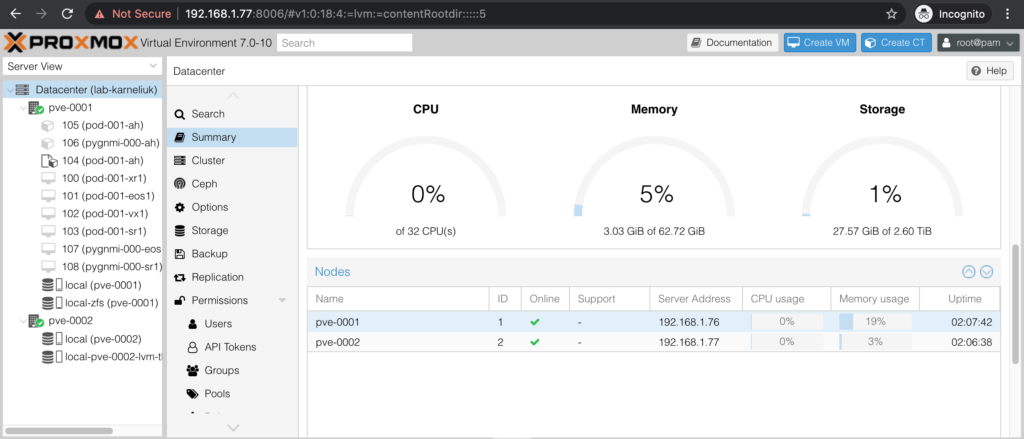
You can also go to the aggregated “Datacenter” view and check your overall CPU and Memory details:
Lessons Learned
Recreating of the local storage for the host we’ve added to the cluster was one of the biggest complications, as this information is not covered in the Proxmox config guide. In fact, we tend to think that this is a bug rather than a desired behaviour. In the same time, it is just important to know how you can re-build that.
Conclusion
Building a multi server cluster using the Open Source tool Proxmox, which based on Debian Linux, is a next step in building the proper virtualisation environment. From our perspective, this step is needed in order to provide connectivity between VMs and containers from different pods in order to be able better balancing load and make sure our students are getting the best possible experience. In the upcoming blogs we’ll cover how to create and operate VMs and containers (LXE) in Proxmox. Stay tuned. Take care and good bye.
Support Us
P.S.
If you have further questions or you need help with your networks, we are happy to assist you, just send us a message. Also don’t forget to share the article on your social media, if you like it.
BR,
Anton Karneliuk