

Hello my friend,
Network Function Virtualisation (NFV) is not a new topic. There are numerous blogpost and articles, even in our blog, which review this topic. Yet, there is much more we can cover. Today we’ll share some insights on one of the very interesting products existing on the market today: 6WIND vRouter Turbo Router. We have a limited amount of days to write a few articles under our evaluation license. Hence, we’ll focus only on the most critical elements.
2
3
4
5
retrieval system, or transmitted in any form or by any
means, electronic, mechanical or photocopying, recording,
or otherwise, for commercial purposes without the
prior permission of the author.
Is Linux Suitable for Automation?
It absolutely is. In fact, Linux is the real home for automation systems, as in many cases it hosts the tools you create in Ansible, Python, Bash, Go or any other language. At the same time, in order to effectively work with Linux, you need to know how to automate management and operation of Linux operating system itself. And you will be absolutely capable to do that, once you attend our Network Automation Training!
At our trainings, advanced network automation and automation with Nornir (2nd step after advanced network automation), we give you detailed knowledge of all the technologies relevant:
- Data encoding (free-text, XML, JSON, YAML, Protobuf)
- Model-driven network automation with YANG, NETCONF, RESTCONF, GNMI.
- Full configuration templating with Jinja2 based on the source of truth (NetBox).
- Best automation programming languages (Python, Bash), configuration management tools (Ansible) and automation frameworks (Nornir).
- Network automation infrastructure (Linux, Linux networking, KVM, Docker, LXE, container networking).
Top notch and money well-spent.
Scott Netterville @ Kandy Communications
Join our community of network automation enthusiasts. Learn the principles of the system management, software development and its components to be able to utilise the 3rd party and create your own IT and network automation tools.
Brief Description
First time I heard about 6WIND in 2017, when I was working as a subject matter expert (SME) for IP/MPLS and Security network technologies in Vodafone Group. It was very interesting to get to know the different approach to networking compared to what we all used those days. Back on 2017 the disaggregation and network function virtualisation in EMEA market was doing early steps and was not existing in Service Provider networks at all. The market was dominated by traditional vendors (Cisco, Nokia, Huawei and Juniper) producing traditional physical devices (routers, switches, firewalls, etc). I was taking part in the project to replace on of the components of the transport network, used in the 4G networks and make it sure it is 5G ready. As part of this project, we were evaluating not only traditional physical devices, but also virtualised ones. So, all the traditional vendors came with a virtualised version of their proprietary operating systems, which is one of the main threads those and these days, deployed as VM on the standard bare metal servers, which is also often refers as COTS – commodity-off-the-shelf servers. 6WIND came up with the proposal to use only COTS and their products for everything. I must admit that back in 2017 the performance of their 6WIND vRouter with some extra functionality was very impressive compared to other virtualised platforms and generally was competitive with traditional purpose-built routers/firewalls we were evaluating…
…4 years later, as Team Karneliuk.com together with our partners from Network Hero we implemented a big solution built only on 6WIND vRouters, which itself is a very interesting case study and we plan to make a write up a detailed blogpost on that. Besides that, as we faced 6WIND again, we decided to write a few blogposts about its basics, such as how to get started with 6WIND vRouter, how to configure and automate them.
So, what is 6WIND? It is a company developing the software for network solutions. In a nutshell, they create a software, which allows you to turn a standard bare metal server in a fully functional router with a decent forwarding performance (tens of Gbps) and some service functionality (NAT, IPSec, EVPN/VXLAN, etc). As such, it may be interesting in certain applications:
- Data Centre Interconnect (DCI) Gateway
- Peering Routers at Internet Exchange Peering (IXP Peering)
- Customer Premises Equipment (CPE)
- Centralised Network Address Translation, also in the high-scale Service Providers (CG-NAT)
- VPN termination (eg. IPSec GW)
What is in common for all these applications, which at a glance look very different?
- All of them are working predominantly with South-North traffic.
- All of them require relatively low amount of interface (just 2-4 data ports).
- They require either a lot of memory (RAM) for DCI GW and IXP Peering or compute routers (amount of CPU cores and Frequency) for NAT and IPSec encryption and decryption.
On the one hand, cost of memory and CPU in COTS servers are much cheaper than in traditional routers/switches/firewalls. On the other hand, speaking about encryption/decryption for example, the routers and firewalls may have a specific purpose-build chips (ASIC), which are designed to perform this operation on a high scale. Thanks to the relatively new generation of CPUs (e.g. Intel Skylake), it is now possible to get also a high encryption/decryption operations, which by the way are used not only in IPSec but also in vide compression), as CPUs have a specific set of instructions, which boosts this operation a lot. In addition to that, it is already to have even 100G network interface cards (NICs) for servers, not even mentioning 10/25G.
All in all, nowadays you have a choice, how you can build your networks:
- relying on traditional purpose-built devices and proprietary operating systems
- relying on baremetal servers and Linux based software
Ultimately, it would be down to few parameters:
- How does the solution cost end to end (something we call TCO – total cost of ownership)?
- What is the skill set of your technical teams, who are to deploy and maintain the solution?
- How much time do you have to implement the solution and develop/integrate its management and automation?
- What level of external support do you need?
Based on the answers, you can figure out if Software Based / Linux Based Networking is suitable for you or the traditional way of doing things, which by the way developing a lot as well, is more suitable. In the end, we truly believe it is very good to have a choice.
Get in touch with us for training or professional services for your networks.
For now, let’s spin up a 6WIND vRouter in our Open Source Linux Cloud and get started.
Lab Topology
We have the following logical topology in our lab:

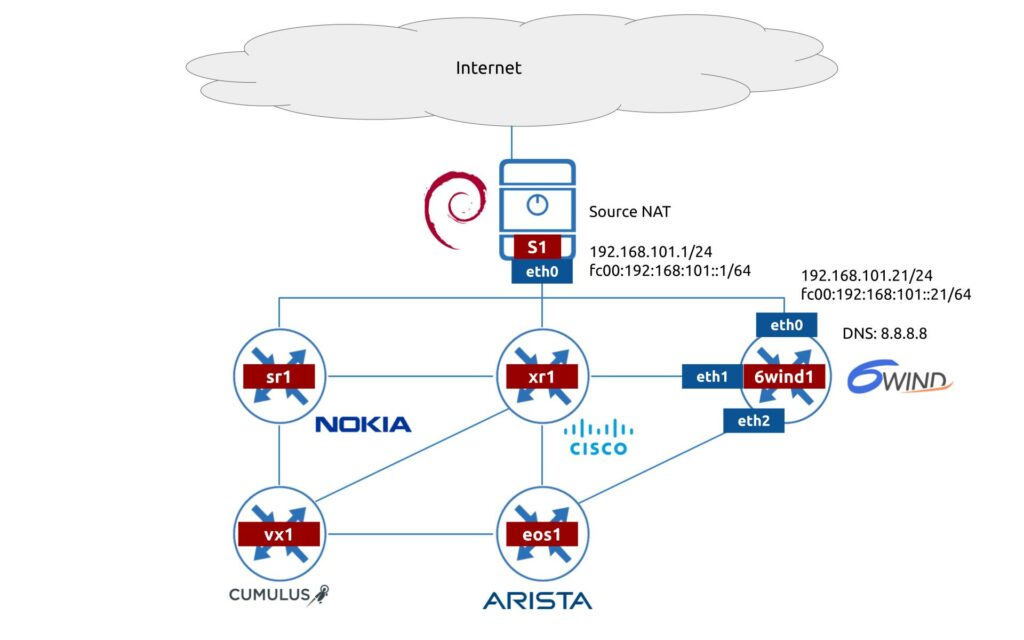
For today, we’ll focus only on 6WIND vRouter setup and its connectivity to management network. There are few infrastructure challenges to be solved:
- 6WIND vRouter must have connectivity to Internet. As such, in our case the S1 server shall perform traffic forwarding and source NAT to allow this type of connectivity.
- 6WIND vRouter shall be able to perform the DNS resolution, as this is required for the license activation.
As you can see, our network environment is truly multivendor, so we’ll see later how all these elements can work together.
Configuration of 6WIND vRouter connectivity to other network devices as well as its automation will be covered in separate articles.
Installation and Activation of 6WIND Turbo Router at ProxMox
There are multiple ways, how you can install the 6WIND Turbo Router, as this heavily depends on the environment. In our case we deploy it on the ProxMox Open Source Linux based virtualisation environment, which is a KVM in a nutshell. Therefore, we’ll use approach for KVM, relying on qcow2 images.
There are alternative ways to deploy it. Consult to the official documentation for further details.
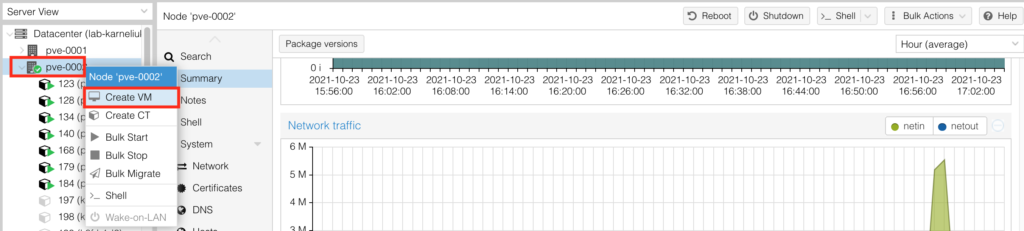
Step #1. Create a VM for 6WIND Turbo Router
In our ProxMox cloud, which all our students benefit from during our Automation Trainings, choose a host, where you plan to deploy the VM and press “Create VM”:

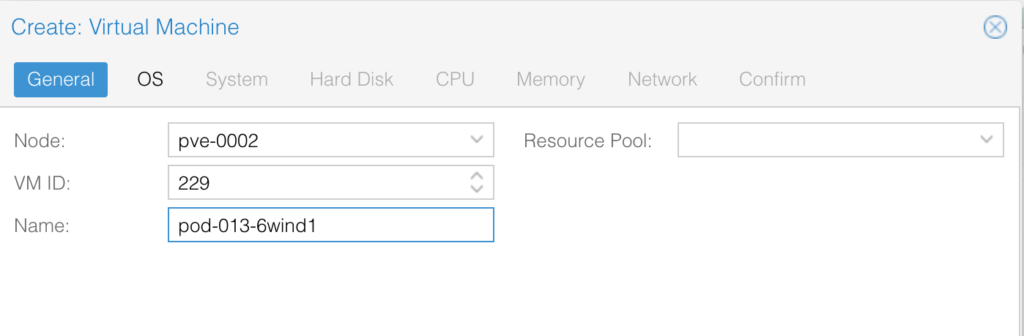
Provide the hostname for the VM:

Specify that you don’t use any media for installation (you will import the qcow2 image later):

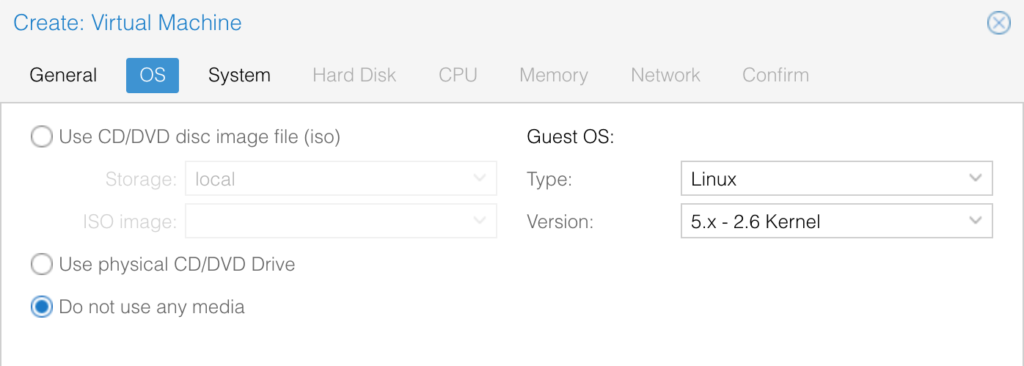
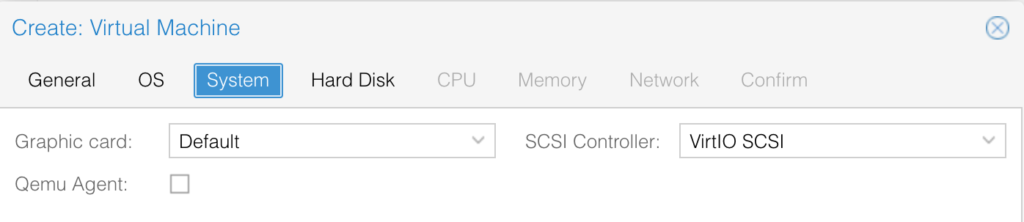
No changes needed on the next screen:

Choose the “IDE” type for the disk and allocate 8 Gbps for it:


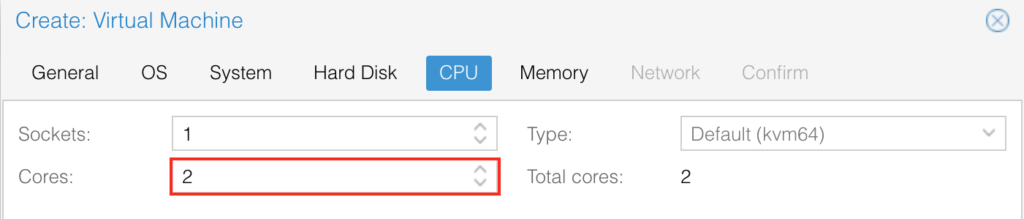
Allocate 2 cores at least:

Allocate 4 GB RAM:


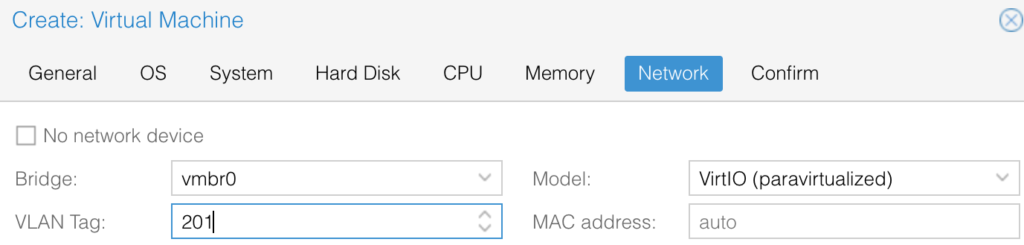
Connect the first interface (it will be management later) to the VLAN, which is also presenting on the NAT box:

Review and confirm settings. Once completed, you will see the VM appeared in the list of VMs for this host:

Point out the VM ID (in this case 229), you will need this number later.
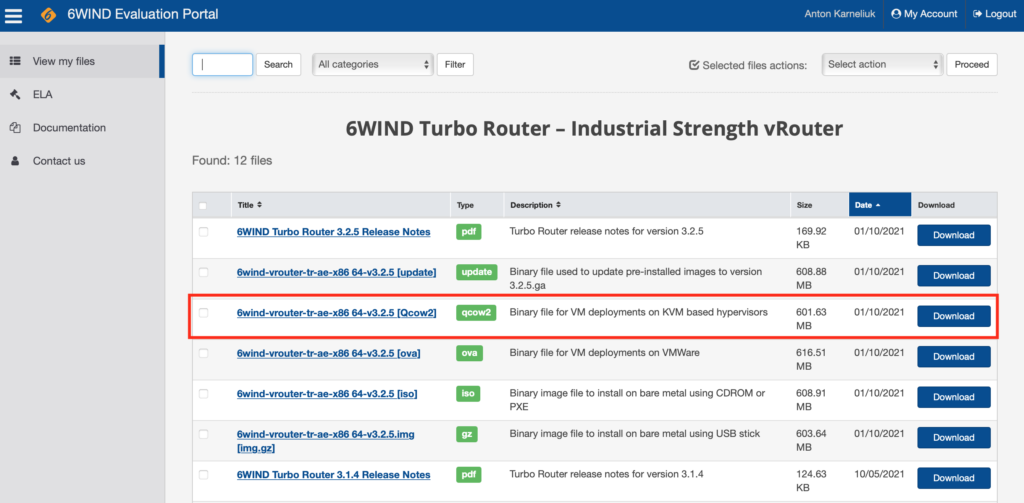
Step #2. Download 6WIND vRouter
Go the the 6wind evaluation portal:

Download the qcow2 image for 6WIND Turbo Router:

Make sure this image appears on your ProxMox host:
2
-rw-r--r-- 1 root root 630849536 Oct 23 16:59 default-6wind-vrouter-tr-ae-x86_64-v3.2.5.qcow2
Step #3. Import Downloaded Image into VM
From the ProxMox host, import the downloaded image into the created VM using qm tool (here is where you need the ID of the VM from step #1):
2
3
4
5
6
7
8
transferred 0.0 B of 20.0 GiB (0.00%)
transferred 204.8 MiB of 20.0 GiB (1.00%)
transferred 409.6 MiB of 20.0 GiB (2.00%)
!
! OUTPUT IS TRUNCATED FOR BREVITY
!
Successfully imported disk as 'unused0:local-pve-0002-lvm-thin:vm-229-disk-1'
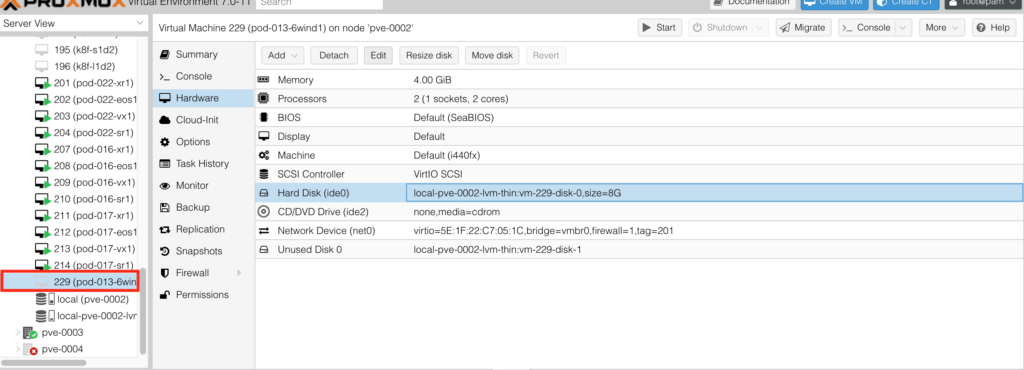
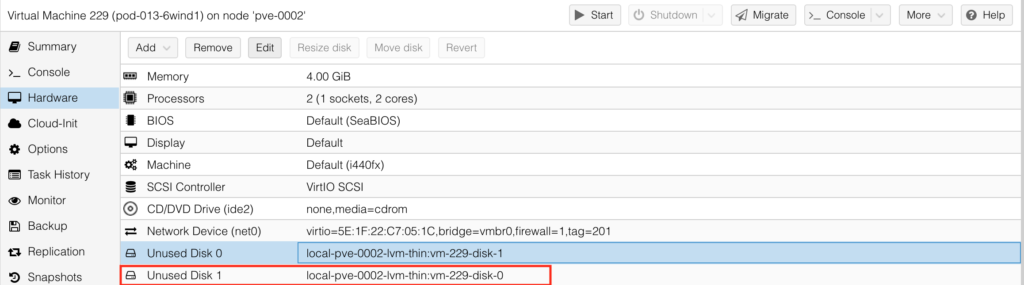
It will take a few moments (or minutes). Once this process is completed, you will see in UI in ProxMox the unused disk:

Step #4. Complete VM Creation
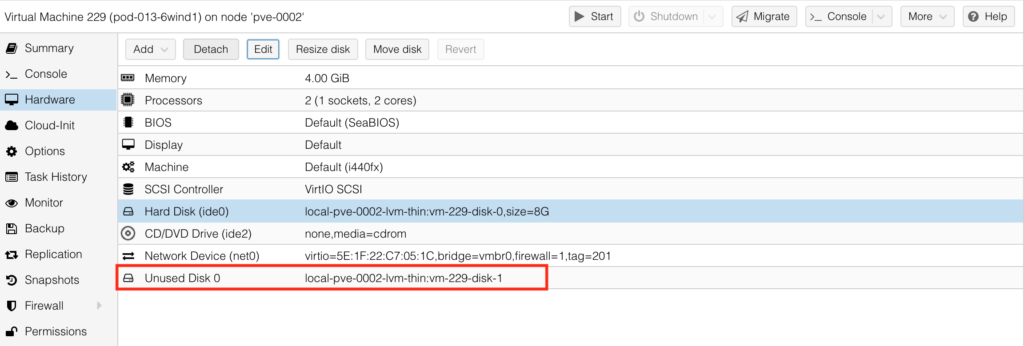
The creation of the VM with the 6WIND Turbo Router is almost completed. You need just to do a few more steps. First of all, detach the existing ide0 drive by choosing the hard disk and pressing “Detach” button. Once done, you will see it now appearing as Unused Disk 1:

Choose Unused Disk 0 and press “Edit” button to insert it in IDE slot 0:

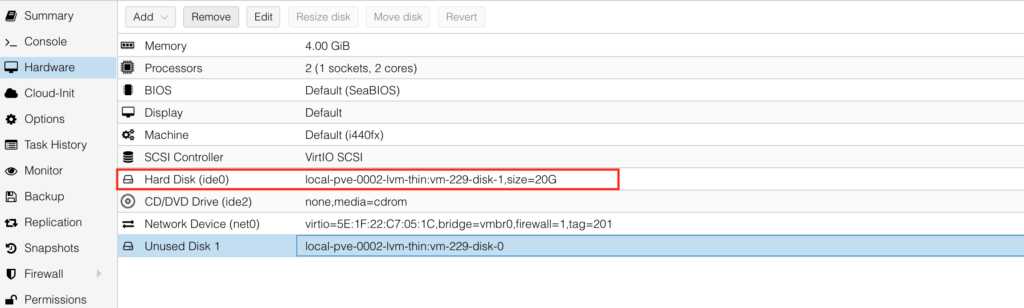
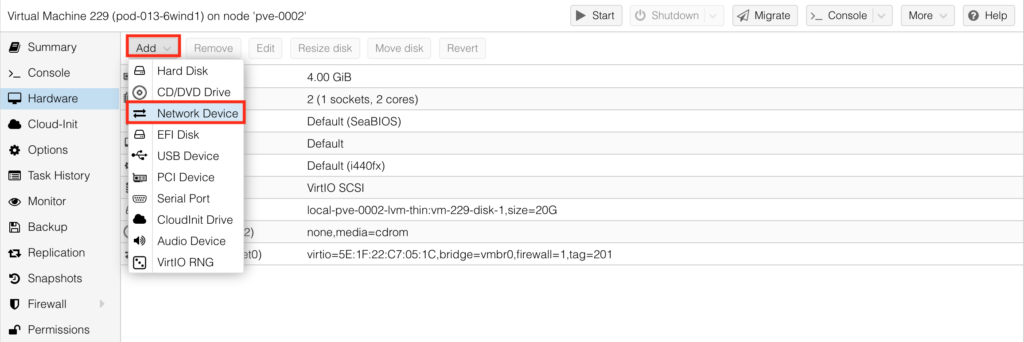
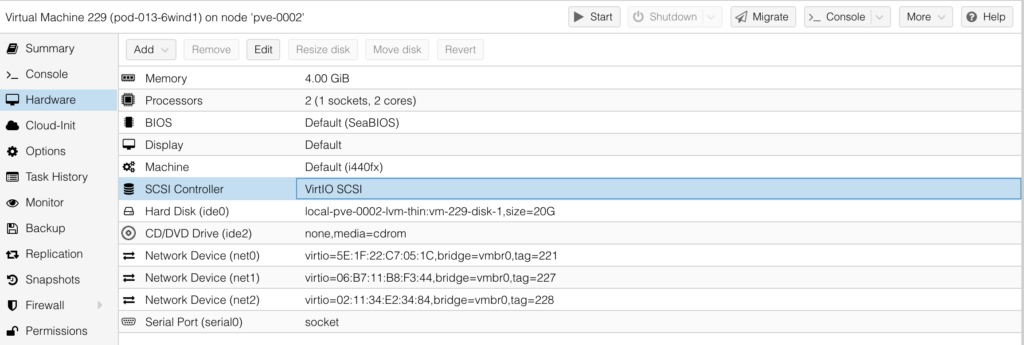
Once done, chose Unused Disk 1 and “Remove” it. Then add network interfaces to connect other ports to the network functions:

Once done, add the serial port for OOB console for the initial setup:

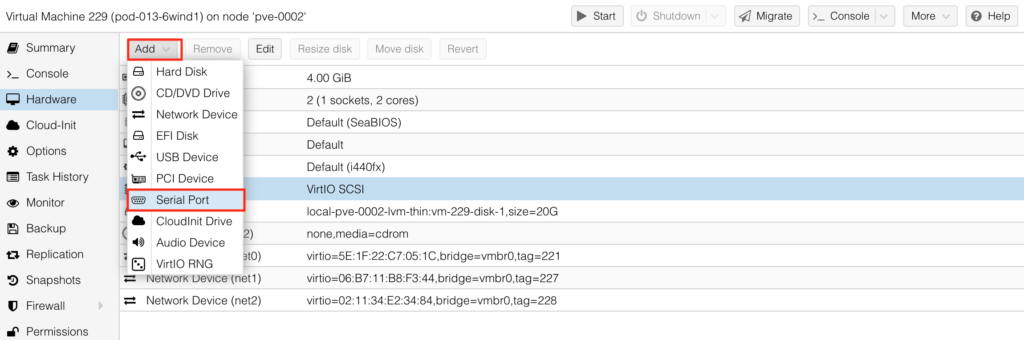
After that the HW for your 6WIND Turbo Router is finally ready:

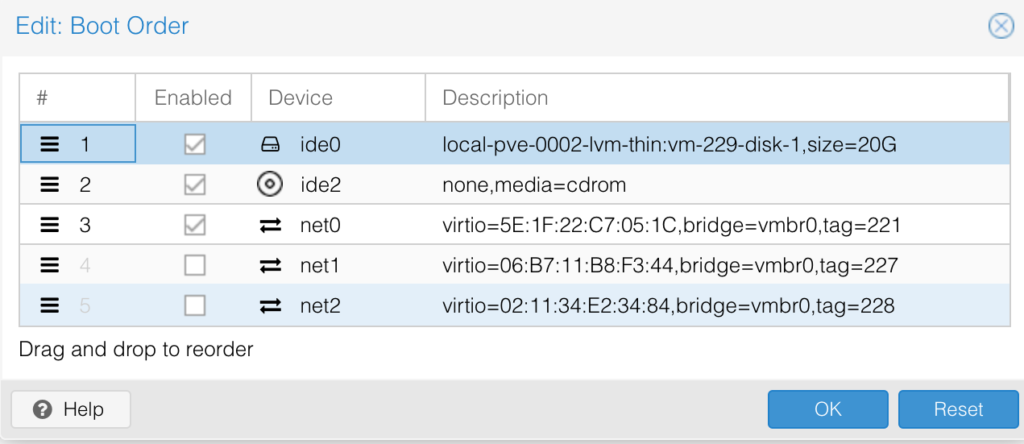
Next step is to make sure that VM is booting from the newly added ide0 drive. To do that, go to “Options” and chose the “Boot Options:
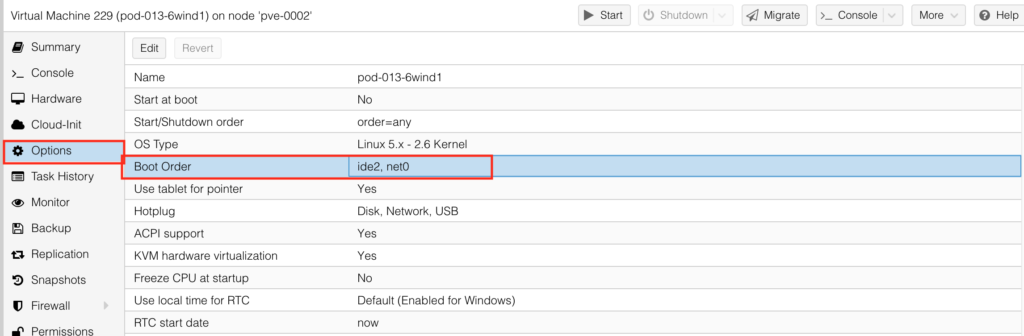
Enable ide0 and put it on top of the list:

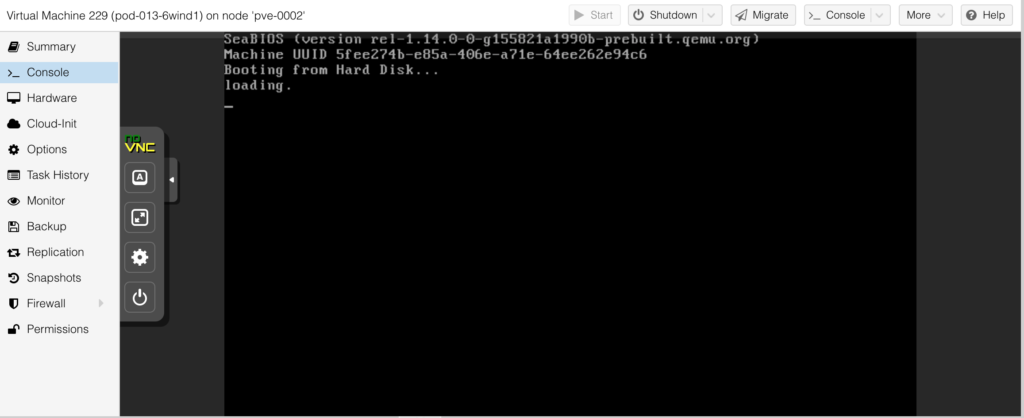
Now your VM is fully ready. Press start button and go to “Console”. You should be able to see the booting process started:

Step #5. Get to the 6WIND Router Terminal
On the ProxMox host, where 6WIND Turbo Router is running, using qm terminal connect to the serial port you added before:
You should see the booting process:
2
3
4
5
6
7
8
Starting Turbo Router - 3.2.5 ...
See 'systemctl status console-setup.service' for details.
[ OK ] Started Initial cloud-init job (pre-networking).
[ OK ] Reached target Network (Pre).
Starting Raise network interfaces...
!
! FURTHER OUTPUT IS TRUNCATED FOR BREVITY
Wait until you see the welcoming message:
2
3
4
5
6
7
/ /\ \ / /_ _| \ | | _ \ __ _| _ \ ___ _ _| |_ ___ _ __
| '_ \ \ /\ / / | || \| | | | | \ \ / / |_) / _ \| | | | __/ _ \ '__|
| (_) \ V V / | || |\ | |_| | \ V /| _ < (_) | |_| | || __/ |
\___/ \_/\_/ |___|_| \_|____/ \_/ |_| \_\___/ \__,_|\__\___|_|
vrouter login:
Default credentials are admin/admin. Login to the CLI and you finally see the prompt:
That’s already quite good, as the infrastructure part is done. The last final step is to complete the configuration in CLI.
Step #6. Perform the Initial Configuration
Welcome to the wonderful world of Linux networking. One of the interesting thing here is that your network interface can have any name you like; however, it shall be mapped to pre-defined names of the physical ports.
Yes, Nokia folks, it is exactly like in Nokia SR OS.
That’s how you do that:
2
3
4
5
6
7
8
9
10
11
12
13
14
15
16
17
18
19
20
21
22
network-port pci-b0s19
pci-bus-addr 0000:00:13.0
vendor "Red Hat, Inc"
model "Virtio network device"
mac-address 06:b7:11:b8:f3:44
interface ens19
..
network-port pci-b0s18
pci-bus-addr 0000:00:12.0
vendor "Red Hat, Inc"
model "Virtio network device"
mac-address 5e:1f:22:c7:05:1c
interface ens18
..
network-port pci-b0s20
pci-bus-addr 0000:00:14.0
vendor "Red Hat, Inc"
model "Virtio network device"
mac-address 02:11:34:e2:34:84
interface ens20
..
Another interesting insight is that show commands operates like it is Nokia SR Linux, though SR Linux is much younger: you have show state for operational data and show config for configuration.
Earlier in the Step #4 you may see which MAC you have on each port from ProxMox perspective. Matching MAC addresses allows you to identify which port shall perform which function (management or data plane) and which IP address it shall have. In our example, port pci-b0s18 shall be used as management port; hence, we’ll map it to the management VRF and configure the aforementioned IP addresses.
Get to the configuration mode issuing edit running command:
2
vrouter running config#
Configure the new hostname per your topology:
6WIND have a 2 stage commit in CLI, which means that configuration is not being activated unless you explicitly type commit in the CLI.
CLI in 6WIND is similar to MD-CLI in Nokia SR OS and Cisco IOS XR in a sense that you can either navigate between contexts or you can make configuration including contexts change in a single command.
Now you need to create a management VRF:
2
vrouter running vrf mgmt#
Then create a management interface with the name you like and map it to the corresponding physical port. Also, add the IP addresses:
2
3
4
5
6
7
vrouter running physical eth0#! port pci-b0s18
vrouter running physical eth0# ipv4 address 192.168.101.21/24
vrouter running physical eth0# ipv6 address fc00:192:168:101::21/64
vrouter running physical eth0# ..
vrouter running interface# ..
vrouter running vrf mgmt#
In order to get to the previous level of hierarchy in CLI use .. charset.
You have capabilities to validate the configuration you have prepared before committing it using diff functionality (same as show conf in Cisco IOS XR or compare in Nokia SR OS):
2
3
4
5
6
7
8
9
10
11
12
13
14
15
16
17
18
=== /
+ vrf mgmt
+ interface
+ physical eth0
+ port pci-b0s18
+ enabled true
+ ipv4
+ address 192.168.101.21/24
+ enabled true
+ ..
+ ipv6
+ address fc00:192:168:101::21/64
+ enabled true
+ ..
+ ..
+ ..
+ ..
Once you have reviewed the interfaces configuration and it looks good to you, you need to configure static routes, as you need to get access to the Internet for license activation later:
2
vrouter running vrf mgmt# routing static ipv6-route ::/0 next-hop fc00:192:168:101::1%eth0
Validate that configuration would be inline with your expectation:
2
3
4
5
6
7
8
9
10
11
12
13
14
15
16
17
18
19
20
21
22
23
24
25
26
27
28
=== /
+ vrf mgmt
+ routing
+ static
+ ipv4-route 0.0.0.0/0
+ next-hop 192.168.101.1%eth0
+ ..
+ ipv6-route ::/0
+ next-hop fc00:192:168:101::1%eth0
+ ..
+ ..
+ ..
+ interface
+ physical eth0
+ port pci-b0s18
+ enabled true
+ ipv4
+ address 192.168.101.21/24
+ enabled true
+ ..
+ ipv6
+ address fc00:192:168:101::21/64
+ enabled true
+ ..
+ ..
+ ..
+ ..
Finally, Add the DNS server:
Adding DNS is a mandatory step. If you miss it, you won’t be able to activate the license afterwards.
Finally, you can commit the configuration:
2
Configuration committed.
Once done, you will see that your prompt is changed:
At this stage you check the operational state of the device using show state command:
2
3
4
5
6
7
8
9
10
11
12
13
14
15
16
17
18
19
20
21
22
23
24
25
26
27
28
29
30
31
32
33
34
35
36
37
38
39
40
41
42
43
44
45
46
47
48
49
50
51
physical eth0
mtu 1500
promiscuous false
enabled true
port pci-b0s18
rx-cp-protection false
tx-cp-protection false
oper-status UP
counters
in-octets 3304
in-unicast-pkts 34
in-discards 0
in-errors 0
out-octets 2964
out-unicast-pkts 22
out-discards 0
out-errors 0
..
ipv4
address 192.168.101.21/24
..
ipv6
address fc00:192:168:101::21/64
address fe80::5c1f:22ff:fec7:51c/64
..
network-stack
ipv4
send-redirects true
accept-redirects false
accept-source-route false
arp-announce any
arp-filter false
arp-ignore any
log-invalid-addresses false
..
ipv6
autoconfiguration true
accept-router-advert never
accept-redirects false
accept-source-route false
router-solicitations -1
use-temporary-addresses never
..
..
ethernet
mac-address 5e:1f:22:c7:05:1c
auto-negotiate false
port-speed unknown
..
..
When you use show state command, you add / and then context you want to review. For example:
- just / will mean that you want to see the operational state of the entire device
- / vrf mgmt – operational state of all elements inside the management vrf
- / vhf mgmt interface physical eth0 – operational state of the interface eth0 inside the vrf mgmt
As interface is operationally UP, you can test the connectivity to some public hosts.:
2
3
4
5
6
7
8
9
10
11
12
13
14
15
16
17
18
19
20
PING 8.8.8.8 (8.8.8.8) 56(84) bytes of data.
64 bytes from 8.8.8.8: icmp_seq=1 ttl=118 time=1.85 ms
64 bytes from 8.8.8.8: icmp_seq=2 ttl=119 time=1.05 ms
64 bytes from 8.8.8.8: icmp_seq=3 ttl=119 time=1.00 ms
--- 8.8.8.8 ping statistics ---
3 packets transmitted, 3 received, 0% packet loss, time 2002ms
rtt min/avg/max/mdev = 1.005/1.303/1.854/0.390 ms
pod-013-6wind1> cmd ping karneliuk.com vrf mgmt count 3
PING karneliuk.com (91.220.34.47) 56(84) bytes of data.
64 bytes from rsi1.gerwanserver.de (91.220.34.47): icmp_seq=1 ttl=47 time=20.0 ms
64 bytes from rsi1.gerwanserver.de (91.220.34.47): icmp_seq=2 ttl=47 time=19.9 ms
64 bytes from rsi1.gerwanserver.de (91.220.34.47): icmp_seq=3 ttl=47 time=19.7 ms
--- karneliuk.com ping statistics ---
3 packets transmitted, 3 received, 0% packet loss, time 2003ms
rtt min/avg/max/mdev = 19.771/19.920/20.088/0.173 ms
If it is successful both for IP and FQDN, your initial config is almost completed and you need only activate license.
Step #7. Activate the License
At the moment of writing, 6WIND doesn’t have the perpetual demo images, but they have evaluation licenses, which are 10 days long. Without license, nothing besides ordinary IP connectivity and static routes is working.
The evaluation license is available in the evaluation portal:

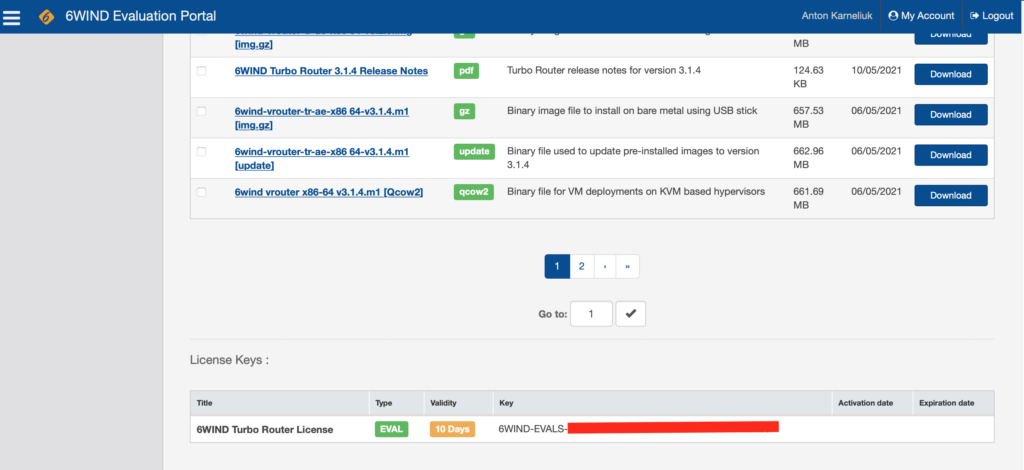
Copy that key and go to CLI. Make sure you are in CLI mode. Then apply the license key:
2
pod-013-6wind1 running config# system license online serial 6WIND-EVALS-***
Once done, you will see the following message:
2
3
4
5
commit # 1/ to commit your changes
exit # 2/ to exit edit mode
show license # 3/ to check the license has been successfully activated
edit running # 4/ to come back to edit mode
Follow those recommendations:
2
3
4
5
6
7
8
9
10
11
12
pod-013-6wind1 running config# exit
pod-013-6wind1> show license
Active evaluation license for Turbo Router until 2021-11-02 17:37:14
Current activations 1/1
Connected to license server (last contact 2021-10-23 17:37:14)
Lease is valid until 2021-11-02 17:37:14
Serial number is 6WIND-EVALS-***
Computer ID is ***
License was activated online
Support is valid until 1970-01-01 00:00:00 (standard mode)
Max throughput 10.0G (moving average 0.0G)
Congratulations, your 6WIND Turbo Router is activate and ready to be tested (or do its job). There is just a last step outstanding…
Step #8. Enable Remote Access via SSH and NETCONF
… which is to make sure you can access your 6WIND Turbo Router not only via the terminal from ProxMox server. To do that, get to the configuration mode and activate the SSH and NETCONF inside the management VRF and bind it to the dedicated IP addresses:
2
3
4
5
6
pod-013-6wind1 running config# vrf mgmt
pod-013-6wind1 running vrf mgmt# ssh-server enabled true
pod-013-6wind1 running vrf mgmt# ssh-server address 192.168.101.21
pod-013-6wind1 running vrf mgmt# netconf-server enabled true
pod-013-6wind1 running vrf mgmt# netconf-server 192.168.101.21
Validate the configuration looks OK:
2
3
4
5
6
7
8
9
10
11
12
=== / vrf mgmt
+ ssh-server
+ enabled true
+ address 192.168.101.21
+ port 22
+ ..
+ netconf-server
+ enabled true
+ idle-timeout 3600
+ address 192.168.101.21 port 830
+ ..
Then commit the configuration:
2
Configuration committed.
Get to the Linux server (Debian 11 in our case) and try to SSH to the device:
2
3
4
5
6
7
8
9
10
11
12
13
14
15
16
17
18
19
20
21
22
The authenticity of host '192.168.101.21 (192.168.101.21)' can't be established.
ECDSA key fingerprint is SHA256:0mGoOrqFgoLu3bnwrcumO3kdYqTSxG24nigV02C0H4E.
Are you sure you want to continue connecting (yes/no/[fingerprint])? yes
Warning: Permanently added '192.168.101.21' (ECDSA) to the list of known hosts.
admin@192.168.101.21's password:
#######################################################################
# Welcome to 6WIND vRouter 3.2.5 #
# #
# Most useful commands at that step: #
# #
# edit running # to edit the running configuration #
# show interface # for interface names, state and IP addresses #
# show summary # for the vRouter state summary #
# ? # for the list of available commands #
# help <cmd> # for detailed help on the <cmd> command #
# #
# Feel free to customize this banner using #
# cmd banner post-login message #
#######################################################################
Last login: Sat Oct 23 17:07:42 2021
pod-013-6wind1>
Also, you can test NETCONF:
2
3
4
5
6
7
8
9
10
11
12
13
Interactive SSH Authentication
Type your password:
Password:
<hello xmlns="urn:ietf:params:xml:ns:netconf:base:1.0">
<capabilities>
<capability>urn:ietf:params:netconf:base:1.0</capability>
<capability>urn:ietf:params:netconf:base:1.1</capability>
<capability>urn:ietf:params:netconf:capability:writable-running:1.0</capability>
<capability>urn:ietf:params:netconf:capability:candidate:1.0</capability>
<capability>urn:ietf:params:netconf:capability:rollback-on-error:1.0</capability>
!
! FURTHER OUTPUT IS TRUNCATED FOR BREVITY
If both connectivity tests were successful, then you are ready to bring 6WIND in production or labs.
Thanks
We are very thankful:
- To Patrick Guerbigny and Hadi Choueiry from 6WIND for providing us evaluation license for tests and review.
- To Pau Nadeu Rabat and all the Network Hero folks for collaboration on 6WIND production deployment projects.
Lessons Learned
Read the vendors’ manuals. That’s the most significant lessons learned, as this would saved a lot of time for us. Namely, we missed the configuration of DNS servers, which spoiled us 2 hours in troubleshooting. At the same time, some parts of vendor documentation was not very clear (e.g., they don’t call license key as license key, but rather that as a serial number, which is quite misleading). All in all, these two items forced us to dig in details of the setup of 6WIND turbo router.
Conclusion
Networking world is getting more and more mixed, where traditional network vendors (Cisco, Nokia, Juniper, Arista, etc) meet pure software Linux-based vendors (6WIND, FRR, BIRD, etc). This creates a lot of opportunities for creative and cost effective network solutions to meet the full spectre of demands: from simple SOHO installations till complex hyper-scale systems. In upcoming articles we’ll cover the configuration of 6WIND and its automation. Take care and good bye.
Support Us
P.S.
If you have further questions or you need help with your networks, we are happy to assist you, just send us a message. Also don’t forget to share the article on your social media, if you like it.
BR,
Anton Karneliuk