

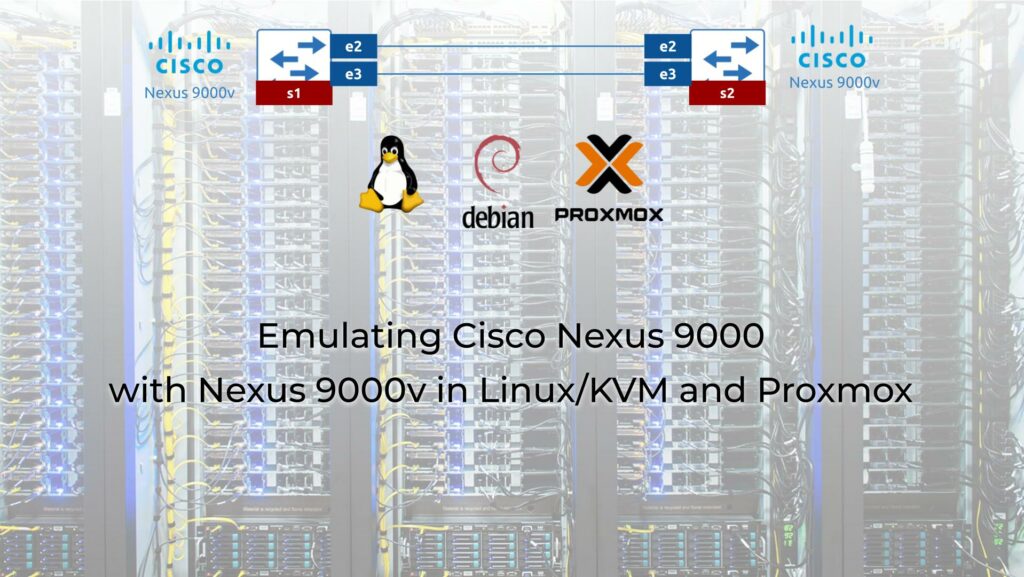
Hello my friend,
We use Proxmox in our Karneliuk Lab Cloud (KLC), which is a driving power behind our Network Automation and Nornir trainings. It allows to run out of the box the vast majority of VMs with network opening systems: Cisco IOS or Cisco IOS XR, Arista EOS, Nokia SR OS, Nvidia Cumulus, and many others. However, when we faced recently a need to emulate a customer’s data centre, which is build using Cisco Nexus 9000 switches, it transpired that this is not that straightforward and we had to spend quite a time in order to find a working solution. Moreover, we figured out that there are no public guides explaining how to do it. As such, we decide to create this blog.
2
3
4
5
retrieval system, or transmitted in any form or by any
means, electronic, mechanical or photocopying, recording,
or otherwise, for commercial purposes without the
prior permission of the author.
How Does KLC Help with Automation?
A lot of network automation trainings worldwide imply that a student has to build a lab his/her-own. Such an approach, obviously, is the easiest for an instructor or training company, but it has a number of limitations:
- Student shall know how to build a lab.
- Student shall have capable local infrastructure (local server or powerful laptop/desktop).
- Instead of focusing on obtaining network automation skills, a student has a miserable experience of trying to fix all the things in Linux or VMware infrastructure.
We must admit, we started our training in the same way. However, we realised that for a proper learning experience, our students shall have a comfortable learning environment. Hence, we created a KLC with a pre-build lab pods, so that students can connect to it via VPN and start learning 24/7.
Benefit from powerful high-capacity lab environment while studying with us.
We offer the following training programs:
- Zero-to-Hero Network Automation Training
- High-scale automation with Nornir
- Ansible Automation Orchestration with Ansble Tower / AWX
During these trainings you will learn the following topics:
- Success and failure strategies to build the automation tools.
- Principles of software developments and tools for that.
- Data encoding (free-text, XML, JSON, YAML, Protobuf)
- Model-driven network automation with YANG, NETCONF, RESTCONF, GNMI.
- Full configuration templating with Jinja2 based on the source of truth (NetBox).
- Best programming languages (Python, Bash) for developing automation, configuration management tools (Ansible) and automation frameworks (Nornir).
- Network automation infrastructure (Linux, Linux networking, KVM, Docker).
- Orchestration of automation workflows with AWX and its integration with NetBox, GitHub, as well as custom execution environments for better scalability.
Moreover, we put all mentions technologies in the context of real use cases, which our team has solved and are solving in various projects in the service providers, enterprise and data centre networks and systems across the Europe and USA. That gives you opportunity to ask questions to understand the solutions in-depts and have discussions about your own projects. And on top of that, each technology is provided with online demos and labs to master your skills thoroughly. Such a mixture creates a unique learning environment, which all students value so much. Join us and unleash your potential.
Brief Description
In general, when you develop network automation tools or testing the configuration, you need to have a safe sandbox environment, where you can experiment without a fear to break production services. It means that the environment shall be similar to your production network:
- The lab topology shall be somewhat the same, but it can be smaller in scale.
- Software versions of network operating systems shall be the same as well.
As we use Linux to emulate network topologies for a long period of time, we already back in past shared a few details, how to setup a number of network operating systems manually in KVM:
- Cisco IOS XR
- Nokia SR OS
- Arista EOS
- NVIDIA Cumulus Linux
Join our Network Automation Training to learn how to automate multivendor networks
Despite all of them are different network operating system, they share one key component. All of them relies on the same version of BIOS, which is called SeaBIOS. This is a default BIOS type used by all VMs, which are created in KVM and, hence, in Proxmox by default. However, it is not a single BIOS type existing in the market. Another one is, for instance, UEFI/OVMF. This type of BIOS have some advanced capabilities, such as passthrough of GPU (at least they say so) towards VM. Despite, that’s clear not the case for Cisco Nexus 9000v, it requires this type of the BIOS to be used in order for the VM to be launched. As such, some tweaking to a standard approach to create VM is needed.
In general, Cisco Nexus 9000v is a virtualised network appliance, which allows to model Cisco Nexus 9300 and Cisco Nexus 9500 switches. This platform can be used to build data centres following both modern EVPN/VXLAN Clos fabrics or legacy vPC L2 based topology. I don’t think anyone these days will be looking to perform a green field deployment with vPC, but it may happen you may need to support an existing network or to plan a migration from it towards EVPN/VXLAN.
Lab Topology
In today’s blogpost we will spin up a simple Lab topology with 2x Cisco Nexus 9000v running Cisco Nexus 9500 functionality. Take a look at the following topology:

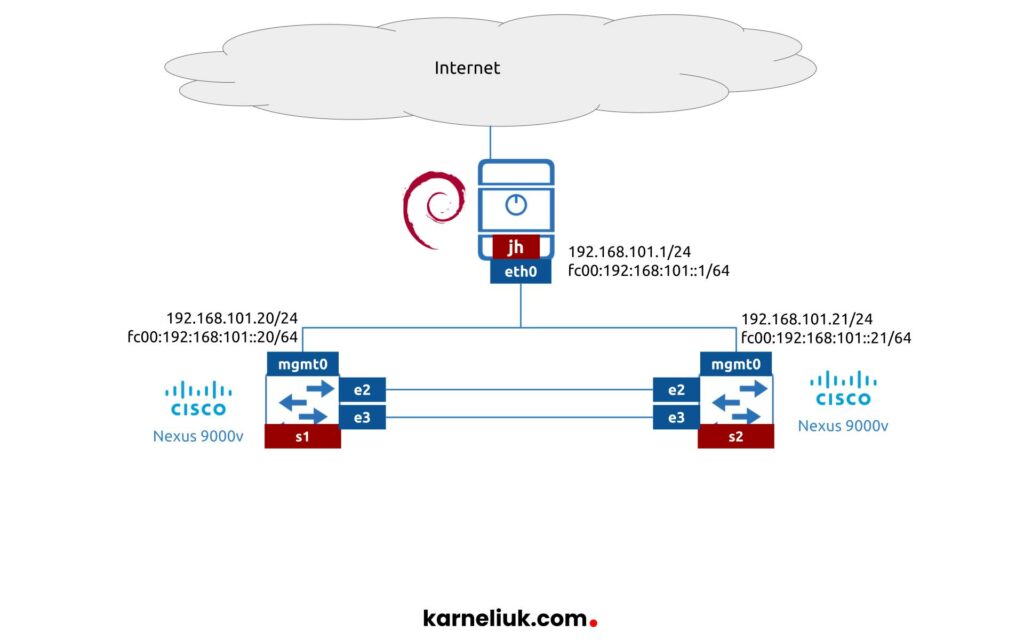
Such a topology satisfies our needs, which are around the network automation development with NAPALM, NETCONF, and GNMI. However, you can scale it further as much as you need, if you want to create a full-scale CCIE DC lab.
Solution Description
The process of lab setup today consists from 3 major steps:
- Get the Cisco Nexus 9000v image
- Build a VM with Cisco Nexus 9000v in Proxmox properly so that it can boot and act
- Boot the VM with Cisco Nexus 9000v
Obviously, afterwards, we will perform a simple validation, that everything works as expected afterwards.
Step #1. Get Cisco Nexus 9000v
The good thing in this step that Cisco Nexus 9000v is publicly free to download (at least at the time of writing this blogpost). You need to have a Cisco account, but you don’t need to have any contract attached to it.
Go to the official webpage for download of Cisco Nexus 9000v and download KVM version (provided you are using Proxmox or pure Linux/KVM as we do):

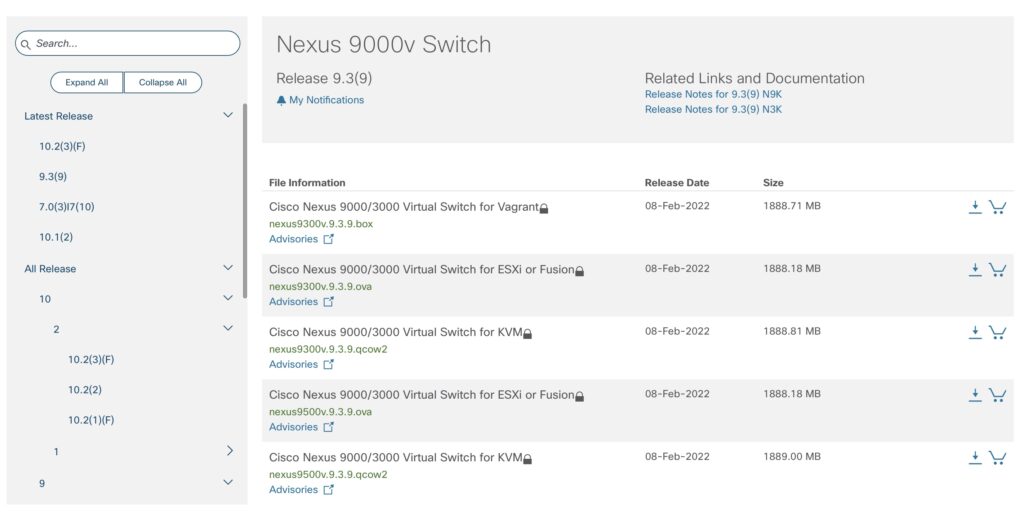
Per our development needs we run the latest Cisco NX-OS from 9.3 train, which is 9.3.9 at the time of writing. Once they are downloaded, you can check that their sizes match provided on the website:
2
3
-rw-r--r--@ 1 anton admin 1980563456 28 May 17:20 nexus9300v.9.3.9.qcow2
-rw-r--r--@ 1 anton admin 1980760064 28 May 17:22 nexus9500v.9.3.9.qcow2
The first step is completed and we can move to the second step, which is to create a VM with Cisco Nexus 9000v itself.
Step #2. Build VM with Cisco Nexus 9000v in Proxmox
This process consists of few steps:
- Create a VM without an operating system but using UEFI/OVMF BIOS.
- Import the downloaded QCOW2 image to a created VM.
- Add extra interfaces, serial console, and imported QCOW2 as SATA drive.
- Fix the booting sequence.
Step #2.1. Create an Empty VM
Start creating the VM in Proxmox:

Add provide the hostname per your topology:

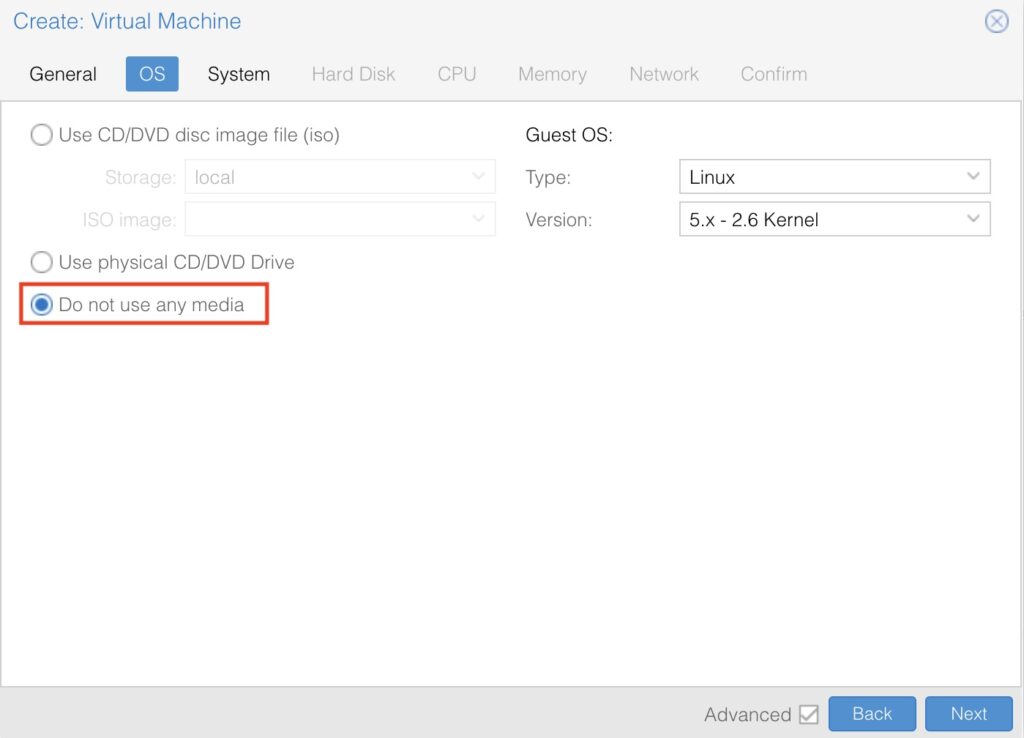
Specify that you don’t need any system to be installed:

This action requires “Advanced” configuration settings. Make sure they are checked in. Choose the UEFI BIOS type and specify you want to create a disk for it using a local storage:

There are no any configuration needed disk step:
Allocate at least 2 vCPUs for Cisco Nexus 9000v:

And 8G RAM:

Finally, specify the network for management interface (mgmt0 interface at Cisco Nexus 9000v) and make sure its type is “E1000“:
Review all the provided parameters one more time and your setup is complete.
Once VM is created, you will see the VM ID, which Proxmox allocated to it. It is a critical piece of information, which you need later.


Step #2.2. Import Downloaded Cisco Nexus 9000v QCOW2 Image
This step is performed from CLI of the Proxmox server.
Import the downloaded Cisco Nexus 9000v image to the created VM:
2
3
4
5
6
7
8
9
importing disk 'default-cisco-nexus9500v.9.3.3.qcow2' to VM 263 ...
transferred 0.0 B of 9.8 GiB (0.00%)
transferred 104.0 MiB of 9.8 GiB (1.04%)
transferred 214.0 MiB of 9.8 GiB (2.14%)
!
! OUTPUT IS TRUNCATED FOR BREVITY
!
Successfully imported disk as 'unused0:local-pve-0003-lvm-thin:vm-263-disk-2'
Once the import is completed, you will see the drive added in the UI of Proxmox as well:

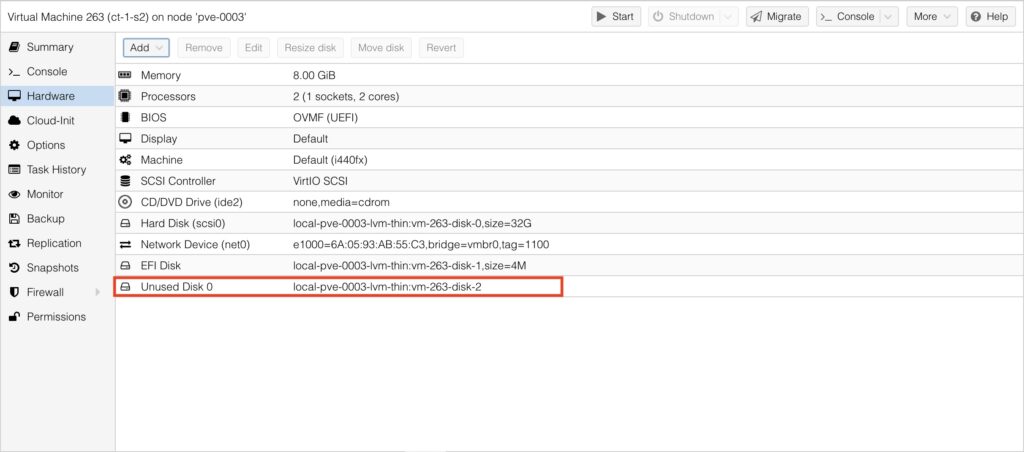
This step is completed.
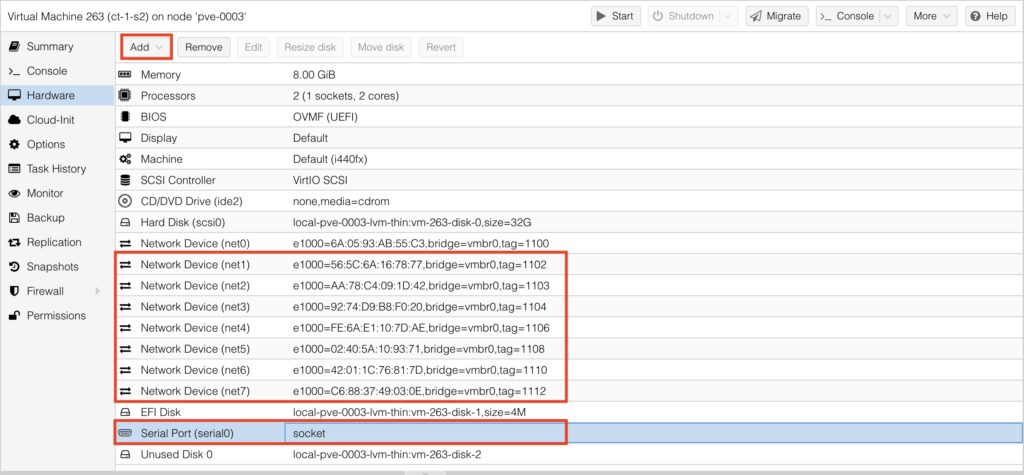
Step #2.3. Add Extra Interfaces, Console, and Modify Disks
Now using the “Add” button in the “Hardware” tab, add the necessary interfaces and serial console:

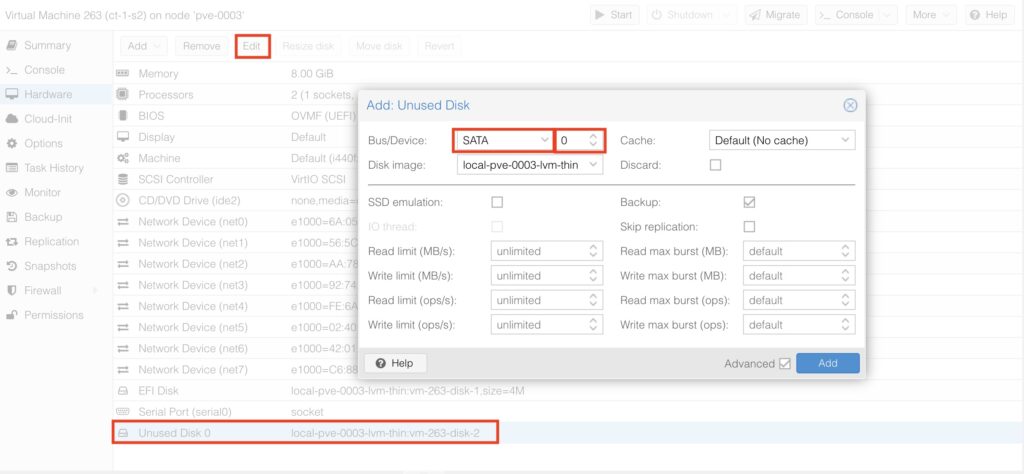
Once that is completed, choose the Hard Disk inserted in scsi0 and Detach and Remove it:

Finally, choose the imported Hard Disk, Edit it and Insert in SATA0 slot:

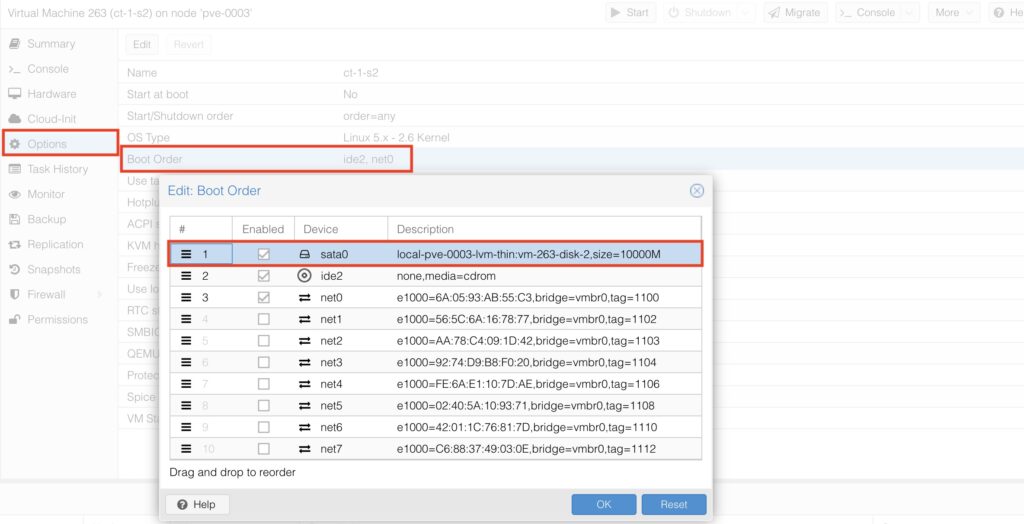
Step #2.4. Correct the Boot Sequence
The final step in the preparation is to go to “Options” tab in the VM settings and amend the boot sequence so that the sata0 has the highest priority:

Now all the preparatory steps completed and you are generally done. As such, we can process with a boot to see if the setup is working properly.
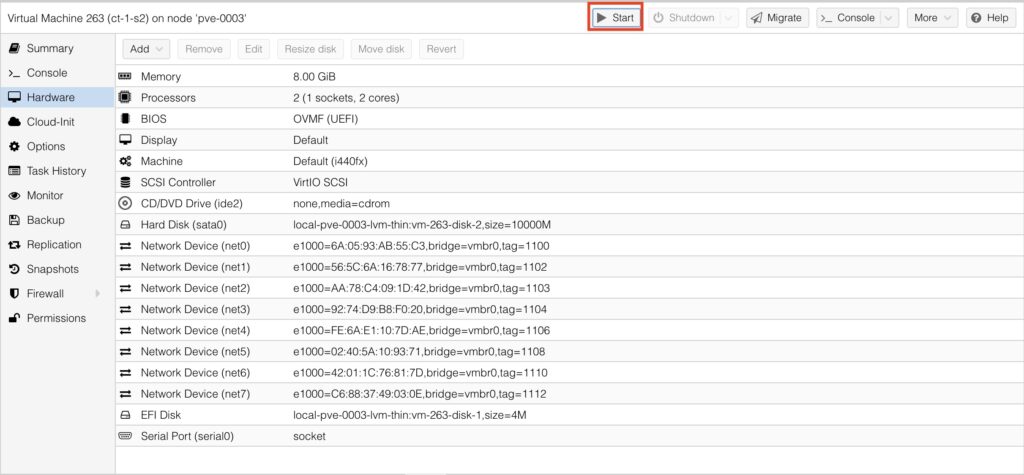
Step #3. Boot of Cisco Nexus 9000v
Start the VM:
After that go to the Proxmox CLI and connect to the VM CLI using the created serial console:
If everything was done properly above, you should start seeing the output in CLI. For example:
2
3
4
5
6
7
8
9
10
11
12
13
14
Checking rpmstore swap in host context.
tune2fs 1.42.9 (28-Dec-2013)
Setting reserved blocks percentage to 0% (0 blocks)
is_lxc: is_titan_eor:y is_stby: suffix: klm_ftrace: /isanboot/lib/modules/klm_ftrace.o
Installing ftrace in lxc 0 mode done
INIT: Entering runlevel: 3
cp: cannot stat '/nxos/tmp/vdc_1_sup1': No such file or directory
Linking n9k flash devices
creating flash devices BOOT_DEV= sda
mknod: '/dev/sda7': File exists
!
! FURTHER OUTPUT IS TRUNCATED FOR BREVITY
The boot process of Cisco Nexus 9000v is quite a long (approximately 5 minutes), so you have a time to grab a fresh brew. You should wait until you see in CLI the following output:
2
3
4
! OUTPUT IS TRUNCATED FOR BREVITY
!
Abort Power On Auto Provisioning [yes - continue with normal setup, skip - bypass password and basic configuration, no - continue with Power On Auto Provisioning] (yes/skip/no)[no]:
Answer “yes” or “skip“, depending on your preference in terms of setting up the new password for admin user. Once you’ve answered, you have to wait for next 3-5 minutes until you see:
2
3
4
Do you want to enforce secure password standard (yes/no) [y]:
If you get to this stage, it means that the setup of Cisco Nexus 9000v on Proxmox was successful and what you need now is to complete the initial configuration.
Initial Configuration and Connectivity Test
Cisco Nexus 9000v comes by default with a pre-configured management VRF:
2
3
4
5
switch# show vrf
VRF-Name VRF-ID State Reason
default 1 Up --
management 2 Up --
All we need is to configure the management IP addresses per the topology above and to connect to it via SSH:
2
3
4
5
6
7
8
9
10
11
12
13
Enter configuration commands, one per line. End with CNTL/Z.
switch(config)# hostname ct-1-s2
ct-1-s2(config)# interface mgmt 0
ct-1-s2(config-if)# vrf member management
ct-1-s2(config-if)# ip address 192.168.101.21/24
ct-1-s2(config-if)# ipv6 address fc00:192:168:101::21/64
ct-1-s2(config-if)# no shut
ct-1-s2(config-if)#
ct-1-s2# copy run startup-config
[########################################] 100%
Copy complete, now saving to disk (please wait)...
Copy complete.
After the configuration is completed, check that the interfaces are up and running:
2
3
4
5
6
7
8
9
10
11
12
13
14
15
16
17
18
IP Interface Status for VRF "default"(1)
Interface IP Address Interface Status
IP Interface Status for VRF "management"(2)
Interface IP Address Interface Status
mgmt0 192.168.101.21 protocol-up/link-up/admin-up
ct-1-s2# show ipv6 int br vrf all
IPv6 Interface Status for VRF "default"(1)
Interface IPv6 Address/Link-local Address Interface Status
prot/link/admin
IPv6 Interface Status for VRF "management"(2)
Interface IPv6 Address/Link-local Address Interface Status
prot/link/admin
mgmt0 fc00:192:168:101::21 up/up/up
fe80::6805:93ff:feab:55c3
The very last step is to try to connect via SSH from the jump host to the newly created Cisco Nexus 9000v:
2
3
4
5
6
7
8
9
10
11
12
13
14
15
16
17
18
19
20
21
22
23
24
25
26
27
28
29
30
31
32
33
34
35
36
The authenticity of host 'fc00:192:168:101::21 (fc00:192:168:101::21)' can't be established.
RSA key fingerprint is SHA256:PXpKIAXqeUU2WnvvnnMxwH90VCLLob6SuzfUJjpXOdY.
Are you sure you want to continue connecting (yes/no/[fingerprint])? yes
Warning: Permanently added 'fc00:192:168:101::21' (RSA) to the list of known hosts.
User Access Verification
Password:
Cisco NX-OS Software
Copyright (c) 2002-2019, Cisco Systems, Inc. All rights reserved.
Nexus 9000v software ("Nexus 9000v Software") and related documentation,
files or other reference materials ("Documentation") are
the proprietary property and confidential information of Cisco
Systems, Inc. ("Cisco") and are protected, without limitation,
pursuant to United States and International copyright and trademark
laws in the applicable jurisdiction which provide civil and criminal
penalties for copying or distribution without Cisco's authorization.
Any use or disclosure, in whole or in part, of the Nexus 9000v Software
or Documentation to any third party for any purposes is expressly
prohibited except as otherwise authorized by Cisco in writing.
The copyrights to certain works contained herein are owned by other
third parties and are used and distributed under license. Some parts
of this software may be covered under the GNU Public License or the
GNU Lesser General Public License. A copy of each such license is
available at
http://www.gnu.org/licenses/gpl.html and
http://www.gnu.org/licenses/lgpl.html
***************************************************************************
* Nexus 9000v is strictly limited to use for evaluation, demonstration *
* and NX-OS education. Any use or disclosure, in whole or in part of *
* the Nexus 9000v Software or Documentation to any third party for any *
* purposes is expressly prohibited except as otherwise authorized by *
* Cisco in writing. *
***************************************************************************
ct-1-s2#
It works. Our goal is completed.
I Want to Learn Network Technologies and Automation!
That’s why we are here for you. Join our training programs right now and become the network automation expert:
- Individuals who passed our training started earning 50% within 3-6 months after completion.
- Companies, which employees took part in our trainings, started experience significantly lower amount of outages caused by human factor within the same 3-6 month.
Start your network automation journey today:
Lessons Learned
We spent a significant amount of time on bringing up the Cisco Nexus 9000v based digital twin of the customer’s data centre. They key learning we did is that, despite VMs are VMs and they shall be in similar to each other, theses tiny parameters, such as BIOS settings, may cause a significant delay in preparing the infrastructure for network automation development or testing. The only solution here is to read the documentation and to try to apply various configurations, until we found a working solution.
Useful documentation for this matter is:
Conclusion
This solution allowed us to complete the portfolio of our data centre Digital twins based on the leading networking vendors. So far we can emulate and, therefore, develop automation and deliver trainings for all major data centre platforms:
- Nokia SR OS and SR Linux
- Juniper Junos
- Cisco IOS XR, IOS XE, and NX-OS
- NVIDIA Cumulus Linux
- Arista EOS
- Broadcom SONiC
And all these items are available, some are on-demand, whilst others are permantenly, in our automation trainings run on top of KLC. And we hope, with a shared knowledge, you could replicate it in your environment as well, or you could benefit from our setup. Take care and good bye.
Need Help? Contract Us
If you need a trusted and experienced partner to automate your network and IT infrastructure, get in touch with us.
P.S.
If you have further questions or you need help with your networks, we are happy to assist you, just send us a message. Also don’t forget to share the article on your social media, if you like it.
BR,
Anton Karneli