

Hello my friend,
The last Black Friday (in 2021) I’ve purchased some Kubernetes trainings from Linux Foundation with quite a huge discount. I’ve purchased and then has been doing nothing in their regard for quite a bit until I’ve received a notification in the beginning of the September that I have only 3 months to use the training and pass exam or it will expire. Moreover, I have 2 exams to pass, so… All my blogs for a bit will be dedicated to Kubernetes only, as I don’t have time to look into anything else for the time being. I will be using these blogs as a brain dump for me during preparation for CKA (Certified Kubernetes Administrator) and CKAD (Certified Kubernetes Application Developer). Whether I will manage it in 2,5 months, the time will show. Let’s get started.
2
3
4
5
retrieval system, or transmitted in any form or by any
means, electronic, mechanical or photocopying, recording,
or otherwise, for commercial purposes without the
prior permission of the author.
How Is Kubernetes Related to Network Automation?
Kubernetes is one of the most popular platforms to build and operate clouds, where workloads are running in containers. That is something called cloud-native applications. In our Zero-to-Hero Network Automation Training we are teaching students how to build containerized applications and why is that beneficial.
Therefore, enroll to our Network Automation Trainings and get ready for the real-world networking challenges:
We offer the following training programs for you:
- Zero-to-Hero Network Automation Training
- High-scale automation with Nornir
- Ansible Automation Orchestration with Ansble Tower / AWX
- Expert-level training: Closed-loop Automation and Next-generation Monitoring
During these trainings you will learn the following topics:
- Success and failure strategies to build the automation tools.
- Principles of software developments and the most useful and convenient tools.
- Data encoding (free-text, XML, JSON, YAML, Protobuf).
- Model-driven network automation with YANG, NETCONF, RESTCONF, GNMI.
- Full configuration templating with Jinja2 based on the source of truth (NetBox).
- Best programming languages (Python, Bash) for developing automation
- The most rock-solid and functional tools for configuration management (Ansible) and Python-based automation frameworks (Nornir).
- Network automation infrastructure (Linux, Linux networking, KVM, Docker).
- Orchestration of automation workflows with AWX and its integration with NetBox, GitHub, as well as custom execution environments for better scalability.
- Collection network data via SNMP and streaming telemetry with Prometheus
- Building API gateways with Python leveraging Fast API
- Integration of alerting with Slack and your own APIs
- … and many more
Moreover, we put all mentions technologies in the context of real use cases, which our team has solved and are solving in various projects in the service providers, enterprise and data centre networks and systems across the Europe and USA. That gives you opportunity to ask questions to understand the solutions in-depts and have discussions about your own projects. And on top of that, each technology is provided with online demos and labs to master your skills thoroughly. Such a mixture creates a unique learning environment, which all students value so much. Join us and unleash your potential.
Brief Description
The paramount goal for me is not the certificate, though. The paramount goal is the obtain the knowledge and skills needed to build and manage applications on Kubernetes, where certificates is just a pleasant addition. At the same time, as I’m using the exam curriculum to learn about Kubernetes, it make sense to look into it. Among the topics related to the first category “Cluster Architecture, Installation and Configuration” there are two, which we will cover in this blogpost:
- Provision underlying infrastructure to deploy Kubernetes cluster
- Use Kubeadm to install a basic cluster
It is quite straightforward, isn’t it? Before we can run any applications in the cloud native format, we need to have that cloud. Moreover, knowing what are the building blocks of the cloud helps to understand how the overall Kubernetes is working, which for us is quite interesting. As such, let’s build our Kubernetes Cluster.
What Are We Going to Achieve Today?
At the end of this blogpost we shall have:
- Fully operational Kubernetes cluster consisting of one control plane node and two worker nodes.
- Test application deployed and running on the cluster validating it works as proper.
The cluster will be deployed on Linux hosts running freshly installed Ubuntu 22.04. So we literally starting from scratches, as per the requirements CKA blueprint requirements. As such, there will be quite a bit of Linux administration as well.
Enroll to our Zero-to-Hero Network Automation Training to get firm grasp on the Linux administration.
Lab Setup
For this lab the topology will be relatively simple:

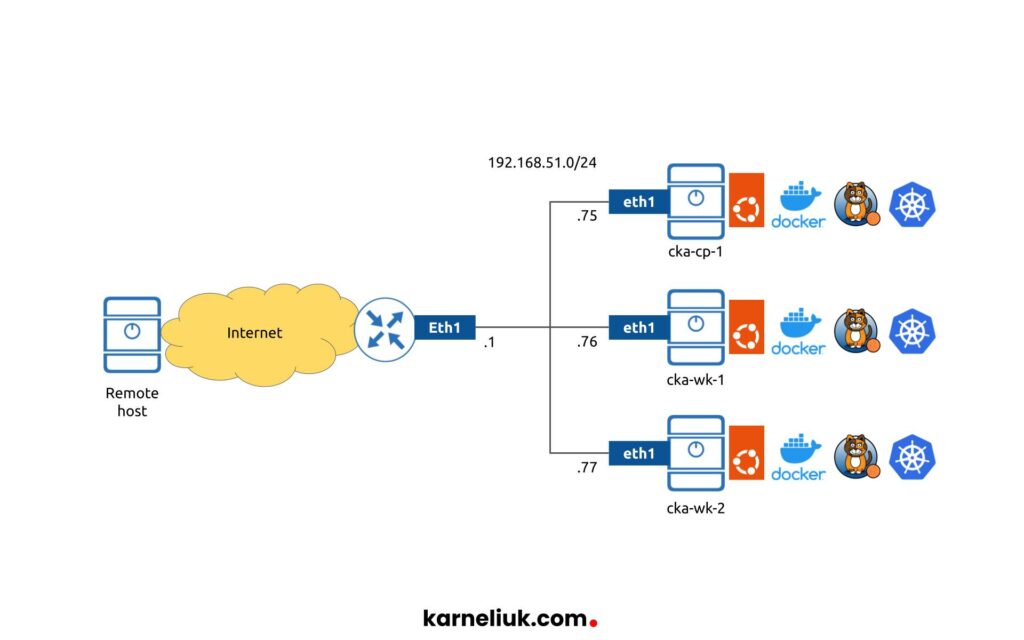
As said beforehand, we start fresh with 3 hosts running Ubuntu Linux 22.04. This is the only component, which is per-installed so far. Over the lab we will install:
- Container Runtime (CR): Docker engine
- Container Runtime Interface (CRI): cri-dockerd
- Container Network Interface (CNI): Calico
- Kubernetes components: kubelet, kubeadm, kubectl
One of the biggest advantages (and complexities) of Kubernetes is its flexibility in a sense that you can chose for quite a long list of container runtimes, container network interfaces, etc. We have seen that in OpenStack world as well; therefore, we can with a confidence say that such a flexibility is applicable to the entire Open Source world.
We have chosen Docker as a container runtime, as we are using it a lot in our projects.
And you can learn a lot about Docker in the our Zero-to-Hero Network Automation Training, which you can enroll and start studying right now.
For CNI, we have chosen Calico as this is one of the most popular and relatively easy to deploy CNIs.
1. Solution implementation
Let’s start our process of building the Kubernetes cluster.
Important note: Kubernetes’s ecosystem is very dynamic and changing often. The reason we decided to publish this blogpost was that we were not able to follow the official guide provided by Linux foundation, neither anything we found on the internet for a simple reason: they were outdated. Therefore, this guide is working as of date of the blogpost. If you are reading this blogpost long after it has been written, some parts may be not working.
Step 1.0. Connect to Hosts Dedicated to Kubernetes Cluster
Description and steps
This is a preparatory step, from our remote host (per the network diagram above) check that you can access the hosts:
2
3
$ ping 192.168.51.76 -c 1
$ ping 192.168.51.77 -c 1
Obviously, you should expect that the hosts are reachable; otherwise, you would need to fix the connectivity issue before trying to install Kubernetes cluster.
Once you checked that hosts are reachable, add your SSH key to them to simplify the process of logging to them and then, finally, log into them (actions are conducted from the remote host):
2
3
4
5
6
$ ssh-copy-id -i ~/.ssh/id_rsa.pub aaa@192.168.51.76
$ ssh-copy-id -i ~/.ssh/id_rsa.pub aaa@192.168.51.77
$ ssh aaa@192.168.51.75
$ ssh aaa@192.168.51.76
$ ssh aaa@192.168.51.77
Expected output
If the aforementioned steps are done correctly, you should expect the following output:
2
3
4
5
6
7
8
9
10
11
12
13
14
15
16
17
18
19
20
21
22
23
24
25
26
27
28
29
30
31
32
33
34
35
36
37
38
39
40
41
42
43
44
45
46
47
48
$ ping 192.168.51.75 -c 1
PING 192.168.51.75 (192.168.51.75) 56(84) bytes of data.
64 bytes from 192.168.51.75: icmp_seq=1 ttl=63 time=3.81 ms
--- 192.168.51.75 ping statistics ---
1 packets transmitted, 1 received, 0% packet loss, time 0ms
rtt min/avg/max/mdev = 3.810/3.810/3.810/0.000 ms
=========================================================================
$ ssh-copy-id -i ~/.ssh/id_rsa.pub aaa@192.168.51.75
/usr/bin/ssh-copy-id: INFO: Source of key(s) to be installed: "/home/anton/.ssh/id_rsa.pub"
The authenticity of host '192.168.51.75 (192.168.51.75)' can't be established.
ECDSA key fingerprint is SHA256:ECGPv5qhLOuOrSR6TffyRc0kwVtkt87+gwmSL8REqiQ.
Are you sure you want to continue connecting (yes/no/[fingerprint])? yes
/usr/bin/ssh-copy-id: INFO: attempting to log in with the new key(s), to filter out any that are already installed
/usr/bin/ssh-copy-id: INFO: 1 key(s) remain to be installed -- if you are prompted now it is to install the new keys
aaa@192.168.51.75's password:
Number of key(s) added: 1
Now try logging into the machine, with: "ssh 'aaa@192.168.51.75'"
and check to make sure that only the key(s) you wanted were added.
=========================================================================
$ ssh aaa@192.168.51.75
Welcome to Ubuntu 22.04 LTS (GNU/Linux 5.15.0-47-generic x86_64)
* Documentation: https://help.ubuntu.com
* Management: https://landscape.canonical.com
* Support: https://ubuntu.com/advantage
System information as of Sat Sep 17 01:23:28 PM UTC 2022
System load: 0.06982421875 Processes: 130
Usage of /: 15.6% of 14.66GB Users logged in: 0
Memory usage: 2% IPv4 address for ens18: 192.168.51.75
Swap usage: 0%
44 updates can be applied immediately.
To see these additional updates run: apt list --upgradable
To run a command as administrator (user "root"), use "sudo <command>".
See "man sudo_root" for details.
Step 1.1. Check the Linux Version
Description and steps
Ensure that the version of Linux matches your expectation. As stated in the beginning of the blog, we are building the cluster on top of new Ubuntu Linux 22.04. Run the following command on all the hosts, where Kubernetes components will be deployed (cp-1, wk-1, wk-2):
Expected output
If the aforementioned steps are done correctly, you should expect the following output:
2
3
4
5
6
7
8
9
10
11
12
13
14
$ cat /etc/os-release
PRETTY_NAME="Ubuntu 22.04 LTS"
NAME="Ubuntu"
VERSION_ID="22.04"
VERSION="22.04 (Jammy Jellyfish)"
VERSION_CODENAME=jammy
ID=ubuntu
ID_LIKE=debian
HOME_URL="https://www.ubuntu.com/"
SUPPORT_URL="https://help.ubuntu.com/"
BUG_REPORT_URL="https://bugs.launchpad.net/ubuntu/"
PRIVACY_POLICY_URL="https://www.ubuntu.com/legal/terms-and-policies/privacy-policy"
UBUNTU_CODENAME=jammy
Step 1.2. Update Linux Packages
Description and steps
What’s the first step after the installation of fresh Linux? This step is, actually, performed regardless of Kubernetes. Right, this step is to get the system to the actual state via updating all the package indexes and upgrading all the components. In Debian-based Linux operating system, to which Ubuntu belongs to, run the following commands (perform them on cp-1, wk-1, wk-2):
Enroll to Zero-to-Hero Network Automation Training to master the fundamentals of Linux administration for Network Automation.
Expected output
If the aforementioned steps are done correctly, you should expect the following output:
2
3
4
5
6
7
8
9
10
11
12
13
14
15
16
17
18
19
Hit:1 http://gb.archive.ubuntu.com/ubuntu jammy InRelease
Hit:2 http://gb.archive.ubuntu.com/ubuntu jammy-updates InRelease
Hit:3 http://gb.archive.ubuntu.com/ubuntu jammy-backports InRelease
Hit:4 http://gb.archive.ubuntu.com/ubuntu jammy-security InRelease
Reading package lists... Done
Reading package lists... Done
Building dependency tree... Done
Reading state information... Done
Calculating upgrade... Done
The following packages will be upgraded:
!
! OUTPUT IS TRUNCATED FOR BREVITY
!
No containers need to be restarted.
No user sessions are running outdated binaries.
No VM guests are running outdated hypervisor (qemu) binaries on this host.
Step 1.3. Add Kubernetes Repositories
Description and steps
The default set of repositories available in Ubuntu Linux includes quite a lot of packages. However, there are many more software packages, which are not included in the default set of repositories and Kubernetes is one of them. Therefore, in order to be able to install it, you need to add the corresponding repository before you can install Kubernetes (run these commands on cp-1, wk-1, wk-2):
2
$ echo "deb [signed-by=/usr/share/keyrings/kubernetes-archive-keyring.gpg] https://apt.kubernetes.io/ kubernetes-xenial main" | sudo tee /etc/apt/sources.list.d/kubernetes.list
Expected output
If the aforementioned steps are done correctly, you should expect the following output:
2
3
4
5
$ sudo curl -fsSLo /usr/share/keyrings/kubernetes-archive-keyring.gpg https://packages.cloud.google.com/apt/doc/apt-key.gpg
$ echo "deb [signed-by=/usr/share/keyrings/kubernetes-archive-keyring.gpg] https://apt.kubernetes.io/ kubernetes-xenial main" | sudo tee /etc/apt/sources.list.d/kubernetes.list
deb [signed-by=/usr/share/keyrings/kubernetes-archive-keyring.gpg] https://apt.kubernetes.io/ kubernetes-xenial main
$
Step 1.4. Install Kubernetes Components
Description and steps
Finally you are ready to install Kubernetes packages. There are three, which we need to install everywhere:
- kubeadm
- kubelet
- kubectl
Technically, kubectl is needed on the node, which which you are going to control your Kubernetes cluster, which is typically control pane (in our case cp-1) node, and remote host (e.g., your laptop). However, there are some dependencies between those tools; hence, just install all three on your Kubernetes hosts. Once Kubernetes components are installed, you should mark them to prevent automatic upgrade or occasional removal via the packages manager. Perform the task on cp1, wk-1, wk-2:
2
3
$ sudo apt install -y kubelet kubeadm kubectl
$ sudo apt-mark hold kubelet kubeadm kubectl
Expected output
If the aforementioned steps are done correctly, you should expect the following output:
2
3
4
5
6
7
8
9
10
11
12
13
14
15
16
17
18
19
20
21
22
23
24
25
26
27
28
29
30
31
32
33
34
35
36
37
38
$ sudo apt-get update -y
Hit:1 http://gb.archive.ubuntu.com/ubuntu jammy InRelease
Hit:2 http://gb.archive.ubuntu.com/ubuntu jammy-updates InRelease
Hit:3 http://gb.archive.ubuntu.com/ubuntu jammy-backports InRelease
Hit:4 http://gb.archive.ubuntu.com/ubuntu jammy-security InRelease
Get:5 https://packages.cloud.google.com/apt kubernetes-xenial InRelease [9,383 B]
Get:6 https://packages.cloud.google.com/apt kubernetes-xenial/main amd64 Packages [59.4 kB]
Fetched 68.8 kB in 1s (91.8 kB/s)
Reading package lists... Done
=========================================================================
$ sudo apt install -y kubelet kubeadm kubectl
Reading package lists... Done
Building dependency tree... Done
Reading state information... Done
The following additional packages will be installed:
conntrack cri-tools ebtables kubernetes-cni socat
The following NEW packages will be installed:
conntrack cri-tools ebtables kubeadm kubectl kubelet kubernetes-cni socat
0 upgraded, 8 newly installed, 0 to remove and 0 not upgraded.
Need to get 81.6 MB of archives.
!
! OUTPUT IS TRUNCATED FOR BREVITY
!
No containers need to be restarted.
No user sessions are running outdated binaries.
No VM guests are running outdated hypervisor (qemu) binaries on this host.
=========================================================================
$ sudo apt-mark hold kubelet kubeadm kubectl
kubelet set on hold.
kubeadm set on hold.
kubectl set on hold.
Step 1.5. Install Container Runtime: Docker Engine
Description and steps
As mentioned earlier, we have chosen Docker Engine as our Container Runtime, because we use it a lot in our projects and we teach it in Zero-to-Hero Network Automation Training. According to the official configuration guide for Docker Engine for Ubuntu Linux, you should execute the following commands on the cp-1, wk-1 and wk-2:
2
3
4
5
6
7
8
9
10
11
12
ca-certificates \
curl \
gnupg \
lsb-release -y
$ sudo mkdir -p /etc/apt/keyrings
$ curl -fsSL https://download.docker.com/linux/ubuntu/gpg | sudo gpg --dearmor -o /etc/apt/keyrings/docker.gpg
$ echo \
"deb [arch=$(dpkg --print-architecture) signed-by=/etc/apt/keyrings/docker.gpg] https://download.docker.com/linux/ubuntu \
$(lsb_release -cs) stable" | sudo tee /etc/apt/sources.list.d/docker.list > /dev/null
$ sudo apt-get update -y
$ sudo apt-get install docker-ce docker-ce-cli containerd.io docker-compose-plugin -y
As you can see, the idea here is the same as with the Kubernetes itself:
- Add trusted GPG key
- Add the corresponding repository
- Update repositories index with the package manager to read the information from the added repositories
- Install the needed packages
Expected output
If the aforementioned steps are done correctly, you should expect the following output:
2
3
4
5
6
7
8
9
10
11
12
13
14
15
16
17
18
19
20
21
22
23
24
25
26
27
28
29
30
31
32
33
34
35
36
37
38
39
40
41
42
43
44
45
46
47
48
49
50
51
52
53
54
55
56
57
58
59
60
61
$ sudo apt-get install \
ca-certificates \
curl \
gnupg \
lsb-release -y
Reading package lists... Done
Building dependency tree... Done
Reading state information... Done
ca-certificates is already the newest version (20211016).
ca-certificates set to manually installed.
lsb-release is already the newest version (11.1.0ubuntu4).
lsb-release set to manually installed.
curl is already the newest version (7.81.0-1ubuntu1.4).
curl set to manually installed.
gnupg is already the newest version (2.2.27-3ubuntu2.1).
gnupg set to manually installed.
0 upgraded, 0 newly installed, 0 to remove and 0 not upgraded.
=========================================================================
$ sudo mkdir -p /etc/apt/keyrings
$ curl -fsSL https://download.docker.com/linux/ubuntu/gpg | sudo gpg --dearmor -o /etc/apt/keyrings/docker.gpg
$ echo \
"deb [arch=$(dpkg --print-architecture) signed-by=/etc/apt/keyrings/docker.gpg] https://download.docker.com/linux/ubuntu \
$(lsb_release -cs) stable" | sudo tee /etc/apt/sources.list.d/docker.list > /dev/null
$
=========================================================================
$ sudo apt-get update -y
Hit:1 http://gb.archive.ubuntu.com/ubuntu jammy InRelease
Hit:2 http://gb.archive.ubuntu.com/ubuntu jammy-updates InRelease
Hit:3 http://gb.archive.ubuntu.com/ubuntu jammy-backports InRelease
Hit:4 http://gb.archive.ubuntu.com/ubuntu jammy-security InRelease
Get:5 https://download.docker.com/linux/ubuntu jammy InRelease [48.9 kB]
Hit:6 https://packages.cloud.google.com/apt kubernetes-xenial InRelease
Get:7 https://download.docker.com/linux/ubuntu jammy/stable amd64 Packages [7,065 B]
Fetched 55.9 kB in 1s (91.4 kB/s)
Reading package lists... Done
=========================================================================
$ sudo apt-get install docker-ce docker-ce-cli containerd.io docker-compose-plugin -y
Reading package lists... Done
Building dependency tree... Done
Reading state information... Done
The following additional packages will be installed:
docker-ce-rootless-extras docker-scan-plugin libltdl7 libslirp0 pigz slirp4netns
Suggested packages:
aufs-tools cgroupfs-mount | cgroup-lite
The following NEW packages will be installed:
containerd.io docker-ce docker-ce-cli docker-ce-rootless-extras docker-compose-plugin docker-scan-plugin libltdl7 libslirp0 pigz slirp4netns
!
! OUTPUT IS TRUNCATED FOR BREVITY
!
No containers need to be restarted.
No user sessions are running outdated binaries.
No VM guests are running outdated hypervisor (qemu) binaries on this host.
Step 1.6. Enable Docker to Run without Sudo
Description and steps
Despite this step is optional, it simplifies your work quite significantly in future. The step is to add your user to the Docker group in your Linux to ensure that you can run “docker” commands without “sudo” (do it on cp-1, wk-1, wk-2):
Expected output
If the aforementioned steps are done correctly, you should expect the following output:
2
3
$ sudo usermod -aG docker "${USER}"
$
Step 1.7. Reboot Linux Hosts
Description and steps
Given that you have upgraded the Ubuntu hosts earlier and have installed quite a few new packages (kubectl, kubeadm, kubelet, docker, containerd, etc), it would be wise to reboot the hosts, which you are using to build Kubernetes cluster. Execute these commands on cp-1, wk-1, wk-2:
Expected output
If the aforementioned steps are done correctly, you should expect the following output:
2
3
$ sudo reboot
disconnected from 192.168.51.75
Step 1.8. Disable Swap
Description and steps
Once your hosts are booted back, it is a good time to disable swap. Kubernetes simply doesn’t work, if it is enabled. Do this step on cp-1, wk-1, wk-2:
Expected output
If the aforementioned steps are done correctly, you should expect the following output:
2
3
$ sudo swapoff -a
$
Step 1.9. Configure Linux for Kubernetes Networking
Description and steps
One of the aspects of Linux hosts within Kubernetes cluster, which is actually controlled by Kubernetes is a networking. Kubernetes typically controls it via one of the Linux tools, such as iptables or so. In order for Kubernetes to be able to do that, configure the sysctl in the corresponding way on all the hosts in the cluster (cp-1, wk-1, wk-2):
2
3
4
5
6
7
8
$ sudo modprobe br_netfilter
$ sudo tee /etc/sysctl.d/kubernetes.conf << __EOF__
net.bridge.bridge-nf-call-ip6tables = 1
net.bridge.bridge-nf-call-iptables = 1
net.ipv4.ip_forward = 1
__EOF__
$ sudo sysctl --system
Expected output
If the aforementioned steps are done correctly, you should expect the following output:
2
3
4
5
6
7
8
9
10
11
12
13
14
15
16
17
18
19
20
21
22
23
24
$ sudo modprobe overlay
$ sudo modprobe br_netfilter
$ sudo tee /etc/sysctl.d/kubernetes.conf << __EOF__
net.bridge.bridge-nf-call-ip6tables = 1
net.bridge.bridge-nf-call-iptables = 1
net.ipv4.ip_forward = 1
__EOF__
net.bridge.bridge-nf-call-ip6tables = 1
net.bridge.bridge-nf-call-iptables = 1
net.ipv4.ip_forward = 1
$
=========================================================================
$ sudo sysctl --system
* Applying /etc/sysctl.d/10-console-messages.conf ...
kernel.printk = 4 4 1 7
* Applying /etc/sysctl.d/10-ipv6-privacy.conf ...
!
! OUTPUT IS TRUNCATED FOR BREVITY
!
net.ipv4.ip_forward = 1
* Applying /etc/sysctl.conf ...
Step 1.10. Install Container Runtime Interface (CRI): cri-dockerd
Description and steps
In previous releases, Kubernetes was able to interact with Docker directly; however, it is not possible anymore. Therefore, you need to install the corresponding CRI, which in this case is for cri-dockerd created by Mirantis. Install it on cp-1, wk-1, wk-2:
2
3
4
5
6
7
8
9
10
11
12
13
14
15
16
$ chmod +x ./installer_linux
$ ./installer_linux
$ source ~/.bash_profile
$ git clone https://github.com/Mirantis/cri-dockerd.git
$ cd cri-dockerd
$ mkdir bin
$ go build -o bin/cri-dockerd
$ mkdir -p /usr/local/bin
$ sudo install -o root -g root -m 0755 bin/cri-dockerd /usr/local/bin/cri-dockerd
$ sudo cp -a packaging/systemd/* /etc/systemd/system
$ sudo sed -i -e 's,/usr/bin/cri-dockerd,/usr/local/bin/cri-dockerd,' /etc/systemd/system/cri-docker.service
$ sudo systemctl daemon-reload
$ sudo systemctl enable cri-docker.service
$ sudo systemctl enable --now cri-docker.socket
Expected output
If the aforementioned steps are done correctly, you should expect the following output:
2
3
4
5
6
7
8
9
10
11
12
13
14
15
16
17
18
19
20
21
22
23
24
25
26
27
28
29
30
31
32
33
34
35
36
37
38
39
40
41
42
43
44
45
46
47
48
49
50
51
52
53
54
55
56
$ wget https://storage.googleapis.com/golang/getgo/installer_linux
--2022-09-17 14:03:22-- https://storage.googleapis.com/golang/getgo/installer_linux
Resolving storage.googleapis.com (storage.googleapis.com)... 108.177.15.128, 173.194.76.128, 66.102.1.128, ...
Connecting to storage.googleapis.com (storage.googleapis.com)|108.177.15.128|:443... connected.
HTTP request sent, awaiting response... 200 OK
Length: 5179246 (4.9M) [application/octet-stream]
Saving to: ‘installer_linux’
installer_linux 100%[===========================================================================================================================================================================>] 4.94M 15.9MB/s in 0.3s
2022-09-17 14:03:23 (15.9 MB/s) - ‘installer_linux’ saved [5179246/5179246]
=========================================================================
$ chmod +x ./installer_linux
$ ./installer_linux
Welcome to the Go installer!
Downloading Go version go1.19.1 to /home/aaa/.go
This may take a bit of time...
Downloaded!
Setting up GOPATH
GOPATH has been set up!
One more thing! Run `source /home/aaa/.bash_profile` to persist the
new environment variables to your current session, or open a
new shell prompt.
=========================================================================
$ source ~/.bash_profile
$ git clone https://github.com/Mirantis/cri-dockerd.git
Cloning into 'cri-dockerd'...
remote: Enumerating objects: 11869, done.
remote: Counting objects: 100% (11869/11869), done.
remote: Compressing objects: 100% (5312/5312), done.
remote: Total 11869 (delta 5380), reused 11808 (delta 5364), pack-reused 0
Receiving objects: 100% (11869/11869), 31.47 MiB | 19.10 MiB/s, done.
Resolving deltas: 100% (5380/5380), done.
=========================================================================
$ cd cri-dockerd
/cri-dockerd$ mkdir bin
/cri-dockerd$ go build -o bin/cri-dockerd
!
! It will take some time
!
$ sudo install -o root -g root -m 0755 bin/cri-dockerd /usr/local/bin/cri-dockerd
$ sudo cp -a packaging/systemd/* /etc/systemd/system
$ sudo sed -i -e 's,/usr/bin/cri-dockerd,/usr/local/bin/cri-dockerd,' /etc/systemd/system/cri-docker.service
$ sudo systemctl daemon-reload
$ sudo systemctl enable cri-docker.service
Created symlink /etc/systemd/system/multi-user.target.wants/cri-docker.service → /etc/systemd/system/cri-docker.service.
$ sudo systemctl enable --now cri-docker.socket
Created symlink /etc/systemd/system/sockets.target.wants/cri-docker.socket → /etc/systemd/system/cri-docker.socket.
Step 1.11. Initialize the Kubernetes with kubeadm on the Control Plan Node
Description and steps
Finally all the preparatory activities are completed, and you are in a position to start the Kubernetes on the control plane node. Installation of the Kubernetes cluster is done via kubeadm in our case; however, there are other ways to do it (e.g., kubespray). Perform this step only on the control plane node (cp-1):
There are two important arguments you need to provide here:
- –pod-network-cidr must match to the one defined in the Container Network Interface (CNI), which we will install later. This subnet (192.168.0.0/16) is a default one for Calico; hence, we use it to simplify the Calico deployment.
- –cri-socket points to the socket created by network CRI plugin. As we use cri-dockerd, we shall specify path to it.
Expected output
If the aforementioned steps are done correctly, you should expect the following output:
2
3
4
5
6
7
8
9
10
11
12
13
$ sudo kubeadm init --pod-network-cidr=192.168.0.0/16 --cri-socket=unix:///var/run/cri-dockerd.sock --upload-certs
[init] Using Kubernetes version: v1.25.1
[preflight] Running pre-flight checks
[WARNING SystemVerification]: missing optional cgroups: blkio
[preflight] Pulling images required for setting up a Kubernetes cluster
!
! OUTPUT IS TRUNCATED FOR BREVITY
!
Then you can join any number of worker nodes by running the following on each as root:
kubeadm join 192.168.51.75:6443 --token nzrljz.kfvkaazan1q8yxft \
--discovery-token-ca-cert-hash sha256:caf3deb9528b4cec2efafa804e1e0339f2f8d99c4a92a4ffb865c63715f91020
Write down the part of the output containing “kubeadm join” part, as it is needed in the following step.
Step 1.12. Connect Worker Nodes to Kubernetes Cluster with kubeadm
Description and steps
After the control plane node has initialised the Kubernetes cluster, the workers shall join it. The documentation says that token generated in the previous step is valid for 2 hours only.
If 2 hours have passed, you would need to regenerate it, which is out of scope for this blogpost.
Execute the command you have seen in the output of the cluster initialisation at all worker nodes (wk-1 and wk2) adding extra parameter to point to CRI:
2
--discovery-token-ca-cert-hash sha256:caf3deb9528b4cec2efafa804e1e0339f2f8d99c4a92a4ffb865c63715f91020 --cri-socket=unix:///var/run/cri-dockerd.sock
Expected output
If the aforementioned steps are done correctly, you should expect the following output:
2
3
4
5
6
7
8
9
10
11
12
13
14
$ sudo kubeadm join 192.168.51.75:6443 --token nzrljz.kfvkaazan1q8yxft \
--discovery-token-ca-cert-hash sha256:caf3deb9528b4cec2efafa804e1e0339f2f8d99c4a92a4ffb865c63715f91020 --cri-socket=unix:///var/run/cri-dockerd.sock
[preflight] Running pre-flight checks
[WARNING SystemVerification]: missing optional cgroups: blkio
[preflight] Reading configuration from the cluster..
!
! OUTPUT IS TRUNCATED FOR BREVITY
!
This node has joined the cluster:
* Certificate signing request was sent to apiserver and a response was received.
* The Kubelet was informed of the new secure connection details.
Run 'kubectl get nodes' on the control-plane to see this node join the cluster.
Step 1.13. Create Configuration for kubectl
Description and steps
Management of the Kubernetes cluster (including installation of CNI), after the cluster is initiated, is conducted with kubectl tool. However, for it work, it needs to know how to connect to the Kubernetes control plane node. To do get this information, perform execute the following command on the control plane node (cp-1):
2
3
$ sudo cp -i /etc/kubernetes/admin.conf $HOME/.kube/config
$ sudo chown $(id -u):$(id -g) $HOME/.kube/config
If you want to manage the Kubernetes cluster remotely from the remote host, copy the created config file $HOME/.kube/config from the control plane to your host. Be aware, that authentication in Kubernetes is done based on the the SSL certificates, which by default uses IP address for the Common Name. Ensure you have access to the IP address of the control plane node without NAT; otherwise the authentication will be unsuccesfull. Alternatively, you could chose to use FQDN instead of IP; however, this require some tweaks during the kubeadm init on the control plane node during the initialisation of the Kubernetes cluster.
Expected output
If the aforementioned steps are done correctly, you should expect the following output:
2
3
4
$ mkdir -p $HOME/.kube
$ sudo cp -i /etc/kubernetes/admin.conf $HOME/.kube/config
$ sudo chown $(id -u):$(id -g) $HOME/.kube/config
Step 1.14. Install Container Networking Interface (CNI): Calico
Description and steps
This is the last step signinficant step in the instlalation of Kubernetes cluster. There are no default CNI in Kubernetes, like there are no default CR (Container Runtime) or CRI (Container Runtime Interface). Therefore, you need to install some before using the Kubernetes. As we decided to use Calico, we need to download its manifest and apply it using kubectl:
2
$ kubectl apply -f calico.yaml
We don’t modify any default parameters of Calico; however, you may want to tweak it per your requirements.
Expected output
If the aforementioned steps are done correctly, you should expect the following output:
2
3
4
5
6
7
8
9
10
11
12
13
14
15
16
17
18
19
20
21
22
23
24
25
$ wget https://docs.projectcalico.org/manifests/calico.yaml
--2022-09-17 14:21:52-- https://docs.projectcalico.org/manifests/calico.yaml
Resolving docs.projectcalico.org (docs.projectcalico.org)... 34.141.103.251, 35.246.229.114, 2a05:d014:275:cb00:7dff:602c:d0e7:9c4, ...
Connecting to docs.projectcalico.org (docs.projectcalico.org)|34.141.103.251|:443... connected.
HTTP request sent, awaiting response... 200 OK
Length: 235193 (230K) [text/yaml]
Saving to: ‘calico.yaml’
calico.yaml 100%[===========================================================================================================================================================================>] 229.68K --.-KB/s in 0.06s
2022-09-17 14:21:52 (3.64 MB/s) - ‘calico.yaml’ saved [235193/235193]
$ kubectl apply -f calico.yaml
poddisruptionbudget.policy/calico-kube-controllers created
serviceaccount/calico-kube-controllers created
serviceaccount/calico-node created
!
! OUTPUT IS TRUNCATED FOR BREVITY
!
clusterrolebinding.rbac.authorization.k8s.io/calico-node created
daemonset.apps/calico-node created
deployment.apps/calico-kube-controllers created
Step 1.15. Install Bash Autocomplete for kubectl
Description and steps
This step is rather a cosmetic one. Yet being a cosmetic, it helps to speed up work with kubectl, especialy in the beginning via autocompletion of kubectl commans. Run this command on cp-1 (optionally, on your remote host as well):
2
3
$ echo "source <(kubectl completion bash)" >> $HOME/.bashrc
$ source $HOME/.bashrc
Expected output
If the aforementioned steps are done correctly, you should expect the following output:
2
3
4
$ sudo apt-get install bash-completion -y
$ echo "source <(kubectl completion bash)" >> $HOME/.bashrc
$ source $HOME/.bashrc
2. Validation
So far the Kubernetes cluster was setup; however, how successful, you yet don’t know. Let’s perform a few vlidation steps
Step 2.1. Check the Nodes and Automatically Created Pods
Description and steps
At the point, when you initialise the Kubernetes cluster on the control plane node and join it from the worker nodes, Kubernetes spins up a number of applications (Kubernetes primitives: deployments, replicasets, pods, services). Thefore, the initial validation point would be to check:
- what nodes are now part of the Kubernetes cluster and what its state
- what pods are running now and on which nodes:
Execute the following commands on cp-1 (or the remote host):
2
$ kubectl get pods -A -o wide
Expected output
If the aforementioned steps are done correctly, you should expect the following output:
2
3
4
5
6
7
8
9
10
11
12
13
14
15
16
17
18
19
20
21
22
23
24
$ kubectl get nodes -o wide
NAME STATUS ROLES AGE VERSION INTERNAL-IP EXTERNAL-IP OS-IMAGE KERNEL-VERSION CONTAINER-RUNTIME
cka-cp-1 Ready control-plane 11m v1.25.1 192.168.51.75 <none> Ubuntu 22.04.1 LTS 5.15.0-47-generic docker://20.10.18
cka-wk-1 Ready <none> 7m52s v1.25.1 192.168.51.76 <none> Ubuntu 22.04.1 LTS 5.15.0-47-generic docker://20.10.18
cka-wk-2 Ready <none> 7m46s v1.25.1 192.168.51.77 <none> Ubuntu 22.04.1 LTS 5.15.0-47-generic docker://20.10.18
=========================================================================
$ kubectl get pods -A -o wide
NAMESPACE NAME READY STATUS RESTARTS AGE IP NODE NOMINATED NODE READINESS GATES
kube-system calico-kube-controllers-58dbc876ff-jkvqx 1/1 Running 0 4m11s 192.168.214.2 cka-wk-1 <none> <none>
kube-system calico-node-9hjgt 1/1 Running 0 4m11s 192.168.51.75 cka-cp-1 <none> <none>
kube-system calico-node-gdzrl 1/1 Running 0 4m11s 192.168.51.77 cka-wk-2 <none> <none>
kube-system calico-node-r5hlz 1/1 Running 0 4m11s 192.168.51.76 cka-wk-1 <none> <none>
kube-system coredns-565d847f94-kfmx6 1/1 Running 0 11m 192.168.223.65 cka-wk-2 <none> <none>
kube-system coredns-565d847f94-tdl9l 1/1 Running 0 11m 192.168.214.1 cka-wk-1 <none> <none>
kube-system etcd-cka-cp-1 1/1 Running 0 11m 192.168.51.75 cka-cp-1 <none> <none>
kube-system kube-apiserver-cka-cp-1 1/1 Running 0 11m 192.168.51.75 cka-cp-1 <none> <none>
kube-system kube-controller-manager-cka-cp-1 1/1 Running 1 (3m46s ago) 11m 192.168.51.75 cka-cp-1 <none> <none>
kube-system kube-proxy-h7s9t 1/1 Running 0 11m 192.168.51.75 cka-cp-1 <none> <none>
kube-system kube-proxy-phggw 1/1 Running 0 8m15s 192.168.51.77 cka-wk-2 <none> <none>
kube-system kube-proxy-rcgmp 1/1 Running 0 8m21s 192.168.51.76 cka-wk-1 <none> <none>
kube-system kube-scheduler-cka-cp-1 1/1 Running 1 (3m46s ago) 11m 192.168.51.75 cka-cp-1 <none> <none>
Step 2.2. Create Test Application in Kubernetes
Description and steps
The second validation step aims to test, if the Kubernetes cluster operate correctly, via creating a test user application. Ultimately, as you plan to use Kubernetes to run applications, it is important to test, if it does its job correctly. As a matter of a fact, you can spin up the test application just with two commands:
- Create deployment (which is a way to deploy applications on Kubernetes)
- Exposit it (which is a way to publish applications on Kubernetes to make them available for other applications in the Kubernets cluter or outside it)
Execute the following commands on cp-1 (or the remote host):
2
3
4
5
$ kubectl expose deployment test-nginx --name test-svc-nginx --port=80 --type=NodePort
$ kubectl get deployments
$ kubectl get pods
$ kubectl get services
Commands containing “get” are used for validation to check the status of the created object.
Expected output
If the aforementioned steps are done correctly, you should expect the following output:
2
3
4
5
6
7
8
9
10
11
12
13
14
15
16
17
18
19
20
21
22
23
24
25
26
27
28
$ kubectl create deployment test-nginx --image=nginx:latest --replicas=2
deployment.apps/test-nginx created
=========================================================================
$ kubectl expose deployment test-nginx --name test-svc-nginx --port=80 --type=NodePort
service/test-svc-nginx exposed
=========================================================================
$ kubectl get deployments.apps
NAME READY UP-TO-DATE AVAILABLE AGE
test-nginx 2/2 2 2 4m46s
=========================================================================
$ kubectl get pods
NAME READY STATUS RESTARTS AGE
test-nginx-8c5568c77-lkh9c 1/1 Running 0 5m2s
test-nginx-8c5568c77-p5rz9 1/1 Running 0 5m2s
=========================================================================
$ kubectl get services
NAME TYPE CLUSTER-IP EXTERNAL-IP PORT(S) AGE
kubernetes ClusterIP 10.96.0.1 <none> 443/TCP 27m
test-svc-nginx NodePort 10.108.222.244 <none> 80:31722/TCP 4m2s
Step 2.3. Test the Application
Description and steps
This final step answers ultimate question: “is your Kuberentes cluster working proper or not?”. From the cp-1 you simply can run curl towards the Cluster IP address of the created service, what will show if your application is reachable from within the Kubernetes cluster (i.e., inter-pod communcaiton). The reachability from outside of the Kubernetes clustrer is tested by curl towards the IP address of any node and NATed port (in this case randpom port 31722 is mapped to the port 80 (see the previous step). Run these commands on cp-1 or the remote host (though, the first command won’t work on the remote host) :
2
3
4
$ curl -X GET http://192.168.51.75:31722
$ curl -X GET http://192.168.51.76:31722
$ curl -X GET http://192.168.51.77:31722
Expected output
If the aforementioned steps are done correctly, you should expect the following output:
2
3
4
5
6
7
8
9
10
11
12
13
14
15
16
17
18
19
20
21
22
23
24
25
26
27
28
29
30
31
32
33
34
35
36
37
38
39
40
41
42
43
44
45
46
47
48
49
50
51
52
$ curl http://10.108.222.244
<!DOCTYPE html>
<html>
<head>
<title>Welcome to nginx!</title>
<style>
html { color-scheme: light dark; }
body { width: 35em; margin: 0 auto;
font-family: Tahoma, Verdana, Arial, sans-serif; }
</style>
</head>
<body>
<h1>Welcome to nginx!</h1>
<p>If you see this page, the nginx web server is successfully installed and
working. Further configuration is required.</p>
<p>For online documentation and support please refer to
<a href="http://nginx.org/">nginx.org</a>.<br/>
Commercial support is available at
<a href="http://nginx.com/">nginx.com</a>.</p>
<p><em>Thank you for using nginx.</em></p>
</body>
</html>
=========================================================================
$ curl -X GET http://192.168.51.75:31722
<!DOCTYPE html>
<html>
<head>
<title>Welcome to nginx!</title>
<style>
html { color-scheme: light dark; }
body { width: 35em; margin: 0 auto;
font-family: Tahoma, Verdana, Arial, sans-serif; }
</style>
</head>
<body>
<h1>Welcome to nginx!</h1>
<p>If you see this page, the nginx web server is successfully installed and
working. Further configuration is required.</p>
<p>For online documentation and support please refer to
<a href="http://nginx.org/">nginx.org</a>.<br/>
Commercial support is available at
<a href="http://nginx.com/">nginx.com</a>.</p>
<p><em>Thank you for using nginx.</em></p>
</body>
</html>
Lessons Learned
Kubernetes is very dynamically development. The previous time we have build Kubernetes cluster approximately a year ago and there was no need to have cri-dockerd as Kubernetes was able to interact with Docker directly. It appeared that this feature was removed in the Kubernetes version 1.24 (the latest to the date is 1.25). There is a probability for this guide to be partially not accurate if the Kubernetes will be changed further in terms of supported CRs, CRIs and CNIs.
Summary
There are multiple moving blocks in the Kubernetes. However, its installation manually leveraging kubeadm is not tremendeously difficult. Installation of the OpenStack without automation is MUCH more complicated and lengthy. Obviously, there are a lot of customisations, which can be done during the setup of Kubernetes: for example, there is a huge variety of configuration options for Calico (IPIP, VXLAN, BGP, etc) not even mentioning the variety of other CNIs. Futher blogpost, where we will be interacting with Kubernetes for the purpose of building and supporting our applications will be based on the this cluster. Take care and good bye!
Reference Documentation
This blogpost relies on the documentation taken from the following sources:
- Kubernetes Installation Guide with kubeadm
- Docker Engine Installation Guide for Ubuntu Linux
- Mirantis cri-dockerd Installation Guide
- Calico CNI installation guide
Need Help? Contract Us
If you need a trusted and experienced partner to automate your network and IT infrastructure, get in touch with us.
P.S.
If you have further questions or you need help with your networks, we are happy to assist you, just send us a message. Also don’t forget to share the article on your social media, if you like it.
BR,
Anton Karneliuk