

Hello my friend,
As mentioned in the previous blogpost, we continue looking into Kubernetes. In the previous blogpost we have built a simple cluster consisting of one control plane node, which is the one ruling the cluster, and two worker nodes, which are the ones hosting the customers’ workloads. Today we will add a few more nodes, both workers and control plane, to the cluster to convert it into a high available one.
2
3
4
5
retrieval system, or transmitted in any form or by any
means, electronic, mechanical or photocopying, recording,
or otherwise, for commercial purposes without the
prior permission of the author.
Are You Still Teaching Network Automation?
We absolutely are. One of the important things we have figured out is that automation is for sure the cross-platform technology. Therefore, whatever area you are coming from or heading two (networking, system administration, or cloud engineering), knowledge of automation frameworks and components, such as Ansible, Bash, Python, YAML, JSON, REST API, GRPC/GNMI is very beneficial and, in fact, is almost mandatory these days.
And in our Network Automation Trainings we have put it together in a holistic way so that you can study all the relevant technologies in one place:
We offer the following training programs for you:
- Zero-to-Hero Network Automation Training
- High-scale automation with Nornir
- Ansible Automation Orchestration with Ansble Tower / AWX
- Expert-level training: Closed-loop Automation and Next-generation Monitoring
During these trainings you will learn the following topics:
- Success and failure strategies to build the automation tools.
- Principles of software developments and the most useful and convenient tools.
- Data encoding (free-text, XML, JSON, YAML, Protobuf).
- Model-driven network automation with YANG, NETCONF, RESTCONF, GNMI.
- Full configuration templating with Jinja2 based on the source of truth (NetBox).
- Best programming languages (Python, Bash) for developing automation
- The most rock-solid and functional tools for configuration management (Ansible) and Python-based automation frameworks (Nornir).
- Network automation infrastructure (Linux, Linux networking, KVM, Docker).
- Orchestration of automation workflows with AWX and its integration with NetBox, GitHub, as well as custom execution environments for better scalability.
- Collection network data via SNMP and streaming telemetry with Prometheus
- Building API gateways with Python leveraging Fast API
- Integration of alerting with Slack and your own APIs
- … and many more
Moreover, we put all mentions technologies in the context of real use cases, which our team has solved and are solving in various projects in the service providers, enterprise and data centre networks and systems across the Europe and USA. That gives you opportunity to ask questions to understand the solutions in-depts and have discussions about your own projects. And on top of that, each technology is provided with online demos and labs to master your skills thoroughly. Such a mixture creates a unique learning environment, which all students value so much. Join us and unleash your potential.
Brief Description
As we have stated in the previous blogpost, we will be mapping activities we are doing to the CKA blueprint to ensure that the content we create is useful for you in general to study Kubernetes or to do you job as Kubernetes engineer and helps to prepare to the Certified Kubernetes Administrator (CKA) exam. Today we focus on two items:
- Manage a highly-available Kubernetes cluster
- Provision underlying infrastructure to deploy a Kubernetes cluster
As usual, we have expected that we would have an easy walk following the documentation from the official Kubernetes webpage. And, as usual, it was not the case.
What Are We Going to Achieve Today?
At the end of the blogpost we would like to have a Kubernetes cluster that is:
- having 3 worker nodes
- having 3 control plane nodes
- highly available so that taking any control or worker node down doesn’t affect the cluster operation
We are building on top of what we have completed in the previous blogpost, so we suggest you read that one first.
Once we know what we are going to achieve, the question would be: “How can we achieve that?” Well, the plan would be the following:
- We would rebuild our cluster (unfortunately) with an important parameter “–control-plane-endpoint“, which allows us to specify any IP or FQDN, which is used to build the cluster. We’ll use FQDN, which will point to the load balancer…
- What means we need first to build a load balancer, which will be providing connectivity to Kubernetes control plane nodes (only to control plane, though, as it won’t be involved in the data plane traffic towards customers’ workloads).
- Then we will add one more worker node to our Kubernetes cluster.
- Finally, we’ll add two more control plane nodes, which will create a highly available cluster with replicated distributed key-value store etcd.
Lab Setup
In general, we take the setup we have used in the previous blogpost, but we add a few more nodes:

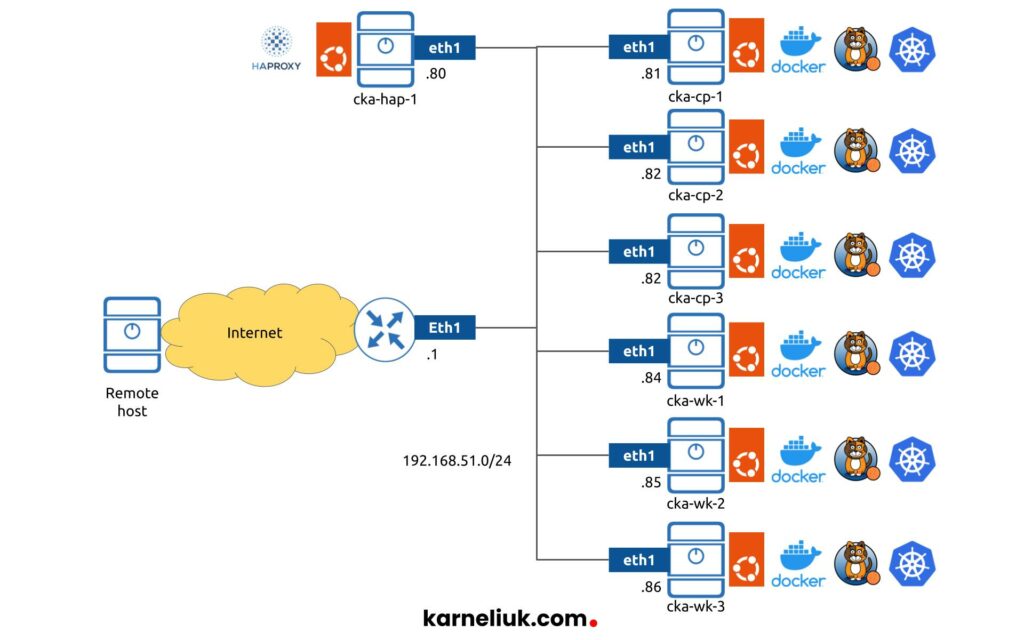
All the nodes, which are the building block of the Kubernetes cluster, like in the previous blogpost, would run:
- Ubuntu Linux 22.04
- Container Runtime (CR) is Docker
- Container Runtime Interface (CRI) is cri-dockerd created by Mirantis
- Container Network Interface (CNI) is Calico
- Kubernetes tools: kubeadm, kubectl, kubeadm
Enroll to Zero-to-Hero Network Automation Training to master containerisation and Docker.
There is one more outstanding node, which is not part of the Kubernetes cluster per SE; this is a load balancer. In our case we run HAProxy.
We don’t build it redundant as it is not the focus of this blogpost. However, if you are up to doing it, refer to these two blogposts: HAProxy + FRR Part1 and HAProxy + FRR Part 2.
Let’s start building our new cluster.
1. Solution Implementation
Step 1.1. Prerequisites
As mentioned beforehand, we already build the cluster in the previous blogpost. Therefore, we won’t repeat the steps here. However, the highly available setup requires some amendments. Namely, the step 1.11 from that blogpost we re-run with extra argument “–control-plane-endpoint“:
Then, once you take a look in the config file, you shall there the endpoint configured with the provided FQDN and port:
2
server: https://k8s-vip:6443
Beware that you need to have working load balancer for your kubectl to work. That means, that it make sense to perform steps 1.2 and 1.3 from this blogpost and then to rebuild the cluster per the previous blogpost.
Step 1.2. Configure Hostnames on All the Hosts
As we are relying on the FQDN, we shall have either DNS or, at least, amend the /etc/hosts. We’ll follow the second approach to simplify our setup; however, in a production environment we definitely shall have DNS. Add the following lines to all the hosts files:
2
3
4
5
6
7
8
9
10
11
12
!
! SOME OUTPUT IS TRUNCATED FOR BREVITY
!
# CKA
192.168.51.80 k8s-vip
192.168.51.81 cka-cp-1
192.168.51.82 cka-cp-2
192.168.51.83 cka-cp-3
192.168.51.84 cka-wk-1
192.168.51.85 cka-wk-2
192.168.51.86 cka-wk-3
Make sure you can ping the k8s-vip:
2
3
4
5
6
7
PING k8s-vip (192.168.51.80) 56(84) bytes of data.
64 bytes from k8s-vip (192.168.51.80): icmp_seq=1 ttl=64 time=0.524 ms
--- k8s-vip ping statistics ---
1 packets transmitted, 1 received, 0% packet loss, time 0ms
rtt min/avg/max/mdev = 0.524/0.524/0.524/0.000 ms
Step 1.3. Setup Load Balancer
We explained the HAProxy setup and configuration in a separate blogpost; therefore, he we will just guide through its setup. In this case, we don’t build it containerized and so we can follow the official documentation, just install it:
2
$ sudo apt-get install -y haproxy
Once it is done, we need to create the configuration for it to work. As Kubernetes relies on certificates for authentication and this operation is performed by kube-apiserver, we shall not terminate the SSL session at the load balancer. As such, we need to configure it work in L4 mode, simply to load balance TCP sessions based on 5 tuples (source/destination IP addresses, IP protocol, source/destination port). The following configuration will do the necessary job:
2
3
4
5
6
7
8
9
10
11
12
13
14
15
16
17
18
19
20
21
22
23
24
25
26
27
28
29
30
31
32
33
34
35
36
37
38
39
40
41
42
43
44
45
46
global
log /dev/log local0
log /dev/log local1 notice
chroot /var/lib/haproxy
stats socket /run/haproxy/admin.sock mode 660 level admin expose-fd listeners
stats timeout 30s
user haproxy
group haproxy
daemon
# Default SSL material locations
ca-base /etc/ssl/certs
crt-base /etc/ssl/private
# See: https://ssl-config.mozilla.org/#server=haproxy&server-version=2.0.3&config=intermediate
ssl-default-bind-ciphers ECDHE-ECDSA-AES128-GCM-SHA256:ECDHE-RSA-AES128-GCM-SHA256:ECDHE-ECDSA-AES256-GCM-SHA384:ECDHE-RSA-AES256-GCM-SHA384:ECDHE-ECDSA-CHACHA20-POLY1305:ECDHE-RSA-CHACHA20-POLY1305:DHE-RSA-AES128-GCM-SHA256:DHE-RSA-AES256-GCM-SHA384
ssl-default-bind-ciphersuites TLS_AES_128_GCM_SHA256:TLS_AES_256_GCM_SHA384:TLS_CHACHA20_POLY1305_SHA256
ssl-default-bind-options ssl-min-ver TLSv1.2 no-tls-tickets
defaults
log global
mode tcp
option tcplog
option dontlognull
timeout connect 5000
timeout client 50000
timeout server 50000
errorfile 400 /etc/haproxy/errors/400.http
errorfile 403 /etc/haproxy/errors/403.http
errorfile 408 /etc/haproxy/errors/408.http
errorfile 500 /etc/haproxy/errors/500.http
errorfile 502 /etc/haproxy/errors/502.http
errorfile 503 /etc/haproxy/errors/503.http
errorfile 504 /etc/haproxy/errors/504.http
frontend k8sVip
bind *:6443
default_backend k8sServers
backend k8sServers
balance roundrobin
server cka-cp-1 192.168.51.81:6443 check
server cka-cp-2 192.168.51.82:6443 check
server cka-cp-3 192.168.51.83:6443 check
__EOF__
The key parameters here are default, frontend and backend:
- default:
- mode shall be tcp instead of default http
- option shall be tcplog instead of default httplog
- frontend:
- bind port 6443
- forward traffic to backend servers, which will be control plane nodes
- backend:
- choose the round robin load balancing
- specify the servers alongside their IP addresses and TCP ports, which kube-apiserver is listening on
- enable checks, which will query the TCP port to validate that the server is up
Once the configuration is completed, restart the haproxy and ensure it is working:
2
3
4
5
6
7
8
9
10
11
12
13
14
15
16
17
18
19
$ sudo systemctl status haproxy.service
● haproxy.service - HAProxy Load Balancer
Loaded: loaded (/lib/systemd/system/haproxy.service; enabled; vendor preset: enabled)
Active: active (running) since Sun 2022-09-25 21:22:57 UTC; 3min 51s ago
Docs: man:haproxy(1)
file:/usr/share/doc/haproxy/configuration.txt.gz
Process: 28264 ExecStartPre=/usr/sbin/haproxy -Ws -f $CONFIG -c -q $EXTRAOPTS (code=exited, status=0/SUCCESS)
Main PID: 28266 (haproxy)
Tasks: 3 (limit: 4575)
Memory: 69.6M
CPU: 482ms
CGroup: /system.slice/haproxy.service
├─28266 /usr/sbin/haproxy -Ws -f /etc/haproxy/haproxy.cfg -p /run/haproxy.pid -S /run/haproxy-master.sock
└─28268 /usr/sbin/haproxy -Ws -f /etc/haproxy/haproxy.cfg -p /run/haproxy.pid -S /run/haproxy-master.sock
Sep 25 21:22:57 cka-hap-1 systemd[1]: Starting HAProxy Load Balancer...
Sep 25 21:22:57 cka-hap-1 haproxy[28266]: [NOTICE] (28266) : New worker #1 (28268) forked
Sep 25 21:22:57 cka-hap-1 systemd[1]: Started HAProxy Load Balancer.
Step 1.4. Validate Non Highly Available Cluster Operates Properly
As aforementioned, at this stage you may want to re-build the original cluster leveraging the FQDN for the –control-plane-endpoint as both cp node and workers will be able to reach the kube-apiserver via the HAProxy load balancer. Run the following command on the cp-1 node:
2
3
4
5
NAME STATUS ROLES AGE VERSION
cka-cp-1 Ready control-plane 8h v1.24.1
cka-wk-1 Ready <none> 8h v1.24.1
cka-wk-2 Ready <none> 8h v1.24.1
If that works, then everything is correct. You can also check at the HAProxy that the request is being sent to cp-1 (run this command from hap-1):
2
3
4
5
!
! OUTPUT IS TRUNCATED FOR BREVITY
!
Sep 25 18:05:53 cka-hap-1 haproxy[27207]: 192.168.51.81:47036 [25/Sep/2022:18:05:53.594] k8sVip k8sServers/cka-cp-1 1/0/32 22531 -- 13/13/12/4/0 0/0
Step 1.5. Get Token to Add the Worker Node
Description and steps
Adding the workers node to Kubernetes cluster is an essential step not only for redundancy and high availability, but also for providing additional compute resources for customers to grow your infrastructure. It is possible to have tens and hundreds nodes in a single Kubernetes cluster.
In order to add the node to the cluster, you need to obtain the token. it is printed in the stdout (CLI) at the end of the kubeadm init process on the control plane. However, the token has a limited lifetime (typically, it is just 2 hours). Therefore, if you add the token later, you would need to generate a new one. You do it on the control plane node (run the following command on cp-1):
Expected output
2
3
$ sudo kubeadm token create --print-join-command
kubeadm join k8s-vip:6443 --token wrcwhn.rjpw9ghzy9t1zx4j --discovery-token-ca-cert-hash sha256:5420769464b1fdfd4364606c50bad713c043bdfd3df4de5836f66775511e277b
Step 1.6. Add the Worker Node
Description and steps
It is expected that your worker node already has Docker and cri-dockerd installed. Refer to the previous blogpost for details.
Once you have completed the previous step, adding the worker node (any amount, in fact) is very easy: just type there the provided by cp-1 command (execute this command from wk-3):
2
--discovery-token-ca-cert-hash sha256:5420769464b1fdfd4364606c50bad713c043bdfd3df4de5836f66775511e277b --cri-socket=unix:///var/run/cri-dockerd.sock
Expected output
It will take a few moments (perhaps, minutes) and your worker node is added:
2
3
4
5
6
7
8
9
10
11
12
13
14
15
16
17
$ sudo kubeadm join k8s-vip:6443 --token x3xsp6.dwqt2lg576fjoug5 \
--discovery-token-ca-cert-hash sha256:5420769464b1fdfd4364606c50bad713c043bdfd3df4de5836f66775511e277b --cri-socket=unix:///var/run/cri-dockerd.sock
[preflight] Running pre-flight checks
[WARNING SystemVerification]: missing optional cgroups: blkio
[preflight] Reading configuration from the cluster...
[preflight] FYI: You can look at this config file with 'kubectl -n kube-system get cm kubeadm-config -o yaml'
[kubelet-start] Writing kubelet configuration to file "/var/lib/kubelet/config.yaml"
[kubelet-start] Writing kubelet environment file with flags to file "/var/lib/kubelet/kubeadm-flags.env"
[kubelet-start] Starting the kubelet
[kubelet-start] Waiting for the kubelet to perform the TLS Bootstrap...
This node has joined the cluster:
* Certificate signing request was sent to apiserver and a response was received.
* The Kubelet was informed of the new secure connection details.
Run 'kubectl get nodes' on the control-plane to see this node join the cluster.
Step 1.7. Verify that the Worker Is Added
Description and steps
From the control plane node, validate that you can see the new worker node:
Expected output
2
3
4
5
6
7
$ kubectl get nodes
NAME STATUS ROLES AGE VERSION
cka-cp-1 Ready control-plane 4h24m v1.24.1
cka-wk-1 Ready <none> 4h11m v1.24.1
cka-wk-2 Ready <none> 4h11m v1.24.1
cka-wk-3 Ready <none> 2m36s v1.24.1
The new worker node is added and ready to get the customers’ workloads.
Step 1.8. Get the Certificate For New Control Plane Nodes
Description and steps
Adding the worker node is very easy process, as you can see. Adding the control plane is a little bit more complicated, as there is more extra piece of information is needed: that is identification of the SSL certificates, so that they are installed on the new control plane nodes. Per the official Kubernetes documentation, this process encompasses just one extra step “kubeadm init phase upload-certs –upload-certs“, which will generate the necessary hash for us. However, as we are using Docker as our Container Runtime, this process is not that trivial. In fact, it took us quite a bit of time to digest, what shall we do.
The problem
If we go straight ahead and apply this command, we get an error (execute this command on cp-1):
2
3
Found multiple CRI endpoints on the host. Please define which one do you wish to use by setting the 'criSocket' field in the kubeadm configuration file: unix:///var/run/containerd/containerd.sock, unix:///var/run/cri-dockerd.sock
To see the stack trace of this error execute with --v=5 or higher
The output suggests that we shall add the criSocket key and it shall work; well, it is worth trying:
2
3
unknown flag: --cri-socket
To see the stack trace of this error execute with --v=5 or higher
That is not what is expected. So, there is no easy way.
The solution
After spending some time going through the Kubernetes documentation and Stack Exchange forums, we found a hint: kubeadm doesn’t accept these argument at kubeadm init phase, for whatever reason; however, it does accept the config file. So, we need to obtain it and augment with extra parameters.
To get the existing config, get the content of the corresponding ConfigMap on cp-1:
Once we look into it, we see the following output:
2
3
4
5
6
7
8
9
10
11
12
13
14
15
16
17
18
19
20
21
22
23
24
25
26
27
28
29
30
31
data:
ClusterConfiguration: |
apiServer:
extraArgs:
authorization-mode: Node,RBAC
timeoutForControlPlane: 4m0s
apiVersion: kubeadm.k8s.io/v1beta3
certificatesDir: /etc/kubernetes/pki
clusterName: kubernetes
controlPlaneEndpoint: k8s-vip:6443
controllerManager: {}
dns: {}
etcd:
local:
dataDir: /var/lib/etcd
imageRepository: k8s.gcr.io
kind: ClusterConfiguration
kubernetesVersion: v1.24.6
networking:
dnsDomain: cluster.local
podSubnet: 192.168.0.0/16
serviceSubnet: 10.96.0.0/12
scheduler: {}
kind: ConfigMap
metadata:
creationTimestamp: "2022-09-25T12:47:03Z"
name: kubeadm-config
namespace: kube-system
resourceVersion: "203"
uid: ab74056b-1d51-43d5-aeb8-897438b9b363
It contains a few important pieces about the network configuration and the control plane endpoint; however, it doesn’t contain anything about the CRI used. Yet at the same time, it has an important next hint to the API group “kubeadm.k8s.io/v1beta3“, which lead us to the documentation about the endpoint. Finally, we were able to find the necessary key called nodeRegistration in kind: InitConfiguration. Finally, we create the kubeadm-config.yaml, which we can use during the regeneration of hash for certificates. Execute the following commands on the cp-1 node:
2
3
4
5
6
7
8
9
10
11
12
13
14
15
16
17
18
19
20
21
22
23
24
25
26
27
28
29
30
apiServer:
extraArgs:
authorization-mode: Node,RBAC
timeoutForControlPlane: 4m0s
apiVersion: kubeadm.k8s.io/v1beta3
certificatesDir: /etc/kubernetes/pki
clusterName: kubernetes
controlPlaneEndpoint: k8s-vip:6443
controllerManager: {}
dns: {}
etcd:
local:
dataDir: /var/lib/etcd
imageRepository: k8s.gcr.io
kind: ClusterConfiguration
kubernetesVersion: v1.24.6
networking:
dnsDomain: cluster.local
podSubnet: 192.168.0.0/16
serviceSubnet: 10.96.0.0/12
scheduler: {}
---
apiVersion: kubeadm.k8s.io/v1beta3
kind: InitConfiguration
nodeRegistration:
criSocket: "unix:///var/run/cri-dockerd.sock"
__EOF__
$ sudo kubeadm init phase upload-certs --upload-certs --config kubeadm-config.yaml
Expected output
2
3
4
5
$ sudo kubeadm init phase upload-certs --upload-certs --config kubeadm-config.yaml
[upload-certs] Storing the certificates in Secret "kubeadm-certs" in the "kube-system" Namespace
[upload-certs] Using certificate key:
8c3c67e3632f926cac260c53f5436014e56e934bff468a169c41893262ac8b31
The new worker node is added and ready to get the customers’ workloads.
Step 1.9. Add the New Control Plane Nodes
Description and steps
You have now all the necessary information to add the new worker nodes. If you do this operation within 2 hours since your token was generated per the earlier description, you don’t need to re-geneate a new one; otherwise, simply repeat step 1.5. In order to add the control plane nodes to the cluster, you need to add two more keys to the “kubeadm join” command, which are:
- –control-plane without argument, which indicates that the node will operate as a control-plane
- –certificate-key with an argument, which value was obtained in the previous step.
Run this command on both cp-2 and cp-3:
2
3
4
5
--token x3xsp6.dwqt2lg576fjoug5 \
--discovery-token-ca-cert-hash sha256:5420769464b1fdfd4364606c50bad713c043bdfd3df4de5836f66775511e277b\
--certificate-key 8c3c67e3632f926cac260c53f5436014e56e934bff468a169c41893262ac8b31\
--cri-socket=unix:///var/run/cri-dockerd.sock
Expected output
Adding the new control plane node takes a bit longer than adding the worker node, so, be patient. Once it is completed, you shall see the following output:
2
3
4
5
6
7
8
9
10
11
12
13
14
15
16
17
18
19
20
21
22
23
24
25
26
27
$ sudo kubeadm join k8s-vip:6443 --control-plane\
--token x3xsp6.dwqt2lg576fjoug5 \
--discovery-token-ca-cert-hash sha256:5420769464b1fdfd4364606c50bad713c043bdfd3df4de5836f66775511e277b\
--certificate-key 8c3c67e3632f926cac260c53f5436014e56e934bff468a169c41893262ac8b31\
--cri-socket=unix:///var/run/cri-dockerd.sock
[sudo] password for aaa:
[preflight] Running pre-flight checks
[WARNING SystemVerification]: missing optional cgroups: blkio
!
! SOME OUTPUT IS TRUNCATED FOR BREVITY
!
This node has joined the cluster and a new control plane instance was created:
* Certificate signing request was sent to apiserver and approval was received.
* The Kubelet was informed of the new secure connection details.
* Control plane label and taint were applied to the new node.
* The Kubernetes control plane instances scaled up.
* A new etcd member was added to the local/stacked etcd cluster.
To start administering your cluster from this node, you need to run the following as a regular user:
mkdir -p $HOME/.kube
sudo cp -i /etc/kubernetes/admin.conf $HOME/.kube/config
sudo chown $(id -u):$(id -g) $HOME/.kube/config
Run 'kubectl get nodes' to see this node join the cluster.
Do the that mentioned steps to have possibility to use kubectl from each control plane node
Step 1.10 Validation
Description and steps
The first validation is very simple: just check from cp-1 that you see the newly added nodes.
One of the main reasons for building the higly available cluster is to ensure that etcd key-value store distributes the information across all the control plane nodes, so that outage of any of them doesn’t impact the cluster operation. Therefore, besides checking that nodes are visible, check also the state of the etcd database:
2
3
4
5
6
7
$ kubectl exec -it pods/etcd-cka-cp-1 -n kube-system -c etcd -- sh -c 'ETCDCTL_API=3 etcdctl -w table \
--endpoints 192.168.51.81:2379,192.168.51.82:2379,192.168.51.83:2379 \
--cacert /etc/kubernetes/pki/etcd/ca.crt \
--cert /etc/kubernetes/pki/etcd/server.crt \
--key /etc/kubernetes/pki/etcd/server.key \
endpoint status'
Expected output
2
3
4
5
6
7
8
9
10
11
12
13
14
15
16
17
18
19
20
21
22
23
24
25
$ kubectl get nodes
NAME STATUS ROLES AGE VERSION
cka-cp-1 Ready control-plane 5h8m v1.24.1
cka-cp-2 Ready control-plane 5m19s v1.24.1
cka-cp-3 Ready control-plane 93s v1.24.1
cka-wk-1 Ready <none> 4h55m v1.24.1
cka-wk-2 Ready <none> 4h55m v1.24.1
cka-wk-3 Ready <none> 47m v1.24.1
=========================================================================
$ kubectl exec -it pods/etcd-cka-cp-1 -n kube-system -c etcd -- sh -c 'ETCDCTL_API=3 etcdctl -w table \
--endpoints 192.168.51.81:2379,192.168.51.82:2379,192.168.51.83:2379 \
--cacert /etc/kubernetes/pki/etcd/ca.crt \
--cert /etc/kubernetes/pki/etcd/server.crt \
--key /etc/kubernetes/pki/etcd/server.key \
endpoint status'
+--------------------+------------------+---------+---------+-----------+------------+-----------+------------+--------------------+--------+
| ENDPOINT | ID | VERSION | DB SIZE | IS LEADER | IS LEARNER | RAFT TERM | RAFT INDEX | RAFT APPLIED INDEX | ERRORS |
+--------------------+------------------+---------+---------+-----------+------------+-----------+------------+--------------------+--------+
| 192.168.51.81:2379 | 7be191c78888168 | 3.5.3 | 4.4 MB | false | false | 6 | 32101 | 32101 | |
| 192.168.51.82:2379 | ebab821f1fc25732 | 3.5.3 | 4.4 MB | true | false | 6 | 32101 | 32101 | |
| 192.168.51.83:2379 | e27f3e67d7cfeaf6 | 3.5.3 | 4.4 MB | false | false | 6 | 32101 | 32101 | |
+--------------------+------------------+---------+---------+-----------+------------+-----------+------------+--------------------+--------+
Step 1.11. Test the Failover
Description and Steps
The final step is to ensure that the failover is working. Make some requests using the kubectl to see which node is responding atm (you can see that in HAProxy logs as mentioned above). Then, reboot that server and continue quering the information with kubectl. You shall see that the cluster continues operating despite the originally active control plane node is down. Execut this command from cp-2:
And this from hap-1:
Expected output
You shall continuously see the response:
2
3
4
5
6
7
8
NAME STATUS ROLES AGE VERSION
cka-cp-1 Ready control-plane 5h23m v1.24.1
cka-cp-2 Ready control-plane 20m v1.24.1
cka-cp-3 Ready control-plane 16m v1.24.1
cka-wk-1 Ready <none> 5h10m v1.24.1
cka-wk-2 Ready <none> 5h10m v1.24.1
cka-wk-3 Ready <none> 62m v1.24.1
And in logs you shall see something simlar to the following output:
2
3
4
5
6
7
8
9
10
11
12
13
14
15
16
17
18
19
20
21
22
23
24
25
26
$ sudo tail -f /var/log/haproxy.log
!
! OUTPUT IS TRUNCATED FOR BREVITY (BEFORE FAILOVER)
!
Sep 25 18:05:53 cka-hap-1 haproxy[27207]: 192.168.51.81:47036 [25/Sep/2022:18:05:53.594] k8sVip k8sServers/cka-cp-1 1/0/32 22531 -- 13/13/12/4/0 0/0
Sep 25 18:06:02 cka-hap-1 haproxy[27207]: 192.168.51.81:42754 [25/Sep/2022:18:06:02.218] k8sVip k8sServers/cka-cp-2 1/0/40 22509 -- 13/13/12/4/0 0/0
Sep 25 18:06:02 cka-hap-1 haproxy[27207]: 192.168.51.81:42770 [25/Sep/2022:18:06:02.470] k8sVip k8sServers/cka-cp-3 1/1/27 22509 -- 13/13/12/4/0 0/0
Sep 25 18:06:02 cka-hap-1 haproxy[27207]: 192.168.51.81:42782 [25/Sep/2022:18:06:02.630] k8sVip k8sServers/cka-cp-1 1/0/27 22509 -- 13/13/12/4/0 0/0
!
! OUTPUT IS TRUNCATED FOR BREVITY (DURING FAILOVER)
!
Sep 25 18:10:32 cka-hap-1 haproxy[27262]: [WARNING] (27262) : Server k8sServers/cka-cp-1 is DOWN, reason: Layer4 connection problem, info: "Connection refused", check duration: 0ms. 2 active and 0 backup servers left. 0 sessions active, 0 requeued, 0 remaining in queue.
Sep 25 18:10:32 cka-hap-1 haproxy[27262]: Server k8sServers/cka-cp-1 is DOWN, reason: Layer4 connection problem, info: "Connection refused", check duration: 0ms. 2 active and 0 backup servers left. 0 sessions active, 0 requeued, 0 remaining in queue.
Sep 25 18:10:32 cka-hap-1 haproxy[27262]: Server k8sServers/cka-cp-1 is DOWN, reason: Layer4 connection problem, info: "Connection refused", check duration: 0ms. 2 active and 0 backup servers left. 0 sessions active, 0 requeued, 0 remaining in queue.
!
! OUTPUT IS TRUNCATED FOR BREVITY (AFTER FAILOVER)
!
Sep 25 18:10:39 cka-hap-1 haproxy[27262]: 192.168.51.82:42312 [25/Sep/2022:18:10:37.050] k8sVip k8sServers/cka-cp-2 1/0/2625 57340 -- 11/11/10/5/0 0/0
Sep 25 18:10:58 cka-hap-1 haproxy[27262]: 192.168.51.82:45712 [25/Sep/2022:18:10:58.957] k8sVip k8sServers/cka-cp-3 1/0/23 4907 -- 11/11/10/5/0 0/0
Sep 25 18:11:01 cka-hap-1 haproxy[27262]: 192.168.51.82:45714 [25/Sep/2022:18:11:01.471] k8sVip k8sServers/cka-cp-2 1/0/62 15246 -- 11/11/10/5/0 0/0
!
! OUTPUT IS TRUNCATED FOR BREVITY (ONCE REBOOTED SERVER IS BACK)
!
Sep 25 18:11:51 cka-hap-1 haproxy[27262]: [WARNING] (27262) : Server k8sServers/cka-cp-1 is UP, reason: Layer4 check passed, check duration: 0ms. 3 active and 0 backup servers online. 0 sessions requeued, 0 total in queue.
Sep 25 18:11:51 cka-hap-1 haproxy[27262]: Server k8sServers/cka-cp-1 is UP, reason: Layer4 check passed, check duration: 0ms. 3 active and 0 backup servers online. 0 sessions requeued, 0 total in queue.
That concludes our lab today: Your Kubernetes cluster is scaled and is turned into the highly available one, which tolerates outage of any node and continues the operation.
Lessons Learned
The most important lessons learned was actually the error we made during the cluster rebuild: we did a typo in the subnet mask of the wk-1 node. The mistake was small: instead of /24 we typed /25. There is no issue from the network connectivity perspecitve, as all our IP addresses in this cluter is within .80-86 and gateway is .1.
However, the CNI (Calico in our case) went absolutely nuts on the control plane node and startes blackholing traffic:
2
3
4
5
6
7
8
9
10
11
default via 192.168.51.1 dev ens18 proto static
172.17.0.0/16 dev docker0 proto kernel scope link src 172.17.0.1 linkdown
unreachable 192.168.51.0/25 proto bird
192.168.51.0/24 dev ens18 proto kernel scope link src 192.168.51.81
blackhole 192.168.111.64/26 proto bird
192.168.111.68 dev cali9c9ed603543 scope link
192.168.111.69 dev cali8b98fbb45c3 scope link
192.168.111.70 dev cali6711d81c909 scope link
unreachable 192.168.214.0/26 proto bird
unreachable 192.168.223.64/26 proto bird
This caused a domino effect:
- HAProxy is on a separate nodes, so cp-1 cannot reach the HAProxy node.
- It means that usage of kubectl is impossible.
- Moreover, even if we use kubectl from another host, cp-1 still cannot respond back to HAProxy.
That was an interesting problem and, to be honest, we like when such issues happen in lab, as they helps to better understand the system we are designing and building.
The solution was to fix the subnet mask on wk-1 node and to restart it. Once it turned up, the routing table was fixed:
2
3
4
5
6
7
8
9
10
default via 192.168.51.1 dev ens18 proto static
172.17.0.0/16 dev docker0 proto kernel scope link src 172.17.0.1 linkdown
192.168.51.0/24 dev ens18 proto kernel scope link src 192.168.51.81
blackhole 192.168.111.64/26 proto bird
192.168.111.71 dev cali6711d81c909 scope link
192.168.111.72 dev cali9c9ed603543 scope link
192.168.111.73 dev cali8b98fbb45c3 scope link
192.168.214.0/26 via 192.168.51.84 dev tunl0 proto bird onlink
192.168.223.64/26 via 192.168.51.85 dev tunl0 proto bird onlink
Summary
In the real production IT and network infrastructure, you would probably see only highly available clusters; therefore, it is important to understand how to build, test and troubleshoot it. This was the second blogpost about Kubernetes and the second about the infrastructure. We will have at least one, which will cover the upgrade of the Kubernetes cluster to a new version and then we will switch to, actually, usage of the Kubernetes cluster. Take care and good bye!
Reference Documentation
This blogpost relies on the documentation taken from the following sources:
Need Help? Contract Us
If you need a trusted and experienced partner to automate your network and IT infrastructure, get in touch with us.
P.S.
If you have further questions or you need help with your networks, we are happy to assist you, just send us a message. Also don’t forget to share the article on your social media, if you like it.
BR,
Anton Karneliuk