

Hello my friend,
It took a bit since our previous blogpost about the setup of the highly-available Kubernetes cluster with multiple control plane and worker nodes. We aimed to write the blogpost about the upgrade, but we will park it for now for two reasons:
- Despite this topic is needed for the exam, it is not very often performed within the cluster.
- We want to provide a broader overview of Kubernetes from the perspective of building and using applications on top of it.
Therefore, we decided to walk you through the main components used to build and publish your application in a cloud native way on Kubernetes. Let’s dive into that.
2
3
4
5
retrieval system, or transmitted in any form or by any
means, electronic, mechanical or photocopying, recording,
or otherwise, for commercial purposes without the
prior permission of the author.
Can Kubernetes Help to Automate Networks?
These days there are interesting projects emerging with Kubernetes acting as a management plane for network devices. Kubernetes in such projects has a role of the entity, which distributes configuration to the worker nodes, which are either proxies for real network devices or, in case of Linux-based network operating systems, the network devices are Kubernetes worker nodes themselves.
However, with Kubernetes being a management plane, it is still important the network devices to be configured appropriately. This is where model-driven automation comes into the stage: to do the conversion of the configuration input from the Kubernetes application to the network device itself. And model-driven automation is something, what we are experts in and teaching students worldwide for 3 years already. Join Zero-to-Hero Network Automation Training, or our other programs, to learn how to automate networks today and tomorrow:
We offer the following training programs for you:
- Zero-to-Hero Network Automation Training
- High-scale automation with Nornir
- Ansible Automation Orchestration with Ansble Tower / AWX
- Expert-level training: Closed-loop Automation and Next-generation Monitoring
During these trainings you will learn the following topics:
- Success and failure strategies to build the automation tools.
- Principles of software developments and the most useful and convenient tools.
- Data encoding (free-text, XML, JSON, YAML, Protobuf).
- Model-driven network automation with YANG, NETCONF, RESTCONF, GNMI.
- Full configuration templating with Jinja2 based on the source of truth (NetBox).
- Best programming languages (Python, Bash) for developing automation
- The most rock-solid and functional tools for configuration management (Ansible) and Python-based automation frameworks (Nornir).
- Network automation infrastructure (Linux, Linux networking, KVM, Docker).
- Orchestration of automation workflows with AWX and its integration with NetBox, GitHub, as well as custom execution environments for better scalability.
- Collection network data via SNMP and streaming telemetry with Prometheus
- Building API gateways with Python leveraging Fast API
- Integration of alerting with Slack and your own APIs
- … and many more
Moreover, we put all mentions technologies in the context of real use cases, which our team has solved and are solving in various projects in the service providers, enterprise and data centre networks and systems across the Europe and USA. That gives you opportunity to ask questions to understand the solutions in-depts and have discussions about your own projects. And on top of that, each technology is provided with online demos and labs to master your skills thoroughly. Such a mixture creates a unique learning environment, which all students value so much. Join us and unleash your potential.
Brief Description
Based on the information provided in the Kubernetes official documentation, Kubernetes has a loosely coupled architecture of various primitives connected via labels which aims to delivery and is delivering a highly-scalable distributed multi-tenant system for cloud-native applications. In today’s blogpost we’ll cover all these buzzwords:
- What are cloud-native applications?
- What are (some) the main primitives used to build a cloud-native applications?
- How are they loosely coupled together via labels so that they can work together?
- How is the multi-tenancy achieved?
As our agenda is quite dense, let’s jump straight to the deployment of our applications accompanied with the description. As usual in our blog, we structure explanation about the practical real-life use cases.
To be able to understand Kubernetes, you need to have a good grasp on data models and REST API. Both you will learn in our Zero-to-Hero Network Automation Training.
What Are We Going to Achieve Today?
In today’s lab we will:
- Create two customers’ tenants.
- Create within customer tenants different application types.
- Publish customer applications to ensure it is possible to access them from inside the Kubernetes cluster and outside.
- Create rules to used to access customer websites based on the URLs emulating the web hosting and work of the browser.
That was a so-called business objective, let’s translate it in the Kubernetes language:
- We will create two Namespaces.
- For the namespaces we will apply LimitRange to control per-pod resources’ request and ResourceQuota to limit the overall usage of the resources per namespace.
- Within these Namespaces we will create two Deployments and one DaemonSet.
- HorizontalPodAutoscaler will be used to scale the Deployment.
- We will use ConfigMaps to provide custom HTML start page for each application.
- We will create three Services of different types (ClusterIP, NodePort, LoadBalancer) across two Namespaces.
- We will install Ingress Controller based on the Open Source version of NGINX.
- We will create Ingress Rules in each Namespace to route the traffic based on the Host HTTP header towards corresponding Services.
That’s our technical breakdown, which are aiming to implement.
At the end of the day, we are covering the vast majority of Kubernetes primitives (highlighted with bold font) as promised.
Lab Setup
The first step, though, before we start implementation of our Kubernetes-based applications is to understand the topology:

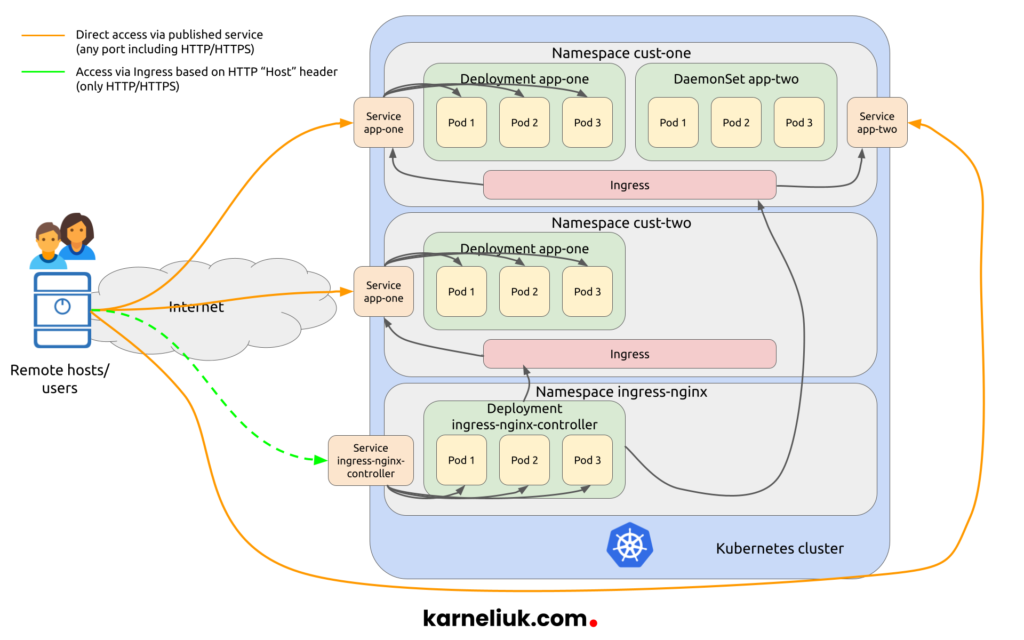
To further clarify what we are going to build, take a look into the following list:
- Each name space we create (cust-one) and (cust-two) will be limited to have one CPU core (shortly, 1c CPU) and 1 GB RAM across all pods they run.
- For each pod we will allocate implicitly 0.125c CPU and 128 MB RAM
- In the namespace cust-one, we will create two applications:
- One will be created using the deployment with three replicas randomly placed across our worker nodes.
- Another will be created using the daemonset to ensure that one copy of the pod is placed at each worker (as we have three workers, there will be three pods created).
- In the namespace cust-two, we will deploy one application using the deployment with three replicas.
- Each created application will have its own service of a different type.
- We will test the connectivity between applications inside the Kubernetes cluster leveraging the IP address and DNS (auto service discovery based on CoreDNS) as well between the clusters using public IPs/ports created for NodePort and LoadBalancer services.
- We will install Ingress NGINX Controller and, afterwards, we’ll create Ingress (rules) to route the traffic to created services based on the HTTP Host header.
- Finally, we’ll test how our Ingress NGINX controller is working from inside the Kubernetes Cluster and from the outside.
1. Solution Implementation
It is expected that you are familiar with our Kubernetes Cluster setup based on the previous blogpost. All the actions in this blogpost are conducted from the cka-cp-1 control plane node, unless something different is specified.
We need to do a small preparation and create the following structure of directories:
2
3
4
5
6
+--cust-one
| +--app-one
| +--app-two
+--cust-two
+--app-one
In our Zero-to-Hero Network Automation Training you can learn basics of Linux administration including management of directories and files.
Assuming you have taken part in our training or that you know how to created directories, you have created them:
2
3
4
5
6
7
8
9
10
11
12
13
14
15
16
17
18
19
20
21
22
23
.:
total 8
drwxrwxr-x 4 aaa aaa 4096 Oct 23 22:00 cust-one
drwxrwxr-x 3 aaa aaa 4096 Oct 23 22:01 cust-two
./cust-one:
total 8
drwxrwxr-x 2 aaa aaa 4096 Oct 23 22:00 app-one
drwxrwxr-x 2 aaa aaa 4096 Oct 23 22:00 app-two
./cust-one/app-one:
total 0
./cust-one/app-two:
total 0
./cust-two:
total 4
drwxrwxr-x 2 aaa aaa 4096 Oct 23 22:01 app-one
./cust-two/app-one:
total 0
Step #1.1. Create Namespaces
First thing first, we need to create a namespace. Namespace is a way how the multi-tenancy is implemented in Kubernetes. In OpenStack world, namespace is equal to project, whilst in AWS it is equal to VPC. As such, it is a higher level of aggregation of all the further resources. By default, there are four namespaces created in Kubernetes at the moment you complete its installation:
2
3
4
5
6
NAME STATUS AGE
default Active 28d
kube-node-lease Active 28d
kube-public Active 28d
kube-system Active 28d
The namespaces with the prefix “kube-” are used by the Kubernetes itself and, therefore, you don’t need to touch them to create your applications. The namespace “default” is used typically in non-multi-tenant deployment, where there is no need or desire to separate applications somehow logically. As we stated above, we are aiming to create two namespaces; hence, we won’t use the default one.
In Kubernetes, it possible to create things, typically, in two ways:
- Using the “kubectl create“, which creates resources in the imperative way.
- Using the “kubectl apply“, which creates resources in the declarative way.
The difference between them are summarized in this document.
We will follow the second (declarative) approach as we believe it is more in-line with the spirit of the Kubernetes. It would mean though that we need to create the corresponding YAML files describing the resources. There are two ways, how you can do that:
- You go the official documentation and create it following the guidelines.
- You use the “kubectl create” to generate it for you so that you can store it in the file and amend as needed.
We’ll go the second way, as it is quite a handy one not only in case of namespaces, but also in other scenarios, such Service or Deployment. Here is how you can do it:
If we amended the argument “–dry-run=client“, it would have created the namespace for us for real. However, this argument allows to generate a request without applying them. By default, the request won’t be shown, but the argument “-o yaml” instructs the kubectl to provide the output to STDOUT (i.e., to your Linux CLI). Finally, that output is redirected to the file “namespace.yaml” in the “cust-one” directory using the “>” modifier.
Join Zero-to-Hero Network Automation Training to upskill yourself in Linux administration.
Check the content of the file:
2
3
4
5
6
7
8
apiVersion: v1
kind: Namespace
metadata:
creationTimestamp: null
name: cust-one
spec: {}
status: {}
In general, it is good to go as it is; however, we will add a few labels to simplify the management of the resources on the namespace level. We also remove the fields having “{}” or “null” values, as they are not creating any value for us. The resulting namespaces definition will be like this:
2
3
4
5
6
7
8
apiVersion: v1
kind: Namespace
metadata:
name: cust-one
labels:
stage: dev
application: k8s-klc
Now we are ready to create the namespace. At the same time, you have a possibility to assess the impact the resource will have in the Kubernetes using “kubectl diff” command. It is less important for the namespace, but it will be very important for other resources we are going to create in this blogpost:
2
3
4
5
6
7
8
9
10
11
12
13
14
15
16
17
18
19
20
diff -u -N /tmp/LIVE-1313468569/v1.Namespace..cust-one /tmp/MERGED-3986347391/v1.Namespace..cust-one
--- /tmp/LIVE-1313468569/v1.Namespace..cust-one 2022-10-23 22:15:12.967520110 +0000
+++ /tmp/MERGED-3986347391/v1.Namespace..cust-one 2022-10-23 22:15:12.967520110 +0000
@@ -0,0 +1,15 @@
+apiVersion: v1
+kind: Namespace
+metadata:
+ creationTimestamp: "2022-10-23T22:15:12Z"
+ labels:
+ application: k8s-klc
+ kubernetes.io/metadata.name: cust-one
+ stage: dev
+ name: cust-one
+ uid: e9cd1573-83a3-4645-b446-63c168f00494
+spec:
+ finalizers:
+ - kubernetes
+status:
+ phase: Active
Interestingly, you see that the resulting resource will have more files compared to what we have in our original declaration. This is due to the fact, that there is a huge amount of default variables, which are set to each Kubernetes primitive, if you don’t specify them explicitly.
The namespace is though not yet instatiated. To do it, as mentioned before, use the “kubectl apply“:
2
namespace/cust-one created
Verify the list of namespaces to check if that is created:
2
3
4
5
6
7
NAME STATUS AGE
cust-one Active 2m3s
default Active 28d
kube-node-lease Active 28d
kube-public Active 28d
kube-system Active 28d
You can also see its details in two formats:
- Human-readable using “kubectl describe“
- More detailed but less human readable using adding “-o yaml” argument to “kubectl get“.
The first option:
2
3
4
5
6
7
8
9
10
11
Name: cust-one
Labels: application=k8s-klc
kubernetes.io/metadata.name=cust-one
stage=dev
Annotations: <none>
Status: Active
No resource quota.
No LimitRange resource.
You see Resource Quotas and Limit Ranges, which are not yet set. We’ll fix that shortly.
The second option:
2
3
4
5
6
7
8
9
10
11
12
13
14
15
16
17
18
19
20
apiVersion: v1
kind: Namespace
metadata:
annotations:
kubectl.kubernetes.io/last-applied-configuration: |
{"apiVersion":"v1","kind":"Namespace","metadata":{"annotations":{},"labels":{"application":"k8s-klc","stage":"dev"},"name":"cust-one"}}
creationTimestamp: "2022-10-23T22:17:03Z"
labels:
application: k8s-klc
kubernetes.io/metadata.name: cust-one
stage: dev
name: cust-one
resourceVersion: "4444522"
uid: 93b44bac-411f-42db-ac7a-99878ae4ac66
spec:
finalizers:
- kubernetes
status:
phase: Active
At this stage you can outline an important difference between these two views:
- get shows the object a it is created via API including its defaults, which is useful to modification of your YAML file when you develop your application.
- describe may also show the interaction with other resources, which is useful for troubleshooting or generally understanding how it Kubernetes work.
Following the same approach as mentioned above, create the second namespace:
2
3
4
5
6
7
8
9
10
11
apiVersion: v1
kind: Namespace
metadata:
name: cust-two
labels:
stage: prod
application: k8s-klc
$ kubectl apply -f cust-two/namespace.yaml
namespace/cust-two created
Validate that both namespaces are available now:
2
3
4
5
6
7
8
NAME STATUS AGE LABELS
cust-one Active 9m56s application=k8s-klc,kubernetes.io/metadata.name=cust-one,stage=dev
cust-two Active 44s application=k8s-klc,kubernetes.io/metadata.name=cust-two,stage=prod
default Active 28d kubernetes.io/metadata.name=default
kube-node-lease Active 28d kubernetes.io/metadata.name=kube-node-lease
kube-public Active 28d kubernetes.io/metadata.name=kube-public
kube-system Active 28d kubernetes.io/metadata.name=kube-system
As you see, we have added an argument “–show-labels“, which you by the way can use with any resource in Kubernetes, to show the content of the created labels.
The namespaces are created, so let’s move on further.
Step #1.2. Create Limit Ranges and Resource Quotas
The second step is to setup, what is permitted for tenants in terms of resources. Namely:
- How many CPU cores and Mbytes or Gbytes of RAM is that available for the entire tenant (Kubernetes namespaces)? In other words, how many resources will it be allocated for all the pods altogether?
- How many CPU cores and Mbytes of RAM each particular pod is allowed to consume?
These two parameters (per pod resources limit and overall limit for all pods) are very important despite being optional, as they allow the entire Kubernetes cluster to be protected from unreasonable resource drain by any tenant. This approach is implemented not only in Kubernetes, but also in any other cloud systems (e.g., OpenStack). In order to achieve that, we shall use two Kubernetes primitives:
- Limit Range defines the compute (CPU/memory) resources available per Kubernetes Pod or even per container in Kubernetes Pod
- Resource Quota specifies the overall limit of resources for the entire namespace.
In contrast to the Namespace, we cannot generate the YAML file out of API that easily, so we have to stick to the Kubernetes API references.
Let’s start with Limit Range (just copy-paste it using vim or any other text editor of choice):
2
3
4
5
6
7
8
9
10
11
12
13
14
15
16
17
18
19
---
apiVersion: v1
kind: LimitRange
metadata:
name: limit-range-4-cust-one
namespace: cust-one
spec:
limits:
- type: Container
defaultRequest:
cpu: 0.25
memory: 256Mi
default:
cpu: 0.5
memory: 512Mi
$ kubectl apply -f cust-one/limitrange.yaml
limitrange/limit-range-4-cust-one created
With this Limit Range, we will achieve the following resources allocation:
- Each container, which doesn’t have resources explicitly defined, will be guaranteed 0.25 core of CPU and 256 MBytes RAM of memory (defaultReuqest key). If the container does have its own request, this field of Limit Range is ignored.
- If the container starts using more than 512 Mbytes RAM (default key), it will be killed (and subsequently restarted if there is corresponding high-level controller such as Deployment or DaemonSet). In terms of CPU, if the usage exceeds 0.5 core, the container becomes throttled. If the container does have its own request, this field of Limit Range is ignored.
The latter requires the monitoring to be deployed with some controller (e.g., Prometheus). If it is not implemented, Kubernetes API server won’t be able to know the real usage and, subsequently, won’t be killing or throttling the container.
You can think about the Limit Range primitive as flavor in OpenStack, but more flexible.
Once you have configured it, you can validate it is applied in the Namepsace output:
2
3
4
5
6
7
8
9
10
11
12
13
14
15
Name: cust-one
Labels: application=k8s-klc
kubernetes.io/metadata.name=cust-one
stage=dev
Annotations: <none>
Status: Active
No resource quota.
Resource Limits
Type Resource Min Max Default Request Default Limit Max Limit/Request Ratio
---- -------- --- --- --------------- ------------- -----------------------
Container cpu - - 250m 500m -
Container memory - - 256Mi 512Mi -
If the Limit Range is applied per Pod/Container and can be overridden by the user’s definitions in Kubernetes Pod spec, the Resource Quota CAN NOT be overridden by customer: it is set by the Kubernetes cluster administrator to limit the overall resource usage (and is typically charged in public clouds).
Let’s create one following the specification:
2
3
4
5
6
7
8
9
10
11
12
13
14
15
16
17
18
19
20
21
22
23
24
25
26
27
28
29
30
31
32
33
34
35
36
37
38
39
40
41
42
---
apiVersion: v1
kind: ResourceQuota
metadata:
name: resource-quota-3-cust-one
namespace: cust-one
spec:
hard:
requests.cpu: 1
requests.memory: 1Gi
limits.cpu: 2
limits.memory: 2Gi
pods: 8
services: 2
$ kubectl diff -f cust-one/resource-quota.yaml
diff -u -N /tmp/LIVE-1318005377/v1.ResourceQuota.cust-one.resource-quota-3-cust-one /tmp/MERGED-3355717436/v1.ResourceQuota.cust-one.resource-quota-3-cust-one
--- /tmp/LIVE-1318005377/v1.ResourceQuota.cust-one.resource-quota-3-cust-one 2022-10-30 13:34:18.671138136 +0000
+++ /tmp/MERGED-3355717436/v1.ResourceQuota.cust-one.resource-quota-3-cust-one 2022-10-30 13:34:18.675138173 +0000
@@ -0,0 +1,16 @@
+apiVersion: v1
+kind: ResourceQuota
+metadata:
+ creationTimestamp: "2022-10-30T13:34:18Z"
+ name: resource-quota-3-cust-one
+ namespace: cust-one
+ uid: a163fb17-6116-49c9-abd8-9e52059ab41a
+spec:
+ hard:
+ limits.cpu: "2"
+ limits.memory: 2Gi
+ pods: "8"
+ requests.cpu: "1"
+ requests.memory: 1Gi
+ services: "2"
+status: {}
$ kubectl apply -f cust-one/resource-quota.yaml
resourcequota/resource-quota-3-cust-one created
Resource Quote is also applied to the Namespace object, pretty much as Limit Range; however, in the contrast with the latter the tenant cannot change its values and it shall use it as an indication what his/her application shall use. As you can see from the aforementioned example:
- We limit the guaranteed resources to 1 CPU core and 1 Gbytes RAM and maximum available resources to 2 CPU cores and 2 Gbytes RAM.
- We limit the amount of all Pods per the namespace, whilst the amount of Services will be only 2 per the namespace.
We can have multiple resources quotas per namespaces, so that we put different items (compute resources vs objects) in different resource quotas.
Verify that it is properly applied using the same command you have used above to check the content of the namespace:
2
3
4
5
6
7
8
9
10
11
12
13
14
15
16
17
18
19
20
21
22
23
24
Name: cust-one
Labels: application=k8s-klc
kubernetes.io/metadata.name=cust-one
stage=dev
Annotations: <none>
Status: Active
Resource Quotas
Name: resource-quota-3-cust-one
Resource Used Hard
-------- --- ---
limits.cpu 0 2
limits.memory 0 2Gi
pods 0 8
requests.cpu 0 1
requests.memory 0 1Gi
services 0 2
Resource Limits
Type Resource Min Max Default Request Default Limit Max Limit/Request Ratio
---- -------- --- --- --------------- ------------- -----------------------
Container cpu - - 250m 500m -
Container memory - - 256Mi 512Mi -
For the second namespace, copy and apply the same files; though, don’t forget to change namespace and names.
Step #1.3. Create Config Maps
Config Map is a Kubernetes primitive used to store some data, which can be passed to Pods either in form of environment variables or be mounted as volume. We will follow the second approach in this scenario. The data, which we will put in the Config Map will be the content of the HTML webpage, which shall be serviced upon requests from our containers.
It is possible to create the ConfigMap using the kubectl create command and it is possible to create it out of the file, where the filename will become a name of variable and its content its value:
2
3
4
5
6
7
8
9
10
11
12
13
14
15
16
17
18
19
20
21
22
23
24
<html>
<head>
<title>Kubernetes at Karneliuk</title>
</head>
<body>
<p>This is App One for Cust One</p>
</body>
</html>
$ kubectl -n cust-one create configmap config-map-app-one --from-file app-one/index.html --dry-run=client -o yaml > config-map-app-one.yaml
$ cat config-map-app-one.yaml
apiVersion: v1
data:
index.html: "<html>\n\t<head>\n\t\t<title>Kubernetes at Karneliuk</title>\n\t</head>\n\t<body>\n\t\t<p>This
is App One for Cust One</p>\n\t</body>\n</html>\n"
kind: ConfigMap
metadata:
creationTimestamp: null
name: config-map-app-one
namespace: cust-one
Take a look and if you are OK with its content apply it:
2
configmap/config-map-app-one created
Create a copy and slightly change the value of index.html variables to reflect that it will be used in the second app:
2
3
4
5
6
7
8
9
10
11
12
13
14
15
16
$ cat config-map-app-two.yaml
apiVersion: v1
data:
index.html: "<html>\n\t<head>\n\t\t<title>Kubernetes at Karneliuk</title>\n\t</head>\n\t<body>\n\t\t<p>This
is App Two for Cust One</p>\n\t</body>\n</html>\n"
kind: ConfigMap
metadata:
name: config-map-app-two
namespace: cust-one
$ kubectl apply -f config-map-app-two.yaml
configmap/config-map-app-two created
Once they are created, you would see them in the list of all the Config Maps within the Namespace:
2
3
4
5
NAME DATA AGE
config-map-app-one 1 3m1s
config-map-app-two 1 50s
kube-root-ca.crt 1 6d15h
Using the same kubectl describe command, you can check its content in an easy human-readable format:
2
3
4
5
6
7
8
9
10
11
12
13
14
15
16
17
18
19
20
21
22
23
24
Name: config-map-app-one
Namespace: cust-one
Labels: <none>
Annotations: <none>
Data
====
index.html:
----
<html>
<head>
<title>Kubernetes at Karneliuk</title>
</head>
<body>
<p>This is App One for Cust One</p>
</body>
</html>
BinaryData
====
Events: <none>
Repeat the process for the another namespace.
Step #1.4. Create Deployments
We could say that by now we were getting ready to deploy our application, whilst from now on we actually are building it. For an application app-one for both customers we will use Deployment Kubernetes primitive. This primitive allows us to create a high-level controller to ensure that the necessary amount of Pods with our applications are deployed in the Kubernetes cluster. In case, the amount of Pods are lower (e.g., some of the nodes running it are down), it will re-create the Pod on the other available nodes. Besides, it also helps to scale the amount of Pods manually and to perform Pods updates upon the image change or the container parameters. Let’s go ahead and create the Deployment for the app-one in the cust-one Namepsace.:
Using the kubectl create we can create for a semi-populated Deployment file. Based on the command above, the following entries will be populated:
- Container’s image used in the pod. In this case we are using nginx running 1.22.1 version.
- Three replicas of the pod shall be created.
- The port 80 (using protocol TCP) will be made available for usage (it much more complicated then that, but such definition is good enough)
We will amend this Deployment with details needed to mount the Config Map as a volume (added path: “.spec.template.spec.containers[].volumeMounts” and “.spec.template.spec.volumes“) to ensure that the default html webpage of NGINX application is replaced with the content of the one we have created:
2
3
4
5
6
7
8
9
10
11
12
13
14
15
16
17
18
19
20
21
22
23
24
25
26
27
28
29
30
31
32
33
34
35
36
37
38
apiVersion: apps/v1
kind: Deployment
metadata:
labels:
app: deployment-app-one
name: deployment-app-one
namespace: cust-one
spec:
replicas: 3
selector:
matchLabels:
app: deployment-app-one
template:
metadata:
labels:
app: deployment-app-one
spec:
containers:
- image: nginx:1.22.1
name: nginx
ports:
- containerPort: 80
protocol: TCP
volumeMounts:
- name: index-html
mountPath: /usr/share/nginx/html
volumes:
- name: index-html
configMap:
name: config-map-app-one
items:
- key: index.html
path: index.html
$ kubectl apply -f deployment.yaml
deployment.apps/deployment-app-one created
The process how Kubernetes builds the application is the following one:
- Use creates a Deployment (or other high-level object, like DaemonSet or StatefulSet) and applies it.
- These objects typically create another lower-level object (e.g., Deployment created ReplicaSet).
- Those, it their turn, finally creates Pods with the application.
You can validate, if the whole chain was created altogether:
2
3
4
5
6
7
8
9
10
11
NAME READY UP-TO-DATE AVAILABLE AGE CONTAINERS IMAGES SELECTOR
deployment.apps/deployment-app-one 3/3 3 3 4m48s nginx nginx:1.22.1 app=deployment-app-one
NAME DESIRED CURRENT READY AGE CONTAINERS IMAGES SELECTOR
replicaset.apps/deployment-app-one-cffdb775b 3 3 3 4m48s nginx nginx:1.22.1 app=deployment-app-one,pod-template-hash=cffdb775b
NAME READY STATUS RESTARTS AGE IP NODE NOMINATED NODE READINESS GATES
pod/deployment-app-one-cffdb775b-95slc 1/1 Running 0 4m48s 192.168.166.101 cka-wk-3 <none> <none>
pod/deployment-app-one-cffdb775b-c4pgl 1/1 Running 0 4m48s 192.168.214.39 cka-wk-1 <none> <none>
pod/deployment-app-one-cffdb775b-chtqr 1/1 Running 0 4m48s 192.168.223.106 cka-wk-2 <none> <none>
You validate the detailed content of each the resource with “kubectl describe” command.
As long as all your resources are up, you are good. You can at this stage check the usage against your quota:
2
3
4
5
6
7
8
9
10
11
12
13
14
15
16
17
18
19
20
21
22
23
24
Name: cust-one
Labels: application=k8s-klc
kubernetes.io/metadata.name=cust-one
stage=dev
Annotations: <none>
Status: Active
Resource Quotas
Name: resource-quota-3-cust-one
Resource Used Hard
-------- --- ---
limits.cpu 1500m 2
limits.memory 1536Mi 2Gi
pods 3 8
requests.cpu 750m 1
requests.memory 768Mi 1Gi
services 0 2
Resource Limits
Type Resource Min Max Default Request Default Limit Max Limit/Request Ratio
---- -------- --- --- --------------- ------------- -----------------------
Container cpu - - 250m 500m -
Container memory - - 256Mi 512Mi -
In the Resource Quotas part you can see the used column, which is populated with the information from the Limit Range, which is expected. However, you don’t have anymore the space resources for 3 more containers with such requests/limits. Therefore, we will amend the Deployment file to incorporate the lower values:
2
3
4
5
6
7
8
9
10
11
12
13
14
15
16
17
18
19
20
21
22
23
24
25
26
27
28
29
30
31
32
33
34
35
36
37
38
39
40
41
42
43
44
45
apiVersion: apps/v1
kind: Deployment
metadata:
labels:
app: deployment-app-one
name: deployment-app-one
namespace: cust-one
spec:
replicas: 3
selector:
matchLabels:
app: deployment-app-one
strategy: {}
template:
metadata:
labels:
app: deployment-app-one
spec:
containers:
- image: nginx:1.22.1
name: nginx
resources: <- added
requests: <- added
cpu: 0.125 <- added
memory: 128Mi <- added
limits: <- added
cpu: 0.25 <- added
memory: 256Mi <- added
ports:
- containerPort: 80
protocol: TCP
volumeMounts:
- name: index-html
mountPath: /usr/share/nginx/html
volumes:
- name: index-html
configMap:
name: config-map-app-one
items:
- key: index.html
path: index.html
$ kubectl apply -f deployment.yaml
deployment.apps/deployment-app-one configured
Take a look on the used resources against the quota now:
2
3
4
5
6
7
8
9
10
11
12
13
14
15
16
17
18
19
20
21
22
23
24
Name: cust-one
Labels: application=k8s-klc
kubernetes.io/metadata.name=cust-one
stage=dev
Annotations: <none>
Status: Active
Resource Quotas
Name: resource-quota-3-cust-one
Resource Used Hard
-------- --- ---
limits.cpu 750m 2
limits.memory 768Mi 2Gi
pods 3 8
requests.cpu 375m 1
requests.memory 384Mi 1Gi
services 0 2
Resource Limits
Type Resource Min Max Default Request Default Limit Max Limit/Request Ratio
---- -------- --- --- --------------- ------------- -----------------------
Container memory - - 256Mi 512Mi -
Container cpu - - 250m 500m -
You see that the resources field specify in the Pod/Deployment takes precedence over the one provided in the Limit Range.
Also, take a look on the created resources using he command above:
2
3
4
5
6
7
8
9
10
11
12
NAME READY UP-TO-DATE AVAILABLE AGE CONTAINERS IMAGES SELECTOR
deployment.apps/deployment-app-one 3/3 3 3 16m nginx nginx:1.22.1 app=deployment-app-one
NAME DESIRED CURRENT READY AGE CONTAINERS IMAGES SELECTOR
replicaset.apps/deployment-app-one-779f8fcc48 3 3 3 3m13s nginx nginx:1.22.1 app=deployment-app-one,pod-template-hash=779f8fcc48
replicaset.apps/deployment-app-one-cffdb775b 0 0 0 16m nginx nginx:1.22.1 app=deployment-app-one,pod-template-hash=cffdb775b
NAME READY STATUS RESTARTS AGE IP NODE NOMINATED NODE READINESS GATES
pod/deployment-app-one-779f8fcc48-7tcbf 1/1 Running 0 3m8s 192.168.166.102 cka-wk-3 <none> <none>
pod/deployment-app-one-779f8fcc48-gvx4q 1/1 Running 0 3m13s 192.168.214.40 cka-wk-1 <none> <none>
pod/deployment-app-one-779f8fcc48-x26t2 1/1 Running 0 3m3s 192.168.223.107 cka-wk-2 <none> <none>
You see that you have one more than Replica Sets: Kubernetes creates each new one every time you modify and re-apply your Deployment, what allows to go back in time to perform the rollback to previous stages in your application:
2
3
4
5
6
7
8
9
10
11
12
13
14
15
16
17
18
19
20
21
22
23
24
25
26
27
28
29
30
31
32
33
34
35
36
37
38
39
40
41
42
43
44
45
46
47
48
49
50
51
deployment.apps/deployment-app-one
REVISION CHANGE-CAUSE
1 <none>
2 <none>
$ kubectl -n cust-one rollout history deployment deployment-app-one --revision 1
deployment.apps/deployment-app-one with revision #1
Pod Template:
Labels: app=deployment-app-one
pod-template-hash=cffdb775b
Containers:
nginx:
Image: nginx:1.22.1
Port: 80/TCP
Host Port: 0/TCP
Environment: <none>
Mounts:
/usr/share/nginx/html from index-html (rw)
Volumes:
index-html:
Type: ConfigMap (a volume populated by a ConfigMap)
Name: config-map-app-one
Optional: false
$ kubectl -n cust-one rollout history deployment deployment-app-one --revision 2
deployment.apps/deployment-app-one with revision #2
Pod Template:
Labels: app=deployment-app-one
pod-template-hash=779f8fcc48
Containers:
nginx:
Image: nginx:1.22.1
Port: 80/TCP
Host Port: 0/TCP
Limits:
cpu: 250m
memory: 256Mi
Requests:
cpu: 125m
memory: 128Mi
Environment: <none>
Mounts:
/usr/share/nginx/html from index-html (rw)
Volumes:
index-html:
Type: ConfigMap (a volume populated by a ConfigMap)
Name: config-map-app-one
Optional: false
Create the 2nd Deployment for the Namespace cust-two using the same approach, but set the amount of replicas to one:
2
3
4
5
6
7
8
9
10
11
12
13
deployment.apps/deployment-app-one created
$ kubectl -n cust-two get deployments.apps,replicasets.apps,pods -o wide
NAME READY UP-TO-DATE AVAILABLE AGE CONTAINERS IMAGES SELECTOR
deployment.apps/deployment-app-one 1/1 1 1 16s nginx nginx:1.22.1 app=deployment-app-one
NAME DESIRED CURRENT READY AGE CONTAINERS IMAGES SELECTOR
replicaset.apps/deployment-app-one-779f8fcc48 1 1 1 16s nginx nginx:1.22.1 app=deployment-app-one,pod-template-hash=779f8fcc48
NAME READY STATUS RESTARTS AGE IP NODE NOMINATED NODE READINESS GATES
pod/deployment-app-one-779f8fcc48-sd67q 1/1 Running 0 16s 192.168.214.41 cka-wk-1 <none> <none>
Step #1.5. Create Horizontal Pod Autoscaler
One of the nice selling points of Kubernetes it that it can autoscale by adding extra replicas automatically based on the load (provided, you have deployed monitoring with Prometheus so that Kubernetes it actually needs to scale). This is achieved with another Kubernetes primitive called HPA – Horizontal Pod Autoscaler.
The good thing is that we can create it with a CLI command (though, we would rather, as usually, put it into a manifest to be able to deploy it in any environment in a declartive approach):
Briefly look into it:
2
3
4
5
6
7
8
9
10
11
12
13
14
15
16
17
18
19
20
21
apiVersion: autoscaling/v1
kind: HorizontalPodAutoscaler
metadata:
name: deployment-app-one
namespace: cust-two
spec:
maxReplicas: 5
minReplicas: 3
scaleTargetRef:
apiVersion: apps/v1
kind: Deployment
name: deployment-app-one
targetCPUUtilizationPercentage: 75
status:
currentReplicas: 0
desiredReplicas: 0
$ kubectl apply -f cust-two/horizontalpodautoscaler.yaml
horizontalpodautoscaler.autoscaling/deployment-app-one created
Once it is implemented, you can check its content:
2
3
4
5
6
7
8
9
10
11
12
13
14
Warning: autoscaling/v2beta2 HorizontalPodAutoscaler is deprecated in v1.23+, unavailable in v1.26+; use autoscaling/v2 HorizontalPodAutoscaler
Name: deployment-app-one
Namespace: cust-two
Labels: <none>
Annotations: <none>
CreationTimestamp: Sun, 30 Oct 2022 15:07:16 +0000
Reference: Deployment/deployment-app-one
Metrics: ( current / target )
resource cpu on pods (as a percentage of request): <unknown> / 75%
Min replicas: 3
Max replicas: 5
Deployment pods: 0 current / 0 desired
Events: <none>
You can see warning that you should use HPA v2 insteand of HPA v1, which is auto generated.
Once you wait for a few moments, you will see that amount of pods is now eqaul to three:
2
3
4
5
6
7
8
9
10
11
NAME READY UP-TO-DATE AVAILABLE AGE CONTAINERS IMAGES SELECTOR
deployment.apps/deployment-app-one 3/3 3 3 14m nginx nginx:1.22.1 app=deployment-app-one
NAME DESIRED CURRENT READY AGE CONTAINERS IMAGES SELECTOR
replicaset.apps/deployment-app-one-779f8fcc48 3 3 3 14m nginx nginx:1.22.1 app=deployment-app-one,pod-template-hash=779f8fcc48
NAME READY STATUS RESTARTS AGE IP NODE NOMINATED NODE READINESS GATES
pod/deployment-app-one-779f8fcc48-fkzdc 1/1 Running 0 6m31s 192.168.223.108 cka-wk-2 <none> <none>
pod/deployment-app-one-779f8fcc48-sd67q 1/1 Running 0 14m 192.168.214.41 cka-wk-1 <none> <none>
pod/deployment-app-one-779f8fcc48-zsfvb 1/1 Running 0 6m31s 192.168.166.103 cka-wk-3 <none> <none>
The created Horizontal Pod Autoscaler modifies the Deployment to the minimum value it has and will be amending it upon the CPU utilisation grow.
Step #1.5. Create Daemon Set
The second application for the first tenant will be created a Daemon Set. The main difference of it to the deployment is that Daemon Set creates a single copy of each Pod at every node in the Kubernetes cluster, which is a useful approach if you create such application is logging, or routing for the Kubernetes itself.
As we already have a Deployment manifest, we simply copy and modify it per the Kubernetes API reference:
2
3
4
5
6
7
8
9
10
11
12
13
14
15
16
17
18
19
20
21
22
23
24
25
26
27
28
29
30
31
32
33
34
35
36
37
38
39
40
41
42
43
44
45
46
47
$ cat cust-one/daemon-set.yaml
apiVersion: apps/v1
kind: DaemonSet
metadata:
labels:
app: daemon-set-app-two
name: daemon-set-app-two
namespace: cust-one
spec:
selector:
matchLabels:
app: daemon-set-app-two
template:
metadata:
labels:
app: daemon-set-app-two
spec:
containers:
- image: nginx:1.22.1
name: nginx
resources:
requests:
cpu: 0.125
memory: 128Mi
limits:
cpu: 0.25
memory: 256Mi
ports:
- containerPort: 80
protocol: TCP
volumeMounts:
- name: index-html
mountPath: /usr/share/nginx/html
volumes:
- name: index-html
configMap:
name: config-map-app-two
items:
- key: index.html
path: index.html
$ kubectl apply -f cust-one/daemon-set.yaml
daemonset.apps/daemon-set-app-two created
Ultimately, besides chaning the name and labels, we have done only 2 modifications:
- We changed the “kind” key to be DaemonSet instead of Deployment.
- We removed “replicas” key from the “.spec” path.
Check what resources were created:
2
3
4
5
6
7
8
9
10
11
NAME DESIRED CURRENT READY UP-TO-DATE AVAILABLE NODE SELECTOR AGE CONTAINERS IMAGES SELECTOR LABELS
daemonset.apps/daemon-set-app-two 3 3 3 3 3 <none> 4m49s nginx nginx:1.22.1 app=daemon-set-app-two app=daemon-set-app-two
NAME CONTROLLER REVISION AGE LABELS
controllerrevision.apps/daemon-set-app-two-5f48bf97bb daemonset.apps/daemon-set-app-two 1 4m49s app=daemon-set-app-two,controller-revision-hash=5f48bf97bb
NAME READY STATUS RESTARTS AGE IP NODE NOMINATED NODE READINESS GATES LABELS
pod/daemon-set-app-two-qk5zx 1/1 Running 0 4m49s 192.168.214.42 cka-wk-1 <none> <none> app=daemon-set-app-two,controller-revision-hash=5f48bf97bb,pod-template-generation=1
pod/daemon-set-app-two-r6ksc 1/1 Running 0 4m49s 192.168.166.104 cka-wk-3 <none> <none> app=daemon-set-app-two,controller-revision-hash=5f48bf97bb,pod-template-generation=1
pod/daemon-set-app-two-vr49c 1/1 Running 0 4m49s 192.168.223.109 cka-wk-2 <none> <none> app=daemon-set-app-two,controller-revision-hash=5f48bf97bb,pod-template-generation=1
As you see, there are 3 Pods created, though we haven’t specified that explicitly. The amount of the Pods in the Daemon Set is equal to the amount of Nodes in the Kubernetes cluster, where it is possible to schedule Pods (by default, it is the amount of the worker nodes):
2
3
4
5
6
7
8
9
10
11
12
13
Name: cka-cp-1
Taints: node-role.kubernetes.io/control-plane:NoSchedule
Name: cka-cp-2
Taints: node-role.kubernetes.io/control-plane:NoSchedule
Name: cka-cp-3
Taints: node-role.kubernetes.io/control-plane:NoSchedule
Name: cka-wk-1
Taints: <none>
Name: cka-wk-2
Taints: <none>
Name: cka-wk-3
Taints: <none>
Step #1.6. Create Services
Alright, Now we have three applications deployed across two customers and it is a time to expose them. Term “expose” means that our it will be possible to reach application running on the created Pods via an FQDN and IP address inside the Kubernetes cluster (e.g., between apps) or using IP address and custom port from outside the Kuberentes cluster. Pods are exposed via another Kubernetes primitive called Service. There are four main times (we will use three of them):
- Cluster IP – default type of the service, where the service got FQDN from internal DNS and IP reachable inside the Kubernetes cluster. By default, you cannot reach service having Cluster IP type unless the network plugin (we use Calico) announces cluster IP range to the data centre fabric.
- Node Port – in additon to what is done in Cluster IP, the published port is associated with randobly picked up port which is NATed to the node IP address. To be specified, it is being NATed to IP address of EVERY Kubernetes node in your cluster.
- Load Balancer – addition to what is done in Node Port, Kubernetes attempts to request external load balancer (if it is configured) to allocate the additional IP address for the exposed Service. In our case, we don’t have this integration and the Service will stay in the Pending state. However, it won’t disturb us to access it via the publshed port in the same way as in Node Port option.
Using the kubectl expose, it is possible to directly publish Deployment, but not the Daemon Set; hence, we generate config file using it:
2
3
4
5
6
7
8
9
10
11
12
13
14
15
16
17
18
19
20
21
22
23
24
25
26
$ cat cust-one/service-ap-one.yaml
apiVersion: v1
kind: Service
metadata:
creationTimestamp: null
labels:
app: deployment-app-one
name: app-one-svc
namespace: cust-one
spec:
ports:
- port: 80
protocol: TCP
targetPort: 80
selector:
app: deployment-app-one
type: ClusterIP
status:
loadBalancer: {}
$ kubectl apply -f cust-one/service-ap-one.yaml
service/app-one-svc created
Despite in the kubectl expose command you provide the name of the Deployment you are to expose, you don’t see any such key once you check the content of the generated file. The bundling of the service to the Pod (we ultimately need to deliver traffic to Containers in Pod, not the Deployment itself) is acheived via the “.spec.selector” key: all the labels specified there shall match the key “.metadata.labels” insoide the target Pod. Thus, the kubectl expose simply generates the selector key properly.
Let’s validate, what was created:
2
3
4
5
6
7
8
9
10
11
NAME TYPE CLUSTER-IP EXTERNAL-IP PORT(S) AGE SELECTOR
service/app-one-svc ClusterIP 10.96.250.237 <none> 80/TCP 5m18s app=deployment-app-one
NAME ENDPOINTS AGE
endpoints/app-one-svc 192.168.166.102:80,192.168.214.40:80,192.168.223.107:80 5m18s
NAME READY STATUS RESTARTS AGE IP NODE NOMINATED NODE READINESS GATES
pod/deployment-app-one-779f8fcc48-7tcbf 1/1 Running 0 65m 192.168.166.102 cka-wk-3 <none> <none>
pod/deployment-app-one-779f8fcc48-gvx4q 1/1 Running 0 65m 192.168.214.40 cka-wk-1 <none> <none>
pod/deployment-app-one-779f8fcc48-x26t2 1/1 Running 0 65m 192.168.223.107 cka-wk-2 <none> <none>
We manage the Service controller, which in its turn creates another Kubernetes primitive named Endpoint, which is responsible to identifies Pods IP and map them with “.spec.ports[].targetPort” from the Service.
At this point, the created Service allow to drive traffic from any node in Kubernetes cluster towards the application via the created ClusterIP:
2
3
4
5
6
7
8
9
<html>
<head>
<title>Kubernetes at Karneliuk</title>
</head>
<body>
<p>This is App One for Cust One</p>
</body>
</html>
More checks will follow below.
Now, we will copy the created file and we will change its type to be NodePort and labels to match the Pods created by the Daemon Set:
2
3
4
5
6
7
8
9
10
11
12
13
14
15
16
17
18
19
20
21
22
23
24
$ cat cust-one/service-app-two.yaml
apiVersion: v1
kind: Service
metadata:
creationTimestamp: null
labels:
app: daemon-set-app-two <--changed
name: app-two-svc <--changed
namespace: cust-one
spec:
ports:
- port: 80
protocol: TCP
targetPort: 80
selector:
app: daemon-set-app-two <--changed
type: NodePort <--changed
$ kubectl apply -f cust-one/service-app-two.yaml
service/app-two-svc created
If you put the label properly, you shall see the Service and Endpoints created appropriately:
2
3
4
5
6
7
8
9
10
11
NAME TYPE CLUSTER-IP EXTERNAL-IP PORT(S) AGE SELECTOR
service/app-two-svc NodePort 10.110.144.237 <none> 80:31946/TCP 45s app=daemon-set-app-two
NAME ENDPOINTS AGE
endpoints/app-two-svc 192.168.166.104:80,192.168.214.42:80,192.168.223.109:80 44s
NAME READY STATUS RESTARTS AGE IP NODE NOMINATED NODE READINESS GATES
pod/daemon-set-app-two-qk5zx 1/1 Running 0 41m 192.168.214.42 cka-wk-1 <none> <none>
pod/daemon-set-app-two-r6ksc 1/1 Running 0 41m 192.168.166.104 cka-wk-3 <none> <none>
pod/daemon-set-app-two-vr49c 1/1 Running 0 41m 192.168.223.109 cka-wk-2 <none> <none>
More validations will be provied later
For the third service, change the type to load balancer, labels/selector, and namespace:
2
3
4
5
6
7
8
9
10
11
12
13
14
15
16
17
18
19
20
21
22
23
24
25
26
27
28
29
30
31
32
33
34
35
36
apiVersion: v1
kind: Service
metadata:
creationTimestamp: null
labels:
app: deployment-app-one
name: app-one-svc
namespace: cust-two
spec:
ports:
- port: 80
protocol: TCP
targetPort: 80
selector:
app: deployment-app-one
type: LoadBalancer
status:
loadBalancer: {}
$ kubectl apply -f cust-two/service-app-one.yaml
service/app-one-svc created
$ kubectl -n cust-two get service,endpoints,pods -o wide
NAME TYPE CLUSTER-IP EXTERNAL-IP PORT(S) AGE SELECTOR
service/app-one-svc LoadBalancer 10.111.207.182 <pending> 80:32761/TCP 12s app=deployment-app-one
NAME ENDPOINTS AGE
endpoints/app-one-svc 192.168.166.103:80,192.168.214.41:80,192.168.223.108:80 12s
NAME READY STATUS RESTARTS AGE IP NODE NOMINATED NODE READINESS GATES
pod/deployment-app-one-779f8fcc48-fkzdc 1/1 Running 0 61m 192.168.223.108 cka-wk-2 <none> <none>
pod/deployment-app-one-779f8fcc48-sd67q 1/1 Running 0 69m 192.168.214.41 cka-wk-1 <none> <none>
pod/deployment-app-one-779f8fcc48-zsfvb 1/1 Running 0 61m 192.168.166.103 cka-wk-3 <none> <none>
Step #1.7. Install Ingress Controller
In general, we could have already stopped at this stage, as the applications are already deployed using different primitives and exposed for a usage. However, there is one more important pieces, particularly important for web-applications: What if you have multiple web services running on the same IP address, which is often the case for the public hosting? So we are ultimately talking about the possibility to look into packet payload, namely in the HTTP headers to find the Host field with the corresponding URL and to make a decision to which Pod traffic to forward based on this information. This is generally the job of the L7 load balancers or reverse proxies. In Kubernetes world, this functionality is available via Ingress and Ingress Controllers. One of the most popular free Ingress Controllers worldwide is NGINX; moreover, it is a single in-house on-prem Ingress Controller in Kubernetes, so we would us it.
Despite we use term in-house, it is not installed as part of the Kubernetes and you need to do it.
Using the official documentation, it is very easy:
2
3
4
5
6
7
8
9
10
11
12
13
14
15
16
17
18
19
20
21
22
23
24
$ kubectl apply -f deploy.yaml
------------------------------------------------------------------
namespace/ingress-nginx created
serviceaccount/ingress-nginx created
serviceaccount/ingress-nginx-admission created
role.rbac.authorization.k8s.io/ingress-nginx created
role.rbac.authorization.k8s.io/ingress-nginx-admission created
clusterrole.rbac.authorization.k8s.io/ingress-nginx created
clusterrole.rbac.authorization.k8s.io/ingress-nginx-admission created
rolebinding.rbac.authorization.k8s.io/ingress-nginx created
rolebinding.rbac.authorization.k8s.io/ingress-nginx-admission created
clusterrolebinding.rbac.authorization.k8s.io/ingress-nginx created
clusterrolebinding.rbac.authorization.k8s.io/ingress-nginx-admission created
configmap/ingress-nginx-controller created
service/ingress-nginx-controller created
service/ingress-nginx-controller-admission created
deployment.apps/ingress-nginx-controller created
job.batch/ingress-nginx-admission-create created
job.batch/ingress-nginx-admission-patch created
ingressclass.networking.k8s.io/nginx created
validatingwebhookconfiguration.admissionregistration.k8s.io/ingress-nginx-admission created
Before jumping further, scroll up until the topoligy picture of our Lab. You will see that Ingress Controller is simply yet another application running on top of the Kubernetes:
- it has its own namespace
- it has two deployments
- It has two pods created by deployments
- It has its service created and mapped to the pods
2
3
4
5
6
7
8
9
10
11
12
13
14
15
16
17
18
19
------------------------------------------------------------------
NAME READY UP-TO-DATE AVAILABLE AGE
deployment.apps/ingress-nginx-controller 3/3 3 3 21m
NAME READY STATUS RESTARTS AGE
pod/ingress-nginx-admission-create-8nh92 0/1 Completed 0 21m
pod/ingress-nginx-admission-patch-72gcq 0/1 Completed 1 21m
pod/ingress-nginx-controller-7844b9db77-55f96 1/1 Running 0 11m
pod/ingress-nginx-controller-7844b9db77-6htl4 1/1 Running 0 21m
pod/ingress-nginx-controller-7844b9db77-b2bxk 1/1 Running 0 11m
NAME TYPE CLUSTER-IP EXTERNAL-IP PORT(S) AGE
service/ingress-nginx-controller LoadBalancer 10.98.70.161 <pending> 80:32433/TCP,443:31274/TCP 21m
service/ingress-nginx-controller-admission ClusterIP 10.104.8.135 <none> 443/TCP 21m
NAME ENDPOINTS AGE
endpoints/ingress-nginx-controller 192.168.166.89:443,192.168.214.28:443,192.168.223.94:443 + 3 more... 21m
endpoints/ingress-nginx-controller-admission 192.168.166.89:8443,192.168.214.28:8443,192.168.223.94:8443 21m
The added value of the Ingress is that it creates a few new resoruces inside the Kubernetes, which allows via Kubernetes primitives to manage, in fact, this containerized and shared across all namespaces reverse proxy by NGINX.
The key created resource is IngressClass, which is not-namespaced resource:
2
3
4
5
6
7
8
9
10
11
12
13
14
15
NAME CONTROLLER PARAMETERS AGE
nginx k8s.io/ingress-nginx <none> 15d
$ kubectl describe ingressclasses.networking.k8s.io nginx
Name: nginx
Labels: app.kubernetes.io/component=controller
app.kubernetes.io/instance=ingress-nginx
app.kubernetes.io/name=ingress-nginx
app.kubernetes.io/part-of=ingress-nginx
app.kubernetes.io/version=1.4.0
Annotations: <none>
Controller: k8s.io/ingress-nginx
Events: <none>
Despite it doesn’t have inside a lot of information, it is a key as it is signalled to the Ingress high-level API, which will in its turn know what to do that (e.g., how to convert it is in the NGINX config).
Step #1.8. Create Ingress (Rules)
The usage of the Ingress Controller is abstracted via Ingress primitive. In short, it allows you to define the URL, as loose or as specific as you want, and send the traffic towards the specific created Service.
Think about the following workflow:
- All the traffic is coming to the IP address or FQDN of the Service associated with the Ingress Controller.
- The HTTP headers are analyzed and based on the Host header the traffic is sent to the desired Service, which in its turn routes traffic to destination Pods.
Important: Ingress is created inside the user namespace, not in the namespace, where Ingress Controller resides, as typically users don’t have permissions to access the latter.
Following the official documentation, let’s create an Ingress for the first app (we may have multiple rules per one Ingress or one rule per Ingress, choose what is better for you):
2
3
4
5
6
7
8
9
10
11
12
13
14
15
16
17
18
19
20
21
22
23
24
---
apiVersion: networking.k8s.io/v1
kind: Ingress
metadata:
name: ingress-rules-app-one
namespace: cust-one
spec:
ingressClassName: nginx
rules:
- host: cool-lab.dev
http:
paths:
- path: /
pathType: Prefix
backend:
service:
name: app-one-svc
port:
number: 80
$ kubectl apply -f cust-one/ingress-app-one.yaml
ingress.networking.k8s.io/ingress-rules-app-one created
Validate that the Ingress is create accurately:
2
3
4
5
6
7
8
9
10
11
12
13
14
15
16
17
18
19
Name: ingress-rules-app-one
Labels: <none>
Namespace: cust-one
Address:
Ingress Class: nginx
Default backend: <default>
Rules:
Host Path Backends
---- ---- --------
cool-lab.dev
/ app-one-svc:80 (192.168.166.102:80,192.168.214.40:80,192.168.223.107:80)
Annotations: <none>
Events:
Type Reason Age From Message
---- ------ ---- ---- -------
Normal Sync 2m24s nginx-ingress-controller Scheduled for sync
Normal Sync 2m24s nginx-ingress-controller Scheduled for sync
Normal Sync 2m24s nginx-ingress-controller Scheduled for sync
This validation gives you a clear view, where traffic will be routed (to which Service and to which Endpoints). Quick test to check that you can reach your Application via Ingress if you specify the correct HTTP Host header (and cannot do so without it):
2
3
4
5
6
7
8
9
10
11
12
13
14
15
16
17
18
19
20
21
22
23
24
25
NAME TYPE CLUSTER-IP EXTERNAL-IP PORT(S) AGE
ingress-nginx-controller LoadBalancer 10.98.70.161 <pending> 80:32433/TCP,443:31274/TCP 15d
ingress-nginx-controller-admission ClusterIP 10.104.8.135 <none> 443/TCP 15d
$ curl http://10.98.70.161
<html>
<head><title>404 Not Found</title></head>
<body>
<center><h1>404 Not Found</h1></center>
<hr><center>nginx</center>
</body>
</html>
$ curl http://10.98.70.161 -H "Host: cool-lab.dev"
<html>
<head>
<title>Kubernetes at Karneliuk</title>
</head>
<body>
<p>This is App One for Cust One</p>
</body>
</html>
Apply the similar configuration to your two more applications per the following table:
| URL | Target namespace | Target service | Target port |
|---|---|---|---|
| cool-lab.dev | cust-one | app-one-svc | 80 |
| another-site.com | cust-one | app-two-svc | 80 |
| top-scorer.org | cust-two | app-one-svc | 80 |
2. Verification
After the extensive build of our application, it is crucial to validate that our build is working as we expect. We will park the failover and rolling upgrades for now and we’ll test the connectivity. First of all, get all the services:
2
3
4
5
6
7
8
9
NAMESPACE NAME TYPE CLUSTER-IP EXTERNAL-IP PORT(S) AGE
cust-one app-one-svc ClusterIP 10.96.250.237 <none> 80/TCP 65m
cust-one app-two-svc NodePort 10.110.144.237 <none> 80:31946/TCP 52m
cust-two app-one-svc LoadBalancer 10.111.207.182 <pending> 80:32761/TCP 48m
default kubernetes ClusterIP 10.96.0.1 <none> 443/TCP 35d
ingress-nginx ingress-nginx-controller LoadBalancer 10.98.70.161 <pending> 80:32433/TCP,443:31274/TCP 15d
ingress-nginx ingress-nginx-controller-admission ClusterIP 10.104.8.135 <none> 443/TCP 15d
kube-system kube-dns ClusterIP 10.96.0.10 <none> 53/UDP,53/TCP,9153/TCP 35d
Step #2.1. Connect between Services From Inside the Kubernetes Cluster
Inside the cluster you can access any other service either via ClusterIP or the FQDN in the format service-name.namespace-name:
From a Pod in any namespace to all the services
2
3
4
5
6
7
8
9
10
11
12
13
14
15
16
17
18
19
20
21
22
23
24
25
26
27
28
29
30
31
32
33
34
35
36
37
38
39
40
41
42
43
44
45
46
47
48
49
50
51
52
NAME READY STATUS RESTARTS AGE
daemon-set-app-two-qk5zx 1/1 Running 0 92m
daemon-set-app-two-r6ksc 1/1 Running 0 92m
daemon-set-app-two-vr49c 1/1 Running 0 92m
deployment-app-one-779f8fcc48-7tcbf 1/1 Running 0 125m
deployment-app-one-779f8fcc48-gvx4q 1/1 Running 0 125m
deployment-app-one-779f8fcc48-x26t2 1/1 Running 0 125m
$ kubectl exec -it -n cust-one pods/deployment-app-one-779f8fcc48-7tcbf -- bash -c "curl http://10.96.250.237"
<html>
<head>
<title>Kubernetes at Karneliuk</title>
</head>
<body>
<p>This is App One for Cust One</p>
</body>
</html>
$ kubectl exec -it -n cust-one pods/deployment-app-one-779f8fcc48-7tcbf -- bash -c "curl http://app-one-svc.cust-one"
<html>
<head>
<title>Kubernetes at Karneliuk</title>
</head>
<body>
<p>This is App One for Cust One</p>
</body>
</html>
$ kubectl exec -it -n cust-one pods/deployment-app-one-779f8fcc48-7tcbf -- bash -c "curl http://10.111.207.182"
<html>
<head>
<title>Kubernetes at Karneliuk</title>
</head>
<body>
<p>This is App One for Cust Two</p>
</body>
</html>
$ kubectl exec -it -n cust-one pods/deployment-app-one-779f8fcc48-7tcbf -- bash -c "curl http://app-one-svc.cust-two"
<html>
<head>
<title>Kubernetes at Karneliuk</title>
</head>
<body>
<p>This is App One for Cust Two</p>
</body>
</html>
Step #2.2. Connect to the Services From Outside the Kubernetes Cluster
By default, from outside of the Kubernetes Cluster you can access only Pods, which are exposed via LoadBalancer or NodePort:
2
3
4
5
6
7
8
9
10
11
12
13
14
15
16
17
18
19
20
<html>
<head>
<title>Kubernetes at Karneliuk</title>
</head>
<body>
<p>This is App Two for Cust One</p>
</body>
</html>
$ curl http://192.168.51.83:32761
<html>
<head>
<title>Kubernetes at Karneliuk</title>
</head>
<body>
<p>This is App One for Cust Two</p>
</body>
</html>
Step #2.3. Connect to URLs via Ingress From Inside the Kubernetes Cluster
To access the websites internally, you shall perform the steps similar to Step 2.1, but as the target ClusterIP or FQDN provide tha address of the Service assocaited with the Ingress Controller. Don’t forget to add Host header:
2
3
4
5
6
7
8
9
10
11
12
13
14
15
16
17
18
19
20
<html>
<head>
<title>Kubernetes at Karneliuk</title>
</head>
<body>
<p>This is App One for Cust One</p>
</body>
</html>
$ kubectl -n cust-two exec -it pods/deployment-app-one-779f8fcc48-fkzdc -- bash -c "curl http://ingress-nginx-controller.ingress-nginx -H 'Host: another-site.com'"
<html>
<head>
<title>Kubernetes at Karneliuk</title>
</head>
<body>
<p>This is App Two for Cust One</p>
</body>
</html>
Step #2.4. Connect to URLs via Ingress From Outside the Kubernetes Cluster
The final test is to evaluate how you can achieve the application via Ingress from outside the Kubernetes cluster. The Service type for it by default is Load Balancer, what allow us to reach it via the published port:
2
3
4
5
6
7
8
9
10
11
12
13
14
15
NAME TYPE CLUSTER-IP EXTERNAL-IP PORT(S) AGE
ingress-nginx-controller LoadBalancer 10.98.70.161 <pending> 80:32433/TCP,443:31274/TCP 15d
ingress-nginx-controller-admission ClusterIP 10.104.8.135 <none> 443/TCP 15d
$ curl http://192.168.51.81:32433 -H "Host: top-scorer.org"
<html>
<head>
<title>Kubernetes at Karneliuk</title>
</head>
<body>
<p>This is App One for Cust Two</p>
</body>
</html>
All the connectivity checks are completed.
GitHub Repository
Get all the Kubernetes manifests used in this lab in our GitHub repository.
Lessons Learned
The main lessons learned for us was about structuring the knowledge we have recently obtained during prepration to CKA and putting them altogether to create a holistic view.
Summary
This blogpost spans a lot of different moving pieces in the Kubernetes. However, we intetionally put it altogether to show you how primitive depends on others, whilst itself being consumed by others. This breakdown of the building blocks of infrastructure into smaller pieces is in general commong for all cloud systems (Kubernets, OpenStack, AWS/GCP) as it provides high flexibility of deployment and great control over the infrastructure. Take care and good bye!
Need Help? Contract Us
If you need a trusted and experienced partner to automate your network and IT infrastructure, get in touch with us.
P.S.
If you have further questions or you need help with your networks, we are happy to assist you, just send us a message. Also don’t forget to share the article on your social media, if you like it.
BR,
Anton Karneliuk