

Hello my friend,
In one of the past blogposts we have highlighted the journey for automation for engineers, who is willing to develop further outside of their core remit, such as networking, compute, or storage. In today’s blogpost we’ll provide some of examples how the different moving pieces are coming along together.
2
3
4
5
retrieval system, or transmitted in any form or by any
means, electronic, mechanical or photocopying, recording,
or otherwise, for commercial purposes without the
prior permission of the author.
Do I Need to Learn Network Automation?
Yes, you do. Start today with our Network Automation Training programs:
We offer the following training programs for you:
- Zero-to-Hero Network Automation Training
- High-scale automation with Nornir
- Ansible Automation Orchestration with Ansble Tower / AWX
- Expert-level training: Closed-loop Automation and Next-generation Monitoring
During these trainings you will learn the following topics:
- Success and failure strategies to build the automation tools.
- Principles of software developments and the most useful and convenient tools.
- Data encoding (free-text, XML, JSON, YAML, Protobuf).
- Model-driven network automation with YANG, NETCONF, RESTCONF, GNMI.
- Full configuration templating with Jinja2 based on the source of truth (NetBox).
- Best programming languages (Python, Bash) for developing automation
- The most rock-solid and functional tools for configuration management (Ansible) and Python-based automation frameworks (Nornir).
- Network automation infrastructure (Linux, Linux networking, KVM, Docker).
- Orchestration of automation workflows with AWX and its integration with NetBox, GitHub, as well as custom execution environments for better scalability.
- Collection network data via SNMP and streaming telemetry with Prometheus
- Building API gateways with Python leveraging Fast API
- Integration of alerting with Slack and your own APIs
- … and many more
Moreover, we put all mentions technologies in the context of real use cases, which our team has solved and are solving in various projects in the service providers, enterprise and data centre networks and systems across the Europe and USA. That gives you opportunity to ask questions to understand the solutions in-depts and have discussions about your own projects. And on top of that, each technology is provided with online demos and labs to master your skills thoroughly. Such a mixture creates a unique learning environment, which all students value so much. Join us and unleash your potential.
Brief Description
The automation and cloud universes is ever growing. However, the core concepts of it stays generally the same:
- API in whatever possible form (SOAP/XMP, REST API/JSON, gRPC/Protobuf).
- Backend doing certain actions based on API calls, such us creating resources, using them and, finally releasing them.
- API client, which is requesting action to be done at the backend.
Obviously, this is very VERY simplified description, but it is also very useful to understand the differences between what different automation tools are doing. In today’s blogpost we will use 3x API clients:
| Tool | URL | Purpose |
|---|---|---|
| Azure CLI | https://learn.microsoft.com/en-us/cli/azure/ | The Microsoft developed CLI client to interact with Azure API to perform all the possible actions (create, consume, delete) all the resources, etc |
| Terraform | https://www.terraform.io/ | One the most popular tools worldwide for Infrastructure as Code (IaC) approach. Shines at most when dealing with public clouds (e.g., Azure, GCP, AWS) and private clouds (e.g., OpenStack) |
| Kubectl | https://kubernetes.io/docs/reference/kubectl/ | The official tool to manage Kubernetes clusters (both Kubernetes related infrastructure and application details) |
These API clients will be interacting with two APIs:
| API | Associated Clients | Purpose |
|---|---|---|
| Azure API | Azure CLI Terraform | Full lifecycle of the resources in Azure cloud (e.g., creating and modifying compute/storage/network resources, accessing them and releasing them when the are not needed anymore) |
| Kubernetes API | Kubectl Terraform* | Full lifecycle of the Kubernetes cluster (managing nodes, applications, deployments, services, storage, etc) excluding underlying infrastructure tasks (e.g, Kubernetes upgrade, etc). |
Terraform can manage Kubernetes Cloud as well, but we believe Kubectl and/or Helm is better suitable for this task.
Finally, these APIs are interconnected with Backends:
| Platform/Backend | Associated API | Purpose |
|---|---|---|
| Azure Cloud | Azure API | The Microsoft Cloud platform, which provides all the possible services, which typical public cloud provides: compute, storage and networking. On top of that, it provides a huge amount of other related products, such as Active Directory, purpose build Kubernetes clusters and many others. |
| Kubernetes | Kubernetes API | The most popular container orchestration platform, which is the de-facto standard for cloud-native applications |
Earlier we have shared how to create your own Kubernetes cluster on top of VMs, which is also applicable for bare metal servers. This the approach we typically follow, when we build the Kubernetes on-premises (in our own data centers). When we build the Kubernetes cluster in public clouds, we have possibility to benefit from purpose built products, such as Azure Kubernetes Services (AKS), Google Kubernetes Engine (GKE), and Amazon Elastic Kubernetes Services (EKS). One the major benefit, as it said in the marketing materials, is the possibility scale out indefinitely… as long as you can afford to pay the bills.
You can point though the limit beyond which your cluster shall NOT be scaled to avoid getting bankrupt.
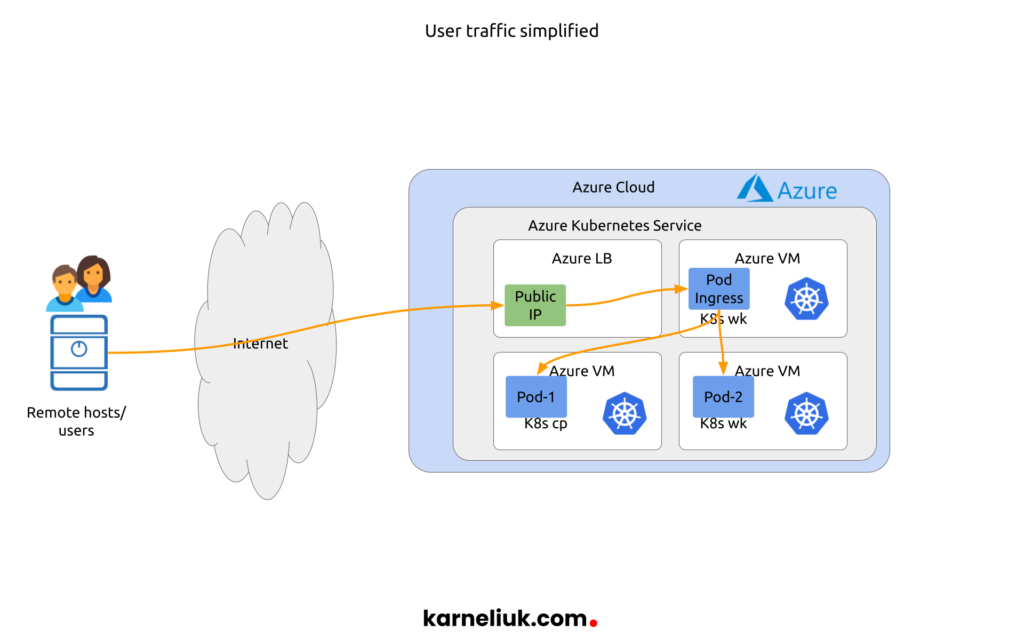
So, we decided to test how all this concept works. Let’s visualize all things together:


Despite this visualization is somewhat simplified, it brings together a holistic view in terms of which client is interacting with which API and for which purpose.
Lab Objectives
Based on what we have so far described above, let’s put together the plan for building the Kubernetes cluster and publishing the cloud native application on top of Azure Kubernetes Services (AKS):
- Authorize yourself with Azure CLI to permit Terraform to interact with Azure API.
- Using Terraform, deploy a Kubernetes cluster with certain amount of CPU/RAM memory and load balancer.
- Using kubectl, deploy a cloud-native user application in the created Kubernetes cluster.
At the end of the lab we should have the fully working application on top of our cloud infrastructure.
Solution
Step 1. Authenticate with Azure CLI against Azure API
Strictly speaking, this step may be excessive in certain scenarios. There are two ways how Terraform can communicate with Azure API:
- If you don’t have Service Principle created, you need to login first of all yourself to Azure using Azure CLI. Afterwards, Terraform will be able to work on top of the created communication session.
- If you create Service Principle, you don’t have authenticate yourself with Azure CLI; instead, Terraform will be using those credentials each time you interact with Azure API (e.g., when you do terraform apply or terraform plan).
However, to create Service Principle uzing Azure CLI, you still have to login to Azure Cloud first, unless you create the user via API.
So first thing first, you need to install the Azure CLI. We use Ubuntu Linux as our automation host, so we are looking for the documentation for this Linux distribution:
2
3
4
5
$ curl -sL https://packages.microsoft.com/keys/microsoft.asc |
sudo gpg --dearmor | tee /etc/apt/trusted.gpg.d/microsoft.gpg > /dev/null
$ sudo apt-get update -y
$ sudo apt-get install azure-cli
If all worked well, you shall be able to see the version of the installed tool:
2
3
4
5
6
7
{
"azure-cli": "2.43.0",
"azure-cli-core": "2.43.0",
"azure-cli-telemetry": "1.0.8",
"extensions": {}
}
Once the Azure CLI is installed, simply login to the the Azure Cloud:
2
To sign in, use a web browser to open the page https://microsoft.com/devicelogin and enter the code ******** to authenticate.
Open the URL, which you’ve got on CLI and provide there the code. You need to be already logged into the Azure in browser, or you will be asked to login first and then to authenticate the request. Once you approve it, you will get in your CLI the similar response:
2
3
4
5
6
7
8
9
10
11
12
13
14
15
16
{
"cloudName": "AzureCloud",
"homeTenantId": "********",
"id": "********",
"isDefault": true,
"managedByTenants": [],
"name": "Azure subscription 1",
"state": "Enabled",
"tenantId": "********",
"user": {
"name": "********",
"type": "user"
}
}
]
That would be mean that you are successfully authenticated and is able to start using Terraform.
Step 2. Create Service Principle
Create a service principle, which we later will use within the Azure Kubernetes Services (AKS) cluster. You can though use it for authentication in Terraform as well:
There are multiple ways, which authentication setup: password, certificates, etc. Check details in the official documentation.
Save the output somewhere, as you won’t be able to see the password anymore. If you forget it, you will have to re-create credentials.
Step 3. Install Terraform
It is expected that you already have some experience with Terraform; though, it is not essential
Following the official Terraform documentation, we install Terraform on Ubuntu Linux:
2
3
4
5
6
7
8
9
$ wget -O- https://apt.releases.hashicorp.com/gpg | \
sudo gpg --dearmor | sudo tee /usr/share/keyrings/hashicorp-archive-keyring.gpg
$ sudo gpg --no-default-keyring \
--keyring /usr/share/keyrings/hashicorp-archive-keyring.gpg \
--fingerprint
$ echo "deb [signed-by=/usr/share/keyrings/hashicorp-archive-keyring.gpg] \
https://apt.releases.hashicorp.com $(lsb_release -cs) main" | tee /etc/apt/sources.list.d/hashicorp.list
$ apt-get install terraform -y
Ensure you check the latest official documentation, if some steps aren’t working. This is all subject for change
Once the Terraform is installed, you shall be able to see its details:
2
3
Terraform v1.3.6
on linux_amd64
Step 4. Prepare Files for Terraform
Terraform uses its own syntax called HCL, what stands for Hashicorp Configuration Langauge. Therefore, to be able to deploy anything Terraform, you need to prepare a bunch of files containing various pieces of information. In our case, we will create 5 files:
| Filename | Purpose |
|---|---|
| providers.tf | This file contains the definition of the Terraform provider, which we are to use in this automation. If you are familiar with Ansible, you can think about Terraform provider as a collection you install from Ansible galaxy, which is in essence the code to interact with the particular backend API. |
| variables.tf | This file contains the definition of all variables, which we are to use in this in our configuration. The definition includes the name of the variable, associated data type and, if defined, the default value for the variable |
| outputs.tf | This file describes all possible associated outputs we may retrieve after the execution of our Terraform operations. |
| main.tf | This file contains the actual logic, which our Terraform is to execute; or, in other words, the declaration of the end state of our infrastructure, which we want to have. |
| terraform.tfvars | This file, if created, stores the values for variables defined earlier in variables.tf. Whilst all previous files are typically committed to your version control system (e.g., GitHub), this file is never committed as it may store sensitive data |
Let’s take a closer look into the content of each file.
Step 4.1. Providers.tf
The content of the file is the following:
2
3
4
5
6
7
8
9
10
11
12
13
14
required_version = ">=1.0"
required_providers {
azurerm = {
source = "hashicorp/azurerm"
version = "~>3.0"
}
}
}
provider "azurerm" {
features {}
}
This file has information about which provider is to be installed in order for other files to work. As you probably can depict from the name, we use azurerm provider created by Hashicorp with the version more than or equal to 3.0, whilst the version of Terraform itself shall be at least 1.0.
Here you can find the full list of available providers.
Step 4.2. Variables.tf
The content is the following:
2
3
4
5
6
7
8
9
10
11
12
13
14
15
16
17
18
19
20
21
22
23
24
25
26
27
28
29
30
31
32
33
34
35
36
37
38
39
40
41
42
43
44
45
type = number
default = 1
}
variable "agent_sku" {
type = string
}
variable "admin_username" {
type = string
}
variable "aks_service_principal_app_id" {
type = string
}
variable "aks_service_principal_client_secret" {
type = string
}
variable "cluster_name" {
type = string
default = "k8s-on-aks"
}
variable "dns_prefix" {
type = string
default = "k8s-on-aks"
}
variable "resource_group_location" {
type = string
description = "Location of the resource group."
}
variable "resource_group_name" {
type = string
description = "Resource Group dedicated for AKS."
}
variable "ssh_public_key" {
type = string
default = "./ssh-pub.key"
}
You see there a number of variables, which we are to use in this Terraform application: some of them have default values, some don’t. Those, which don’t have default values, must be explicitly specified in the terraform.tfvars or provided as key-value pairs, when you run Terraform.
You may also here that we provide a path for SSH key. Follow the official guide how to generate the SSH key, if you are not familiar.
Step 4.3. Outputs.tf
The content of the file is the following:
2
3
4
5
6
7
8
9
10
11
12
13
14
15
16
17
18
19
20
21
22
23
24
25
26
27
28
29
30
31
32
33
34
value = azurerm_kubernetes_cluster.k8s.kube_config[0].client_certificate
sensitive = true
}
output "client_key" {
value = azurerm_kubernetes_cluster.k8s.kube_config[0].client_key
sensitive = true
}
output "cluster_ca_certificate" {
value = azurerm_kubernetes_cluster.k8s.kube_config[0].cluster_ca_certificate
sensitive = true
}
output "cluster_password" {
value = azurerm_kubernetes_cluster.k8s.kube_config[0].password
sensitive = true
}
output "cluster_username" {
value = azurerm_kubernetes_cluster.k8s.kube_config[0].username
sensitive = true
}
output "host" {
value = azurerm_kubernetes_cluster.k8s.kube_config[0].host
sensitive = true
}
output "kube_config" {
value = azurerm_kubernetes_cluster.k8s.kube_config_raw
sensitive = true
}
This file contains the list of the variables, which we shall be able to retrieve after the Terraform execution.
Step 4.4. Main.tf
This is the key file as it contains the declartion for our infrastructure:
2
3
4
5
6
7
8
9
10
11
12
13
14
15
16
17
18
19
20
21
22
23
24
25
26
27
28
29
30
31
32
33
34
35
36
37
38
39
40
41
location = var.resource_group_location
name = var.resource_group_name
}
resource "azurerm_kubernetes_cluster" "k8s" {
location = azurerm_resource_group.rg.location
name = var.cluster_name
resource_group_name = azurerm_resource_group.rg.name
dns_prefix = var.dns_prefix
tags = {
Environment = "Development"
}
default_node_pool {
name = "k8snodepool"
vm_size = var.agent_sku
node_count = var.agent_count
}
linux_profile {
admin_username = var.admin_username
ssh_key {
key_data = file(var.ssh_public_key)
}
}
automatic_channel_upgrade = "patch"
network_profile {
network_plugin = "kubenet"
load_balancer_sku = "standard"
}
service_principal {
client_id = var.aks_service_principal_app_id
client_secret = var.aks_service_principal_client_secret
}
}
This file ensures we create two resources:
- Resource Group (think about it as OpenStack Project or Kubernetes Namespace), which is created using the variables we provide.
- Managed Azure Kubernetes Cluster. The cluster will:
- Consist of:
- var.agent_count amount of nodes (default to 1 based on variables.tf)
- nodes having spec var.agent_sku, which is the size of VM (there is no default value, so it will be provided in terraform.tfvars)
- Be located at azurerm_resource_group.rg.location data centre
- Belong to azurerm_resource_group.rg.name resource group.
- Use var.admin_username as super admin with SSH key from var.ssh_public_key.
- Use standard load balancer and kubenet network plugin for Kubernetes.
- Be using service principle var.aks_service_principal_app_id with the password var.aks_service_principal_client_secret for Kubernetes to interact with other services.
- Consist of:
Step 4.5. Terraform.tfvars
This is the last key file we need to create, as it will contain values for the variables we defined previously. In our scenario, it has the following content:
2
3
4
5
6
aks_service_principal_client_secret = "***"
resource_group_name = "karneliuk-rg"
resource_group_location = "eastus"
admin_username = "gigaadmin"
agent_sku = "Standard_B4ms"
Service principal app id and client secret are those you created at Step 2.
Important thing here is the sizing of your Kubernetes cluster. As you can see, you don’t specify directly CPU/RAM available in total. Instead, you specify the amount of VMs (agents, by default 1 as we defined) you would like to have in your cluster and the specification of these VMs (Standard_B4ms – 4c and 16GB RAM).
All available sizes and prices are available for you here.
Step 5. Create Kubernetes Cluster
By this point we have prepared all the files we would need to create our Kubernetes cluster at AKS. Let’s start gradually doing that. The last thing though we will mention, as we plan for scale (namely, we can have more than one Kubernetes cluster), we will rely on the concept of Terraform workspaces.
Therefore, first of all, let’s create a workspace for this deployment:
2
3
4
5
6
Created and switched to workspace "k8s-1"!
You're now on a new, empty workspace. Workspaces isolate their state,
so if you run "terraform plan" Terraform will not see any existing state
for this configuration.
Within the workspace, install the Terraform provider:
2
3
4
5
6
7
8
9
10
11
12
13
14
15
16
17
18
19
20
21
22
23
24
25
Initializing the backend...
Initializing provider plugins...
- Finding hashicorp/random versions matching "~> 3.0"...
- Finding hashicorp/azurerm versions matching "~> 3.0"...
- Installing hashicorp/random v3.4.3...
- Installed hashicorp/random v3.4.3 (signed by HashiCorp)
- Installing hashicorp/azurerm v3.35.0...
- Installed hashicorp/azurerm v3.35.0 (signed by HashiCorp)
Terraform has created a lock file .terraform.lock.hcl to record the provider
selections it made above. Include this file in your version control repository
so that Terraform can guarantee to make the same selections by default when
you run "terraform init" in the future.
Terraform has been successfully initialized!
You may now begin working with Terraform. Try running "terraform plan" to see
any changes that are required for your infrastructure. All Terraform commands
should now work.
If you ever set or change modules or backend configuration for Terraform,
rerun this command to reinitialize your working directory. If you forget, other
commands will detect it and remind you to do so if necessary.
Once the provider is installed, you can plan your application by running the following command:
You can add an optional argument to save the result of planning, but in our case we simply want to see how the created Kubernetes cluster MAY look like. The output will be similar to:
2
3
4
5
6
7
8
9
10
11
12
13
14
15
16
17
18
19
20
21
22
23
24
25
26
27
28
29
30
31
32
33
34
35
36
37
38
39
+ create
Terraform will perform the following actions:
# azurerm_kubernetes_cluster.k8s will be created
+ resource "azurerm_kubernetes_cluster" "k8s" {
+ automatic_channel_upgrade = "patch"
+ dns_prefix = "k8s-on-aks"
+ fqdn = (known after apply)
+ http_application_routing_zone_name = (known after apply)
+ id = (known after apply)
+ image_cleaner_enabled = false
+ image_cleaner_interval_hours = 48
+ kube_admin_config = (sensitive value)
+ kube_admin_config_raw = (sensitive value)
+ kube_config = (sensitive value)
+ kube_config_raw = (sensitive value)
+ kubernetes_version = (known after apply)
!
! OUTPUT IS TRUNCATED FOR BREVITY
!
# azurerm_resource_group.rg will be created
+ resource "azurerm_resource_group" "rg" {
+ id = (known after apply)
+ location = "eastus"
+ name = "karneliuk-rg"
}
Plan: 2 to add, 0 to change, 0 to destroy.
Changes to Outputs:
+ client_certificate = (sensitive value)
+ client_key = (sensitive value)
+ cluster_ca_certificate = (sensitive value)
+ cluster_password = (sensitive value)
+ cluster_username = (sensitive value)
+ host = (sensitive value)
+ kube_config = (sensitive value)
Review the provided output and, you are happy with the forecast results, deploy it for real:
You still have possibilities to stop the deployment, as you will be asked to confirm your intention:
2
3
4
5
6
7
!
Do you want to perform these actions in workspace "k8s-1"?
Terraform will perform the actions described above.
Only 'yes' will be accepted to approve.
Enter a value:
If you typed “yes”, Terraform will communicate to Azure API to perform the intended change:
2
3
4
5
6
7
8
9
10
11
12
13
14
15
16
17
18
19
20
21
22
23
24
25
26
27
28
29
30
31
32
33
34
35
36
37
38
azurerm_resource_group.rg: Creation complete after 1s [id=/subscriptions/********************/resourceGroups/karneliuk-rg]
azurerm_kubernetes_cluster.k8s: Creating...
azurerm_kubernetes_cluster.k8s: Still creating... [10s elapsed]
azurerm_kubernetes_cluster.k8s: Still creating... [20s elapsed]
azurerm_kubernetes_cluster.k8s: Still creating... [30s elapsed]
azurerm_kubernetes_cluster.k8s: Still creating... [40s elapsed]
azurerm_kubernetes_cluster.k8s: Still creating... [50s elapsed]
azurerm_kubernetes_cluster.k8s: Still creating... [1m0s elapsed]
azurerm_kubernetes_cluster.k8s: Still creating... [1m10s elapsed]
azurerm_kubernetes_cluster.k8s: Still creating... [1m20s elapsed]
azurerm_kubernetes_cluster.k8s: Still creating... [1m30s elapsed]
azurerm_kubernetes_cluster.k8s: Still creating... [1m40s elapsed]
azurerm_kubernetes_cluster.k8s: Still creating... [1m50s elapsed]
azurerm_kubernetes_cluster.k8s: Still creating... [2m0s elapsed]
azurerm_kubernetes_cluster.k8s: Still creating... [2m10s elapsed]
azurerm_kubernetes_cluster.k8s: Still creating... [2m20s elapsed]
azurerm_kubernetes_cluster.k8s: Still creating... [2m30s elapsed]
azurerm_kubernetes_cluster.k8s: Still creating... [2m40s elapsed]
azurerm_kubernetes_cluster.k8s: Still creating... [2m50s elapsed]
azurerm_kubernetes_cluster.k8s: Still creating... [3m0s elapsed]
azurerm_kubernetes_cluster.k8s: Still creating... [3m10s elapsed]
azurerm_kubernetes_cluster.k8s: Still creating... [3m20s elapsed]
azurerm_kubernetes_cluster.k8s: Still creating... [3m30s elapsed]
azurerm_kubernetes_cluster.k8s: Still creating... [3m40s elapsed]
azurerm_kubernetes_cluster.k8s: Creation complete after 3m47s [id=/subscriptions/********************/resourceGroups/karneliuk-rg/providers/Microsoft.ContainerService/managedClusters/k8s-on-aks]
Apply complete! Resources: 2 added, 0 changed, 0 destroyed.
Outputs:
client_certificate = <sensitive>
client_key = <sensitive>
cluster_ca_certificate = <sensitive>
cluster_password = <sensitive>
cluster_username = <sensitive>
host = <sensitive>
kube_config = <sensitive>
As you see from the output, it may take some time to create the cluster, depending on the requested parameters.
By this time, our Kubernetes cluster is deployed in Managed Azure Kubernetes Services (AKS) and is ready for application’s onboarding.
Step 6. Connect to Kubernetes Cluster
The next step is actually to deploy an application on top of created Kubernetes Cluster. Install kubectl first:
2
3
4
$ curl -fsSLo /etc/apt/keyrings/kubernetes-archive-keyring.gpg https://packages.cloud.google.com/apt/doc/apt-key.gpg
$ echo "deb [signed-by=/etc/apt/keyrings/kubernetes-archive-keyring.gpg] https://apt.kubernetes.io/ kubernetes-xenial main" | sudo tee /etc/apt/sources.list.d/kubernetes.list
$ sudo apt-get install -y kubectl
Check that it is installed properly:
2
3
4
WARNING: This version information is deprecated and will be replaced with the output from kubectl version --short. Use --output=yaml|json to get the full version.
Client Version: version.Info{Major:"1", Minor:"26", GitVersion:"v1.26.0", GitCommit:"b46a3f887ca979b1a5d14fd39cb1af43e7e5d12d", GitTreeState:"clean", BuildDate:"2022-12-08T19:58:30Z", GoVersion:"go1.19.4", Compiler:"gc", Platform:"linux/amd64"}
Kustomize Version: v4.5.7
Now we need to create a custom config file with the kube config:
2
$ export KUBECONFIG=./azurek8s.yaml
These commands are very important:
- To interact with Kubernetes API server, you need to know its address and to have corresponding authentication infor, which in case of Kubernetes by default implement as a set of SSL certificates. These certificates are generated for you along with the proper hostname when you create the cluster with Terraform, so you need to get this info from the terraform output.
- The default path for the kubeconfig is ~/.kube/config.yaml. We need to change that path by modifying the environment variable KUBECONFIG to the newly created kubeconf file.
If all was done correctly you shall be able now to see nodes in your Kubernetes cluster:
2
3
4
-----------------------------------------------------------------------------
NAME STATUS ROLES AGE VERSION
aks-k8snodepool-24388181-vmss000000 Ready agent 3m32s v1.24.6
You shall also be able to see the current utilization of resources in your cluster:
2
3
4
-----------------------------------------------------------------------------
NAME CPU(cores) CPU% MEMORY(bytes) MEMORY%
aks-k8snodepool-24388181-vmss000000 93m 2% 1018Mi 8%
Step 7. Deploy Cloud-native Application with Kubernetes
For more details about various Kubernetes primiteves, refer to our previous blogpost.
Finally you have everything set and configured to deploy and publish your cloud native application. We do that in a few steps:
- Create Namespace
- Installing Ingress Controller
- Creating new Deployment
- Creating new Service for Deployment
- Create Ingress
Step 7.1. Create New Namespace in Kubernets
For further details refer to one of the previous blogposts:
2
3
-----------------------------------------------------------------------------
namespace/test-app created
Step 7.2. Install Ingress Controller
We will do that using Helm (Kubernetes Package Manager); therefore, we need to have Helm first:
2
3
4
5
6
7
8
$ chmod 700 get_helm.sh
$ ./get_helm.sh
-----------------------------------------------------------------------------
Downloading https://get.helm.sh/helm-v3.10.3-linux-amd64.tar.gz
Verifying checksum... Done.
Preparing to install helm into /usr/local/bin
helm installed into /usr/local/bin/helm
Verify that Helm is installed properly:
2
3
-----------------------------------------------------------------------------
version.BuildInfo{Version:"v3.10.3", GitCommit:"835b7334cfe2e5e27870ab3ed4135f136eecc704", GitTreeState:"clean", GoVersion:"go1.18.9"}
Add the repository with NGINX packages, which incluges NGINX Ingress Controller:
2
3
4
5
6
7
8
9
-----------------------------------------------------------------------------
"nginx-stable" has been added to your repositories
$ helm repo update
-------------------------------------------------------------------------------
Hang tight while we grab the latest from your chart repositories...
...Successfully got an update from the "nginx-stable" chart repository
Once that is done, you can install it (per Kubernetes best practices, Ingress Controllers typically have their own namespaces, where they reside):
2
3
4
5
6
7
8
9
10
11
12
13
14
15
16
17
18
19
20
21
-----------------------------------------------------------------------------
NAME CHART VERSION APP VERSION DESCRIPTION
nginx-stable/nginx-ingress 0.15.2 2.4.2 NGINX Ingress Controller
$ kubectl create namespace nginx-ingress
-----------------------------------------------------------------------------
namespace/nginx-ingress created
$ helm -n nginx-ingress install nic-non-plus nginx-stable/nginx-ingress
-----------------------------------------------------------------------------
NAME: nic-non-plus
LAST DEPLOYED: Mon Dec 19 22:12:43 2022
NAMESPACE: nginx-ingress
STATUS: deployed
REVISION: 1
TEST SUITE: None
NOTES:
The NGINX Ingress Controller has been installed.
Validate that the Kubernetes Ingress Controller is successfully installed and has the assocaited service:
2
3
4
5
6
7
8
9
10
-----------------------------------------------------------------------------
NAME READY UP-TO-DATE AVAILABLE AGE
deployment.apps/nic-non-plus-nginx-ingress 1/1 1 1 54s
NAME READY STATUS RESTARTS AGE
pod/nic-non-plus-nginx-ingress-57d946bd-5vcn4 1/1 Running 0 54s
NAME TYPE CLUSTER-IP EXTERNAL-IP PORT(S) AGE
service/nic-non-plus-nginx-ingress LoadBalancer 10.0.39.148 40.88.234.198 80:32081/TCP,443:32720/TCP 55s
Step 7.3. Deploy and Publish Application
First of all, create the deployment in our namespace:
2
3
4
5
6
$ kubectl apply -f k8s/deployment.yaml
-----------------------------------------------------------------------------
deployment.apps/test-web created
Then, publish it:
2
3
4
5
6
$ kubectl apply -f k8s/service.yaml
-----------------------------------------------------------------------------
service/svc-4-test-web created
Verify the Deployment and Service is properly published:
2
3
4
5
6
7
8
9
10
11
12
13
14
15
16
17
-----------------------------------------------------------------------------
NAME READY UP-TO-DATE AVAILABLE AGE
test-web 2/2 2 2 13s
$ kubectl -n test-app get pods
-----------------------------------------------------------------------------
NAME READY STATUS RESTARTS AGE
test-web-7c4847d74b-5949f 1/1 Running 0 17s
test-web-7c4847d74b-lxwjn 1/1 Running 0 17s
$ kubectl -n test-app get services
-----------------------------------------------------------------------------
NAME TYPE CLUSTER-IP EXTERNAL-IP PORT(S) AGE
svc-4-test-web LoadBalancer 10.0.190.75 - 80/TCP 43s
Finally, create the Ingress:
2
3
4
5
6
7
8
9
10
11
12
13
14
15
16
17
18
19
20
21
22
23
24
25
26
---
apiVersion: networking.k8s.io/v1
kind: Ingress
metadata:
name: test-app-ingress
namespace: test-app
spec:
ingressClassName: nginx
rules:
- host: aks.karneliuk.com
http:
paths:
- path: /
pathType: Prefix
backend:
service:
name: svc-4-test-web
port:
number: 80
__EOF__
$ kubectl apply -f ingress.yaml
-------------------------------------------------------------------------------
ingress.networking.k8s.io/test-app-ingress created
Verify that the application is created:
2
3
4
5
6
7
8
9
10
11
12
13
14
15
16
17
18
-------------------------------------------------------------------------------
Name: test-app-ingress
Labels: <none>
Namespace: test-app
Address: 40.88.234.198
Ingress Class: nginx
Default backend: <default>
Rules:
Host Path Backends
---- ---- --------
aks.karneliuk.com
/ svc-4-test-web:80 (10.244.0.15:80,10.244.0.16:80)
Annotations: <none>
Events:
Type Reason Age From Message
---- ------ ---- ---- -------
Normal AddedOrUpdated 49s nginx-ingress-controller Configuration for test-app/test-app-ingress was added or updated
Step 8. Validataion
The ultimate goal of this exrcise is to bring the cloud-native application app on Kubernets on AKS. Therefore, the ultimate test is to validate if that is reachable online:
2
3
4
5
6
7
8
9
10
11
12
13
14
15
16
17
18
19
20
21
22
23
24
<!DOCTYPE html>
<html>
<head>
<title>Welcome to nginx!</title>
<style>
html { color-scheme: light dark; }
body { width: 35em; margin: 0 auto;
font-family: Tahoma, Verdana, Arial, sans-serif; }
</style>
</head>
<body>
<h1>Welcome to nginx!</h1>
<p>If you see this page, the nginx web server is successfully installed and
working. Further configuration is required.</p>
<p>For online documentation and support please refer to
<a href="http://nginx.org/">nginx.org</a>.<br/>
Commercial support is available at
<a href="http://nginx.com/">nginx.com</a>.</p>
<p><em>Thank you for using nginx.</em></p>
</body>
</html>
It works! And this is the simplified view of the traffic flow in the deployed application:
GitHub Repository
You can find all the supporting files in this GitHub repository.
Lessons Learned
The main learning curve for us was around the Terraform workspaces. It is not very visible in this blogpost, how it can help; however, when you need to manage multiple environments in parallel, it truly shines.
Summary
Kubernetes is without doubts one of the most important tools these days to rollour and manage infrastructure for application delivery allowing the rapid growth, changes yet providing self-healing capabilities. That’s why all the public clouds provides managed Kubernetes cluster, so that you can start working with this even quicker. Take care and good bye!
Need Help? Contract Us
If you need a trusted and experienced partner to automate your network and IT infrastructure, get in touch with us.
P.S.
If you have further questions or you need help with your networks, we are happy to assist you, just send us a message. Also don’t forget to share the article on your social media, if you like it.
BR,
Anton Karneliuk