


Dear friend,
We hope you are doing great and had a nice time over the festive period to recharge your batteries towards the new year. We wish it to be successful, productive and prosperous. With this, let’s dive into the topic of today’s blog, which is network automation for OCP SONiC with GNMI and Python over pyGNMI.
2
3
4
5
retrieval system, or transmitted in any form or by any
means, electronic, mechanical or photocopying, recording,
or otherwise, for commercial purposes without the
prior permission of the author.
Do I Need to Automate SONiC? How Can I Do It?
SONiC, which stands for Software for Open Networking in the Cloud, is a Network Operating System (NOS). SONiC’s main purpose is to run on the data center switches and provide simple and reliable connectivity between endpoints (Baremetal servers, virtual machines, containers, etc). As it is a piece of the network software, which runs on network hardware, it is for sure requires automation.
The good news is that it supports RESTCONF and GNMI with OpenConfig YANG modules, which we extensively cover in our Network Automation Trainings:
We offer the following training programs for you:
- Zero-to-Hero Network Automation Training
- High-scale automation with Nornir
- Ansible Automation Orchestration with Ansble Tower / AWX
- Expert-level training: Closed-loop Automation and Next-generation Monitoring
During these trainings you will learn the following topics:
- Success and failure strategies to build the automation tools.
- Principles of software developments and the most useful and convenient tools.
- Data encoding (free-text, XML, JSON, YAML, Protobuf).
- Model-driven network automation with YANG, NETCONF, RESTCONF, GNMI.
- Full configuration templating with Jinja2 based on the source of truth (NetBox).
- Best programming languages (Python, Bash) for developing automation
- The most rock-solid and functional tools for configuration management (Ansible) and Python-based automation frameworks (Nornir).
- Network automation infrastructure (Linux, Linux networking, KVM, Docker).
- Orchestration of automation workflows with AWX and its integration with NetBox, GitHub, as well as custom execution environments for better scalability.
- Collection network data via SNMP and streaming telemetry with Prometheus
- Building API gateways with Python leveraging Fast API
- Integration of alerting with Slack and your own APIs
- … and many more
Moreover, we put all mentions technologies in the context of real use cases, which our team has solved and are solving in various projects in the service providers, enterprise and data centre networks and systems across the Europe and USA. That gives you opportunity to ask questions to understand the solutions in-depts and have discussions about your own projects. And on top of that, each technology is provided with online demos and labs to master your skills thoroughly. Such a mixture creates a unique learning environment, which all students value so much. Join us and unleash your potential.
Brief Description
SONiC is still one of the hottest topic for discussion in the network community in context of the high- and hyper- scale data centers with the primary purpose to run cloud-native workloads, such as Kubernetes cluster, etc. Developed by Microsoft to power their Azure cloud, it gradually starts getting into Enterprise-ish world. We discussed it a while ago already; however, we have not discussed that time automation of the platform. On the other hand, SONiC has evolved massively over these past years and had obtained some great capabilities for the network automation such as GNMI. GNMI is a de-facto standard for streaming telemetry; however, it also have capabilities to manage network devices with the full CRUD mode.
As we have developed the pyGNMI to help you managing network devices via GNMI using Python, we are interested in applying it to all possible network operating systems, including SONiC. Back in the days, we were actively developing it, we tested it against a number of platforms, such as Arista EOS, Cisco NX-OS, and Nokia SR OS ourselves, and further the network automation community at GitHub has picked that up and helped us with testing against Juniper JUNOS, Cisco IOS XR. The community is an incredible power, as it has not already tested the functionality, but also helped to develop pyGNMI further. As our commitment to the network automation community, we continue supporting this library and recently got a question: the library is not working for the Open Source version of SONiC (OCP SONiC) as well as for commercial versions (Broadcom Enterprise SONiC and some others). For sure, that was not a great news and decided to dig into it ourselves. Let’s see, where we land.
Lab Setup
The topology is dead simple, as we only need to ensure we have a management connectivity from our automation host to SONiC under test.

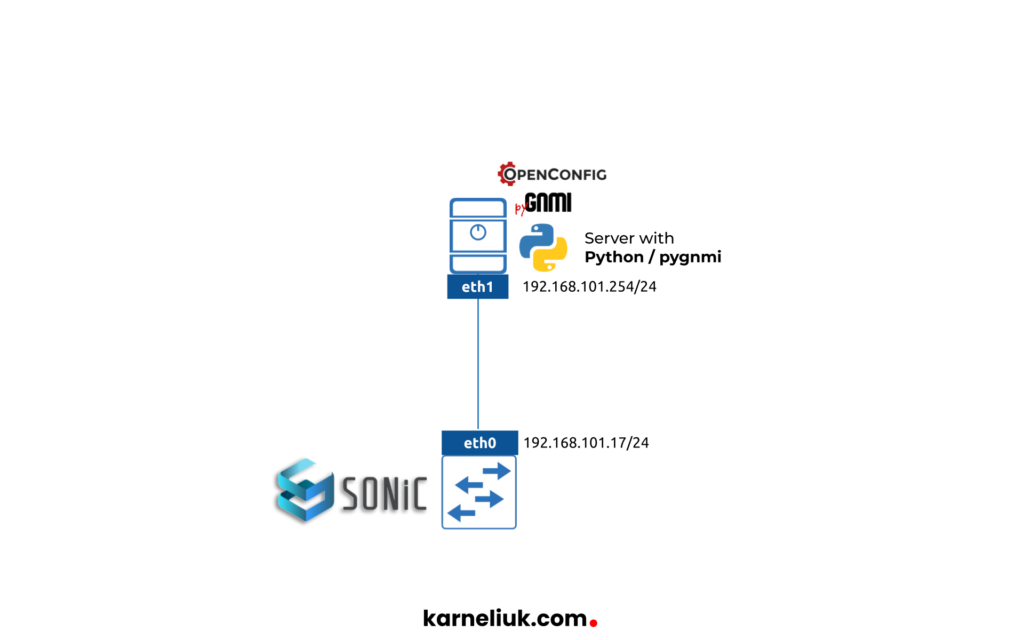
Now, question could be: which SONiC we are actually running? OCP (Open Source) or Enterprise (that is Broadcom but re-sold by Dell and others)? We went for OCP version, as this is the one you can download publicly. Back in time, when we have been looking to VM version of SONiC, we were unable to find it and we used containers. It worked, but there was quite a degree of complexity as we needed to deal with a multiple nested namespaces. As we have VM image now, it is much easier to build the virtual lab for testing.
To be specific, we have downloaded the latest branch vs version of SONiC.
SONiC Configuration
We’ve build the SONiC on top of KVM in our Karneliuk Lab Cloud, the same we use for our network automation trainings.
Enroll to our Network Automation Training programs to get up to speed with network automation and software development for networks.
Step 1. Basic Connectivity
Once the SONiC is booted, you can log into it with the default credentials:
2
3
4
5
6
7
8
9
10
11
12
13
14
15
16
17
18
19
Password:
Last login: Fri Apr 22 23:49:11 UTC 2022 on ttyS0
Linux sonic 4.19.0-9-2-amd64 #1 SMP Debian 4.19.118-2+deb10u1 (2020-06-07) x86_64
You are on
____ ___ _ _ _ ____
/ ___| / _ \| \ | (_)/ ___|
\___ \| | | | \| | | |
___) | |_| | |\ | | |___
|____/ \___/|_| \_|_|\____|
-- Software for Open Networking in the Cloud --
Unauthorized access and/or use are prohibited.
All access and/or use are subject to monitoring.
Help: http://azure.github.io/SONiC/
admin@sonic:~$
The next step is to configure hostname and IP address for management interface:
2
3
4
5
6
7
8
---------------------------------------------------------------------------
Please note loaded setting will be lost after system reboot. To preserve setting, run `config save`.
Broadcast message: Hostname has been changed from 'sonic' to 'dev-pygnmi-sonic-001'. Users running 'sonic-cli' are suggested to restart your session.
admin@sonic:~$ sudo config interface ip add eth0 192.168.101.17/24 192.168.101.1
Step 2. Fix GNMI Service
The philosophy of SONiC, being a cloud-focused network operating system, is to run a local cloud as well. It is a bit an overestimation, but it highlights the way it works internally: a lot various services including LLDP, BGP and GNMI among others run as Docker containers:
2
3
4
5
6
7
8
9
10
11
12
13
14
15
CONTAINER ID IMAGE COMMAND CREATED STATUS PORTS NAMES
41b1a5310be9 docker-sonic-telemetry:latest "/usr/local/bin/supe…" 18 minutes ago Exited (0) 17 minutes ago telemetry
3000b57f30ea docker-snmp:latest "/usr/local/bin/supe…" 18 minutes ago Up 18 minutes snmp
585372ba71cc docker-sonic-mgmt-framework:latest "/usr/local/bin/supe…" 18 minutes ago Up 18 minutes mgmt-framework
a8c0f97cceb0 docker-teamd:latest "/usr/local/bin/supe…" 20 minutes ago Up 20 minutes teamd
4983bfb767b7 docker-fpm-frr:latest "/usr/bin/docker_ini…" 20 minutes ago Up 20 minutes bgp
89f203534a9d docker-platform-monitor:latest "/usr/bin/docker_ini…" 20 minutes ago Up 20 minutes pmon
3ca0b5b4eabd docker-lldp:latest "/usr/bin/docker-lld…" 20 minutes ago Up 20 minutes lldp
f92f788f5216 docker-router-advertiser:latest "/usr/bin/docker-ini…" 21 minutes ago Up 21 minutes radv
f43c0eede468 docker-gbsyncd-vs:latest "/usr/local/bin/supe…" 21 minutes ago Up 21 minutes gbsyncd
021921df84ea docker-syncd-vs:latest "/usr/local/bin/supe…" 21 minutes ago Up 21 minutes syncd
75d604784b18 docker-orchagent:latest "/usr/bin/docker-ini…" 21 minutes ago Up 21 minutes swss
9dd695cd789b docker-eventd:latest "/usr/local/bin/supe…" 21 minutes ago Up 21 minutes eventd
c605060638c9 docker-database:latest "/usr/local/bin/dock…" 21 minutes ago Up 21 minutes database
The Docker container responsible for GNMI is called telemetry and it, as you can see, is down. The problem is that there is not much info, which will help you to fix it if you look in the docker logs:
However, if you look in the telemetry.service logs, you will find something interesting:
2
3
4
Jan 2 10:34:29.930752 dev-pygnmi-sonic-003 INFO telemetry#supervisord: telemetry F0102 10:34:29.930236 20 telemetry.go:93] could not load server key pair: open /etc/sonic/telemetry/streamingtelemetryserver.cer: no such file or directory
Jan 2 10:35:10.731646 dev-pygnmi-sonic-003 INFO telemetry#supervisord: telemetry F0102 10:35:10.730932 22 telemetry.go:93] could not load server key pair: open /etc/sonic/telemetry/streamingtelemetryserver.cer: no such file or directory
Jan 2 10:35:49.728947 dev-pygnmi-sonic-003 INFO telemetry#supervisord: telemetry F0102 10:35:49.728626 23 telemetry.go:93] could not load server key pair: open /etc/sonic/telemetry/streamingtelemetryserver.cer: no such file or directory
We found this info in one of the SONiC discussions at GitHub.
Going through further discussion, it appeared that the recommended way to deploy SONiC for test is to use some testbed Ansible playbook. As we already deployed SONiC, we used this playbook to figure out the solution to fix the GNMI container:
- We need to create CA certificate and key.
- We need to create CSR and key to be signed by CA.
- We need then to sign it and create the certificate for the server
That is the solution to address it:
2
3
4
5
6
7
8
9
10
11
12
13
-out /etc/sonic/telemetry/dsmsroot.cer -sha256 -days 365 -nodes -subj '/CN=lab-ca'
admin@sonic:~$ sudo openssl req -new -newkey rsa:4096 -nodes \
-keyout /etc/sonic/telemetry/streamingtelemetryserver.key -out /etc/sonic/telemetry/streamingtelemetryserver.csr \
-subj "/CN=dev-pygnmi-sonic-003"
admin@sonic:~$ sudo openssl x509 -req -in /etc/sonic/telemetry/streamingtelemetryserver.csr \
-CA /etc/sonic/telemetry/dsmsroot.cer -CAkey /etc/sonic/telemetry/dsmsroot.key \
-CAcreateserial -out /etc/sonic/telemetry/streamingtelemetryserver.cer \
-days 365 -sha512
Once these steps are completed, you shall restart the GNMI container:
2
3
4
5
6
7
telemetry
$ sudo docker container ls
CONTAINER ID IMAGE COMMAND CREATED STATUS PORTS NAMES
41b1a5310be9 docker-sonic-telemetry:latest "/usr/local/bin/supe…" 3 hours ago Up 9 minutes telemetry
You shall not see any issues with it right now and the container shall be up and running. If that is the case, move it to the pyGNMI part; but before that figure out what is the port for GNMI:
2
3
4
5
6
7
8
9
10
11
12
13
14
15
16
17
18
State Recv-Q Send-Q Local Address:Port Peer Address:Port Process
LISTEN 0 512 0.0.0.0:179 0.0.0.0:*
LISTEN 0 128 0.0.0.0:22 0.0.0.0:*
LISTEN 0 3 127.0.0.1:2616 0.0.0.0:*
LISTEN 0 5 127.0.0.1:3161 0.0.0.0:*
LISTEN 0 2 127.0.0.1:2620 0.0.0.0:*
LISTEN 0 100 127.0.0.1:5570 0.0.0.0:*
LISTEN 0 100 127.0.0.1:5571 0.0.0.0:*
LISTEN 0 100 127.0.0.1:5572 0.0.0.0:*
LISTEN 0 100 127.0.0.1:5573 0.0.0.0:*
LISTEN 0 3 127.0.0.1:2601 0.0.0.0:*
LISTEN 0 511 127.0.0.1:6379 0.0.0.0:*
LISTEN 0 3 127.0.0.1:2605 0.0.0.0:*
LISTEN 0 512 [::]:179 [::]:*
LISTEN 0 128 [::]:22 [::]:*
LISTEN 0 512 *:443 *:*
LISTEN 0 512 *:50051 *:* <-- This is GNMI port
Test with PYGNMI
We’ve spent quite a bit of time developing the functionality to skip SSL-verification in pyGNMI, and it appears to be working. However, it also appears that this functionality depends on the GRPC/GNMI server implementation on the network device side, which may or may not be implementing what we need.
In a nutshell, the functionality behind the functionality is this:
- pygnmi attempts to download the SSL certificate from the network device.
- In the downloaded certificate it looks for CN and/or SAN values and modifies the CN/SAN in the downloaded certificate to match the IP address or FQDN, depending on what we specify in the certificate.
If, however, it is not possible to download the certificate for any reason, then you may be experiencing such an error:
2
3
4
E0102 18:21:48.433945928 69953 ssl_transport_security.cc:556] Corruption detected.
E0102 18:21:48.433993742 69953 ssl_transport_security.cc:532] error:10000412:SSL routines:OPENSSL_internal:SSLV3_ALERT_BAD_CERTIFICATE
E0102 18:21:48.434006826 69953 secure_endpoint.cc:304] Decryption error: TSI_DATA_CORRUPTED
The solution for this is to copy the CA certificate as well as the server certificate and key locally to the host with your network automation from the SONiC VM and use them in your pyGNMI script. We have used this approach initially before we developed skip-verify capability. This approach is still valid. So, we need to copy from SONiC VM to our host the following files:
- CA certificate
- Server certificate
- Server key
Let’s do that:
2
3
4
5
6
7
8
$ scp admin@192.168.101.17:/etc/sonic/telemetry/dsmsroot.cer certs/ca.pem
$ scp admin@192.168.101.17:/etc/sonic/telemetry/streamingtelemetryserver.cer certs/server.pem
$ scp admin@192.168.101.17:/etc/sonic/telemetry/streamingtelemetryserver.key certs/server.key
$ ls certs/
ca.pem server.key server.pem
Now you can use them to connect to SONiC using pyGNMI:
2
3
4
5
6
7
8
9
10
11
12
13
14
15
16
17
18
19
20
21
22
23
24
25
26
27
28
# Modules
from pygnmi.client import gNMIclient
import json
# Variables
host = {
"ip_address": "192.168.101.17",
"port": 50051,
"username": "admin",
"password": "YourPaSsWoRd",
}
# Body
if __name__ == "__main__":
with gNMIclient(
target=(host["ip_address"], host["port"]),
username=host["username"],
password=host["password"],
path_root="certs/ca.pem",
path_cert="certs/server.pem",
path_key="certs/server.key",
override="dev-pygnmi-sonic-003",
) as gc:
result = gc.capabilities()
print(json.dumps(result, indent=4))
Run the script:
2
3
4
5
6
7
8
9
10
11
12
13
14
15
16
17
18
19
20
21
22
23
24
25
26
27
28
29
30
31
32
33
34
35
36
37
38
39
40
41
42
43
44
45
46
47
48
49
50
{
"supported_models": [
{
"name": "openconfig-acl",
"organization": "OpenConfig working group",
"version": "1.0.2"
},
{
"name": "openconfig-acl",
"organization": "OpenConfig working group",
"version": "1.0.2"
},
{
"name": "openconfig-interfaces",
"organization": "OpenConfig working group",
"version": "1.0.2"
},
{
"name": "openconfig-lldp",
"organization": "OpenConfig working group",
"version": "1.0.2"
},
{
"name": "openconfig-platform",
"organization": "OpenConfig working group",
"version": "1.0.2"
},
{
"name": "openconfig-system",
"organization": "OpenConfig working group",
"version": "1.0.2"
},
{
"name": "ietf-yang-library",
"organization": "IETF NETCONF (Network Configuration) Working Group",
"version": "2016-06-21"
},
{
"name": "sonic-db",
"organization": "SONiC",
"version": "0.1.0"
}
],
"supported_encodings": [
"json",
"json_ietf"
],
"gnmi_version": "0.7.0"
}
And you are done!
GitHub Repository
Check out the examples in our GitHub.
Lessons Learned
The key lessons learned we got is that some functionality, which we test and claim as working, is working indeed, but it depends on the implementation of certain features on the GNMI server side. That is exactly the case we’ve got for this specific issue. However, at the same time, it is good to have multiple options to achieve the desired result: to manage the network device via GNMI using Python without undermining the security (i.e., without disabling encryption).
Summary
We hope you enjoy using pyGNMI for labs and for production to simplify management of your network infrastructure with Python. If you have questions how to use it or you encounter problems, please, raise issues at GitHub. Together with you, dear friend, we could improve it beyond any limits, like in this case with SONiC. Take care and good bye!
Need Help? Contract Us
If you need a trusted and experienced partner to automate your network and IT infrastructure, get in touch with us.
P.S.
If you have further questions or you need help with your networks, we are happy to assist you, just send us a message. Also don’t forget to share the article on your social media, if you like it.
BR,
Anton Karneliuk