

Dear friend,
Source of Truth plays crucial role in network automation as this is the basis we are automating our IT and network infrastructure against. It doesn’t mean to be monitoring system in any capacity. At the same time, it may be useful to quickly do some checks against your network infrastructure and to update some metadata in the Source of Truth.
Oh, Are You Talking About NetBox Again?
Yes, we are. NetBox is a leading tool in the source of truth framework. Being open-source, it by far outpaces all other open-source and commercial tools existing worldwide in this area. On top of its wide built-in capabilities, it is highly extensible via plugins and scripts.
The good news is that we covered NetBox in our Zero-to-Hero Network Automation Training, and you can benefit from learning it from the context of network automation with integrations to Python and Ansible tools, which you create during our training.
We offer the following training programs for you:
- Zero-to-Hero Network Automation Training
- High-scale automation with Nornir
- Ansible Automation Orchestration with Ansble Tower / AWX
- Expert-level training: Closed-loop Automation and Next-generation Monitoring
During these trainings you will learn the following topics:
- Success and failure strategies to build the automation tools.
- Principles of software developments and the most useful and convenient tools.
- Data encoding (free-text, XML, JSON, YAML, Protobuf).
- Model-driven network automation with YANG, NETCONF, RESTCONF, GNMI.
- Full configuration templating with Jinja2 based on the source of truth (NetBox).
- Best programming languages (Python, Bash) for developing automation
- The most rock-solid and functional tools for configuration management (Ansible) and Python-based automation frameworks (Nornir).
- Network automation infrastructure (Linux, Linux networking, KVM, Docker).
- Orchestration of automation workflows with AWX and its integration with NetBox, GitHub, as well as custom execution environments for better scalability.
- Collection network data via SNMP and streaming telemetry with Prometheus
- Building API gateways with Python leveraging Fast API
- Integration of alerting with Slack and your own APIs
- … and many more
Moreover, we put all mentions technologies in the context of real use cases, which our team has solved and are solving in various projects in the service providers, enterprise and data centre networks and systems across the Europe and USA. That gives you opportunity to ask questions to understand the solutions in-depth and have discussions about your own projects. And on top of that, each technology is provided with online demos and labs to master your skills thoroughly. Such a mixture creates a unique learning environment, which all students value so much. Join us and unleash your potential.
Brief Description
NetBox has a possibility to execute arbitrary Python scripts directly from NetBox UI. Moreover, it allows to create you nice form in Web-UI to provide parameters, which may be coming from NetBox itself or some arbitrary literals (text, integers, boolean, etc). That may sound a bit odd: why would you want to run arbitrary Python Scripts from NetBox Web-UI?..
Well, there are certain use cases. The use case that NetBox official documentation for scripts explains is the generation of the huge amount of similar objects (i.e, devices on the site). On the one hand, it is not a rocket science: we can achieve it via REST API creating a simple script. On the other hand, the benefit here is that you have possibility to create simple but functional UI form for your colleagues, who are less savvy with Python (or any other programming language) and REST API, so that they can do some job with a customized logic, which you (network automation engineer), build for them. For example, you can pre-build certain templates for network devices, their connection between each other, IP addressing and so on, and the deployment engineer can plan a deployment for any site simply by providing the amount of mthe desired leafs/spines, routers and IP prefix. We’d guess, you’d agree that may be quite an improvement for the company operations.
Having said that, it may seem that NetBox scripts are used exclusively to interact with NetBox database. However, it is not the case; although, the interaction with NetBox database is indeed a primary use case for NetBox scripts. The script is just a Python code, which means you can write there any functionality. For example, you may add a simple script, which will validate the reachability of network devices via ICMP and set status of the device to be active or offline depending on the result.
We have stated before, that NetBox is NOT an NMS and with this script we are NOT aiming to replace the monitoring system. At the same time, it may be useful for certain scenarios, where you do launch of new site (say, new data centre) and is willing to change status of device in netbox based on its reachability as part of this launch process.
Before we jump to a scenario, where we will write the code to the scenario above, let’s spend a few minutes understanding how it works.
NetBox consists of a number of services. Putting database components (both PostgreSQL and Redis), we have 3 of them:
2
3
4
5
6
[sudo] password for aaa:
CONTAINER ID IMAGE COMMAND CREATED STATUS PORTS NAMES
84e689453020 netboxcommunity/netbox:v3.4-2.4.0 "/usr/bin/tini -- /o…" About an hour ago Up 58 minutes (healthy) netbox-docker_netbox-worker_1
7777afe947fd netboxcommunity/netbox:v3.4-2.4.0 "/usr/bin/tini -- /o…" About an hour ago Up 58 minutes (healthy) netbox-docker_netbox-housekeeping_1
980bc6baa797 netboxcommunity/netbox:v3.4-2.4.0 "/usr/bin/tini -- /o…" About an hour ago Up 58 minutes (healthy) 0.0.0.0:8000->8080/tcp, :::8000->8080/tcp netbox-docker_netbox_1
The key from the Network Scripts perspective are netbox-webservice and netbox-worker, with latter playing the most crucial role. The following figure explains how they interact:

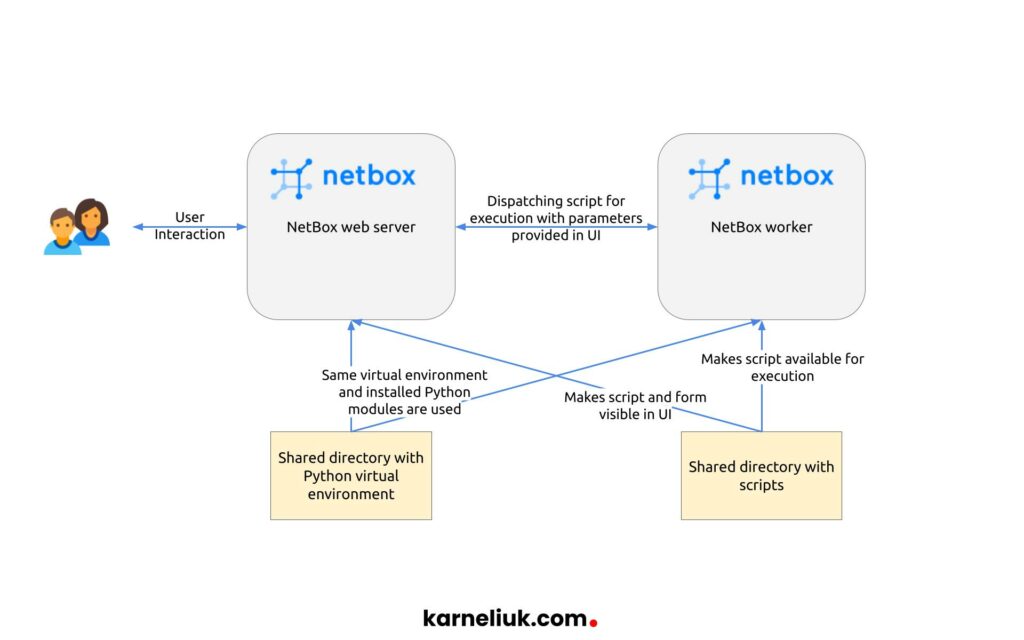
Let’s walk through the process:
- A user navigates to “Other” -> “Scripts” in NetBox UI (which is happening in NetBox web server container).
- He/she chooses the name of the script to be executed.
- In the opened form, he/she provides the parameters needed for the script to run and press “Run Script” button.
- At this stage, the script with the parameters is dispatches for execution at NetBox worker.
- The worker performs the requested tasks and provides response back to the web server.
- Finally, user sees the result.
These workflow highlights that it is important for both NetBox worker and web server to share the same list of scripts to ensure that they can execute them properly. In general it is also recommended for both of them to be built using the same NetBox container image (which is the case by default).
In the diagram above it is mentioned that the same virtual environment is used. This is indeed so for non-containerized version of NetBox; however, in the containerized version each container has its own virtual environment directory, which are identical though as both containers should be built from the same container image.
Lab Scenario
We are going to create the NetBox script, which will change the status of the network device on NetBox depending on the results of the ICMP reachability test:

Lab Setup
For this lab we have a VM with Ubunti Linux, which runs containerized NetBox (deployed with docker compose) and 2 network devices:
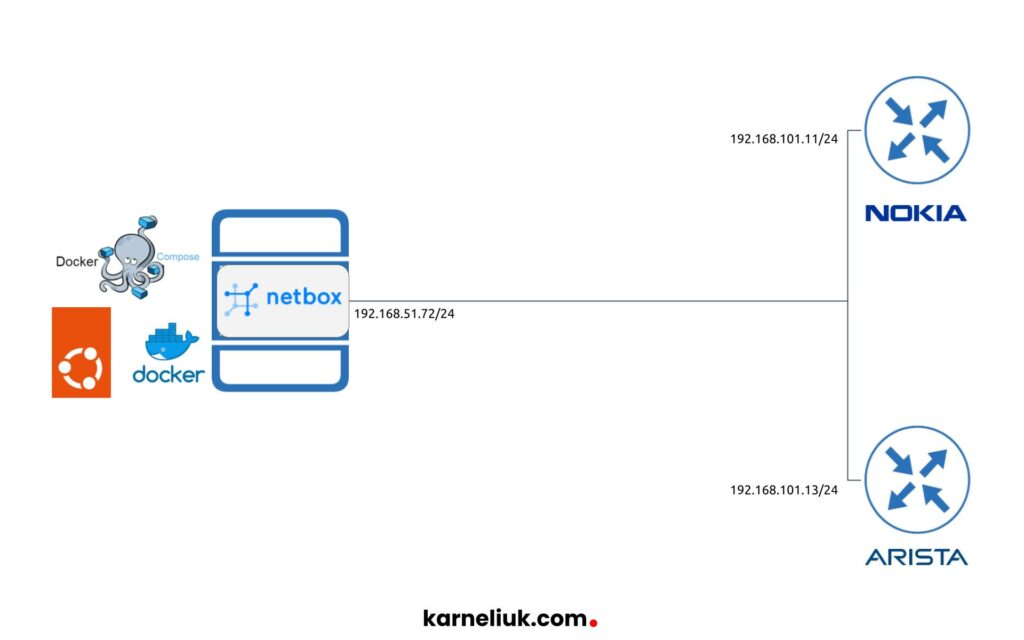
On the NetBox side, we run:
- Ubuntu 20.04.5 LTS
- Docker 20.10.17
- NetBox v 3.4.5
As network devices we run:
- Nokia SR OS 21.10.R1
- Arista EOS 4.28.0.1F
Solution Implementation
To write the script for NetBox, you need to have many things to start with. However, bear in mind that NetBox is created to be a Source of Truth, not an monitoring system or a workflow engine. That means that the amount of the Python libraries installed in NetBox virtual environment is quite limited and focused mainly around the web service functionality as well as interacting with database (both are covered by Django framework). However, it doesn’t include any network related functionality on top of default Python libraries. Moreover, as we run in production typically containerized NetBox version, the amount of the default Linux tools is also quite limited. For example, default NetBox container images don’t have anything besides “curl” tool, not even “ping“. Therefore, besides writing the NetBox Script itself we also need to add to the container with NetBox the relevant libraries. That means, that we need to build a custom image with NetBox and use it inside our service deployment.
Step 1. Custom NetBox Image with Python Library for Ping
It is expected that You are familiar with NetBox. If not, enroll to Zero-to-Hero Network Automation Training.
In the output above, you could have spotted the name of the NetBox image, which is used for our deployment: “netboxcommunity/netbox:v3.4-2.4.0“. What need to do now is to install inside the library for ping. We will use icmplib, which is quite a good pure Python implementation of ping and traceroute tests.
To achieve it, we create a new directory somewhere and compose the following Dockerfile:
2
3
4
5
6
7
$ cd /tmp/tweaked-nb/
$ tee Dockerfile < __EOF_
FROM netboxcommunity/netbox:v3.4-2.4.0
RUN /opt/netbox/venv/bin/python -m pip install icmplib
__EOF__
Enroll to our Zero-to-Hero Network Automation Training to master Docker skills.
You may add any amount of Python libraries in the second line depending on your needs. Once the file is ready, create new NetBox image:
It may take a few minutes for the image to be build. Once the build process is completed ensure that the new image is available:
2
3
4
REPOSITORY TAG IMAGE ID CREATED SIZE
tweaked-netbox 0.1 280ba61cebb0 4 hours ago 635MB
netboxcommunity/netbox v3.4-2.4.0 af0d44f766d1 15 hours ago 635MB
Afterwards, amend the docker-compose file coming as part of the NetBox distribution to use the new image:
2
3
4
5
6
7
8
9
10
11
12
13
14
15
version: '3.4'
services:
netbox: &netbox
image: tweaked-netbox:0.1 <-- add this line
# image: netboxcommunity/netbox:${VERSION-v3.4-2.4.0} <-- comment this line
depends_on:
- postgres
- redis
- redis-cache
env_file: env/netbox.env
user: 'unit:root'
healthcheck:
!
! FURTHER OUTPUT IS TRUNCATED FOR BREVITY
And, finally rebuild the NetBox:
Ensure it is up and running and it is using the corresponding image:
2
3
4
5
6
7
8
CONTAINER ID IMAGE COMMAND CREATED STATUS PORTS NAMES
84e689453020 tweaked-netbox:0.1 "/usr/bin/tini -- /o…" 4 hours ago Up 3 hours (healthy) netbox-docker_netbox-worker_1
7777afe947fd tweaked-netbox:0.1 "/usr/bin/tini -- /o…" 4 hours ago Up 3 hours (healthy) netbox-docker_netbox-housekeeping_1
980bc6baa797 tweaked-netbox:0.1 "/usr/bin/tini -- /o…" 4 hours ago Up 3 hours (healthy) 0.0.0.0:8000->8080/tcp, :::8000->8080/tcp netbox-docker_netbox_1
b3998ee333d2 redis:7-alpine "docker-entrypoint.s…" 5 hours ago Up 3 hours 6379/tcp netbox-docker_redis-cache_1
91329da35bba postgres:15-alpine "docker-entrypoint.s…" 5 hours ago Up 3 hours 5432/tcp netbox-docker_postgres_1
dd447bf15456 redis:7-alpine "docker-entrypoint.s…" 5 hours ago Up 3 hours 6379/tcp netbox-docker_redis_1
By this point, NetBox has a corresponding packages available, so you can move to the script part.
Step 2. Update sysctl Parameters of Your Linux system
Typically the Linux requires process to have superuser permissions to create a socket, which would require us to provide “privileges: True” argument to the container in Docker. To avoid it, icmplib suggest to modify one sysctl parameter:
2
$ sudo sysctl -p
Once these commands are run, you will be able to run the Python code with icmplib without sudo privileges.
Read more in this document.
Step 3. NetBox Script
In a nutshell, NetBox script is a single class with one nested class and one public method. The public documentation is pretty good; therefore, we will provide an example for you and then explain the details:
2
3
4
5
6
7
8
9
10
11
12
13
14
15
16
17
18
19
20
21
22
23
24
25
26
27
28
29
30
31
32
33
34
35
36
37
38
39
40
41
42
from icmplib import ping
# Netbox artifcats
from extras.scripts import Script, ObjectVar, MultiObjectVar
from dcim.models import Site, Device
# Classes
class DeviceChecker(Script):
class Meta:
name = "Validate state of network devices"
description = "Sample Script to set the status of the device based on its availability"
field_order = ("site", "devices")
site = ObjectVar(
model=Site
)
devices = MultiObjectVar(
model=Device,
query_params={
"site_id": "$site"
}
)
def run(self, data, commit) -> None:
print_in_nb = []
for device in data["devices"]:
result = ping(str(device.primary_ip.address.ip), count=3, interval=0.2, privileged=False)
if result.is_alive:
device.status = "active"
else:
device.status = "offline"
print_in_nb.append(f"{device.name} is set to {device.status}")
device.save()
return "\n".join(print_in_nb)
The class for our script is called DeviceChecker and it is inherited from Script() class from extras.scripts path from NetBox code base. Besides this class, we import also ObjectVar and MultiObjectVar classes, which are responsible for collecting user input (either single choice or multiple choice dynamic field) and passing it to the data argument of run() method. In our case we specify to fields to be filled in by user:
- site (created using ObjectVar) to specify sites, where we would like to check devices. As we are dealing with sites, we import class Site from dcim.models module so that we can work with PostgreSQL database via Python Django.
- devices (created using MultiObjectVar) to specify devices, which are being polled by the script. Network devices are represented by Device module from dcim.models. You can also see that we pass there as query_params the id of the chosen site, so that we can tailor the list of the devices to filter out ones belonging to different sites.
- nested class Meta is responsible for providing name for the script, its description as well as to sequence the appearance of fields on the web form.
- Public method run() contains the code, which will be implemented upon the script is executed.
- In our scenario, we loop through the devices specified in the web form by accessing it from the dictionary data. Bear in mind, that you deal with Python objects in list, not dictionaries; as such, use the proper syntax to access attribute “device.primary_ip.address.ip“.
- Using the function ping() from the installed module icmplib, perform the validation of the network devices’ reachability:
- If network device is reachable, set its status to “active“.
- If it is not, then the status shall be “offline“.
- Add the corresponding notice to the list, which will be returned back to the NetBox web server at the end of the script’s execution. Also, save the device in the database using save() method.
Enroll to Zero-to-Hero Network Automation Training to up skill yourself with Python
The script must be placed in the “./scripts” directory in the directory you cloned from GitHub (this directory is already created and having a single file “__init__.py“:
2
3
4
5
6
7
8
9
10
11
12
13
14
15
16
17
18
19
20
21
22
23
24
total 120
drwxrwxr-x 2 aaa aaa 4096 Feb 26 15:45 build-functions
-rwxrwxr-x 1 aaa aaa 2969 Feb 26 15:45 build-latest.sh
-rwxrwxr-x 1 aaa aaa 15227 Feb 26 15:45 build.sh
drwxrwxr-x 3 aaa aaa 4096 Feb 26 15:45 configuration
drwxrwxr-x 2 aaa aaa 4096 Feb 26 15:45 docker
-rw-rw-r-- 1 aaa aaa 64 Feb 26 15:46 docker-compose.override.yml
-rw-rw-r-- 1 aaa aaa 64 Feb 26 15:45 docker-compose.override.yml.example
-rw-rw-r-- 1 aaa aaa 1296 Feb 26 15:45 docker-compose.test.yml
-rw-rw-r-- 1 aaa aaa 2136 Feb 26 17:25 docker-compose.yml
-rw-rw-r-- 1 aaa aaa 4130 Feb 26 15:45 Dockerfile
drwxrwxr-x 2 aaa aaa 4096 Feb 26 15:45 env
-rw-rw-r-- 1 aaa aaa 10175 Feb 26 15:45 LICENSE
-rw-rw-r-- 1 aaa aaa 359 Feb 26 15:45 pyproject.toml
-rw-rw-r-- 1 aaa aaa 7222 Feb 26 15:45 README.md
-rwxrwxr-x 1 aaa aaa 4981 Feb 26 15:45 release.sh
-rw-rw-r-- 1 aaa aaa 244 Feb 26 15:45 renovate.json
drwxrwxr-x 2 aaa aaa 4096 Feb 26 15:45 reports
-rw-rw-r-- 1 aaa aaa 170 Feb 26 15:45 requirements-container.txt
drwxrwxr-x 2 aaa aaa 4096 Feb 26 16:10 scripts <-- place your script here
drwxrwxr-x 2 aaa aaa 4096 Feb 26 15:45 test-configuration
-rwxrwxr-x 1 aaa aaa 2035 Feb 26 15:45 test.sh
-rw-rw-r-- 1 aaa aaa 6 Feb 26 15:45 VERSION
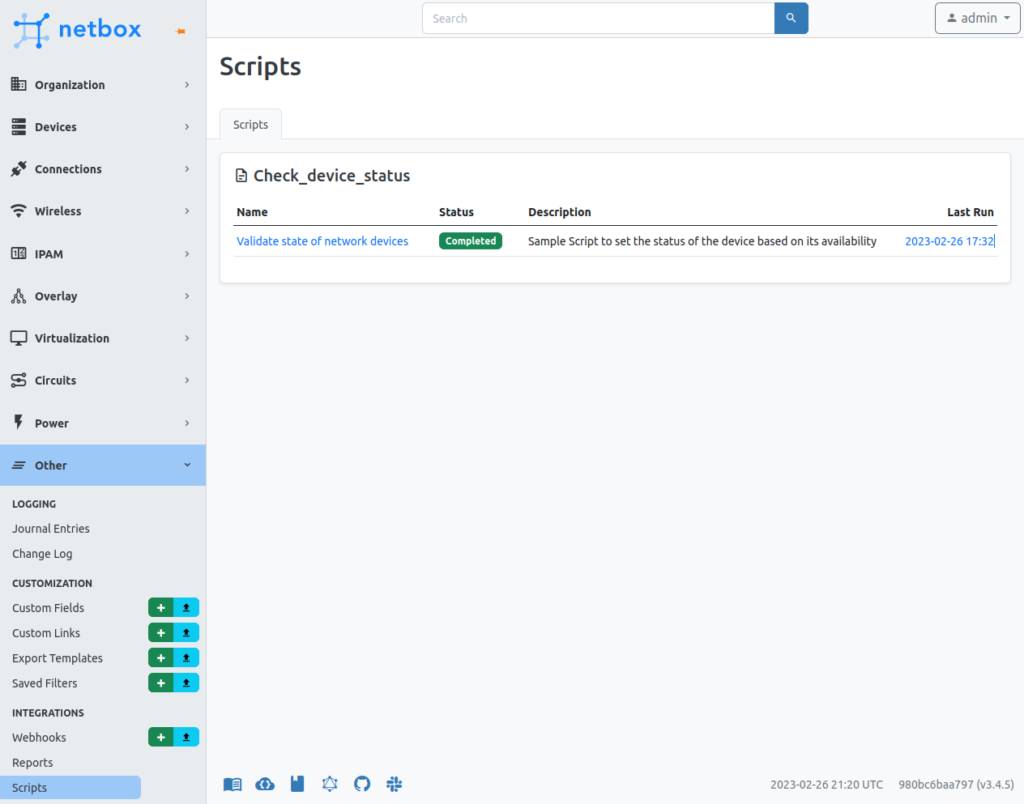
Validation
As mentioned above, navigate to “Others” -> “Scripts” in NetBox UI. In the opened window you should see the script with the name matching the one you provided in the nested Meta class:

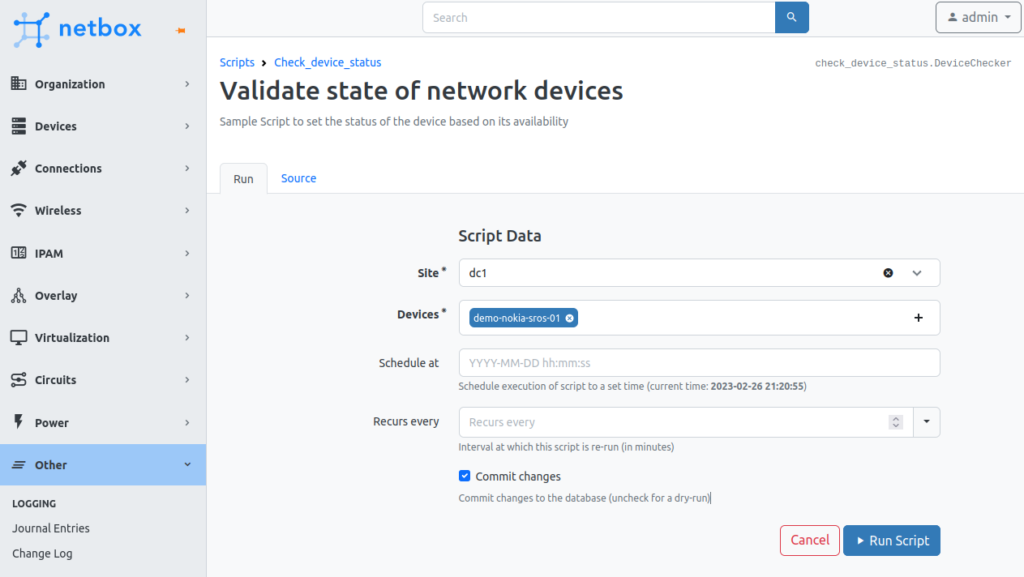
Jump inside the script and in the opened window you can select the site and the device in the drop down menus in the form:

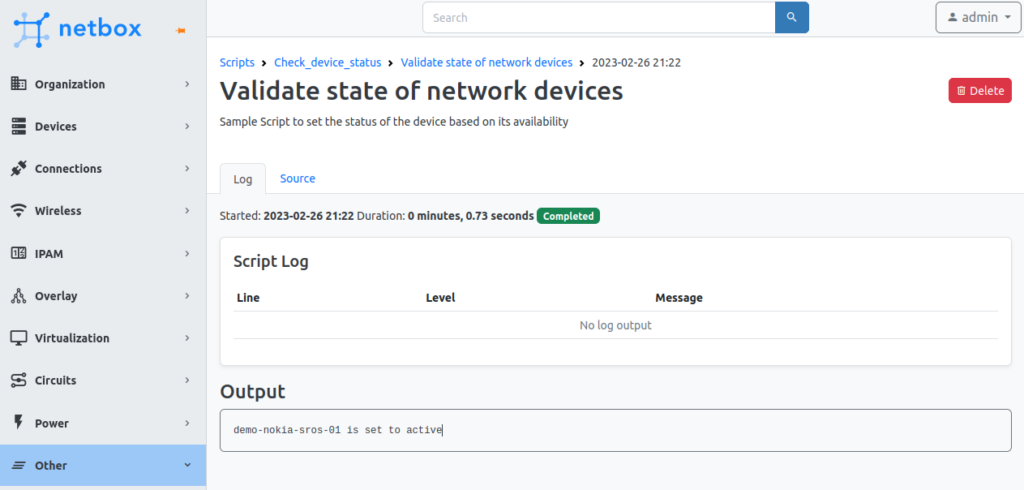
Once all the relevant fields are chosen, press the “Run Script” button. It may take a few moments for script to run. You should see in the result of execution (what we have passed in return instruction to run() method) as an output of the script:

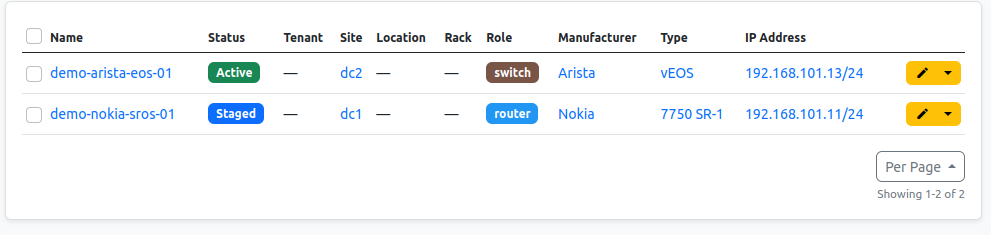
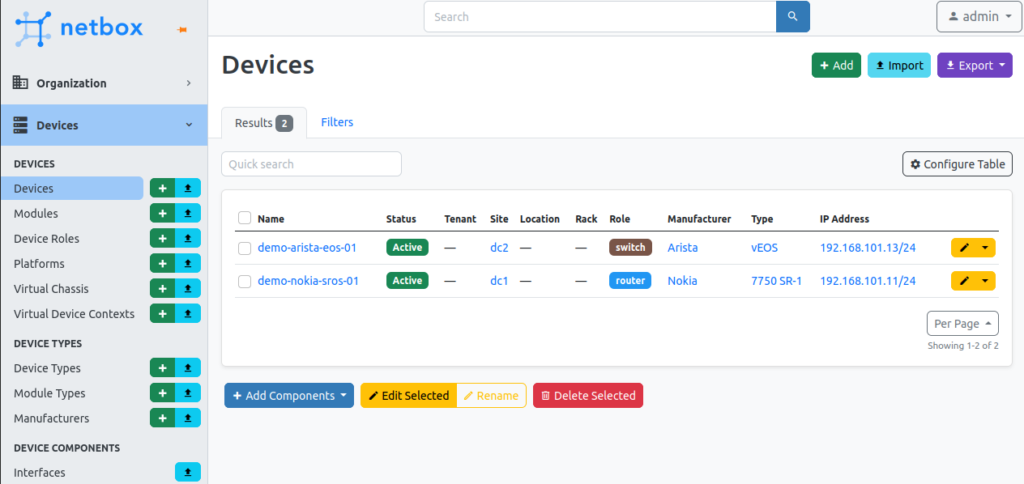
Afterwards you can navigate to “Devices” -> “Devices” tab and to ensure that the status of the network device is changed

If you experience problems, you can troubleshoot the script. The results of executions (or if you are using print() statements for debug) you can find in logs of the netbox-worker container:
2
3
4
5
6
7
8
9
10
11
12
[sudo] password for aaa:
Sorry, try again.
[sudo] password for aaa:
2023-02-26T17:03:52.235292684Z 🧬 loaded config '/etc/netbox/config/configuration.py'
2023-02-26T17:03:52.235645453Z 🧬 loaded config '/etc/netbox/config/extra.py'
2023-02-26T17:03:52.236077602Z 🧬 loaded config '/etc/netbox/config/logging.py'
2023-02-26T17:03:52.236409336Z 🧬 loaded config '/etc/netbox/config/plugins.py'
2023-02-26T17:25:33.300878889Z No queues have been specified. This process will service the following queues by default: high, default, low
2023-02-26T17:26:02.844180709Z demo-nokia-sros-01 True <-- this will be printed if you use the print() function in the run() method
2023-02-26T17:31:06.609270577Z active <-- this will be printed if you use the print() function in the run() method
2023-02-26T17:32:15.421021999Z staged <-- this will be printed if you use the print() function in the run() method
Congratulations, your NetBox script is ready and properly working.
Lessons Learned
The most complicated part was to understand how to deal with the worker. We originally developed the script in the non-containerized version of NetBox and was not able to run any scripts, as the worker was not up. Once we figured out, that it is required to manually start it in the case of the non-containerized NetBox, we were able to progress relatively quickly with the script. In the containerized version, where the worker is deployed as a separated container by default without a need to do any extra user activities, the development of scripts is even smoother.
Summary
With this blogpost, we wanted to outline that the NetBox universe is ever expanding: it already has a lot of useful capabilities to act as a source of truth for your network automation. With Scripts it is brought to the next level, allowing you to add even more functionality to augment data with useful actions. Take care and good bye!
Need Help? Contract Us
If you need a trusted and experienced partner to automate your network and IT infrastructure, get in touch with us.
P.S.
If you have further questions or you need help with your networks, we are happy to assist you, just send us a message. Also don’t forget to share the article on your social media, if you like it.
BR,
Anton Karneliuk