


Hello my friend,
In this article I want to cover the topic of the split tunneling, which is part of VPN technologies. It’s quite good technology that can help you to introduce new services into your network on per user basis without necessity of building Site-to-site VPN. Both Cisco VPN Client and Cisco AnyConnect Client provide you such possibility, so we will compare them and outline the differences in configuration. Ready?
Disclaimer
One of the main objectives of my blog is to help you and me with preparation for CCIE SP. On the other hand there are a lot practical cases that happen at my job. And though they are not necessary related to SP filed, they have a significant practical value and can help you to shorten the time for implementation and troubleshooting of the networking solutions. Just copy and paste them.
The main idea of spilt tunneling
From the wording itself you can understand that we split something. In case of the VPN tunnel we split the traffic so that one its part is send through the tunnel, whereas the second part is sent normally via your local network (LAN). If we speak about ordinary IPSec VPN, such splitting is achieved by access-lists (ACL), which chose interesting traffic. Interesting traffic means that IP packets of this flow correspond to source/destination IP addresses and/or transport ports in access-list associated with VPN.
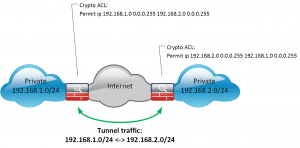

In case of remote access VPNs either we use IPSec of SSL, we don’t have any access-lists configured at the client side. So all the configuration is done at the VPN head-end, which is usually Cisco ASA nowadays if we speak about Cisco Systems. Also the client is usually Cisco AnyConnect now. Previously it was also Cisco VPN Client, but it is End of Life and End of Support today. Split tunneling in remote access VPN is realized usually by authorization process.
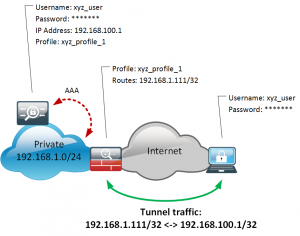

In a couple of words you we can explain this process as follow.
If you name is “ABC” and you are authenticated then you can access network “192.168.1.111/32”
That’s it. Split tunneling has quite straightforward logic in its background.
Real world scenario
I can provide you real world scenario, where you can use such solution. If your company uses some external applications or databases that demands access to the internal resources of another company or you provide such service yourself, split tunneling is a key option for you. If you need to provide access for this service for a lot of employees, then you should use Site-to-Site VPN. However remote access VPN helps you simplify the management for the connectivity service, as you just have to configure one profile for all external users.
How it works – Cisco AnyConnect Client
Cisco AnyConnect Client is the only software client by Cisco that should be used now. The underlying transport can be either SSL or IPSec, but in any case this configuration is done at the VPN head-end.
To be more precise, let’s say that we want to provide access to the network 10.195.1.0/24 for the customers. Let’s take a look how the configuration at Cisco ASA must be done.
First of all you should configure AnyConnect Profile on remote access VPN tab. So you get there via “Configuration” -> “Remote Access VPN” -> “AnyConnect Connection Profile”.


To create new you should press “Add” and to modify the existing one you should press “Edit”. In our case the necessary profile is already configured, so we use “Edit”.


It is the main pane for the configuration of the AnyConect Profile, and from here you have access to all details. The most important option here is “Group Policy”, where you configure the parameter os the tunnel, supported protocols and split tunnel also. But before we jump into policy configuration, we need to create necessary alias and URL in order to have possibility to connect this certain profile and get these certain routes.
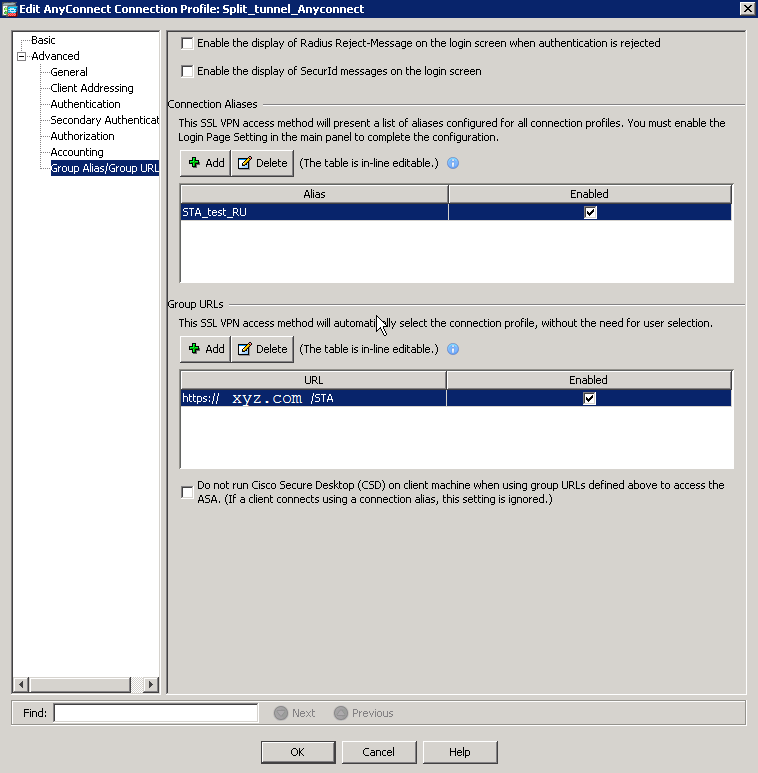

This URL will be used further when you will establish VPN connection, so we will enter “https://xyz.com/STA” in Cisco AnyConnect Client. Well, this part is done and we can proceed with the policy configuration.
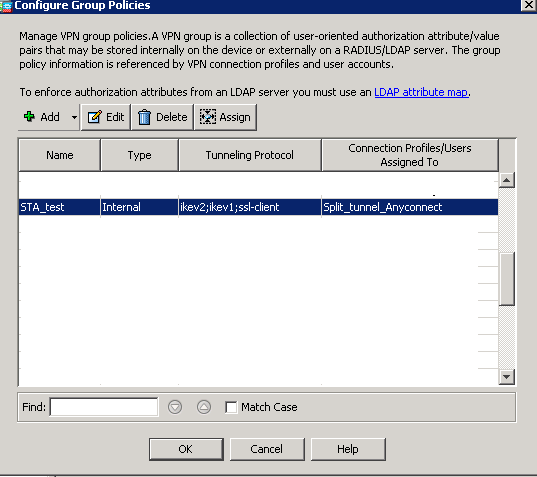

As well as with previous images, you should either “Add” new policy or “Edit” existing one. I’m omitting the configuration of the tunnel protocol as it isn’t relevant for the article. You can configure whatever you like for Cisco AnyConnect. But what is relevant is configuration of “Split Tunneling” under “Advanced” configuration.


There are three options how the remote access VPN tunneling is done. The first one is “Tunnel all traffic”, which means that all the traffic is tunneled form the remote device to this Cisco ASA. From the technical point of view it looks like the remote client just receives the default route “0.0.0.0/0” from the VPN head-end and installs it in its routing table with the lowest metric. It isn’t our case as just provide access to certain resources (network 10.195.1.0/24). The second option is “Tunnel Network List Below”. It means that only such routes will be installed that are allowed in the access-list that is chosen in “Network List”. This is what we need for Cisco AnyConnect Split Tunneling. The third option will be shown in the next case. So you select policy type “Tunnel Network List Below” instead of “inherit” and then select the necessary access-list.


That’s all about simple AnyConnect Connection Profile with split tunneling. We just apply and save the configuration. It will work as follows:
Send to the remote client the routes that are allowed by access-list. All other traffic must be sent locally without VPN.
Let’s try it. We open Cisco AnyConnect Client and enter the necessary link including Profile URL. After successful authentication we can see what routes we receive.
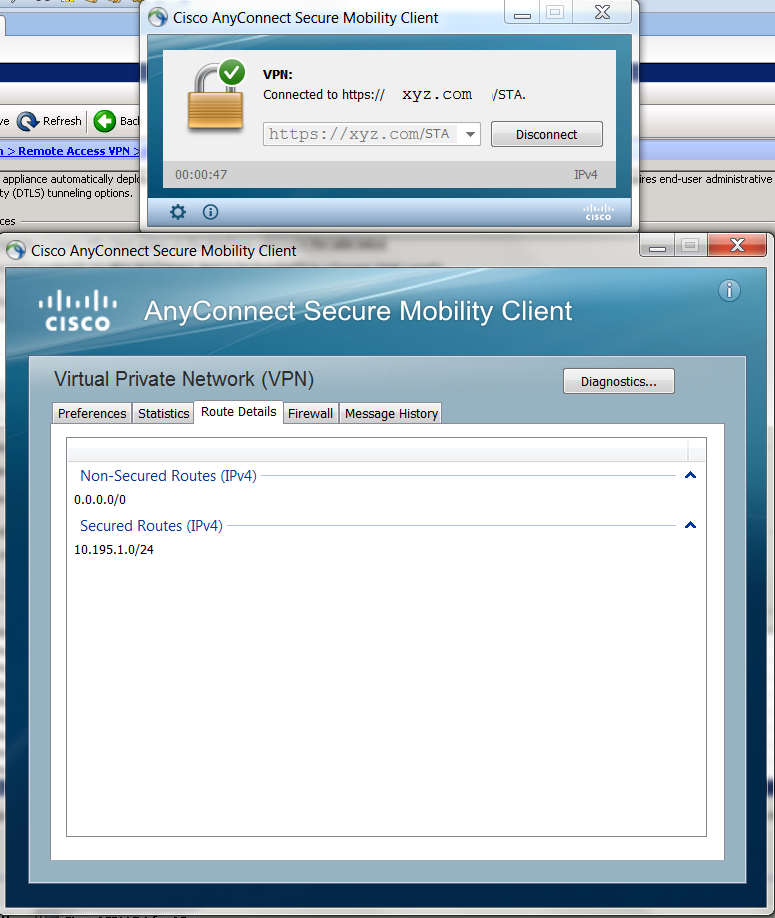

We’ve met accomplished our goal to provide access just to the only one subnet.
How it works – Cisco VPN Client
Actually it is legacy client that isn’t supported anymore officially by Cisco. Despite this fact it is still widely used nowadays. Some time ago it was very good, but if you have now possibility to perform the migration to Cisco AnyConnect, you certainly should do it. The main problem with any migration to new software is that the customers can quite disagree with you, because they have to learn something new. About 70% of customers have panic, when they have to use new software. And try to avoid to do it by complaining to the account managers. Well, I have faced such situation myself and have had to configure split tunneling for Cisco VPN Client. The main problem here is that it works completely differently comparing to Cisco AnyConnect.
For legacy Cisco VPN Client as well as for other third parties IPSec VPN clients the configuration is done under “Configuration” -> “Remote Access VPN” -> “IPsec [IKEv1] Connection Profile”. It looks completely the same as “AnyConnect” pane, so we don’t provide screen shot for it. There you either “Add” new profile or “Edit” existing one.
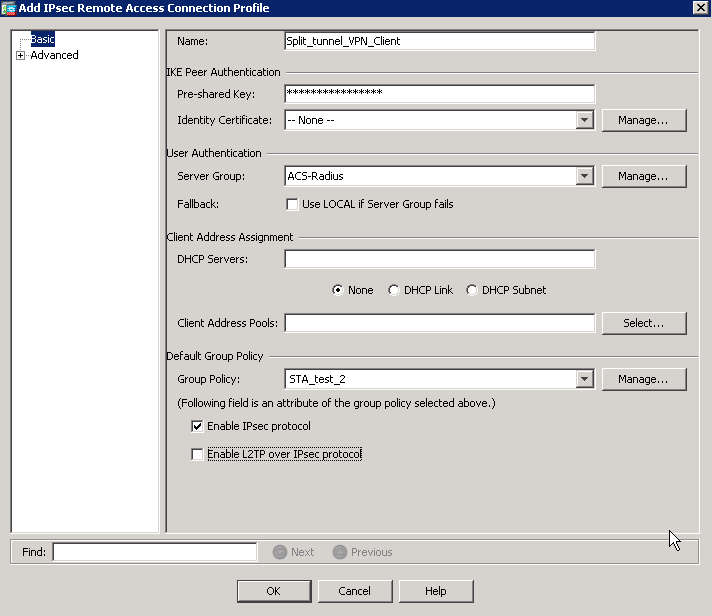

There are two main differences comparing to AnyConnect. The first one is so you have to configure pre-shared key for this profile. The same key will be configured later at the Cisco VPN Client as well. So you have a two factor authentication, where the first one is password for the profile and the second one is unique username/password for each user. The second difference is so that you don’t know to configure ant URL or alias to access this profile. Actually you have to configure profile name, which is “Split_tunnel_VPN_Client” in our case, at the Cisco VPN Client side. Later we’ll show how you can do it.
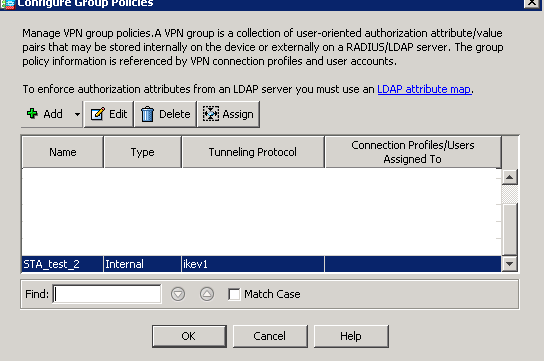
Then we configure the group policy, to provide access only the network 10.195.1.0/24.


And here we come to the key difference. Do you remember, I have said previously that we have 3 options for split tunnel policies, whereas I’ve explained only two? Well, it’s time to explain the third one. It’s called “Exclude Network List Below” and work as follows:
Don’t tunnel traffic only for a certain subnets, whereas other traffic must be tunneled to VPN head-end.
It’s the only supported mode for Cisco VPN Client. Unfortunately it doesn’t support “Include” mode, what we’ve used for Cisco AnyConnect profile. It’s rather disappointing, because we have to configure very long access-list to cover this gap.


Actually it must be longer, but I don’t use any subnets beside 10.129.0.0/16 or 10.192.0.0/16 in my network. You should think about this ACL as follows:
The networks permitted in this ACL are denied to be tunneled.
At the end of the day you should deny all the subnets beside 10.195.1.0/24. Silly, right? But it’s the only way how to achieve the necessary behavior with Cisco VPN Client. I suppose that other vendors don’t have such limitation in their VPN Clients, as well as Cisco doesn’t have it in its AnyConnect Clients. But if you have to use legacy Cisco VPN Client, just use this solution.
Now, let’s configure the Cisco VPN Client itself.
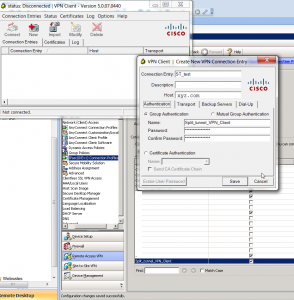

Under “Authentication” tab you configure the name of the profile and pre-shared key that you have already configured at Cisco ASA.
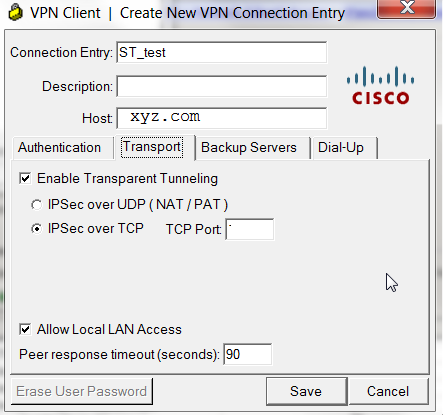

At the “Transport” tab the most important feature is “Allow Local LAN Access”. Without having this feature enabled, the received routes won’t work as proper.
Let’s test, whether our configuration works.


After successful authentication we can check the parameters for the established tunnel. At the first tab we should check that local LAN communication is allowed. It guarantees us that traffic to the routes, which we have allowed for exclusion under the profile configuration, will be sent locally.
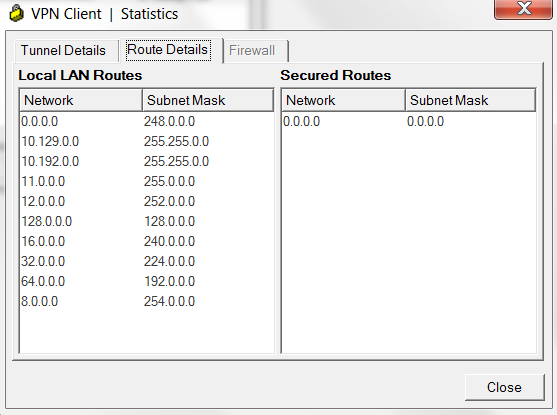

At the next tab we actually see that default route points to VPN, but there are lots of Local LAN Routes. Actually all public and almost all private routes are Local LAN.
Conclusion
In this article we’ve compared the configuration and operation of split tunneling for software-based Cisco VPN solutions. Though both Cisco VPN Client and Cisco AnyConnect Client are made by Cisco, their nature is quite different. This difference leads to different approach in the profile’s configuration. In general legacy VPN Clients has option only for IPSec and it use IKEv1. Sometimes it brings a lot of troubles, if you have VPN Clients behind the NAT and Site-to-Site VPN to the same head-end. On the other hand AnyConnect provide you possibilities to use SSL instead of IPSec, making the operation of VPN at 7th layer of OSI model. So your long-term objective must be to migrate to Cisco AnyConnect, if you use Cisco ASA as head-end.
Lessons learned
Sometimes you can’t change the operational environment of your or partners company. Such restrictions demands you to be more flexible and open minded. I like such challenges, because solving them brings me a lot of fun and experience. If you can’t find quick answer in the Cisco configuration guides, try to find your own. I’m completely confident that good understanding of the network technologies will help you with any difficult case.