Ansible (IT automation) with Nokia (Alcatel-Lucent) SR OS and Cisco IOS XR
Anton Karneliuk
Hello my friend,
Everybody wants to do less and to get more. Thanks to this desire the humanity has been developing for a long time. Let’s see what we can automate in the network build with Nokia (Alcatel-Lucent) SR OS and Cisco IOS XR and how we can achieve this automation.
1 2 3 4 5
No part of this blogpost could be reproduced, stored in a
retrieval system, or transmitted in any form or by any
means, electronic, mechanical or photocopying, recording,
or otherwise, for commercial purposes without the
prior permission of the author.
Brief overview
With the growth of the network the complexity of its management increases significantly. Complexity is a cumulative parameter, which includes time being spent on network management as well. For sure you need much more time to update the configuration at 1000 routers than at 10 routers. Sometimes the configuration might be quite specific, so you have to do it manually at the particular device. But more commonly you have to make the same changes at dozens of devices. Like when you make a service rollout of new L2 or L3 VPN for customer, or when you change routing policies in your network globally, or when you add new rules to your access lists to protect your network. You can easily continue this list on your own with the recent activities you have made. These types of tasks are perfect examples for automation.
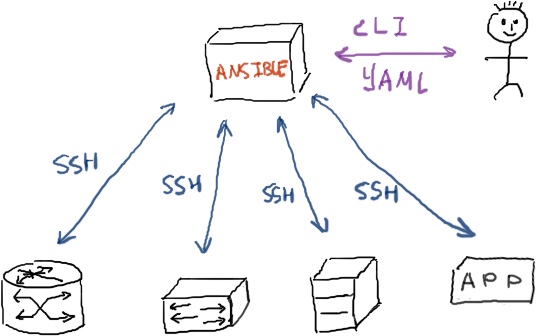
There are a lot of tools of the market that can help you to do this thing. Besides vendors’ specific NMS’s (line SAM by Nokia (Alcatel-Lucent) or Cisco Prime by Cisco) there are others free and paid applications. In this article I’ll talk about the application that I’ve heard recently from my colleague Greg Hankins, which is called Ansible. Ansible was initially open-source tool for IT automation (software or hardware deployment) and it’s acquired by Red Hat. In a nutshell it’s CLI based tool that connected to remote devices via SSH and perform some activities there. SSH implies that Ansible is in general suitable for managing any device, which can speak SSH. In a commercial language it’s called “agentless”. There is also a GUI-based solution, which is called Ansible Tower, but I haven’t worked with it so I can’t provide details.
Ansible uses YAML language to its scripts, which managed devices. This language is quite easy, so you don’t have to be a professional in any other programming language. Scripts in Ansible is called playbooks, so you actually create playbooks and run them using Ansible. The latest official version is 2.2, which was released at 2. November. It’s the first Ansible release that supports Nokia (Alcatel-Lucent) SR OS. Cisco IOS was supported previously, but the latest changes to its operation were made in release 2.1. Interaction with the different OS (vendors) is done by calling corresponding core modules from your playbook. There is some documentation at the official page regarding these modules. This documentation is everything you need to start creating your playbooks. We need the following four modules for our lab:
I want to speed up the implementation of VPNs (as one of the most common tasks I have to deal with). So in this article I’ll show you a simple example of how to use Ansible for creation of VRF/VPRN templates and its deployment in order to get working service in short period of time.
Topology
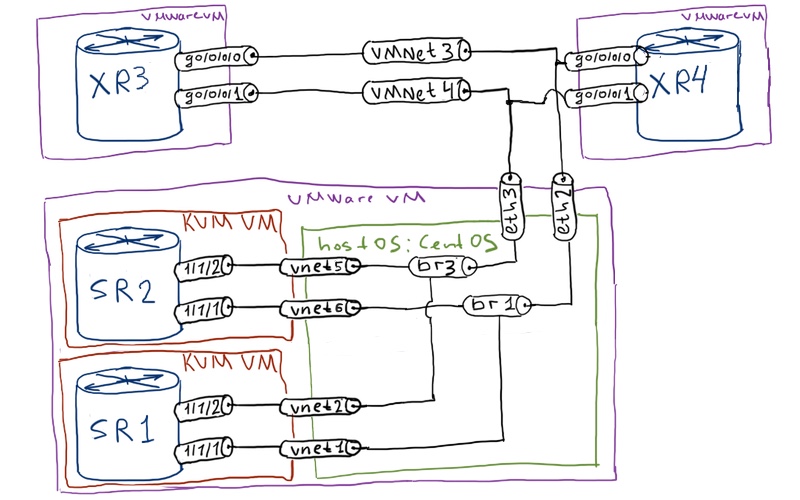
Physical topology is a little bit different:
As you see, we have 4 routers in general here. I can’t run them simultaneously at my laptop, therefore I will run separately 2 VSRs, when I will be describing Nokia (Alcatel-Lucent) SR OS configuration part, and separately 2 XRvs, when I will be describing Cisco IOS XR part. Ansible is installed in host OS, which is CentOS in my case. Next follows the logical topology:
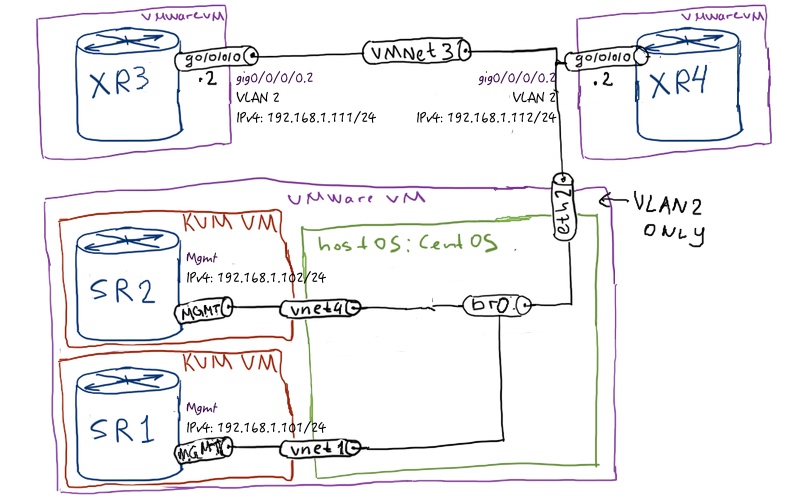
We have fully configured networks with 4 routers. All of them play role of PE and P routers. We have OSPF + LDP + MP-BGP for vpnv4 unicast and vpnv6 unicast address families, so it’s a quite easy SP (service provider) core. The most important part though is the management connectivity between server with Ansible and our devices. In Nokia (Alcatel-Lucent) SR OS routers dedicated management interface is used, whereas in Cisco we just configure one more interface and map it to “br0” interface in CentOS, which is used for management in our lab:
Don’t forget to activate ssh server in Cisco IOS XR and configure BOF file with management IP address in Nokia (Alcatel-Lucent) SR OS.
SSH keys
Ansible uses SSH to connect to managed nodes. When you connect to the node for the first time, you are asked if you want to connect to the device due to unknown DSA fingerprint
[root@localhost ~]# ssh cisco@192.168.1.112
RSA key fingerprint is 94:47:a9:b3:66:94:91:19:a6:12:a1:57:57:cd:fd:ef.
Are you sure you want to continue connecting (yes/no)? yes
I advise you to make such first connection to all of your nodes manually in order to get all the SSH keys saved. It allows Ansible to work smoothly, when we’ll use it.
Ansible installation
The first step is to install the necessary release of Ansible. At the official website you can find corresponding manual. In general I have followed it. First of all I’ve tried to install from yum directory (I have CentOS on my management VM):
At the time of writing the version that was available in yum repository was 2.1.2, which doesn’t support Nokia (Alcatel-Lucent) SR OS. Well, then I have decided to install the latest version from github:
Now it looks much better and I can go further with basic configuration of Ansible. The next step you should take is to prepare your “hosts”, where all information about your managed node is located. In the output above you see the folder, where Ansible is installed, so let’s go there:
[root@localhost ~]# cd /etc/ansible/
!
!
[root@localhost ansible]# ls
ansible.cfg hosts roles
!
!
[root@localhost ansible]# cat hosts
# This is the default ansible ‘hosts’ file.
#
# It should live in /etc/ansible/hosts
#
# – Comments begin with the ‘#’ character
# – Blank lines are ignored
# – Groups of hosts are delimited by [header] elements
# – You can enter hostnames or ip addresses
# – A hostname/ip can be a member of multiple groups
# Ex 1: Ungrouped hosts, specify before any group headers.
## green.example.com
## blue.example.com
## 192.168.100.1
## 192.168.100.10
# Ex 2: A collection of hosts belonging to the ‘webservers’ group
## [webservers]
## alpha.example.org
## beta.example.org
## 192.168.1.100
## 192.168.1.110
# If you have multiple hosts following a pattern you can specify
# them like this:
## www[001:006].example.com
# Ex 3: A collection of database servers in the ‘dbservers’ group
## [dbservers]
##
## db01.intranet.mydomain.net
## db02.intranet.mydomain.net
## 10.25.1.56
## 10.25.1.57
# Here’s another example of host ranges, this time there are no
# leading 0s:
## db-[99:101]-node.example.com
[nokia]
192.168.1.101
192.168.1.102
!
[cisco]
192.168.1.111
192.168.1.112
All commented strings exist in the file by default and they provide very good help for you to build your own inventory, in my opinion. There is also useful information in online-help. In my case, I have created two groups: nokia (for SR OS devices) and cisco (for IOS XR devices).
Remove the “!” from the output above. There must be empty string, but wordpress breaks text formatting then.
The latest step is to create some folder, where all your playbooks will be stored. For example:
[root@localhost ~]# mkdir /home/aaa/ansible_test_scripts/
[root@localhost ~]# cd /home/aaa/ansible_test_scripts/
Initial configuration of Ansible is done and we can proceed with its usage for its main goal that is automation.
BGP/MPLS IP VPN Service topology
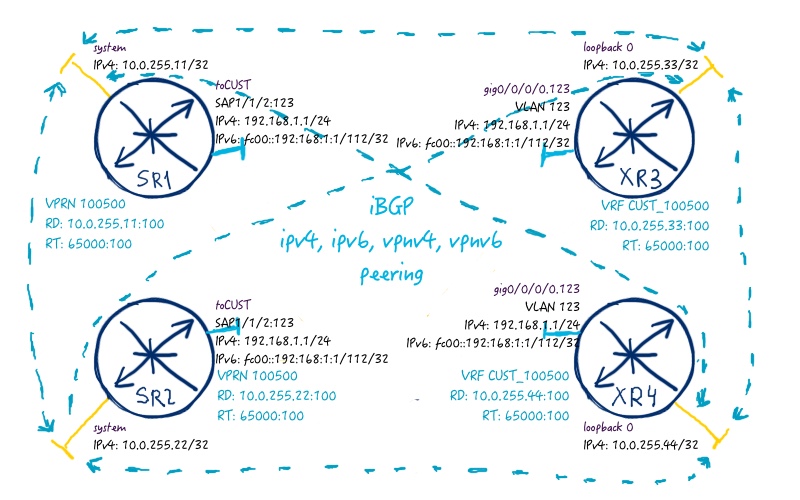
At the picture above you see how the service that we are going to build looks like:
So we need to create in our topology new L3 MPLS VPN service, with route distinguisher IPv4_address_system_interface:100, route-target 65000:100. In each VRF/VPRN we have an interface with the same VLAN tag that is 444 and the same access-list that allows access only to certain subnet (IPv4: 192.168.1.0/24, IPv6: fc00::192:168:1:0/112) for attached nodes. Such deployment is very similar to real world, where you configure mobile backhaul network for rollout for 3G or 4G base stations.
Ansible playbooks for Nokia and Cisco configuration
Based on the provided explanation in the part above I’m going to create playbook for configuration of Nokia (Alcatel-Lucent) SR OS and Cisco IOS XR:
Spaces before words is absolutely important for YAML. Make sure they are consistent like in my example. Remove “.” In the beginning of each string and you copy-paste this config. Also refer to my playbooks in the end of this article.
I guess you wonder, what is written above. Well, this is script in YAML, which instructs Ansible how to configure router. For configuration of Nokia (Alcatel-Lucent) SR OS the “sros_config” module is used, whereas for Cisco IOS XR “iosxr_config” is used. Pay attention to the configuration, as all commands are applied inside one context, which is defined by parents. There is also possibility to add “before” or “after” parts, which add some commands that must be issued before or after main body, but I don’t used them in my scripts. Spend some time here, before going further, and make sure that you understand now it’s structure.
Let’s see how the configuration is done. Before you launch this playbook, you see only default configuration in service part in Nokia (Alcatel-Lucent) SR OS PE router:
You see that tasks from our playbook are applied to the router in the configured order and change its configuration. Now services context at our Nokia (Alcatel-Lucent) SR OS looks much differ:
It’s amazing, isn’t it? Pay attention that we save made configuration by the last task.Let’s check the Cisco side now. Before we use our playbook we don’t see no VRFs configured:
In such a way you get the same configuration at all your routers, which is very useful for activities like roll out.
Ansible playbooks for Nokia and Cisco non-configuration
In the previous part we have reviewed the possibility of configuration our network using Ansible, as this task is the most essential. But as you have seen in the beginning of the article, we also have modules that are responsible for non-configuration commands.
One such command was used in Nokia (Alcatel-Lucent) SR OS playbook for saving configuration.
From the practical point of view, we can use such playbooks for analyzing routing tables at all routers for certain service (VPRN/VRF) or globally:
When you use this playbook, you receive the following output:
[root@localhost ansible_test_scripts]# ansible-playbook nokia_check_rib.yml
PLAY [nokia] ************************************************************************
!
TASK [GLOBAL / check RIB] ***********************************************************
ok: [192.168.1.101]
ok: [192.168.1.102]
!
TASK [debug] ************************************************************************
ok: [192.168.1.101] => {
“msg”: [
[
“”,
“===============================================================================”,
“Route Table (Router: Base)”,
“===============================================================================”,
“Dest Prefix[Flags] Type Proto Age Pref”,
” Next Hop[Interface Name] Metric “,
“——————————————————————————-“,
“10.0.0.0/31 Local Local 00h49m45s 0″,
” toSR2 0″,
“10.0.0.2/31 Local Local 00h49m45s 0″,
” toXR3 0″,
“10.0.255.11/32 Local Local 00h49m55s 0″,
” system 0″,
“10.0.255.22/32 Remote ISIS 00h47m16s 18″,
” 10.0.0.1 10″,
“——————————————————————————-“,
“No. of Routes: 4”,
“Flags: n = Number of times nexthop is repeated”,
” B = BGP backup route available”,
” L = LFA nexthop available”,
” S = Sticky ECMP requested”,
“===============================================================================”
]
]
}
ok: [192.168.1.102] => {
“msg”: [
[
“”,
“===============================================================================”,
“Route Table (Router: Base)”,
“===============================================================================”,
“Dest Prefix[Flags] Type Proto Age Pref”,
” Next Hop[Interface Name] Metric “,
“——————————————————————————-“,
“10.0.0.0/31 Local Local 00h47m18s 0″,
” toSR1 0″,
“10.0.0.4/31 Local Local 00h47m18s 0″,
” toXR4 0″,
“10.0.255.11/32 Remote ISIS 00h47m17s 18″,
” 10.0.0.0 10″,
“10.0.255.22/32 Local Local 00h47m29s 0″,
” system 0″,
“——————————————————————————-“,
“No. of Routes: 4”,
“Flags: n = Number of times nexthop is repeated”,
” B = BGP backup route available”,
” L = LFA nexthop available”,
” S = Sticky ECMP requested”,
“===============================================================================”
]
]
}
TASK [VRF / check RIB] **************************************************************
ok: [192.168.1.101]
ok: [192.168.1.102]
!
TASK [debug] ************************************************************************
ok: [192.168.1.101] => {
“msg”: [
[
“”,
“===============================================================================”,
“Route Table (Service: 100500)”,
“===============================================================================”,
“Dest Prefix[Flags] Type Proto Age Pref”,
” Next Hop[Interface Name] Metric “,
“——————————————————————————-“,
“192.168.1.0/24 Local Local 00h42m28s 0″,
” toCUST 0″,
“——————————————————————————-“,
“No. of Routes: 1”,
“Flags: n = Number of times nexthop is repeated”,
” B = BGP backup route available”,
” L = LFA nexthop available”,
” S = Sticky ECMP requested”,
“===============================================================================”
]
]
}
ok: [192.168.1.102] => {
“msg”: [
[
“”,
“===============================================================================”,
“Route Table (Service: 100500)”,
“===============================================================================”,
“Dest Prefix[Flags] Type Proto Age Pref”,
” Next Hop[Interface Name] Metric “,
“——————————————————————————-“,
“192.168.1.0/24 Local Local 00h42m28s 0″,
” toCUST 0″,
“——————————————————————————-“,
“No. of Routes: 1”,
“Flags: n = Number of times nexthop is repeated”,
” B = BGP backup route available”,
” L = LFA nexthop available”,
” S = Sticky ECMP requested”,
“===============================================================================”
]
]
}
!
PLAY RECAP **************************************************************************
192.168.1.101 : ok=4 changed=0 unreachable=0 failed=0
192.168.1.102 : ok=4 changed=0 unreachable=0 failed=0
For Cisco IOS XR the output will be similar
Ad-hoc commands in Ansible
As you have seen, playbooks are powerful scripts that can make your life much easier and network operation much smoother. On the other hand, time to time you need to issue a single command at all your devices (or part of them). You might do it by using so called ad-hoc commands. For example, you want to see what Cisco IOS XR version do you have currently at your routers:
[root@localhost /]# ansible cisco -m raw -a “show ver | inc disk0” -u cisco -k -c paramiko
SSH password:
192.168.1.111 | SUCCESS | rc=0 >>
Sat Oct 22 00:43:13.399 UTC
System image file is “bootflash:disk0/xrvr-os-mbi-5.3.2/mbixrvr-rp.vm”
2321392k bytes of disk0: (Sector size 512 bytes).
Boot device on node 0/0/CPU0 is disk0:
iosxr-infra, V 5.3.2[Default], Cisco Systems, at disk0:iosxr-infra-5.3.2
iosxr-fwding, V 5.3.2[Default], Cisco Systems, at disk0:iosxr-fwding-5.3.2
iosxr-routing, V 5.3.2[Default], Cisco Systems, at disk0:iosxr-routing-5.3.2
iosxr-ce, V 5.3.2[Default], Cisco Systems, at disk0:iosxr-ce-5.3.2
xrvr-os-mbi, V 5.3.2[Default], Cisco Systems, at disk0:xrvr-os-mbi-5.3.2
xrvr-base, V 5.3.2[Default], Cisco Systems, at disk0:xrvr-base-5.3.2
xrvr-fwding, V 5.3.2[Default], Cisco Systems, at disk0:xrvr-fwding-5.3.2
xrvr-mgbl-x, V 5.3.2[Default], Cisco Systems, at disk0:xrvr-mgbl-x-5.3.2
iosxr-mpls, V 5.3.2[Default], Cisco Systems, at disk0:iosxr-mpls-5.3.2
iosxr-mgbl, V 5.3.2[Default], Cisco Systems, at disk0:iosxr-mgbl-5.3.2
iosxr-mcast, V 5.3.2[Default], Cisco Systems, at disk0:iosxr-mcast-5.3.2
xrvr-mcast-supp, V 5.3.2[Default], Cisco Systems, at disk0:xrvr-mcast-supp-5.3.2
iosxr-bng, V 5.3.2[Default], Cisco Systems, at disk0:iosxr-bng-5.3.2
xrvr-bng-supp, V 5.3.2[Default], Cisco Systems, at disk0:xrvr-bng-supp-5.3.2
iosxr-security, V 5.3.2[Default], Cisco Systems, at disk0:iosxr-security-5.3.2
xrvr-fullk9-x, V 5.3.2[Default], Cisco Systems, at disk0:xrvr-fullk9-x-5.3.2
!
!
192.168.1.112 | SUCCESS | rc=0 >>
Fri Jun 17 10:04:26.264 UTC
System image file is “bootflash:disk0/xrvr-os-mbi-5.3.2/mbixrvr-rp.vm”
2321392k bytes of disk0: (Sector size 512 bytes).
Boot device on node 0/0/CPU0 is disk0:
iosxr-infra, V 5.3.2[Default], Cisco Systems, at disk0:iosxr-infra-5.3.2
iosxr-fwding, V 5.3.2[Default], Cisco Systems, at disk0:iosxr-fwding-5.3.2
iosxr-routing, V 5.3.2[Default], Cisco Systems, at disk0:iosxr-routing-5.3.2
iosxr-ce, V 5.3.2[Default], Cisco Systems, at disk0:iosxr-ce-5.3.2
xrvr-os-mbi, V 5.3.2[Default], Cisco Systems, at disk0:xrvr-os-mbi-5.3.2
xrvr-base, V 5.3.2[Default], Cisco Systems, at disk0:xrvr-base-5.3.2
xrvr-fwding, V 5.3.2[Default], Cisco Systems, at disk0:xrvr-fwding-5.3.2
xrvr-mgbl-x, V 5.3.2[Default], Cisco Systems, at disk0:xrvr-mgbl-x-5.3.2
iosxr-mpls, V 5.3.2[Default], Cisco Systems, at disk0:iosxr-mpls-5.3.2
iosxr-mgbl, V 5.3.2[Default], Cisco Systems, at disk0:iosxr-mgbl-5.3.2
iosxr-mcast, V 5.3.2[Default], Cisco Systems, at disk0:iosxr-mcast-5.3.2
xrvr-mcast-supp, V 5.3.2[Default], Cisco Systems, at disk0:xrvr-mcast-supp-5.3.2
iosxr-bng, V 5.3.2[Default], Cisco Systems, at disk0:iosxr-bng-5.3.2
xrvr-bng-supp, V 5.3.2[Default], Cisco Systems, at disk0:xrvr-bng-supp-5.3.2
iosxr-security, V 5.3.2[Default], Cisco Systems, at disk0:iosxr-security-5.3.2
xrvr-fullk9-x, V 5.3.2[Default], Cisco Systems, at disk0:xrvr-fullk9-x-5.3.2
Explanation of the keys for ansible tool you can find either in built-in help or at official website.
Unfortunately, I haven’t managed to use such ad-hoc commands with Nokia (Alcatel-Lucent) SR OS. Probably there are still some problems with interoperability and they will be solved in future.
What is to do further
The first time I have heard about Ansible 12 days ago, so I’m not profi on it still. But I’m sure that it’s possible to make parametrization for your playbook by preconfiguring some lists of IP addresses or something similar in order get them different at different nodes. Some parametrization was already used, but it’s possible to provide more. But even in our case it isn’t problem if attached router announces some prefix. When I get further with Ansible, I’ll make another post.
Just remove “_.txt” so that ending is “.yml” and go ahead!
Lessons learned
You might spot in the beginning of the article that I have mentioned both ios and iosxr modules. The reason for that is that you can use both of the for configuration and reviewing something in IOS XR. For example, if you use ios_config, you just need add the last command to lines as “-commit” and that’s it. So, both variants are possible.
Conclusion
The last week I had a long discussion with colleagues from one service provider in Germany regarding automation and scripting. The resulting thesis was such that automation is good for deployment of services and changes of the current ones, what can decrease humans’ intervention and therefore lead to reduction of employee number. This is for sure a fear for many engineers, who might lose their job. On the other hand, nobody can replace human in troubleshooting today, so there is still plenty of work for engineers. My personal opinion that there will be always work for good engineers, who constantly develop their skills in networking and adjacent areas (i.e. automation). So Ansible helps you to spend less time on routine activities, so that you can focus on development of the network (or your skills). Use robots. Take care and good bye!