


Hello my friend,
we continue the series of the blogpost dedicated to the overview of the Nokia SR Linux. Today we will speak about the interoperability and its joint operation with Microsoft Azure SONiC, another disaggregated OS, which is used in the hyper scale data centres.
2
3
4
5
retrieval system, or transmitted in any form or by any
means, electronic, mechanical or photocopying, recording,
or otherwise, for commercial purposes without the
prior permission of the author.
Automate your data centre infrastrcutre
The data centres and applications they host might be very static, if that is classical enterprise workloads. However, in the world of the clouds the frequency of the changes performed in the data centre network and servers can be very high. Effectively, it can be so high that doing them manually is impractical.
At our network automation training (either live or self-paced) you will learn the foundation of the automation for the small and big data centres, and clouds. You will lean how to structure the data using YANG modules, how to serialise it using JSON, XML, Protobuf depending on the application requirements and how to manage the fleet of your IT and network workloads using gRPC, gNMI, NETCONF, REST API and many others.
Big Data Centre Life
The interoperability of the technologies, or the same technology across different vendors is a paramount factor for build the complex IT systems, and there are no doubts that the data centres, especially hyper scale data centres, are the complex IT systems. The interoperability is a broad term; hence, for the purpose of this blogpost we’ll specify it as follows:
- Interoperability of the BGP to build the join IP fabric.
- Same approach to the BGP NLRI distribution and filtering.
- Possibility to send and receive the actual data traffic from the endpoints (hosts) to the fabric and back.
Yet in this article we don’t speak about the integration of the Nokia SR Linux container in the Data Centre Graph. We’ll do that at a later stage.
BGP is a de-facto standard for building hyper scale data centres; hence, it is a starting point for the interoperability overview. On the other hand, especially when we talk about the application design in the hyper scale data centres, there is no need to run any sort of the overlay at the network level, because the parts of the applications communicates between each other using IP addresses. That simplifies the data centre design making the pure IP/BGP fabric sufficient. In the same time, it doesn’t exclude the possibility to deploy the overlays on the host level, where the tenants networks can be spanning multiple hosts, like in case of OpenStack or Docker clouds. Hence, BGP interoperability is a key
What are we going to test?
Both the Nokia SR Linux and Microsoft Azure SONiC are available as Docker containers, what allows the network and automation developers to test various designs and configuration quickly and efficiently. As such, in this lab we will focus on :
- Building a network topology containing both Nokia SR Linux and Microsoft Azure SONiC containerised network functions.
- Building the eBGP fabric and propagating customer routes.
- Connecting customers (Ubuntu hosts) both to Nokia SR Linux and SONiC leafs and making sure they can communicate to each other.
Software version
As we aren’t focusing on the automation yet, we are interested in the SW versions of the network functions:
- Nokia SR Linux [guest CNF]
- Microsoft Azure SONiC [guest CNF]
Topology
In the beginning the topology is pretty small:

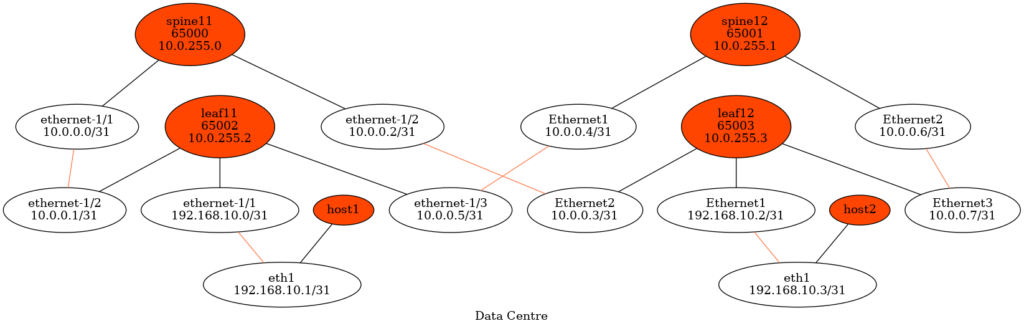
Graph is generated the Data Centre Network Graph. Integration of the Nokia SRLinux to it will be covered later.
The further details are as follows:
- Nokia SR Linux runs on leaf11 and spine11
- Microsoft Azure SONiC runs on leaf12 and spine12
- The hosts are Ubuntu Linux
- Each leaf and spine node has its own BGP ASN
- IP addresses for the customers and for point-to-point link are IPv4.
You can take a look at the code in our GitHub repository.
Solution development
The overall structure of the of interoperability lab consist from the following steps:
- Bring topology up
- Configure network functions
- Verify the traffic forwarding
Let’s start with that
#1. Bring Topology Up: Linux containers and container networking
As promised in the previous blogpost, we will share how to build the connectivity between the containers. In fact, we will use the approach described earlier, when we just started our researches with Microsoft Azure SONiC. The approach is the following:
- Create the Docker containers in the mode without network.
- Add the connectivity between containers using pairs of veth interfaces.
In the previous approach we were terminating the connectivity between containers on the Linux bridges. However, that is not the case anymore. We have moved to CentOS 8, where the bridge tool (brctl) is missing. It doesn’t mean that we can’t do it, if we want to, but we will have to rely on the network manager daemon.
Learn more about installation and management of Linux CentOS 8 at our network automation training.
To build the topology we are using the simple Bash script, which we will cover in depth now. This script will assure the topology is build accurately.
Hello to everyone who thinks that Bash is dead. It is not and it is keep walking.
2
3
4
5
6
7
8
9
10
11
12
13
14
15
16
17
18
19
20
21
22
23
24
25
26
27
28
29
30
31
32
33
34
35
36
37
38
39
40
41
42
43
44
45
46
47
48
49
50
51
52
53
54
55
56
57
58
#/usr/bin/env bash
K_FABRIC1='srlinux:19.11.7-75'
K_FABRIC2='docker-sonic-p4:latest'
K_HOST='ubuntu:14.04'
# Step 1
echo "$(date): Launching Docker // starting..."
sudo systemctl start docker.service
echo "$(date): Launching Docker // done"
# Step 2
echo "$(date): Creating the containers // starting..."
FABRIC=('leaf11' 'leaf12' 'spine11' 'spine12' 'host11' 'host12')
for CENTRY in ${FABRIC[@]}; do
# Bulding Nokia SRL network function
if [[ ${CENTRY} == 'leaf11' || ${CENTRY} == 'spine11' ]]; then
sudo docker run --privileged \
--user root --env SRLINUX=1 \
--name ${CENTRY} --hostname ${CENTRY} -it -d \
-v $PWD/shared/license.key:/opt/srlinux/etc/license.key:ro \
-v $PWD/${CENTRY}/config.json:/etc/opt/srlinux/config.json:rw \
-v $PWD/${CENTRY}/srlinux.conf:/home/admin/.srlinux.conf:rw \
-v $PWD/${CENTRY}/tls/:/etc/opt/srlinux/tls/:rw \
-v $PWD/${CENTRY}/checkpoint/:/etc/opt/srlinux/checkpoint/:rw \
${K_FABRIC1} \
bash -c 'sudo /opt/srlinux/bin/createuser.sh && /opt/srlinux/bin/sr_facls.sh && /opt/srlinux/bin/sr_linux'
# Bulding Microsoft Azure SONiC network function
elif [[ ${CENTRY} == 'leaf12' || ${CENTRY} == 'spine12' ]]; then
sudo docker run --net=none --privileged \
--entrypoint /bin/bash --name ${CENTRY} -it -d \
-v $PWD/${CENTRY}:/sonic \
${K_FABRIC2}
# Building Ubuntu host
else
sudo docker run --net=none --privileged \
--entrypoint /bin/bash \
--name ${CENTRY} --hostname ${CENTRY} -it -d ${K_HOST}
fi
sleep 5
PID=$(sudo docker inspect --format '{{ .State.Pid }}' ${CENTRY})
sudo ip netns attach ns_${CENTRY} ${PID}
done
echo "$(date): Creating the containers // done"
!
! FURTHER OUTPUT IS TRUNCATED
With this part we create the Docker containers with our network functions:
- The variables K_FARBIC1, K_FABRIC2 and K_HOST store the name of the Docker images. If you don’t have them, the Ubuntu image will be downloaded automatically, the Azure SONiC you can download yourself, whereas for Nokia SRLinux you yet need to contact Nokia.
2
3
4
5
REPOSITORY TAG IMAGE ID CREATED SIZE
srlinux 19.11.7-75 a5f0f09222c5 8 weeks ago 1.06GB
ubuntu 14.04 6e4f1fe62ff1 7 months ago 197MB
docker-sonic-p4 latest a62359e719f0 2 years ago 445MB
- Afterwards the service for the Docker container is started, if it is not yet running in Step 1
- And in Step 2 we create the containers. All of them have some their specifics.
- For Nokia SR Linux there are lots of variables including mapping of the local folders and files, which you can create as empty yet. The bad thing, you need to have a license file, which is used to load the containers, which we can not share with you (same as image, talk to Nokia representatives). Another interesting thing here is that Nokia SR Linux is launched in the networking mode, meaning it has an interfaces connected to the default Docker bridge (can be changed to custom bridge if necessary). This interfaces allows us to connect to the host via IP and manage it with gNMI (will be covered in the coming blogposts).
- Microsoft Azure SONiC also has a directory it maps, where the configuration files are stored. However, it is launched in the non-networking mode as it doesn’t have OOB management, which Nokia SRLinux has.
- The Ubuntu host is the most simple one.
- Once each container is created, its Linux process ID (PID) is collected and the named Linux Namespace is created for the networking purpose using ip netns attach command.
In this simple example we have predefined earlier, what network elements run which network operating system. That’s why the provided for-loop with if-conditional matching the hostnames is absolutely OK. Later, once we will integrate it in the Data Centre Network Graph with Python, we will add the automated topology generation capabilities on other attributes.
Once the Docker containers with network elements are launched, you can interconnect them.
2
3
4
5
6
7
8
9
10
11
12
13
14
15
16
17
18
19
20
21
22
23
24
25
26
27
28
29
30
31
32
33
34
35
36
37
38
39
40
41
42
43
44
45
46
47
48
49
50
51
52
53
54
55
56
57
58
59
60
61
62
63
64
65
66
67
68
69
70
71
72
73
74
75
76
77
78
79
80
81
82
83
84
!
# Step 3
echo "$(date): Creating the network connectivity // starting..."
# SONiC-specific step
SONICS=('leaf12' 'spine12')
for C_S in ${SONICS[@]}; do
sudo docker exec -d ${C_S} ip netns add sw_net
done
# Leaf11 - Spine11
sudo ip link add leaf11_1 type veth peer name spine11_1
sudo ip link set leaf11_1 netns ns_leaf11
sudo ip link set spine11_1 netns ns_spine11
sudo ip netns exec ns_leaf11 ip link set leaf11_1 name e1-1
sudo ip netns exec ns_spine11 ip link set spine11_1 name e1-1
sudo ip netns exec ns_leaf11 ip link set e1-1 up
sudo ip netns exec ns_spine11 ip link set e1-1 up
# Leaf12 - Spine11
sudo ip link add spine11_2 type veth peer name leaf12_1
sudo ip link set spine11_2 netns ns_spine11
sudo ip link set leaf12_1 netns ns_leaf12
sudo ip netns exec ns_spine11 ip link set spine11_2 name e1-2
sudo ip netns exec ns_leaf12 ip link set leaf12_1 name sw_port0
sudo ip netns exec ns_spine11 ip link set e1-2 up
sudo docker exec -d leaf12 ip link set dev sw_port0 netns sw_net
sudo docker exec -d leaf12 ip netns exec sw_net sysctl net.ipv6.conf.sw_port0.disable_ipv6=1
sudo docker exec -d leaf12 ip netns exec sw_net ip link set sw_port0 up
# Leaf11 - Spine12
sudo ip link add leaf11_2 type veth peer name spine12_1
sudo ip link set leaf11_2 netns ns_leaf11
sudo ip link set spine12_1 netns ns_spine12
sudo ip netns exec ns_leaf11 ip link set leaf11_2 name e1-2
sudo ip netns exec ns_spine12 ip link set spine12_1 name sw_port0
sudo ip netns exec ns_leaf11 ip link set e1-2 up
sudo docker exec -d spine12 ip link set dev sw_port0 netns sw_net
sudo docker exec -d spine12 ip netns exec sw_net sysctl net.ipv6.conf.sw_port0.disable_ipv6=1
sudo docker exec -d spine12 ip netns exec sw_net ip link set sw_port0 up
# Leaf12 - Spine12
sudo ip link add leaf12_2 type veth peer name spine12_2
sudo ip link set leaf12_2 netns ns_leaf12
sudo ip link set spine12_2 netns ns_spine12
sudo ip netns exec ns_leaf12 ip link set leaf12_2 name sw_port1
sudo ip netns exec ns_spine12 ip link set spine12_2 name sw_port1
sudo docker exec -d leaf12 ip link set dev sw_port1 netns sw_net
sudo docker exec -d leaf12 ip netns exec sw_net sysctl net.ipv6.conf.sw_port1.disable_ipv6=1
sudo docker exec -d leaf12 ip netns exec sw_net ip link set sw_port1 up
sudo docker exec -d spine12 ip link set dev sw_port1 netns sw_net
sudo docker exec -d spine12 ip netns exec sw_net sysctl net.ipv6.conf.sw_port1.disable_ipv6=1
sudo docker exec -d spine12 ip netns exec sw_net ip link set sw_port1 up
# Leaf11 - Host11
sudo ip link add leaf11_3 type veth peer name host11_1
sudo ip link set leaf11_3 netns ns_leaf11
sudo ip link set host11_1 netns ns_host11
sudo ip netns exec ns_leaf11 ip link set leaf11_3 name e1-3
sudo ip netns exec ns_host11 ip link set host11_1 name eth1
sudo ip netns exec ns_leaf11 ip link set e1-3 up
sudo ip netns exec ns_host11 ip link set eth1 up
# Leaf12 - Host12
sudo ip link add leaf12_3 type veth peer name host12_1
sudo ip link set leaf12_3 netns ns_leaf12
sudo ip link set host12_1 netns ns_host12
sudo ip netns exec ns_leaf12 ip link set leaf12_3 name sw_port5
sudo ip netns exec ns_host12 ip link set host12_1 name eth1
sudo docker exec -d leaf12 ip link set dev sw_port5 netns sw_net
sudo docker exec -d leaf12 ip netns exec sw_net sysctl net.ipv6.conf.sw_port5.disable_ipv6=1
sudo docker exec -d leaf12 ip netns exec sw_net ip link set sw_port5 up
sudo ip netns exec ns_host12 ip link set eth1 up
echo "$(date): Creating the network connectivity // done"
echo "$(date): Configuring SONiC // starting..."
SONICS=('leaf12' 'spine12')
for C_S in ${SONICS[@]}; do
sudo docker exec -d ${C_S} sh /sonic/scripts/startup.sh
done
echo "$(date): Configuring SONiC // done"
!
! FURTHER OUTPUT IS TRUNCATED FOR BREVITY
- In the beginning we create a nested Linux networking namespace inside the container for Microsoft Azure SONiC, as that is the way how it works.
- Afterwards we build the links used in our topology. For each link we create a pair of the veth interfaces, which we map into the Linux Networking Namespaces created earlier during the build of Docker containers. Inside the namespace we map veth interface to the naming convention of the network element (those interfaces are already predefined) and bring interfaces up.
- There are some complications in case of the Microsoft SONiC, as we need to map the interfaces inside the Docker container to the created namespace there to make it working. From that standpoint it is easier to bring the Docker container with Nokia SR Linux up and connect it.
- Finally, after the connectivity is done, you need to run the startup script for SONiC to bring interfaces up.
The final steps are related to the configuration of the customer endpoints (Ubuntu hosts) and tweak of the Linux firewall (iptables):
2
3
4
5
6
7
8
9
10
11
12
13
14
15
sudo docker container exec -d host11 sysctl net.ipv6.conf.eth1.disable_ipv6=1
sudo docker container exec -d host12 sysctl net.ipv6.conf.eth1.disable_ipv6=1
sudo docker container exec -d host11 ifconfig eth1 192.168.1.2/24 mtu 1400
sudo docker container exec -d host11 ip route replace default via 192.168.1.1
sudo docker container exec -d host12 ifconfig eth1 192.168.2.2/24 mtu 1400
sudo docker container exec -d host12 ip route replace default via 192.168.2.1
echo "$(date): Configuring hosts // starting..."
echo "$(date): Fixing iptables firewall // starting..."
sudo iptables -I FORWARD 1 -s 10.0.0.0/24 -d 10.0.0.0/24 -j ACCEPT
sudo iptables -I FORWARD 1 -s 192.168.0.0/16 -d 192.168.0.0/16 -j ACCEPT
echo "$(date): Fixing iptables firewall // done"
Once the script, which builds the lab is clear, we can execute it to boot the lab:
2
3
4
5
6
7
8
9
10
11
12
13
14
15
16
17
18
19
20
Wed Jul 29 22:51:48 BST 2020: Launching Docker // starting...
[sudo] password for aaa:
Wed Jul 29 22:51:52 BST 2020: Launching Docker // done
Wed Jul 29 22:51:52 BST 2020: Creating the containers // starting...
7da9d2adcb156f220eab4c91dad4139ee14328af75da914907b8a07f19fbe169
87a1ab00876004e88bd941bc1db41f217dbe21ba12cdeeacc50486e41b6410e9
6a5784abc3ebf4417bd7dc4821175f470fbece8ceb0b154fde6575e8ba0a40ca
27c280f0734f0ca2cb22b6f2ce1f62b38e17ea701b0ec4fa9c2989cfd9228772
33d9c327fe74a9305ca86380322d0c9549d81b6bd4953e682ca3e34c2a843c29
90c3f12f273d7c5c2d6e07022fdf40d3132445984bc0af9d25a21a52882a3fd0
Wed Jul 29 22:52:26 BST 2020: Creating the containers // done
Wed Jul 29 22:52:26 BST 2020: Creating the network connectivity // starting...
Wed Jul 29 22:52:31 BST 2020: Creating the network connectivity // done
Wed Jul 29 22:52:31 BST 2020: Configuring SONiC // starting...
Wed Jul 29 22:52:31 BST 2020: Configuring SONiC // done
Wed Jul 29 22:52:31 BST 2020: Configuring hosts // starting...
Wed Jul 29 22:52:33 BST 2020: Configuring hosts // starting...
Wed Jul 29 22:52:33 BST 2020: Fixing iptables firewall // starting...
Wed Jul 29 22:52:33 BST 2020: Fixing iptables firewall // done
At this point the network emulation is build, we have 6 containers up and running and 6 Linux network namespaces:
2
3
4
5
6
7
8
9
10
11
12
13
14
15
16
17
CONTAINER ID IMAGE COMMAND CREATED STATUS PORTS NAMES
90c3f12f273d ubuntu:14.04 "/bin/bash" 2 minutes ago Up 2 minutes host12
33d9c327fe74 ubuntu:14.04 "/bin/bash" 2 minutes ago Up 2 minutes host11
27c280f0734f docker-sonic-p4:latest "/bin/bash" 2 minutes ago Up 2 minutes spine12
6a5784abc3eb srlinux:19.11.7-75 "/tini -- fixuid -q …" 2 minutes ago Up 2 minutes spine11
87a1ab008760 docker-sonic-p4:latest "/bin/bash" 2 minutes ago Up 2 minutes leaf12
7da9d2adcb15 srlinux:19.11.7-75 "/tini -- fixuid -q …" 2 minutes ago Up 2 minutes leaf11
$ sudo ip netns list --all
ns_host12 (id: 5)
ns_host11 (id: 4)
ns_spine12 (id: 3)
ns_spine11 (id: 1)
ns_leaf12 (id: 2)
ns_leaf11 (id: 0)
As such, we can go further to the configuration and verification how it will work.
#2. Configure network functions: Nokia SR Linux
In the previous blogpost we have taken a look on the configuration of the Nokia SRLinux over CLI. So today we will analyse the configuration file, which is stored at our automation host in case of usage of the Docker container:
2
3
4
5
6
total 8
drwxrwxrwx+ 2 1002 1002 4096 Jul 26 17:23 checkpoint
-rwxrwxrwx+ 1 1002 1002 3371 Jul 26 17:38 config.json
-rw-rw-r--. 1 aaa aaa 0 Jul 26 13:23 srlinux.conf
drwxrwx---+ 2 1002 1003 60 Jul 26 13:23 tls
The configuration file is called config.json, and as you can figure out from its name, it is a JSON file. In case of our lab topology, it has the following structure:
2
3
4
5
6
7
8
9
10
11
12
13
14
15
16
17
18
19
20
21
22
23
24
25
26
27
28
29
30
31
32
33
34
35
36
37
38
39
40
41
42
43
44
45
46
47
48
49
50
51
52
53
54
55
56
57
58
59
60
61
62
63
64
65
66
67
68
69
70
71
72
73
74
75
76
77
78
79
80
81
82
83
84
85
86
87
88
89
90
91
92
93
94
95
96
97
98
99
100
101
102
103
104
105
106
107
108
109
110
111
112
113
114
115
116
117
118
119
120
121
122
123
124
125
126
127
128
129
130
131
132
133
134
135
136
137
138
139
140
141
142
143
144
145
146
147
148
149
150
151
152
153
154
155
156
157
158
159
160
161
162
163
164
165
{
"srl_nokia-interfaces:interface": [
{
"name": "ethernet-1/1",
"admin-state": "enable",
"subinterface": [
{
"index": 0,
"ipv4": {
"address": [
{
"ip-prefix": "10.0.0.1/31"
}
]
}
}
]
},
{
"name": "ethernet-1/2",
"admin-state": "enable",
"subinterface": [
{
"index": 0,
"ipv4": {
"address": [
{
"ip-prefix": "10.0.0.5/31"
}
]
}
}
]
},
{
"name": "ethernet-1/3",
"admin-state": "enable",
"subinterface": [
{
"index": 0,
"ipv4": {
"address": [
{
"ip-prefix": "192.168.1.1/24"
}
]
}
}
]
},
{
"name": "lo0",
"admin-state": "enable",
"subinterface": [
{
"index": 0,
"ipv4": {
"address": [
{
"ip-prefix": "10.1.1.11/32"
}
]
}
}
]
}
],
"srl_nokia-network-instance:network-instance": [
{
"name": "default",
"admin-state": "enable",
"ip-forwarding": {
"receive-ipv4-check": true
},
"interface": [
{
"name": "ethernet-1/1.0"
},
{
"name": "ethernet-1/2.0"
},
{
"name": "ethernet-1/3.0"
},
{
"name": "lo0.0"
}
],
"protocols": {
"srl_nokia-bgp:bgp": {
"admin-state": "enable",
"autonomous-system": 65111,
"router-id": "10.1.1.11",
"group": [
{
"group-name": "PG_PEERS",
"admin-state": "enable",
"export-policy": "PS_ALLOW",
"import-policy": "PS_ALLOW"
}
],
"ipv4-unicast": {
"admin-state": "enable"
},
"neighbor": [
{
"peer-address": "10.0.0.0",
"admin-state": "enable",
"peer-as": 65101,
"peer-group": "PG_PEERS"
},
{
"peer-address": "10.0.0.4",
"admin-state": "enable",
"peer-as": 65102,
"peer-group": "PG_PEERS"
}
],
"route-advertisement": {
"rapid-withdrawal": true
}
}
}
}
],
"srl_nokia-routing-policy:routing-policy": {
"prefix-set": [
{
"name": "PS_HOST",
"prefix": [
{
"ip-prefix": "192.168.1.0/24",
"mask-length-range": "24..24"
},
{
"ip-prefix": "192.168.2.0/24",
"mask-length-range": "24..24"
}
]
}
],
"policy": [
{
"name": "PS_ALLOW",
"default-action": {
"reject": {
}
},
"statement": [
{
"sequence-id": 10,
"match": {
"prefix-set": "PS_HOST"
},
"action": {
"accept": {
}
}
}
]
}
]
}
}
Nokia SRLinux supports gNMI with Nokia SRLinux YANG modules, what will be covered later.
The SR Linux is a brand-new network operating system. As such, Nokia has taken an approach of creating a model-driven configuration from the day zero, pretty much what they do in Nokia SR OS for a couple of years now. As you can see, each configuration context starts with “module_name:top_level_container”, which as a JSON serialisation of the YANG-formatted data.
Come to our network automation training to learn about YANG data modules, how to read them and how to create your own, as well as to deal with JSON.
If you are familiar with OpenConfig, you can figure out that all the Nokia SRLinux YANG modules effectively are very similar to OpenConfig YANG.
In the previous part you might have seen that this configuration file is mapped to the file inside the Docker container with Nokia SRLinux. From the management perspective, having this file during the container is off is very convenient, as you can modify it as you need, assuming you know the YANG modules, and boot the node directly with the proper configuration.
To review the operational data, we need to connect to the device via SSH:
2
3
4
5
6
7
8
9
10
172.17.0.2
$ ssh admin@172.17.0.2
admin@172.17.0.2's password:
Using configuration file '/etc/opt/srlinux/srlinux.rc'
Welcome to the srlinux CLI.
Type 'help' (and press <ENTER>) if you need any help using this.
--{ running }--[ ]--
A:leaf11#
Let’s take a look, what do we see in terms of the configuration of the interfaces at leaf11:
2
3
4
5
6
7
8
9
10
11
12
13
14
15
16
17
18
19
20
21
22
23
24
25
26
27
28
29
======================================================================
ethernet-1/1 is up, speed None, type None
ethernet-1/1.0 is up
Encapsulation: null
IPv4 addr : 10.0.0.1/31 (static)
----------------------------------------------------------------------
ethernet-1/2 is up, speed None, type None
ethernet-1/2.0 is up
Encapsulation: null
IPv4 addr : 10.0.0.5/31 (static)
----------------------------------------------------------------------
ethernet-1/3 is up, speed None, type None
ethernet-1/3.0 is up
Encapsulation: null
IPv4 addr : 192.168.1.1/24 (static)
----------------------------------------------------------------------
lo0 is up, speed None, type None
lo0.0 is up
Encapsulation: null
IPv4 addr : 10.1.1.11/32 (static)
----------------------------------------------------------------------
======================================================================
Summary
1 loopback interfaces configured
3 ethernet interfaces are up
0 management interfaces are up
4 subinterfaces are up
======================================================================
Once the interfaces’ verification is done, you can check if the routing context is up and running:
2
3
4
5
6
+---------+---------+-------------+------------+-----------+-------------+
| Name | Type | Admin state | Oper state | Router id | Description |
+=========+=========+=============+============+===========+=============+
| default | default | enable | up | | |
+---------+---------+-------------+------------+-----------+-------------+
Afterwards, it makes sense to check the list of the BGP neighbours and their states However, this time we will check the operational data using the YANG module. Nokia SRLinux gives you opportunity to see it in the CLI directly:
2
3
4
5
6
7
8
9
10
11
12
13
14
15
16
17
18
19
20
21
22
23
24
25
26
27
28
29
30
network-instance default {
protocols {
bgp {
neighbor 10.0.0.0 {
admin-state enable
under-maintenance false
maintenance-group ""
export-policy PS_ALLOW
import-policy PS_ALLOW
local-preference 100
next-hop-self false
peer-as 65101
peer-group PG_PEERS
session-state established
last-state active
last-event recvOpen
last-established 2020-07-29T21:54:07.200Z
established-transitions 1
advertised-capabilities [
MP_BGP
ROUTE_REFRESH
4-OCTET_ASN
]
received-capabilities [
MP_BGP
ROUTE_REFRESH
4-OCTET_ASN
!
! FURTHER OUTPUT IS TRUNCATED FOR BREVITY
This snippet gives you idea, what you should expect upon collecting info using gRPC/gNMI.
And finally the routing table:
2
3
4
5
6
7
8
9
10
11
12
13
14
15
16
17
18
19
20
21
22
-----------------------------------------------------------------------------------------------------------------------------------------------------------------------------------------
IPv4 Unicast route table of network instance default
-----------------------------------------------------------------------------------------------------------------------------------------------------------------------------------------
+-------------------------------------+-------+------------+-----------------+---------+-------+----------------------------------------------------+-----------------------+
| Prefix | ID | Active | Owner | Metric | Pref | Next-hop (Type) | Next-hop Interface |
+=====================================+=======+============+=================+=========+=======+====================================================+=======================+
| 10.0.0.0/31 | 0 | true | local | 0 | 0 | 10.0.0.1 (direct) | ethernet-1/1.0 |
| 10.0.0.1/32 | 0 | true | host | 0 | 0 | None (extract) | None |
| 10.0.0.4/31 | 0 | true | local | 0 | 0 | 10.0.0.5 (direct) | ethernet-1/2.0 |
| 10.0.0.5/32 | 0 | true | host | 0 | 0 | None (extract) | None |
| 10.1.1.11/32 | 0 | true | host | 0 | 0 | None (extract) | None |
| 192.168.1.0/24 | 0 | true | local | 0 | 0 | 192.168.1.1 (direct) | ethernet-1/3.0 |
| 192.168.1.1/32 | 0 | true | host | 0 | 0 | None (extract) | None |
| 192.168.2.0/24 | 0 | true | bgp | 0 | 170 | 10.0.0.4 (indirect) | None |
| | | | | | | 10.0.0.0 (indirect) | None |
+-------------------------------------+-------+------------+-----------------+---------+-------+----------------------------------------------------+-----------------------+
-----------------------------------------------------------------------------------------------------------------------------------------------------------------------------------------
8 IPv4 routes total
8 IPv4 prefixes with active routes
1 IPv4 prefixes with active ECMP routes
-----------------------------------------------------------------------------------------------------------------------------------------------------------------------------------------
Which is also available in YANG modules:
2
3
4
5
6
7
8
9
10
11
12
13
14
15
16
17
18
19
20
21
22
23
24
network-instance default {
route-table {
ipv4-unicast {
route 10.0.0.0/31 id 0 {
owner local
metric 0
preference 0
active true
last-app-update 2020-07-29T21:52:27.223Z
next-hop-group 470557407
resilient-hash false
}
route 10.0.0.1/32 id 0 {
owner host
metric 0
preference 0
active true
last-app-update 2020-07-29T21:52:27.223Z
next-hop-group 470557406
resilient-hash false
}
!
! FURTHER OUTPUT IS TRUNCATED FOR BREVITY
So far you have seen that BGP is up, mean that the interoperability is already there. Nevertheless, let’s take a look on another hyper scaler network operating system.
#3 Configure network functions: Microsoft Azure SONiC
The Microsoft Azure SONiC was already in-depth explained.
As such, we outline here only the most relevant pieces. The configuration of the Microsoft Azure SONiC is also stored within a JSON file, which is available whereas the container is down:
2
3
4
5
6
7
8
9
10
11
12
13
14
15
16
17
18
19
20
21
22
23
24
25
26
27
28
29
30
31
32
33
34
35
36
37
38
39
{
"VLAN": {
"Vlan140": {
"members": [
"Ethernet0"
],
"vlanid": "140"
},
"Vlan141": {
"members": [
"Ethernet1"
],
"vlanid": "141"
},
"Vlan142": {
"members": [
"Ethernet5"
],
"vlanid": "142"
}
},
"VLAN_MEMBER": {
"Vlan140|Ethernet0": {
"tagging_mode": "untagged"
},
"Vlan141|Ethernet1": {
"tagging_mode": "untagged"
},
"Vlan142|Ethernet5": {
"tagging_mode": "untagged"
}
},
"VLAN_INTERFACE": {
"Vlan140|10.0.0.3/31": {},
"Vlan141|10.0.0.7/31": {},
"Vlan142|192.168.2.1/24": {}
}
}
The BGP configuration is provided in a separate file per the SONiC architecture, which is a configuration file for Quagga:
2
3
4
5
6
7
8
9
10
11
12
13
14
15
16
17
18
19
20
21
hostname bgpd
password zebra
enable password zebra
log file /var/log/quagga/bgpd.log
!
router bgp 65112
bgp router-id 10.1.1.12
bgp bestpath as-path multipath-relax
network 192.168.2.0 mask 255.255.255.0
neighbor 10.0.0.2 remote-as 65101
neighbor 10.0.0.2 timers 1 3
neighbor 10.0.0.2 send-community
neighbor 10.0.0.2 allowas-in
neighbor 10.0.0.6 remote-as 65102
neighbor 10.0.0.6 timers 1 3
neighbor 10.0.0.6 send-community
neighbor 10.0.0.6 allowas-in
maximum-paths 64
!
access-list all permit any
Once the Docker container with Microsoft Azure SONiC is up and running, we can verify the interfaces using the standard Linux commands:
2
3
4
5
6
7
8
9
10
11
12
13
14
15
16
!
! SOME OUTPUT IS TRUNCATED FOR BREVITY
!
100: Vlan140@Bridge: <BROADCAST,MULTICAST,UP,LOWER_UP> mtu 1500 qdisc noqueue state UP group default qlen 1000
link/ether 00:dc:5e:01:01:02 brd ff:ff:ff:ff:ff:ff
inet 10.0.0.3/31 scope global Vlan140
valid_lft forever preferred_lft forever
101: Vlan141@Bridge: <BROADCAST,MULTICAST,UP,LOWER_UP> mtu 1500 qdisc noqueue state UP group default qlen 1000
link/ether 00:dc:5e:01:01:02 brd ff:ff:ff:ff:ff:ff
inet 10.0.0.7/31 scope global Vlan141
valid_lft forever preferred_lft forever
102: Vlan142@Bridge: <BROADCAST,MULTICAST,UP,LOWER_UP> mtu 1500 qdisc noqueue state UP group default qlen 1000
link/ether 00:dc:5e:01:01:02 brd ff:ff:ff:ff:ff:ff
inet 192.168.2.1/24 scope global Vlan142
valid_lft forever preferred_lft forever
Learn the Linux networking and key commands to control it at our network automation training.
The BGP status is available via the Quagga CLI:
2
3
4
5
6
7
8
9
10
BGP router identifier 10.1.1.12, local AS number 65112
RIB entries 9, using 1008 bytes of memory
Peers 2, using 9312 bytes of memory
Neighbor V AS MsgRcvd MsgSent TblVer InQ OutQ Up/Down State/PfxRcd
10.0.0.2 4 65101 3676 3677 0 0 0 01:01:15 4
10.0.0.6 4 65102 3673 3675 0 0 0 01:01:13 1
Total number of neighbors 2
And the routing table using the Linux commands again:
2
3
4
5
6
7
8
9
10.0.0.0/31 via 10.0.0.2 dev Vlan140 proto zebra
10.0.0.2/31 dev Vlan140 proto kernel scope link src 10.0.0.3
10.0.0.6/31 dev Vlan141 proto kernel scope link src 10.0.0.7
10.1.1.1 via 10.0.0.2 dev Vlan140 proto zebra
192.168.1.0/24 proto zebra
nexthop via 10.0.0.6 dev Vlan141 weight 1
nexthop via 10.0.0.2 dev Vlan140 weight 1
192.168.2.0/24 dev Vlan142 proto kernel scope link src 192.168.2.1
Per the documentation we’ve managed to found, the Microsoft Azure SONiC supports YANG-based management. However, the modules shall be developed. It also supports the streaming telemetry.
#4. Verify the traffic forwarding
This is the easiest exercise, to be honest, following our topology we just need to ping the IP address of the host12 from the host11:
2
3
4
5
6
7
8
PING 192.168.2.2 (192.168.2.2) 56(84) bytes of data.
64 bytes from 192.168.2.2: icmp_seq=1 ttl=61 time=43.9 ms
64 bytes from 192.168.2.2: icmp_seq=2 ttl=61 time=11.5 ms
^C
--- 192.168.2.2 ping statistics ---
2 packets transmitted, 2 received, 0% packet loss, time 1001ms
rtt min/avg/max/mdev = 11.556/27.770/43.984/16.214 ms
That effectively concludes the lab:
- The packet from host11 (Ubuntu) comes to leaf11 (Nokia SR Linux)
- Then it goes either to spine11 (Nokia SR Linux) or spine12 (Microsoft Azure SONiC)
- Afterwards it goes to leaf12 (Microsoft Azure SONiC)
- And finally to host12 (Ubuntu)
GitHub repository
This article is part of the Hyper Scale Data Centre (hs-dc) series, which has its own GitHub repository.


Lessons learned
The core complexity was about the building the Linux networking between the containers. Despite we have it already done earlier, we have reworked them again to simplify the topology and reduce the amount of the interfaces omitting the brctl and adapting topology to CentOS 8. Finally the Bash script with the lab launch looks smoother and easier to read.
Conclusion
Having the configuration files as JSON files creates a good opportunities for the automation, it is very easy to create a JSON files using Python out of Python data structures. That’s very valuable both in case of the lab, where the configuration can be prepared in advance of the topology build allowing the network to get directly into the desired state, and in case of the production network, where you can distribute the full configuration file assuring there are no hand-made artefacts. Nokia SR Linux supports the YANG modules out of the box, whereas SONiC requires them to be developed. The tests on the gRPC/gNMI joint operation and telemetry will be done in an upcoming articles. Take care and good bye.
Support us
P.S.
If you have further questions or you need help with your networks, I’m happy to assist you, just send me message. Also don’t forget to share the article on your social media, if you like it.
BR,
Anton Karneliuk