

Hello my friend,
With this blogpost we continue the series of pygnmi tutorials covering various use cases of our Python library created to help you with managing your network devices via GNMI. And today we show you, how easily you can use it with Nornir, if you like this automation framework.
2
3
4
5
retrieval system, or transmitted in any form or by any
means, electronic, mechanical or photocopying, recording,
or otherwise, for commercial purposes without the
prior permission of the author.
Can it be enough automation?
Yes, it can be. But how to understand, what you should automate and what shouldn’t? What are the success strategies to start the automation projects and what are the receipts of disaster? What is the most efficient ways and technologies depending on context, and how to identify? Should you still stick to CLI? Is the model-driven automation all the time suitable? There are gazillions of questions about the network automation, which you may have in your mind, but don’t know whom to ask. We are here to help you.
At our trainings, advanced network automation and automation with Nornir (2nd step after advanced network automation), we give you detailed knowledge of all the technologies relevant:
- Data encoding (free-text, XML, JSON, YAML, Protobuf)
- Model-driven network automation with YANG, NETCONF, RESTCONF, GNMI.
- Full configuration templating with Jinja2 based on the source of truth (NetBox).
- Best automation programming languages (Python, Bash), configuration management tools (Ansible) and automation frameworks (Nornir).
- Network automation infrastructure (Linux, Linux networking, KVM, Docker).
Moreover, we put all mentions technologies in the context of the real use cases, which our team has solved and are solving in various projects in the service providers, enterprise and data centre networks and systems across the Europe and USA. That gives you opportunity to ask questions to understand the solutions in-depts and have discussions about your own projects. And on top of that, each technology is provided with online demos and you are doing the lab afterwards to master your skills. Such a mixture creates a unique learning environment, which all students value so much. Join us and unleash your potential.
Disclaimer
Being honest, I haven’t used Nornir for a long time myself, as compared to Ansible it was far more complex to me. However, it doesn’t mean that other people don’t use it extensively. For example, one of my now ex-colleagues, Catalin Petrescu, shew it to me more than a year ago, as he used it for the vast majority of the network configuration tasks he did whilst we were working together.
Nowadays I’m using the Nornir time-to-time, when I need to create something quick and efficient-ish, and when I don’t have time to write the code in async mode. So, Nornir appeared to be very helpful for me as well.
Brief description
Nornir is a Python automation framework. It is designed to simplify the code the engineers need to write to achieve certain goals (e.g., managing several network elements simultaneously) and provides easy approach for parallelisation and inventory handling.
Our new training Automation with Nornir will teach you from basics to advanced level of this capabale tool.
As folks are using the Nornir for automating the network management, we decided to show you the examples, how you can rely on pygnmi for this purpose as well. Soon you will see that it is quite easy.
Integration with Nornir
In this lab, same is in other pygnmi setup, we are using the following topology:
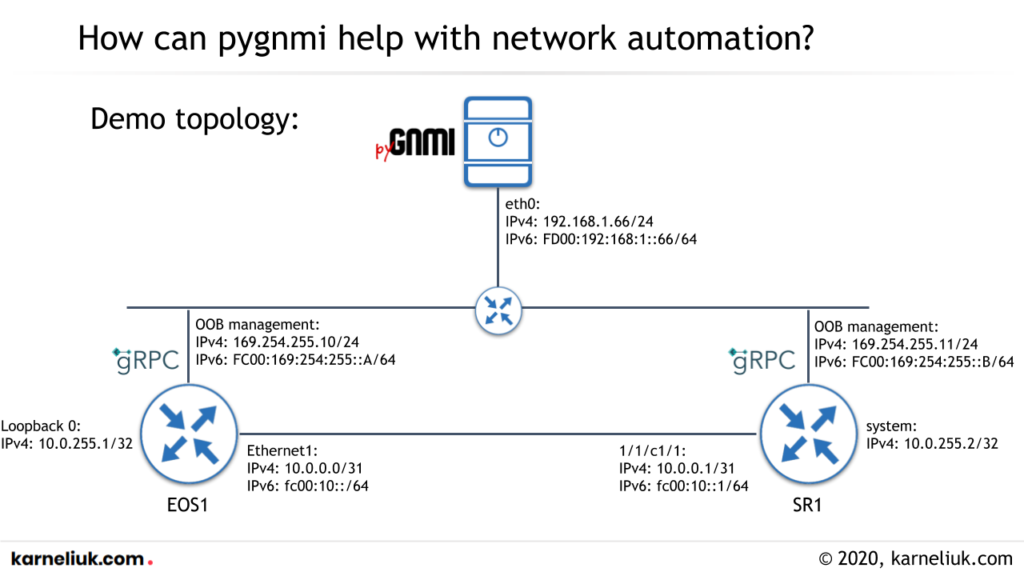
In our demo we are using Nokia SR OS and Arista EOS routers. However, pyGNMI is vendor agnostic and it works perfectly with Cisco IOS XE, IOS XR, Nexus and Juniper JUNOS.
#1. Setting up the Nornir and pyGNMI libraries
First of all, as with many other our projects, you would need to create and activate the virtual environment for Python:
2
3
$ source venv/bin activate
(venv)$
Now you don’t need to worry about the permissions to install the Python libraries and their dependencies. As such, you just install both Nornir and pyGNMI:
2
3
4
! Some output is truncated for brevity
!
Successfully installed grpcio-1.34.0 grpcio-tools-1.34.0 mypy-extensions-0.4.3 nornir-3.0.0 protobuf-3.14.0 pygnmi-0.3.5 ruamel.yaml-0.16.12 ruamel.yaml.clib-0.2.2 six-1.15.0 typing-extensions-3.7.4.3
Both Nornir and pyGNMI will resolve the dependencies and install additional packages, which they need for the operation. Once the installation is complete, you can proceed with the next step.
#2. Creating Nornir config file and inventory
Before you start with the creation of the Python script to automate the network management with Nornir and pyGNMI, you need to create a predefined set of files, which shall look like as follows:
2
3
4
5
+--inventory
| +--hosts.yaml
+--confg.yaml
+--test.py
Let’s take a quick look at each of them:
- The config.yaml contains the information needed for Nornir to launch. At a bare minimum it shall include the inventory plugin definition and type of the workers including amount of threads.
- The inventory directory in our case will contain the files with the inventory following the information from config.yaml.
- The hosts.yaml is an inventory file, which has the dictionary of the network elements being managed is a Nornir format.
- Finally, test.py is a Python script which relies on Nornir and pyGNMI.
For this scenario, you can compose the config.yaml as follows:
2
3
4
5
6
7
8
9
10
11
12
13
14
15
16
17
---
inventory:
plugin: SimpleInventory
options:
host_file: "./inventory/hosts.yaml"
group_file: "./inventory/groups.yaml"
defaults_file: "./inventory/defaults.yaml"
logging:
enabled: True
runner:
plugin: threaded
options:
num_workers: 20
...
You can see that we have specified in the inventory plugin also non-existing files (e.g., group_file and defaults_file). We won’t use them in our demo, as we will specify all the details in host_file, which for this demo looks like as follows:
2
3
4
5
6
7
8
9
10
11
12
13
14
15
16
---
gNMI-EOS1:
hostname: fc00:169:254:255::a
port: 57400
username: aaa
password: aaa
platform: arista-eos
gNMI-SR1:
hostname: 169.254.255.11
port: 57400
username: admin
password: admin
platform: nokia-sros
...
The pyGNMI works both over the IPv4 and IPv6, so for the demo purposes we decided to use IPv6 address for one network device and IPv4 for another one.
With this, the Nornir environment is ready and you can finally got to the Python script itself.
#3. Creating Python script
This blogpost assumes you already know how Nornir works; therefore, we don’t provide in-depth explanation of details. Join our Nornir training for that.
First of all, you will need to import all the necessary artefacts (classes, functions, etc) out of Nornir and pyGNMI packages to start you script with:
2
3
4
5
6
7
8
#!/usr/bin/env python
# Modules
from pygnmi.client import gNMIclient
from nornir import InitNornir
from nornir.core.task import Task, Result
import logging
For the pyGNMI, you shall import the same class gNMIclient, as we did in all other demos. For Nornir, you shall import the InitNornir class, which will be managing the execution of all the tasks and Tasks and Result, to help you with building your tasks and the results of the tasks.
The next step is to create the tasks in this demo we show you the Capabilities and Get operations out of gNMI, but you can also create the Set and even Subscribe operations. So, the task shall be composed as follows:
2
3
4
5
6
7
8
9
10
11
12
13
14
15
16
17
18
19
20
21
22
!
! Some output is truncated
!
# User-defined tasks
def gnmi_capabilites(task: Task) -> Result:
with gNMIclient(target=(task.host.hostname, task.host.port), username=task.host.username,
password=task.host.password, insecure=True) as gc:
r = gc.capabilities()
return Result(host=task.host, result=r)
def gnmi_get(task: Task, path) -> Result:
with gNMIclient(target=(task.host.hostname, task.host.port), username=task.host.username,
password=task.host.password, insecure=True) as gc:
r = gc.get(path=path)
return Result(host=task.host, result=r)
!
! Further output is truncated
Each task is created as a user-defined function, which takes at least one argument task using the Task class and returning the result of the execution using the Result class our of Nornir library. Inside each task we create an object to connect to the network element using gNMIclient out of pyGNMI library.
gNMIclient is used exactly in the same way as explained in other demos.
You can see that each task is doing atomic RPC operation, but you can compose multiple RPC operations inside a single task, if that is better suits your workflow. Afterwards, the result of the execution is stored in the variable r, which is used as an input for the Result class to save the outcome of the function’s execution.
Finally, you shall put it all together in the executable part of your script:
2
3
4
5
6
7
8
9
10
11
!
! Some output is truncated
!
# Main
if __name__ == "__main__":
nr = InitNornir(config_file='config.yaml')
result1 = nr.run(task=gnmi_capabilites)
result2 = nr.run(task=gnmi_get, path=['openconfig-interfaces:interfaces'])
print(result2['gNMI-EOS1'][0])
In this part the object nr is initiated with the config from the file you have seen earlier. Then the tasks are executed with nr.run statement, where the mandatory argument is the name of the tasks (e.g., gnmi_capabilities or gnmi_get) and optional argument path for the second task, as the Get RPC requires that.
After the tasks is executed, the results are stored in the result1 or result2, depending which task were completed. Then results are accessible via result[hostname][0], and it will contain exactly same results, as direct usage without Nornir.
Validation
The script is ready and you can execute it:
2
{'notification': [{'timestamp': 0, 'update': [{'path': 'interfaces', 'val': ...
Once you execute the created Python script for the first time, you will see the nornir.log created in the directory with the Python script. If there were any errors during the execution (e.g. timeout, etc), you would see it there. In this case, there are no issues observed:
2
3
2021-01-02 17:26:36,848 - nornir.core - INFO - run() - Running task 'gnmi_capabilites' with args {} on 2 hosts
2021-01-02 17:26:37,068 - nornir.core - INFO - run() - Running task 'gnmi_get' with args {'path': ['openconfig-interfaces:interfaces']} on 2 hosts
GitHub and PyPI
You can see this and others examples of the pygnmi usage in our GitHub repository. Moreover, it is also available in PyPI, what makes the installation process very easy.
If you prefer video
You can watch this demo on our YouTube channel:
Lessons learned
You may be guessing why the article now is having index 7, whereas the previous was only 3. We were focused on creating the video tutorial first, which is available at our YouTube. Over the time we will fill the gap with the blogpost pygnmi 4 – 7. So we are sorry about the confusion, but we believe it is important to share with you the video tutorial as quick as possible so that you can benefit from pygnmi quicker.
Conclusion
GNMI is gradually coming into the networking reality. Pretty much as it happened with other management protocols, it’s entry is not lightning quick. However, with the raise of the telemetry, where the gNMI is playing a crucial role, its influence’s grow seems unavoidable. And we are happy to give you a proper tool, pyGNMI, which will help you to manage the network using Python and remove from you the burden of the gNMI complexity. Stay tuned as more use cases and information is due to come. Take care and good bye.
Support us
P.S.
If you have further questions or you need help with your networks, we are happy to assist you, just send us a message. Also don’t forget to share the article on your social media, if you like it.
BR,
Anton Karneliuk