


Hello my friend,
One of the import aspects of the reliable change management is to know for sure, which operational impact has the change of the network configuration. In this blogpost you will learn, how it is easy to build such a robust framework for the network management with pyGNMI, our Open Source Python library for network management with gNMI, and DeepDiff, quite cool Open Source library for a comparison of two elements.
2
3
4
5
retrieval system, or transmitted in any form or by any
means, electronic, mechanical or photocopying, recording,
or otherwise, for commercial purposes without the
prior permission of the author.
Won’t Network Automation Let Me Know Which Impact Did the Change Make?
It absolutely will, if you create your automation tool in such a way. The development and implementation of network automation is always tailored to the company processes. Therefore, if you validate the status of the network before and after the change right now in a manual way, you can implement the same logic in the automated way as well. At our network automation trainings we teach you about the theoretical foundation of why and how to do that, as well as provide you practical step-by-step guides and real world scenarios how to deploy such a solution, to make sure that all the changes in your network are clearly observed and their impact is clear and recorded.
We offer the following training programs:
- Zero-to-Hero Network Automation Training
- Automation with Nornir (2nd step after advanced network automation)
- Automation Orchestration wth AWX
During these trainings you will learn the following topics:
- Success and failure strategies to build the automation tools.
- Principles of software developments and tools for that.
- Data encoding (free-text, XML, JSON, YAML, Protobuf)
- Model-driven network automation with YANG, NETCONF, RESTCONF, GNMI.
- Full configuration templating with Jinja2 based on the source of truth (NetBox).
- Best programming languages (Python, Bash) for developing automation, configuration management tools (Ansible) and automation frameworks (Nornir).
- Network automation infrastructure (Linux, Linux networking, KVM, Docker).
- Orchestration of automation workflows with AWX and its integration with NetBox, GitHub, as well as custom execution environments for better scalability.
Anton has a very good and structured approach to bootstrap you in the network automation field.
Angel Bardarov @ Telelink Business Services
Moreover, we put all mentions technologies in the context of the real use cases, which our team has solved and are solving in various projects in the service providers, enterprise and data centre networks and systems across the Europe and USA. That gives you opportunity to ask questions to understand the solutions in-depts and have discussions about your own projects. And on top of that, each technology is provided with online demos and you are doing the lab afterwards to master your skills. Such a mixture creates a unique learning environment, which all students value so much. Join us and unleash your potential.
Brief Description
Whilst gNMI is a very good protocol and has a lot of useful functionality, some of its built-in messages by default may be misleading if the one doesn’t look in the specification. For example, if you apply the configuration to the device using the Set RPC, you will get the response that configuration is updated, deleted or replaced (depending on which task you have chosen), regardless of whether did happen in reality or not. You can think, that this is a minor issue and the one should have checked in advance, whether the configuration shall be applied or not. This might be true, but may be not, depending on the workflows the company implements.
Ultimately, there might be three outcomes of every change you do in the network:
| Outcome | Details |
|---|---|
| Positive | The change you implemented changed the operational state of the device in a desired way and you achieved your intent (provision new service, onboard new customer, perform clean-up, etc). |
| Neutral | The change you implemented didn’t change the operational state of the device (e.g., some external aspects prevented that, or the configuration already existed). |
| Negative | The change you implemented changed the operational state of the device, but not in the way you expected and caused disruptions for customers/services. |
The first one is the only desirable result in all honesty. Though, arguable, the neutral outcome of the change is not that bad, it means that something went not as expected or that configuration already existed on the device. The negative outcome of the change is, clearly, bad.
So, what is the strategy to check, what exactly is changed:
- Collect the operational state of the elements being changed or being affected by the change before the change is actually implemented.
- Perform the configuration change.
- Collect the operational state of the same elements as in the first step after the change is implemented.
- Compare the operational status before and after the change to see what exactly has changed.
It sounds straightforward, isn’t it? Let’s see how we can implement that with pyGNMI and DeepDiff.
Lab Setup
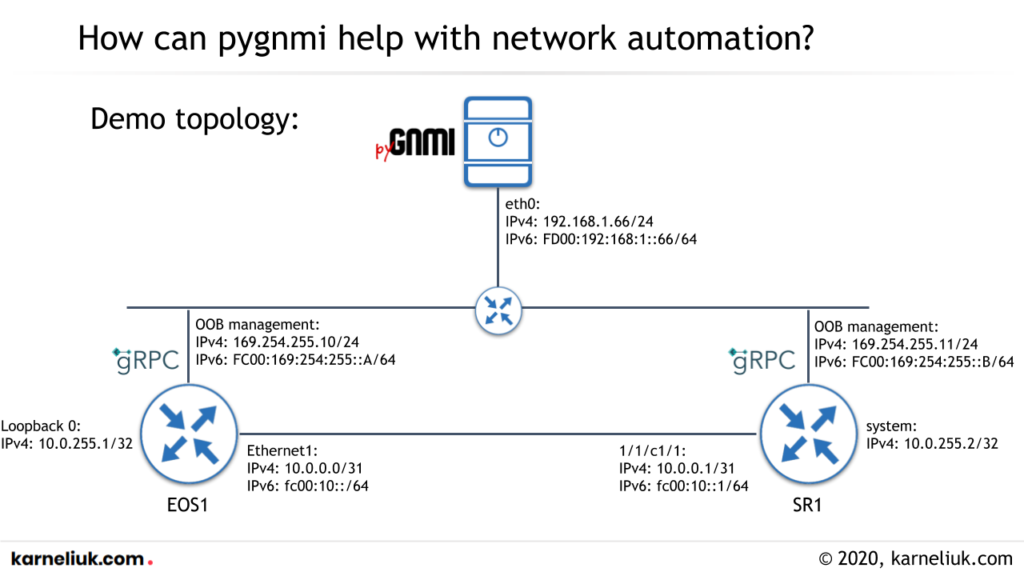
Our topology stays unchanged since we have introduced it earlier in this blog series:

GNMI is a multivendor protocol and at out Zero-To-Hero Network Automation Training you learn how to confidently use it in different scenarios.
Scenario Description
Let’s try to implement the mentioned steps relying on the built-in GNMI functionality. To illustrate the default its behaviour, let’s create the following simple Python script with pygnmi:
2
3
4
5
6
7
8
9
10
11
12
13
14
15
16
17
18
19
20
21
22
23
24
25
26
# Modules
from pygnmi.client import gNMIclient
# Vars
connectivity_dict = {
"host": "EOS425",
"port": 6030,
"username": "***",
"password": "***",
"cert_path": "./cert.pem"
}
# Body
if __name__ == "__main__":
with gNMIclient(target=(connectivity_dict["host"], connectivity_dict["port"]), username=connectivity_dict["username"],
password=connectivity_dict["password"], path_cert=connectivity_dict["cert_path"]) as gc_obj:
r1_dict = gc_obj.get(path=["/openconfig-interfaces:interfaces/interface[name=Ethernet1]/config/description"])
print(r1_dict)
r2_dict = gc_obj.set(update=[("/openconfig-interfaces:interfaces/interface[name=Ethernet1]/config", {"description": "pygnmi-controlled-2"})])
print(r2_dict)
r3_dict = gc_obj.get(path=["/openconfig-interfaces:interfaces/interface[name=Ethernet1]/config/description"])
print(r3_dict)
Please, refer to the previous blogposts for further details.
Quick recap what script is doing:
- It establishes secure gNMI channel to the target network device using gRPC
- Using the Get() RPC it collects the current status of the leaf following the XPath “/openconfig-interfaces:interfaces/interface[name=Ethernet1]/config/description”.
- It then configures a new value using Set() RPC to the mentioned XPath.
- Finally collects the state of the same XPath.
Let’s execute the script and see the results:
2
3
4
{'notification': [{'timestamp': 0, 'prefix': None, 'alias': None, 'atomic': False, 'update': [{'path': 'interfaces/interface[name=Ethernet1]/config/description', 'val': 'pygnmi-controlled-2'}]}]}
{'timestamp': 1638657319245844939, 'prefix': None, 'response': [{'path': 'interfaces/interface[name=Ethernet1]/config', 'op': 'UPDATE'}]}
{'notification': [{'timestamp': 0, 'prefix': None, 'alias': None, 'atomic': False, 'update': [{'path': 'interfaces/interface[name=Ethernet1]/config/description', 'val': 'pygnmi-controlled-2'}]}]}
So you can see that the desired leaf “interfaces/interface[name=Ethernet1]/config/description” already has a value, which we are trying to pass to it. Yet, the result of the Set RPC is “UPDATE”.
We could potentially compare two dictionaries stored in r1_dict and r3_dict variables, but:
- Result of the comparison will be only True or False, which is not informative
- You may see the timestamp field in notification, which, if implemented in the vendor, will definitely be different between two consecutive Get() RPCs.
Solution Development
Some time ago, when we were working on such a solution with Ansible, we found an interesting collection called ansible.utils, which has a fact_diff module. This module allows us to compare two dictionaries in Ansible and show the difference on the key by key basis. We thought, that’s pretty awesome. This should be existing in Python as well, as Ansible is ultimately created in Python.
After some researches we found two good Python libraries to solve that task:
Both go the can accomplish this task, though in slightly different ways. After some review we decided to go with dictdiffer. However, the choice doesn’t seem straightforward for a number of reasons:
- DeepDiff has 2 times more contributors on GitHub than dictdiffer.
- DeepDiff has 2 times more stars on Github than dictdiffer.
Some good software development practices suggest that we should have choose DeepDiff based on those facts. However, the dictdiffer is much more lightweight and suits our use case. DeepDiff has more functionality, which in certain contexts may be needed, whereas for us this functionality is excessive.
How would the script look like with dictdiffer and pygnmi together? In all honesty, the modifications are minor:
2
3
4
5
6
7
8
9
10
11
12
13
14
15
16
17
18
19
20
21
22
23
24
25
26
27
28
29
30
31
# Modules
from pygnmi.client import gNMIclient
from dictdiffer import diff
from pprint import pprint
# Vars
connectivity_dict = {
"host": "EOS425",
"port": 6030,
"username": "aaa",
"password": "aaa",
"cert_path": "./cert.pem"
}
# Body
if __name__ == "__main__":
with gNMIclient(target=(connectivity_dict["host"], connectivity_dict["port"]), username=connectivity_dict["username"],
password=connectivity_dict["password"], path_cert=connectivity_dict["cert_path"]) as gc_obj:
r1_dict = gc_obj.get(path=["/openconfig-interfaces:interfaces/interface[name=Ethernet1]"])
r2_dict = gc_obj.set(update=[("/openconfig-interfaces:interfaces/interface[name=Ethernet1]/config", {"description": "pygnmi-controlled-"})])
r3_dict = gc_obj.get(path=["/openconfig-interfaces:interfaces/interface[name=Ethernet1]"])
diff_list = list(diff(r1_dict, r3_dict))
## Printing details of change
print("Change details: ")
pprint(diff_list)
We have added only 3 lines:
| Line | Logic |
|---|---|
| from dictdiffer import diff | importing function diff() from the dictdiffer library |
| from pprint import pprint | importing function pprint() from the pprint library |
| diff2_list = list(diff(r1_dict, r3_dict)) | creating list of the the changes between two dictionaries |
| pprint(diff2_list) | printing differences in pretty format |
Let’s change the description to some different value and re-run the value:
2
3
4
5
6
7
8
9
10
11
12
13
14
15
16
17
18
19
20
21
22
[('change',
['notification',
0,
'update',
0,
'val',
'openconfig-interfaces:config',
'description'],
('pygnmi-controlled-new22', 'pygnmi-controlled-')),
('change',
['notification',
0,
'update',
0,
'val',
'openconfig-interfaces:state',
'counters',
'out-multicast-pkts'],
('782', '783')),
!
! FURTHER OUTPUT IS TRUNCATED FOR BREVITY
It looks like a bit excessive output; however, we can focus only on the last line. it shows us:
- The nature of the difference with possible values are: change, add, or remove.
- The the key in the dictionary with the whole path from the topmost key till the key having difference as a list (if there is multiple nesting levels) or as a string (if there are no extra levels).
- The old and the new values as a tuple (for change) and a single value as a list or as string (for add and remove).
Now you have much more clarity on what is changed in the operational status of your network since you implement the change.
If You Prefer Video
Watch out the video demo of how to use the dictdiffer together with pygnmi to get a clear view on changes in the device state/configuration over the time :

You can watch other demos from pygnmi blogs in our YouTube channel.
Examples in GitHub
You can find this and other examples in our GitHub repository.
Lessons Learned
There are two important lessons learned for us as outcome of the preparation of this blogpost.
The first one, is that not necessary the most popular tool makes the best job for you. We mean that DeepDiff is more feature rich and popular. However, as its functionality is excessive for us, and we decided to go with dictdiffer as more lean and matching our needs.
The second one, we started integrating the functionality of the dictdiffer directly in pygnmi as a new functionality for the client itself and pygnmicli to show the difference directly when you work with the library. Learning new features and tools is always an inspiration for us to see, where we can improve our products.
Conclusion
Together with our outstanding community we continue to expand possibility of pyGNMI by developing practical use cases, which would simplify and make more robust your network management process with Python and GNMI . We encourage you to use the GitHub repo to raise requests or your suggestions to keep it help us better match your needs. Take care and good bye.
Support us
P.S.
If you have further questions or you need help with your networks, we are happy to assist you, just send us a message. Also don’t forget to share the article on your social media, if you like it.
BR,
Anton Karneliuk