

Hello my friend,
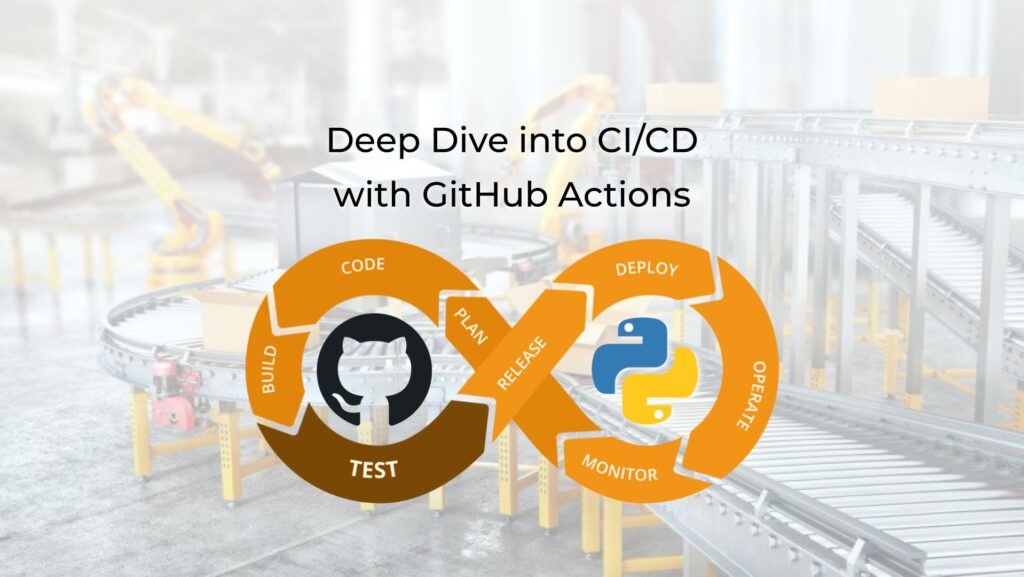
We planned to write this blogpost for a few weeks if not months, but due to various reasons it was delayed. We are delighted to finally post it, so that you can get some useful ideas how you can build your own CI/CD pipeline with GitHub, probably the most popular platform for collaborative software development.
2
3
4
5
retrieval system, or transmitted in any form or by any
means, electronic, mechanical or photocopying, recording,
or otherwise, for commercial purposes without the
prior permission of the author.
Regards
A lot of lessons about building the CI/CD pipelines and importance of unit testing and linting checks I learned from a colleague of mine, Leigh Anderson, whom I’m very grateful for that.
CI/CD Overview
CI/CD is an approach, which is very often used in software development, and discussed outside of that area. It stands for:
- CI (Continuous Integration) is a process, where the created software (for sake of simplicity, any piece of code) is getting ready to be deployed.
- CD (Continuous Deployment) is a process, where the software, which is ready for deployment, is actually deployed on target systems.
These definitions might slightly vary from what you can read in any other materials about CI/CD; however, they represent an understanding from our network automation development perspective based on real experience.
Take a look at the following illustration to better understand the relation between these two processes:

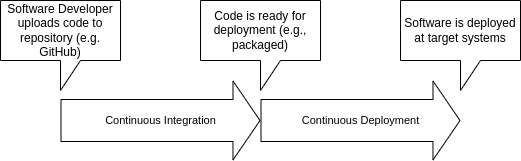
Let’s dive into what is happening at each stage of the CI/CD
Continuous Integration
As said, it this process starts once the new code is uploaded to the repository at the software versioning platform you use (e.g., GitHub or GitLab, but for simplicity we’ll be referring further to GitHub only). If you ever dealt with such a platform, you know that ultimately there may be multiple use cases, how the code appears there:
- The code is pushed directly to a master (main) branch, which typically contains the production code, which shall be clean and stable.
- The code is pushed to a non-master branch, which contains the code in a development stage, for example if you develop new features, which are not yet fully ready. Once the code is ready, it is the merged with the master branch via the pull requested.
It is worth mentioning, that some developers follow completely different approach: they use non-master branches to store production versions of code (e.g., with different releases), whilst the master branch stores the development (non-stable) code).
As the goal of the Continuous Integration is make code ready for deployment, it typically performs a sequence of steps over the code:
- Linting checks. The very first step is to make sure that the code complies with certain syntax rules. The software (and hence, network automation) development gives you a truthful joy of freedom in a way how you compose your code. This is a common misunderstanding of junior developers or engineers, which are retrained to be automation engineers from network or system management, until they face any linter for the first time. Linters are tools or scripts, which checks whether the code comply with syntax rules defined within each particular programming language. For example, in Python the rules are defined in PEP8; however, there are further approaches, which extend that concept (e.g., flake8). The interesting thing about writing any code is that in vast majority of all the cases, the code will work even if you don’t stick to any rules, as long as you follow common sense. You may ask then, why do I need to follow any linting rules? The answer consists of two parts: first of all, if you write a code alone for yourself and you are the only maintainer, you can ignore linting rules, though they may bring some useful insights (e.g., linters can highlight where your code has excessive complexity or you have unused branches); secondly, if you work on a code with someone else, sticking to linting rules are very important, as it will much simplify the readability and, ultimately, maintainability of your code by others.
- Unit testing. The next step in the Continuous Integration process is to test if your code, specifically its building blocks, work as it is expected. The unit testing focuses on testing of each separation component of your code (e.g., function, class, method, etc) to test that it operates properly. It is worth mentioning, that you should think of testing both your successful execution of your script blocks (e.g., all variables present, all of them have appropriate format, etc) and unsuccessful (e.g., variables/files are missing, they have wrong format, etc). The more testing you do in a sense the better coverage of your code with unit tests, the more stable your code will be in production and the better (less interrupted) you will sleep. Unit tests, if you need to interact with external systems during execution of your code, often relies on mocks, a pieces of code which artificiality produce expected responses.
- Integration testing. Once your code is successfully tested in separate pieces during the unit testing phase, it is then needed to test whether its execution as a whole produces the intended result. For example, if we develop a Python tool for network automation of network devices using NETCONF or GNMI, we want to see if actually the state of the device is changed as a result of our script’s execution. In contrast to unit tests, which rely on mocks, integration tests shall be performed, where possible, against real external systems to provide real outcome of the tool’s execution. To do that, you need to ensure that the external systems are reachable from your CI platform; however, they shall be not live systems, as results of integration tests may be damaging to it. Elaborating on the example above, we need to unsure that we have a network device, which we configure with NETCONF/GNMI in automated way with some preset data from CI system, which means that we need also have connectivity from CI to a network device (e.g., ACLs and FW rules, VPN, etc shall be configured correspondingly) and credentials shall be known by the CI system, though, obviously, we shall avoid storing them in a clear text anywhere.
- Packaging. Finally, if all previous steps are successfully completed, and our code satisfy our expectations both in terms of results and quality, we need make it packaged it, so that it can be used at the deployment stage. Packaging is a broad term and depending on the programming language or on the environment, where it will be used, may have different meanings. Speaking from our experience in building network automation tools and software, we have used 3 following packaging types: publishing Ansible roles in Ansible galaxy, publishing Python packages at PyPI, and containerising and publishing Docker containers at a container registry.
Ansible, Python, and Docker (and many more) you can learn at our Zero-to-Hero Network Automation Training
All the mentioned steps are performed one by one in a sequential manner making sure that the next step starts only if the previous step is successfully completed. For first three steps (linting, unit and integration testing) you can typically setup criteria defining what success means (e.g., fail the step if less than 80% of checks/tests are passed) to make sure that your code satisfy your and/or your company standards of quality.
Depending on the code development/versioning platform, it is possible to trigger the CI process automatically once the code is pushed to any branch and to have possibility to trigger it manually as well. Automatic launch is very important though, as it makes sure that an automation engineer doesn’t forget to launch it manually, when he/she uploads the code.
Continuous Deployment
This process can be launched immediately once the Continuous Integration is completed, or it can be triggered separately at certain data and time (e.g., during the maintenance window). From implementation perspective, it can be a separated item, or it can be part of the same workflow as the Continuous Integration as well (especially, if the deployment is to be done immediately after CI provided it was successful).
Pretty much as Continuous Integration, Continuous Deployment consists of several steps:
- Preparing deployment logic. The general approach for any deployment is to copy some files on target hosts and run some commands. As such, the primary mean to do that is to use SSH and SCP, which is based on SSH as well. You can perform that via running commands ‘ssh username@hostname “command”’ and ‘scp souce_path username@hostname:destination_path’ from your Linux host directly. Alternatively you can use more advanced tools to do that: for example, you can use Ansible to create corresponding roles and playbooks, which will perform the necessary deployment steps in a reliable way. The downside is that you need to install Ansible itself and all further dependent packages on a host which performs CD function.
- Connecting to target systems. As the deployment process involves connectivity to a remote host, you need to have a mean how to connect to it. By a mean, we mean the credentials, for that system. Speaking of SSH, it means you need to have a username and a password or, what is more secure, a username, an SSH key for authentication and a password for sudo user. The login with the password shall be prohibited, so that the password is used solely for authorization purposes. Those credentials shall be stored in the Continuous Deployment system in a secure (encrypted way). It is much desirable, so that the user cannot easily see its content and can only modify it.
- Pre-deployment validation and backup. Once the deployment machinery (i.e., pure Linux, Ansible, etc) and credentials are sorted, the next step is to focus on the Continuous Deployment logic itself. The first step is to save the state of the system before applying new version of the software. This step includes the backup of the existing software configuration files, backup of databases, etc. Another name of of this step is creation of a rollback point, because the main purpose of all these backups is to ensure than in case of a failure of a new software rollout you can rollback to a working state. Also, besides backing up various files, at this stage operational metrics (such as state of services, their versions, responses to various calls, etc) are collected. This is needed to ensure you have a baseline, against which you will compare a new version’s operation (basically, how accurate it is installed and running correctly).
- Rollout of a new software version. At this stage the Continuous Deployment system copies the necessary packages of a new software version to destination hosts, installs them, and then performs the appropriate configuration changes. If there are any issues with the deployment, e.g. there are errors with connectivity, permissions, installations, etc, the CD system shall stop and rollback to the previous step.
- Post-deployment validations. Finally, once the new software is installed and configured, the CD systems shall check, if the installation is successful. This is achieved by validating the built-in health checks in the software itself or by running some automated tests (e.g., sort of integration tests), which can prove if the software working accurately or if there are any issue. If there are issues with the new software operation, the CD system shall roll back to the pre-new SW stage in the same way as explained in the previous chapter.
Enroll to our Zero-to-Hero Network Automation Training to learn how software development lifecycle can be effectively applied to network automation.
Now with a high-level understanding of what is CI/CD, which goals it aims to achieve and how they can be achieved on the logical level, let’s see how it is applicable to Network Automation, and how GitHub Actions can be used to build a CI/CD pipeline for your needs.
How Is the Network Automation Related to CI/CD?
Network Automation is a discipline, where you apply traditional software development lifecycle techniques to improve the quality and stability of network operations, such as implementation of changes, troubleshooting, backing up configuration, validation of configuration against the baseline, etc. CI/CD can be a great approach to build a pipeline, which will validate the configuration against all possible errors (e.g. typos, syntax, semantic, etc) and deploy the configuration in a production network only if this is safe.
And in our Network Automation Trainings you can learn a lot about this and other software development techniques, as well as the market leading tools and useful tricks.
We offer the following training programs for you:
- Zero-to-Hero Network Automation Training
- High-scale automation with Nornir
- Ansible Automation Orchestration with Ansble Tower / AWX
- Expert-level training: Closed-loop Automation and Next-generation Monitoring
During these trainings you will learn the following topics:
- Success and failure strategies to build the automation tools.
- Principles of software developments and the most useful and convenient tools.
- Data encoding (free-text, XML, JSON, YAML, Protobuf).
- Model-driven network automation with YANG, NETCONF, RESTCONF, GNMI.
- Full configuration templating with Jinja2 based on the source of truth (NetBox).
- Best programming languages (Python, Bash) for developing automation
- The most rock-solid and functional tools for configuration management (Ansible) and Python-based automation frameworks (Nornir).
- Network automation infrastructure (Linux, Linux networking, KVM, Docker).
- Orchestration of automation workflows with AWX and its integration with NetBox, GitHub, as well as custom execution environments for better scalability.
- Collection network data via SNMP and streaming telemetry with Prometheus
- Building API gateways with Python leveraging Fast API
- Integration of alerting with Slack and your own APIs
- … and many more
Moreover, we put all mentions technologies in the context of real use cases, which our team has solved and are solving in various projects in the service providers, enterprise and data centre networks and systems across the Europe and USA. That gives you opportunity to ask questions to understand the solutions in-depts and have discussions about your own projects. And on top of that, each technology is provided with online demos and labs to master your skills thoroughly. Such a mixture creates a unique learning environment, which all students value so much. Join us and unleash your potential.
GitHub Actions Explained
Once you got, hopefully, clear understanding about the CI/CD in theory, it is time to see, how it is implemented in GitHub. Not so far ago GitHub has introduced Actions (or, formally, GitHub Actions), which is part of the platform, which allows you to create CI/CD pipelines directly there, without a need to use any extra tools. How does it work? That’s a very good question. Let’s review all its major aspects.
How does GitHub Action look like?
In a nutshell, GitHub Action is a YAML file stored in the directory named “.github” of your repository. The YAML file defines all the aspects of the CI/CD, such as when it shall be triggered, where it shall be executed, what exactly it does, and so on. YAML is the most human-friendly format, which allows to define the structured data.
Enroll now to our Zero-to-Hero Network Automation Training to become proficient with YAML.
When Is GitHub Action Triggered?
You specify it yourself in the aforementioned YAML file. The most popular scenarios are the following:
- Automatically executed on a push to a specified branch. This scenario is very useful yo make sure that the code, which is pushed to the specific branch (e.g., master branch) is validated. The automatically executed CI/CD pipeline will conduct the actions you specify (e.g., linting checks, unit/integration tests, etc) and depending on the success of tests’ conduction, will inform you and/or members of your team of the result. It is important to outline, that it GitHub Actions doesn’t prevent the code to be pushed to the branch if tests are failed. It just informs you, and you are responsible to take a decision on how to react further.
- Automatically executed on a merger request to specified branch. This scenario is popular, where you are working on the repository not alone. In this case, you will highly likely want to have some code review procedure, where the proposed new code is validated before being added to the production branch. Typically, the code review procedure is a manual process, where some committee or a technical lead of the project reviews the code created by other team members. In order to help him/her to assess the code properly, the CI/CD pipeline can be executed to show the compliance with linting checks as well as the outcome of unit and integration tests.
- Manually triggered on demand. You may want to run the CI/CD pipeline at any point of time, whenever you decide it is appropriate. It may be that you haven’t implemented any automated trigger and are willing to control that manually. This is a popular scenario for Continuous Deployment, where you want to closely monitor the state of the target system during the rollout of new software.
Where Is GitHub Action Executed?
There are two main options to execute GitHub Actions:
- In the cloud. We’d agree that the term is very ambiguous, as all we know that “cloud” is just someone else’s computer. So in this context, the GitHub action is executed inside a Linux Container instantiated specifically to perform your CI/CD pipeline and destroyed right after that. The container is instantiated inside the GitHub infrastructure. You don’t have any direct access to the container and you control it in two ways:
- You specify the operating system, which is used for the execution of CI/CD tasks. You have a choice from a few Linux distributions (e.g., Ubuntu, CentOS, Fedora, etc).
- You specify the actions, which are one by one executed inside the container (more on that below).
- On your premises. There are two main use cases, when you may be willing to run the CI/CD on your premises instead of GitHub cloud directly:
- You need to carry on with the execution of CI/CD on a customer operating system (e.g., some Unix or Windows), which is not (and cannot be) containerised. In this case, the only way to achieve it is to create a VM with an operating system you need and to permit GitHub to access it via SSH (beware of NAT and ACL rules you need to implement to make it happen).
- It is not possible to access the target hosts, where the new software is to be applied from GitHub directly and, therefore, GitHub shall connect to some jump host first, from which the rollout of new software components is to be performed (same note about NAT and ACLs as mentioned above are applicable here as well).
It is worth to outline that both scenarios are absolutely valid. At the same time, in this blogpost we’ll focus on the former option with an execution of the CI/CD pipeline in GitHub Cloud.
What Does GitHub Action Do?
Finally we’ve got to the flesh of GitHub Actions. Once you have specified in the YAML file when and where your GitHub Action is to be executed, you define what exactly is to be done. Ultimately, the specification of what is to be done is a collection of shell commands, which are executed in a sequential way. These shell commands can be provided in three ways::
- As multiple independent single line commands. In this case, each command is a separate action, which has its own exit code and, therefore, can be successful or failed. Example here would be an execution of Python linting checks or unit tests, which are simple one-line commands.
- As a single multiline command. In certain cases it may be needed to have multiple shell commands to be executed to get to desired result. For example, if you want to execute Ansible playbook via GitHub Action, which is absolutely possible, you may need to specify SSH key to connect to a destination host. As private SSH key is a very sensitive information, you be not willing to store it as a file inside your repository. That creates a need to somehow dynamically generate such a file. Later you will know about GitHub Actions Secrets, but for now think that you may define some variables within your repository, which are not stored as text files and are available only for GitHub Action. To solve the mentioned task, you would need to create a multiline command, where first you create a text file with a private SSH key and then you use this new file as an argument during the execution of Ansible playbook.
- As a combination of both. As you learned above, there are a number of use cases, which CI/CD is solving. As such, it is highly likely that your pipeline will be consisting of multiple actions (that’s why the whole framework is called GitHub Actions), with some of them being single line and others being multiple line commands.
If you are familiar with Ansible, it is pretty the same as using shell module from ansible.builtin collection multiple times. And you can learn Ansible in-depth at our Zero-to-Hero Network Automation Training, which you can start now.
Lab Setup
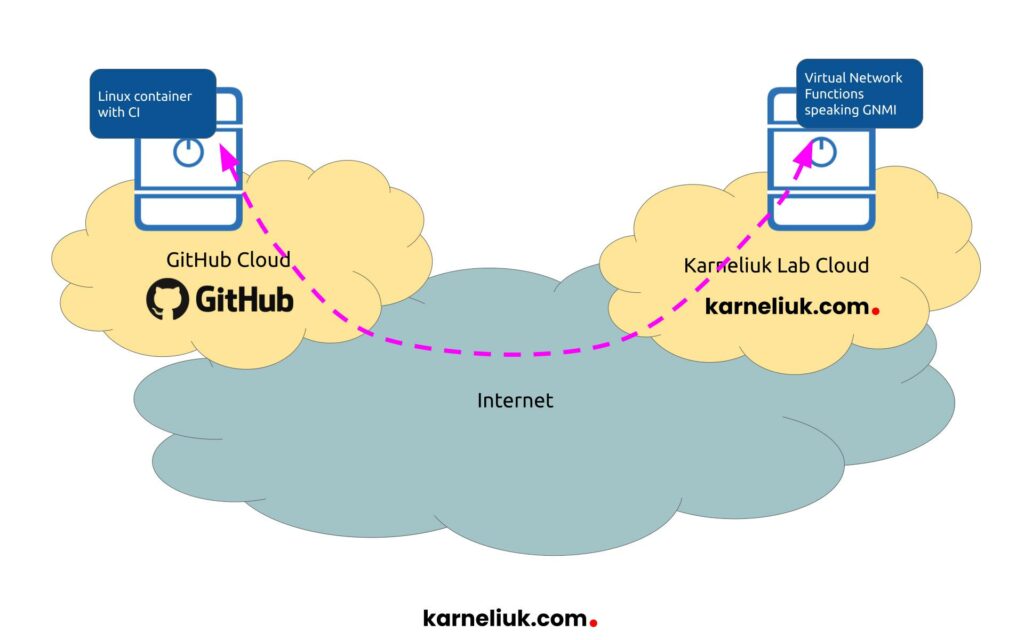
Picture costs thousands words, and a good example helps to understand how technology works much better than a pure theory. For this blogpost I will share the real CI/CD we have created to support the development of pyGNMI, Python module for network management of network devices via gNMI and telemetry collection. The use of this CI/CD allows us to speed up the development of the module, as well as simplifies the incorporation of collaborations done by 3rd parties, including yourself if you contributed to pyGNMI.
The focus for us was CI functionality, where out pipeline shall perform:
- Python linting checks using pylint library.
- Python unit tests using pytest library, where unit tests are to be conducted against the virtualised network function supporting gNMI and OpenConfig, which is available online at a public IP address.
Here is the sample topology of our lab setup:

Let’s see how we implemented such the CI/CD using GitHub actions for such a scenario.
We won’t focus on Python aspects of our module as this is not the focus for this blogpost. You can learn though Python from zero to hero level at our Zero-to-Hero Network Automation Training, which you can enroll to today.
Solution Implementation
Step #1. Prepare Your Environment
As we run unit tests of our CI again the real node, we need to make sure that the node is available from GitHub. As such, we have implemented NAT with port forwarding (PAT) to permit the access to a testing node. As the IP addresses of GitHub containers are not known in advance and may be different at each new CI execution, it is not possible to create an ACL, which will permit only a small range of IP addresses. Therefore, we have to open the access to the whole world. At the same time, we have opened only a necessary port used by REST API and changed certificates and credentials to make sure that only our CI system can be authenticated and authorized against the node. In addition to that, the test node was deployed in an isolated environment to ensure that even in case of breach, the host cannot initiate any sessions itself. That was a reasonable compromise to be able to perform unit tests on the one hand, and not to spend too much time on creating mocks on the other hand.
To avoid confusions, it is worth to mention that CI itself is executed in GitHub Cloud using their Linux Containers; it is unit testing, which is performed against a remote host.
If you don’t need to perform any external connectivity as part of your CI/CD, you could skip this step.
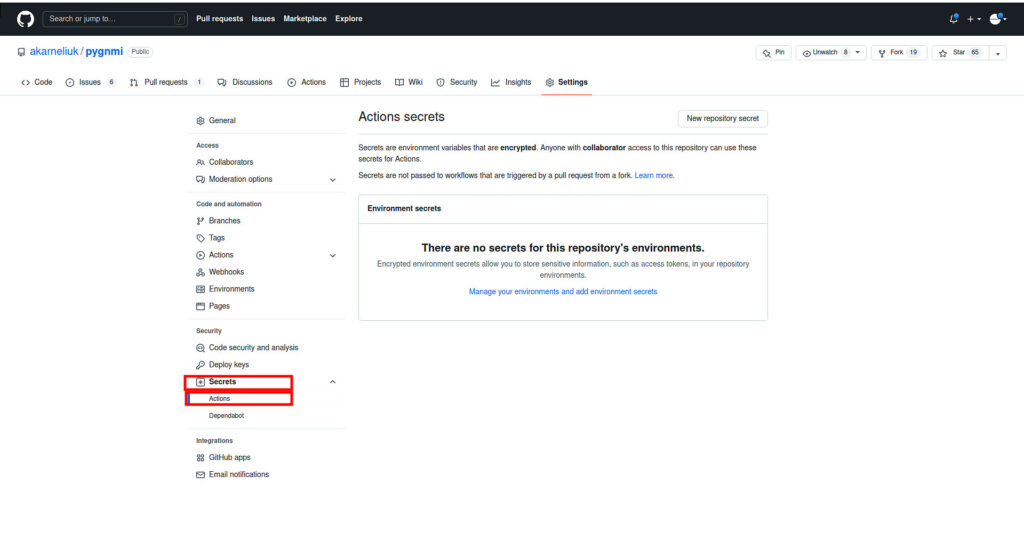
Step #2. Create Secrets to Store Sensitive Variables
The next important step, which you need to do before composing the CI itself, is to prepare variables, which you need for the CI itself. You could think about variables as an information, which you don’t want to store in clear text in any file in your repository including the CI workflow itself. This information is stored a text format (i.e., each variable is a separate sting). Depending on the nature of your projects, variables may be storing information about usernames and passwords, IP addresses and FQDNs of target hosts, TCP/UDP ports, content of SSH private keys and TLS certificates/keys in a text format.
Here is how you can create it.
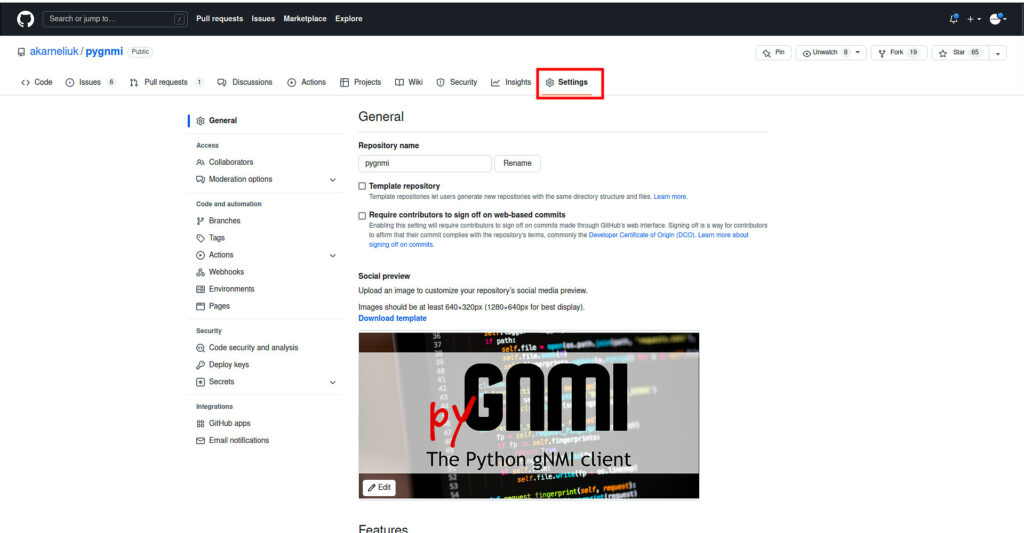
Navigate to the “Settings” tab in your repository:

In the left menu choose the “Secrets” tab:
Create a new variable and provide its value:
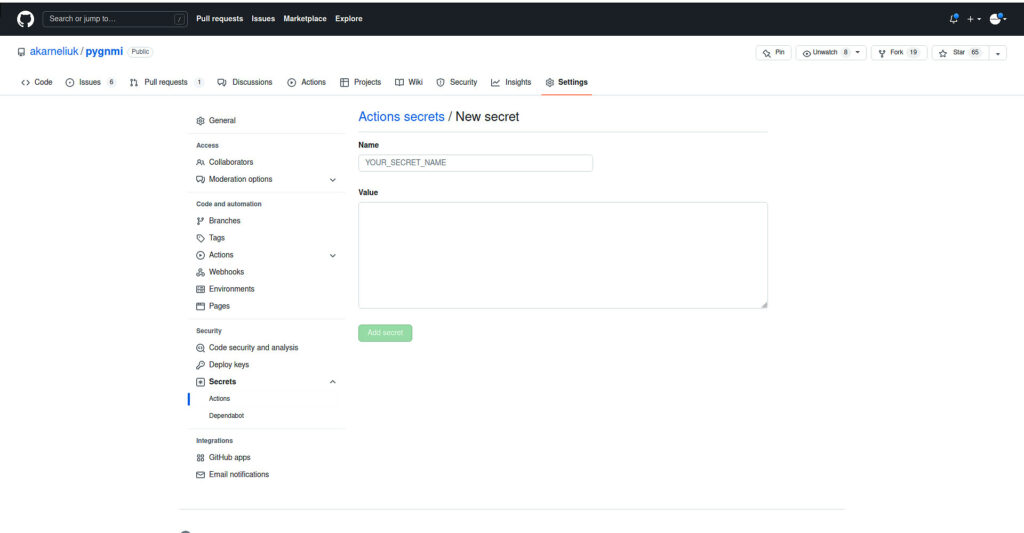
Repeat the previous step for all variables you need:
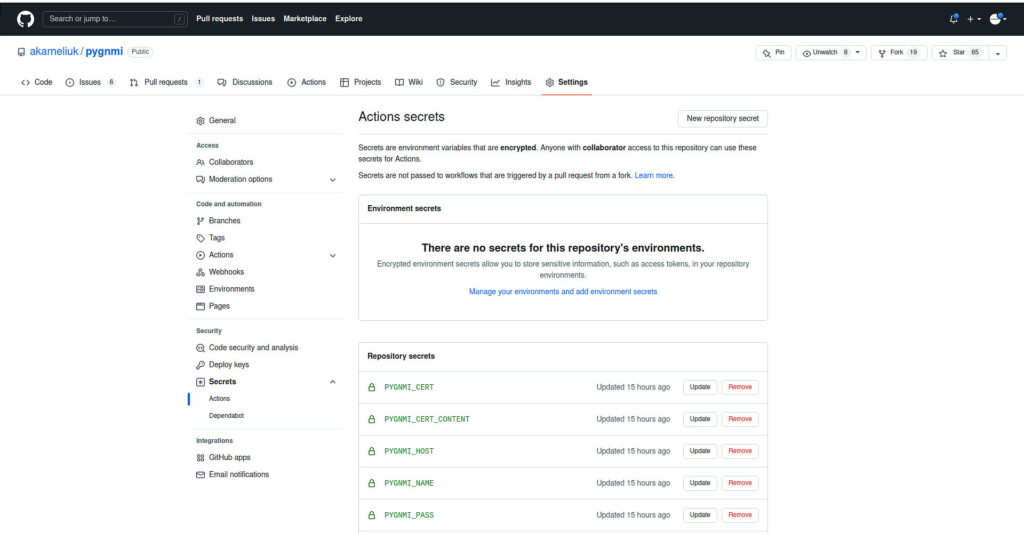
All your variables are created and you are in position to start creating the GitHub Actions workflow.
Be mindful that you cannot see the content of the secret after you create it. You can only change its value, if you forget it.
Step #3. Compose Your CI/CD Pipeline
Following the explanation above, we split the build of the GitHub Actions workflow in 3 main steps:
- Define the condition for execution.
- Specify the operating system it will be executed on.
- Define GitHub Actions.
Step #3.1. Define GitHub Actions Triggers
As mentioned beforehand, GitHub Actions are defined in the YAML file. Therefore you need to stick to YAML syntax, when you deal with it. To define triggers, which is the first part of the file, you would use the following syntax:
2
3
4
5
6
7
8
9
10
on:
push:
branches: [ master ]
pull_request:
branches: [ master ]
workflow_dispatch:
!
! FURTHER CODE IS TRUNCATED FOR BREVITY
In this snippet there we define two main parts:
- name. This is the name of your CI/CD pipeline.
- on. This part defines an automated execution of GitHub actions. As you can see, it consists from two subcommands:
- pull_requests. Here you specify upon pull requests in which branches the action is being automatically launched.
- push. Here you specify upon push in which branches the action is being automatically launched.
- workflow_dispatch. This command makes it possible the manual execution of GitHub Actions.
Step #3.2. Specify the Operating System For GitHub Actions
In this step you start building the workflow itself. First of all you must specify the operating system and may create also environment variables. You automatically have access to GitHub secrets created for your repository before, so you can create environment variables our of them.
2
3
4
5
6
7
8
9
10
11
12
13
!
jobs:
build:
runs-on: ubuntu-latest
env:
PYGNMI_HOST: ${{ secrets.PYGNMI_HOST }}
PYGNMI_NAME: ${{ secrets.PYGNMI_NAME }}
PYGNMI_PORT: ${{ secrets.PYGNMI_PORT }}
PYGNMI_CERT: ${{ secrets.PYGNMI_CERT }}
PYGNMI_USER: ${{ secrets.PYGNMI_USER }}
PYGNMI_PASS: ${{ secrets.PYGNMI_PASS }}
PYGNMI_CERT_CONTENT: ${{ secrets.PYGNMI_CERT_CONTENT }}
Let’s take a closer look:
- jobs define the beginning of your GitHub actions workflow.
- build is the name for the workflow (you can provide any name you like).
- runs-on defines the operating system (favour of Linux), which will be used to run your CI/CD on. We use Ubuntu Linux.
- env is a collection of environment variables, which will be passed to the newly created container upon its launch.
You may ask, “Why do I need to create new variables from existing variables?” The thing is that GitHub Secrets have a specific syntax how you call them. So if you want to access them from, say, your code for unit tests, You should ensure that your pytest scripts are created accordingly. Despite this is possible, it creates certain complications at the stage when you do a local testing before pushing the code to the GitHub. Usage of Linux environment variables allows you to normalise access to variables both for your local development environment and for GitHub.
Variables created in your GitHub repository secrets are called in Jinja2 syntax following convention secrets.name_of_your_variable. Jinja2 is part of our Zero-to-Hero Network Automation Training
Step #3.3. Compose CI/CD Workflow
The final, and the most important, step in building the CI/CD pipeline is list of activities, which are to be performed within the defined platform during the define conditions. We have the following steps in our workflow:
2
3
4
5
6
7
8
9
10
11
12
13
14
15
16
17
18
19
20
21
22
23
24
25
26
27
28
29
30
31
32
33
!
steps:
- name: Syncronise GitHub repository with the container
uses: actions/checkout@v3
- name: Setup Python
uses: actions/setup-python@v3
with:
python-version: 3.8
- name: Install dependencies
run: |
python -m pip install --upgrade pip
pip install -r requirements.txt
- name: Perform linting validation
continue-on-error: true
run: |
pylint pygnmi
- name: Create certificate
run: |
echo "${{ secrets.PYGNMI_CERT_CONTENT }}" > "${{ secrets.PYGNMI_CERT }}"
- name: Amend hosts
run: |
sudo echo "${{ secrets.PYGNMI_HOST }} ${{ secrets.PYGNMI_NAME }}" | sudo tee -a /etc/hosts
- name: Perform unit testing
run: |
coverage run --branch --source pygnmi -m pytest
coverage report --fail-under 70
The actual CI/CD workflow is defined in steps key, which is a list of dictionaries, where each dictionary consists of the following entries:
- name provides some hints on what is done in a specific step.
- Then the actual content of the step is defined by one of these:
- uses is prebuilt collection of steps, which is polled from GitHub itself and run inside the Linux container with your CI/CD.
- run is an actual sequence of shell commands, which are to be executed inside the container.
- with (or env) can be added to the each step to provide extra variables needed for execution of each specific step.
The defined steps are executed one after another and their result is cumulative (i.e., the results of the predecessor’s step are available and influences an execution of the following one).
So, how do we create our own CI? Here is the logic:
- Synchronise the content of the repository with the Container. We use prebuilt action “actions/checkout@v3” for that.
- Install the corresponding version of Python to run the code during linting and unit tests. We use prebuilt “actions/setup-python@v3” fot that.
- Upgrade the pip version and install the dependencies from the file requirements.txt, which was synchronised from our GitHub repository.
- Perform the linting of Python scripts using pylint, which was install at the previous step.
- Temporary create a copy of SSL Certificate, which is used to build the connectivity towards the target network function. We store its content as GitHub secrets values, so we create a temporary copy within the container to pass it to pygnmi during unit tests.
- Modify the /etc/hosts file within the CI/CD container by adding the pubic IP and hostname of the device under test.
- Execution of unit tests leveraging pytest and measuring the coverage of the pygnmi code with the tests. Validating the results and failing if coverage is less than 70%.
As you see, we use a mix of prebuilt actions (coming from uses statements) and our own logic (coming from run statements).
Step #4. Test Your CI/CD
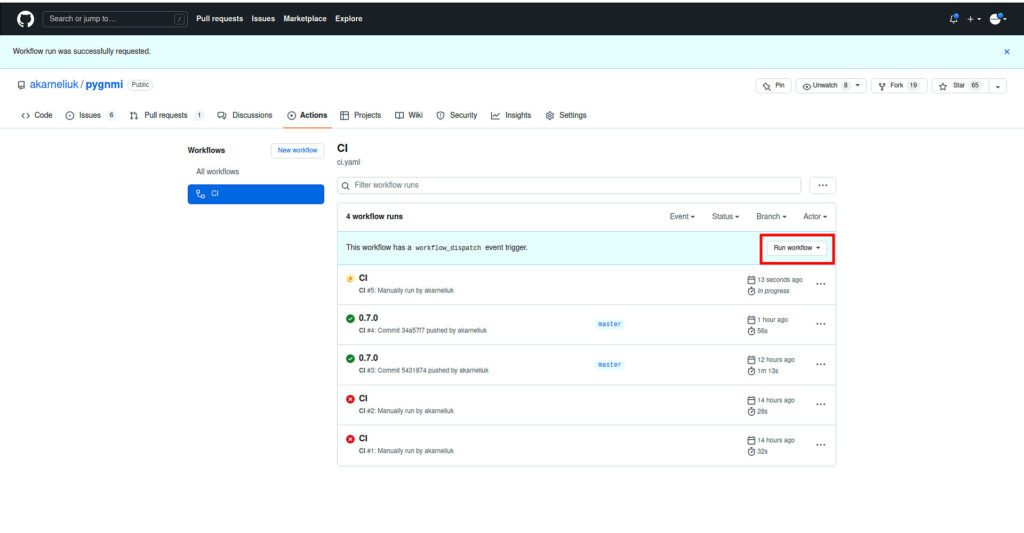
Finally our CI/CD is ready and once we do any commit to the master branch or pull request to merger changes to master, this workflow will be executed. It is also possible to run it manually. To do so, go to the Actions tab in your repository:

In this repository you can see the history of the past launches. Press on the left hand side the name of your workflow (CI in our case):
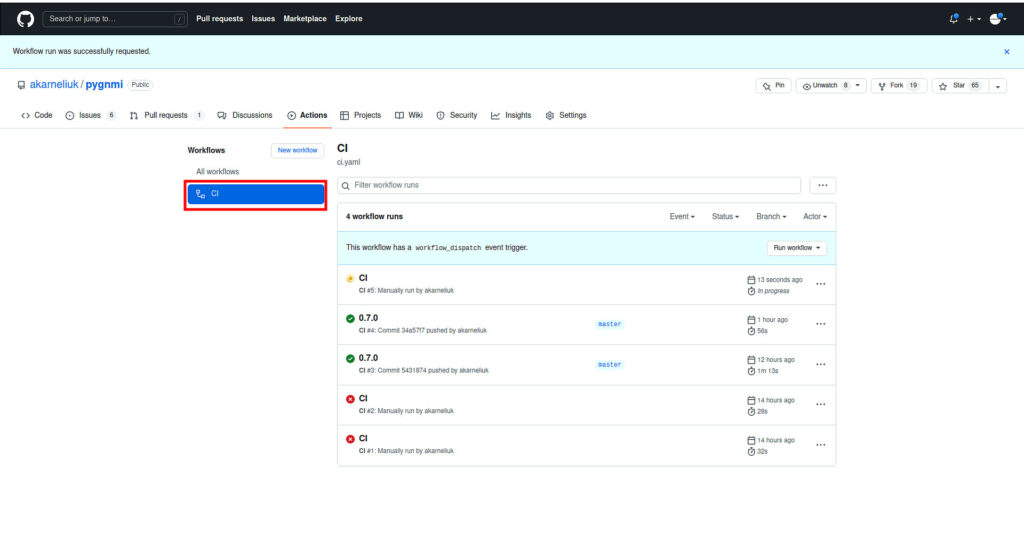
And then press the button “Run worlfkow” (choose a branch on which you want to run it):
In a moment it starts. And you can go inside and watch its execution in live:
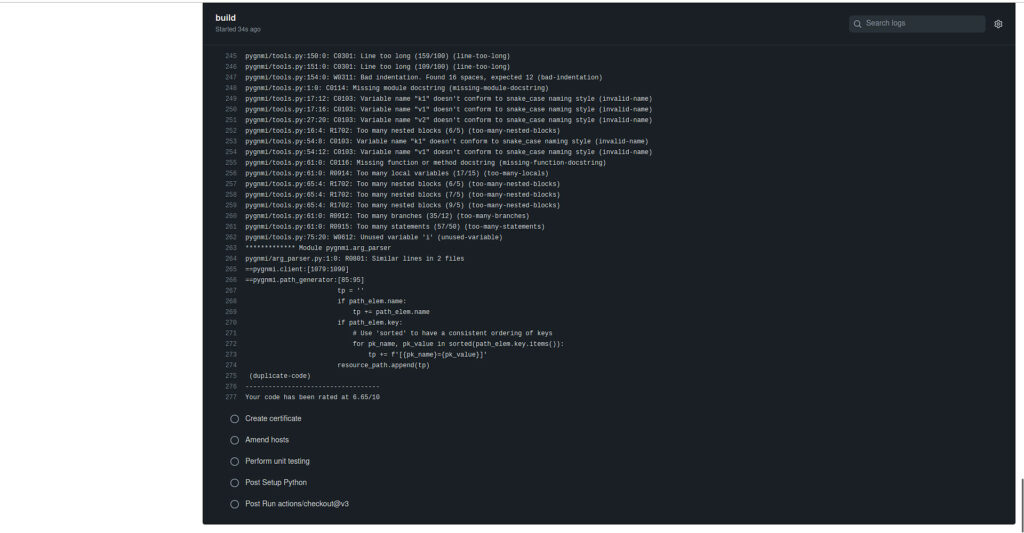
Once it is completed, you will see a result if that is failed or was successful:
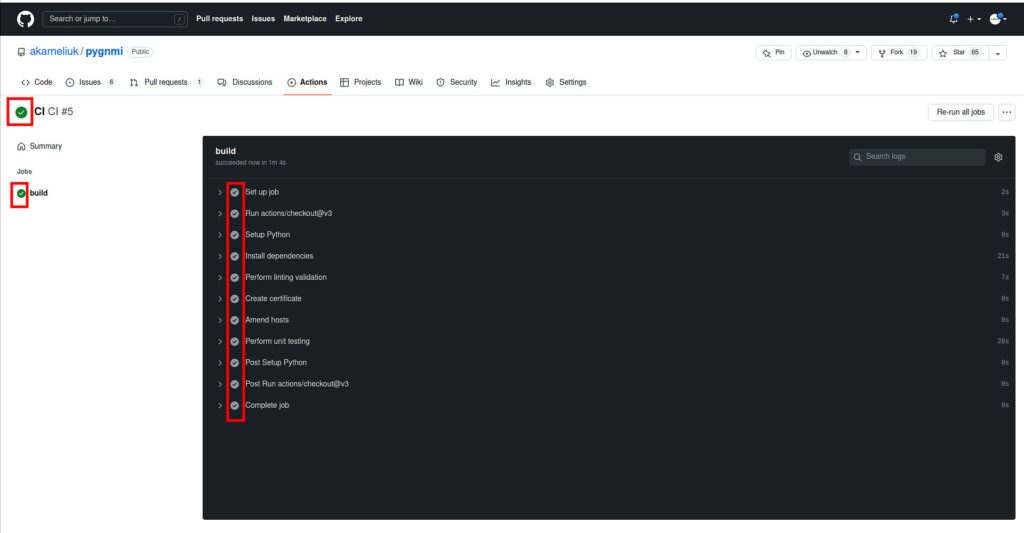
Your first CI/CD pipeline created with GitHub Actions is completed.
Further Ideas
We use CI/CD pipelines in many occasions. For example, we have created for one of our customers the CD workflow, which automatically re-deploy Prometheus each time they modify its configuration file and push it to the repository to ensure they have an accurate state of their infrastructure’s monitoring. The possibilities are endless, frankly speaking, and they are limited just by your imagination.
Our GitHub Repository
Check the CI/CD pipeline described in this blogpost in our GitHub repo.
Lessons Learned
The syntax of GitHub Actions is slightly different to GitLab CI. However, if you carefully compare them, you will find a lot of similarities and once you are able to confidently build CI/CD pipelines for one of the platforms, you will be able to quickly pick that up for other platforms as well.
Summary
Building CI/CD is an automation, pretty much like network automation or in general IT infrastructure automation. That means that all the same principles and characteristics are applicable here as well: if you do it right and do necessary checks and validation, you will have a massive help and reduction of manual activities. However, if you make mistakes (e.g., rollout of new code without sufficient level of checks into production), it may bite you quite severely. Think about it and build your own CI/CD pipelines. Take care and good bye.
Need Help? Contract Us
If you need a trusted and experienced partner to automate your network and IT infrastructure, get in touch with us.
P.S.
If you have further questions or you need help with your networks, we are happy to assist you, just send us a message. Also don’t forget to share the article on your social media, if you like it.
BR,
Anton Karneliuk