

Hello my friend,
When I booted up my laptop in the morning I was aiming to write something simple and easy: it is a summer and I don’t want to spend the whole Sunday on writing a blogpost. However, the topic, which is supposed to be an easy ride, appeared to be a bit more complicated. Well, it is even better then, as the official documentation to the topic is unfortunately vague.
2
3
4
5
retrieval system, or transmitted in any form or by any
means, electronic, mechanical or photocopying, recording,
or otherwise, for commercial purposes without the
prior permission of the author.
Shall I use NETCONF or GNMI for automation?
The answer to this question, as usual, it depends. The first fact to think about is whether your platform supports any of these protocols. For example, the platform we will talk about today started supporting GNMI relateively recently and, to my surprise, it supports quite a legacy version of GNMI. At the same time, NETCONF, being an older technology compared to GNMI, are supported more robust. On the other hand, there are platforms, such as Nokia SRLinux, which don’t support NETCONF at all. Another aspect is how you are comfortable with these frameworks.
And in our Network Automation Trainings you will learn both NETCONF and GNMI, so that you can confidently automate your network devices using either of them.
We offer the following training programs for you:
- Zero-to-Hero Network Automation Training
- High-scale automation with Nornir
- Ansible Automation Orchestration with Ansble Tower / AWX
- Expert-level training: Closed-loop Automation and Next-generation Monitoring
During these trainings you will learn the following topics:
- Success and failure strategies to build the automation tools.
- Principles of software developments and the most useful and convenient tools.
- Data encoding (free-text, XML, JSON, YAML, Protobuf).
- Model-driven network automation with YANG, NETCONF, RESTCONF, GNMI.
- Full configuration templating with Jinja2 based on the source of truth (NetBox).
- Best programming languages (Python, Bash) for developing automation
- The most rock-solid and functional tools for configuration management (Ansible) and Python-based automation frameworks (Nornir).
- Network automation infrastructure (Linux, Linux networking, KVM, Docker).
- Orchestration of automation workflows with AWX and its integration with NetBox, GitHub, as well as custom execution environments for better scalability.
- Collection network data via SNMP and streaming telemetry with Prometheus
- Building API gateways with Python leveraging Fast API
- Integration of alerting with Slack and your own APIs
- … and many more
Moreover, we put all mentions technologies in the context of real use cases, which our team has solved and are solving in various projects in the service providers, enterprise and data centre networks and systems across the Europe and USA. That gives you opportunity to ask questions to understand the solutions in-depts and have discussions about your own projects. And on top of that, each technology is provided with online demos and labs to master your skills thoroughly. Such a mixture creates a unique learning environment, which all students value so much. Join us and unleash your potential.
Brief Description
We have discussed numerous times, why model driven automation is such a crucial topic for building reliable automation solution, even in the previous blogpost. So, we have skip this time explaining why it is needed and will take a look on how you can do that. There are three protocols, which can be used these days for model-driven automation:
- NETCONF is based on SSH transport with XML message encoding format.
- RESTCONF utilizes HTTP transport with JSON encoding (think REST API running on the network device).
- GNMI relies on HTTP/2 transport with Protobuf messaging format and gRPC machinery.
Yes, all three protocols are covered in our Zero-to-Hero Network Automation Training, which you can enroll to and start studying right now.
All of these protocols are united by the common base: YANG modules, as it defines key/value pairs structure for the configuration in our network devices.
Today we speak about Cisco Nexus 9000v, the virtual network function running Cisco NX-OS operating system. This platform is a work-horse for data centers running Cisco networking gear. Despite Cisco promotes their Cisco ACI product, which is an SDN controller for data centers, a lot of companies decide not to use it. There are a number of reasons for this; however, what is important is that Cisco NX-OS based network devices shall be and can be automated even without ACI controller. This is where model-driven automation comes onto the stage.
Cisco NX-OS, depending on the version, supports two YANG models:
- OpenConfig YANG modules, which is a collection of vendor-neutral device-oriented YANG modules.
- Cisco NX-OS native YANG modules, which is working solely at Cisco Nexuses (e.g, Cisco Nexus 9000 or Nexus 3000 or Nexus 7000).
Enroll to Zero-to-Hero Network Automation Training to learn how to automate network devices with OpenConig and vendor-native YANG modules.
In separate blogposts we will cover details how to automate Cisco NX-OS (Nexus 9000) leveraging both YANG modules approaches. So today’s focus is to enable the network device to be manageable via both NETCONF and GNMI.
Lab Setup
The lab setup is very simple as demonstrated on the following image:

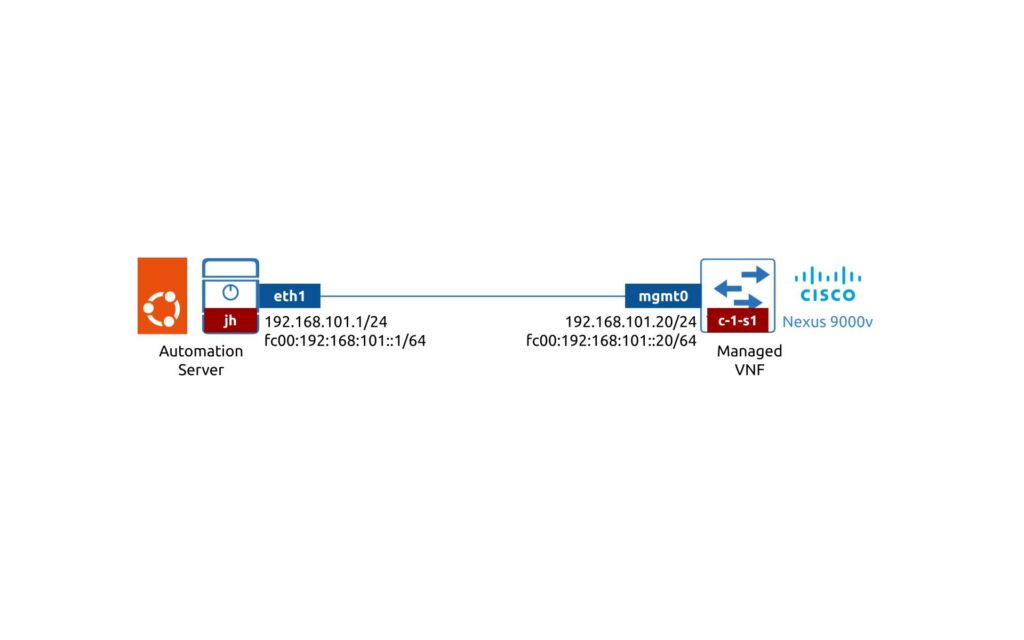
Despite being simple, this setup is enough for our goal, which is enabling both NETCONF and GNMI at Cisco Nexus 9000 network device:
- We have a virtual network function Cisco Nexus 9000v running Cisco NX-OS 9.3.9
- We have a Ubuntu 20.04 server running Python 3.9.2 with scrali_netconf (for NETCONF) and pygnmi (for GNMI)
Solution Implementation
We’ll cover one by one configuration of the network device to operate both with NETCONF in GNMI. For both management protocols we’ll share the configuration steps you need to do on the network device as well as sample Python script to test it.
NETCONF
Configuration of Network Device
Cisco NX-OS is built on top of the Linux. Linux is a modular operating system, where you install packages (applications) in order to get some extra functionality. Likewise, you uninstall certain applications or shut them down to get free up the resources.
Enroll to Zero-to-Hero Network Automation Training to learn Linux and master skills of basic system administration.
The similar approach is taken in Cisco NX-OS. You don’t install packages there per SE; instead, you enable or disable features based on which functionality you need. This concept is followed in order to get any functionality in Cisco NX-OS on top of the most basic one: OSPF, OSPFv3, BGP, MPLS, EVPN, PIM, – all these protocols require enabling its own feature. So does NETCONF.
In order to enable NETCONF on Cisco Nexus 9000 (or any other Cisco NX-OS platform running Cisco NX-OS 9.3 release train), you need just a single command:
It is dead simple, isn’t it? Once you enable it, validate that is indeed enabled:
2
netconf 1 enabled
It is worth mentioning, that NETCONF operates on top of SSH; therefore, it is required to have first SSH properly working in your Cisco NX-OS before enabling NETCONF.
Testing NETCONF on Cisco NX-OS with Python
To test if the NETCONF is working you even don’t need to have any extra library; in fact, you even don’t need Python. Just run the SSH from your automation host against the NETCONF port, which is 830/TCP by default:
If there is no ACL or no customer configuration which breaks NETCONF (e.g., in our lab we take a virgin Cisco Nexus 9000v setup), you should see the following output:
2
3
4
5
6
7
8
9
10
11
12
13
14
15
16
17
18
19
20
User Access Verification
Password:
<?xml version="1.0" encoding="UTF-8"?>
<hello xmlns="urn:ietf:params:xml:ns:netconf:base:1.0">
<capabilities>
<capability>urn:ietf:params:netconf:base:1.0</capability>
<capability>urn:ietf:params:netconf:base:1.1</capability>
<capability>urn:ietf:params:netconf:capability:writable-running:1.0</capability>
<capability>urn:ietf:params:netconf:capability:rollback-on-error:1.0</capability>
<capability>urn:ietf:params:netconf:capability:candidate:1.0</capability>
<capability>urn:ietf:params:netconf:capability:validate:1.1</capability>
<capability>urn:ietf:params:netconf:capability:confirmed-commit:1.1</capability>
<capability>urn:ietf:params:netconf:capability:notification:1.0</capability>
<capability>urn:ietf:params:netconf:capability:interleave:1.0</capability>
<capability>urn:ietf:params:netconf:capability:with-defaults:1.0?basic-mode=report-all</capability>
<capability>http://cisco.com/ns/yang/cisco-nx-os-device?revision=2022-02-04&amp;module=Cisco-NX-OS-device</capability>
</capabilities>
<session-id>110016974</session-id>
</hello>
If you see it, then NETCONF is working.
However, we promised an example of Python script to poll some data from Cisco NX-OS. First of all, install scrapli_netconf:
Once this is done, you can reuse the following Python script:
2
3
4
5
6
7
8
9
10
11
12
13
14
15
16
17
18
19
20
21
22
23
24
25
26
27
Tool to work with Nexus over NETCONF
"""
# Modules
from scrapli_netconf import NetconfDriver
# Variables
COLLECT_CDP = """<System xmlns="http://cisco.com/ns/yang/cisco-nx-os-device">
<cdp-items/>
</System>"""
INVENTORY = {
"host": "192.168.101.20",
"auth_username": "admin",
"auth_password": "cisco",
"auth_strict_key": False,
"port": 830
}
# Body
if __name__ == "__main__":
conn = NetconfDriver(**INVENTORY)
conn.open()
response = conn.get(filter_=COLLECT_CDP)
print(response.result)
Join Zero-to-Hero Network Automation Training to learn Python in-depth to a level to able to develop your own automation tools.
At a high level, in this script you do the following:
- Create a variable with XML message based on Cisco NX-OS native YANG modules to retrieve the information about CDP neighbors.
- Create a variable with connectivity details (i.e., IPv4/IPv6 address of FQDN, username and password).
- You connect to the network device using NetconfDriver imported from scrapli_netconf libary.
- Using NETCONF get() RPC you collect the operational data for CDP.
- You print results of the received RPC response.
Here is what we have received:
2
3
4
5
6
7
8
9
10
11
12
13
14
15
16
17
18
19
20
21
22
23
24
25
26
27
28
<rpc-reply xmlns="urn:ietf:params:xml:ns:netconf:base:1.0" message-id="101">
<data>
<System xmlns="http://cisco.com/ns/yang/cisco-nx-os-device">
<cdp-items>
<inst-items>
<adminSt>enabled</adminSt>
<devIdType>none</devIdType>
<holdIntvl>180</holdIntvl>
<if-items>
<If-list>
<id>eth1/61</id>
<adminSt>enabled</adminSt>
<nativeVlan>1</nativeVlan>
<operSt>down</operSt>
<operStQual>if-down</operStQual>
<rsethIf-items>
<tDn>/System/intf-items/phys-items/PhysIf-list[id='eth1/61']</tDn>
</rsethIf-items>
</If-list>
!
! OUTPUT IS TRUNCATED FOR BREVITY
!
</inst-items>
</cdp-items>
</System>
</data>
</rpc-reply>
It was easy ride, wasn’t it? now let’s move on to GNMI.
GNMI
Disclaimer
I decided to create this part, because I was not able to find all pieces in one place. I checked Cisco NX-OS Programmability documentation on DevNet as well as Cisco Nexus 9000 Series NX-OS Programmability Guide. Unfortunately, non of them has a simple and clear step-by step procedure how you can enable GNMI in Cisco NX-OS; hence, we are taking the responsibility to create it ourselves.
Configuration of Network Device
As mentioned before, Cisco NX-OS is built on top of the Linux. However, you normally don’t operate with the Linux itself; instead, you interact only with Cisco NX-OS CLI. But, we can get to the Linux, to Bash CLI, and this is something we will need to be able to enable GNMI at Cisco NX-OS.
Jumping ahead, it is needed because we build a lab and we don’t want to spend too much time on setting up a proper PKI. Otherwise, going to Bash would be not needed.
The process of GNMI configuration in Cisco NX-OS is much more complicated, as it involves SSL certificates. It is possible to use GNMI in the insecure mode without encryption; however, it is as bad as using telnet and, therefore, not recommended even in lab. At the same time, setting up the proper PKI is quite a long task. Therefore, we decided to go for self-signed certificates, which appeared to be a non-trivial task in Cisco NX-OS.
Step #1. Enable Bash
In order to create self-signed certificates, we need to go into Linux itself, as it is not possible to create a self-signed certificate from CLI in Cisco NX-OS 9.3. To get into Linux, we need to enable Bash CLI, which is yet another feature:
Verify that it is enabled:
2
bash-shell 1 enabled
Step #2. Generate the Self-signed Certificate, Key, and Bundle
Go inside the Bash shell as a super user:
2
bash-4.3#
Then navigate to the /bootflash directory, which is directory visible from the Cisco NX-OS CLI:
Once you are there, generate the self-signed certificate and key and then bundle them in PKCS12:
2
bash-4.3# openssl pkcs12 -export -out grpc_test.pfx -inkey grpc_test.key -in grpc_test.pem -certfile grpc_test.pem -password pass:some_cunning_password
It is imperative to provide password when you create pkcs12 bundle as this password you would need to provide later in the Cisco NX-OS CLI and you won’t have possibility to skip the password during the import
We have provided a subject ‘/CN=c-1-s1.lab.karneliuk.com’ directly when we created certificate to make this process fully non-interactive.
Exit the Bash CLI and validate that you can see the created files:
2
3
4
5
c-1-s1# dir | grep grpc
1704 Jul 24 14:34:40 2022 grpc_test.key
1135 Jul 24 14:34:40 2022 grpc_test.pem
3237 Jul 24 14:36:35 2022 grpc_test.pfx
Step #3. Create Trustpoint Importing the Created Bundle
Navigate to the config context and and create an empty trustpoint, which you then import the created bundle into:
2
c-1-s1(config)# crypto ca import grpc-test-ca pkcs12 bootflash:///grpc_test.pfx some_cunning_password
If you did all the steps exactly as we explained, you shall be able to see the created turstpoint, key and certificate:
2
3
4
5
6
7
8
9
10
11
12
13
14
15
16
17
18
19
20
21
22
23
24
25
26
27
28
29
30
31
trustpoint: grpc-test-ca; key-pair: grpc-test-ca
revokation methods: crl
c-1-s1# show crypto key mypubkey rsa
key label: grpc-test-ca
key size: 2048
exportable: yes
key-pair already generated
c-1-s1# show crypto ca certificates grpc-test-ca
Trustpoint: grpc-test-ca
certificate:
subject= /CN=c-1-s1.lab.karneliuk.com
issuer= /CN=c-1-s1.lab.karneliuk.com
serial=F8319CA4D31F73FD
notBefore=Jul 24 14:34:40 2022 GMT
notAfter=Jul 24 14:34:40 2023 GMT
SHA1 Fingerprint=D7:D5:C8:2B:58:C4:9A:62:79:04:3F:09:05:A8:F4:A0:FB:8B:58:05
purposes: sslserver sslclient
CA certificate 0:
subject= /CN=c-1-s1.lab.karneliuk.com
issuer= /CN=c-1-s1.lab.karneliuk.com
serial=F8319CA4D31F73FD
notBefore=Jul 24 14:34:40 2022 GMT
notAfter=Jul 24 14:34:40 2023 GMT
SHA1 Fingerprint=D7:D5:C8:2B:58:C4:9A:62:79:04:3F:09:05:A8:F4:A0:FB:8B:58:05
purposes: sslserver sslclient
Step #4. Enable GRPC
There is no feature GNMI in Cisco NX-OS features; however, GNMI is working on top of GRPC and there is feature GRPC. Enable it:
And validate that it is properly enabled:
2
grpc 1 enabled
Step #5. Associate Trustpoint with GNMI
The last step in configuration is to associate the trustpoint, which you achieve with a single command:
The final verification shall demonstrate that your Cisco Nexus 9000 (or any other Nexus running Cisco NX-OS 9.3) is ready to be managed with GNMI:
2
3
4
5
6
7
8
9
10
11
12
13
14
15
16
17
18
19
20
21
22
23
24
25
26
27
=============
gRPC Endpoint
=============
Vrf : management
Server address : [::]:50051
Cert notBefore : Jul 24 14:34:40 2022 GMT
Cert notAfter : Jul 24 14:34:40 2023 GMT
Max concurrent calls : 8
Listen calls : 1
Active calls : 0
Number of created calls : 1
Number of bad calls : 0
Subscription stream/once/poll : 0/0/0
Max gNMI::Get concurrent : 5
Max grpc message size : 8388608
gNMI Synchronous calls : 0
gNMI Synchronous errors : 0
gNMI Adapter errors : 0
gNMI Dtx errors : 0
Testing GNMI on Cisco NX-OS with Python
In contrast to NETCONF, you cannot test GNMI without some tool. As we are authoring and maintaining pygnmi, the open source Python library for network devices management with GNMI, we will use it. Moreover, we always wanted to test it against Cisco NX-OS, so it was a right opportunity to do so and to kill two birds with one stone.
First of all, install pygnmi:
Then, use the following simple script to test GNMI operation:
2
3
4
5
6
7
8
9
10
11
12
13
14
15
16
17
18
19
20
21
22
23
24
25
26
27
28
29
30
Tool to work with Nexus over GNMI
"""
# Modules
from pprint import pprint
from pygnmi.client import gNMIclient
# Variables
INVENTORY = {
"host": "192.168.101.20",
"auth_username": "admin",
"auth_password": "cisco",
"port": 50051
}
# Body
if __name__ == "__main__":
with gNMIclient(target=(INVENTORY["host"], INVENTORY["port"]),
username=INVENTORY["auth_username"],
password=INVENTORY["auth_password"],
path_cert="./cert.pem",
skip_verify=True) as gconn:
r1 = gconn.capabilities()
pprint(r1)
r2 = gconn.get(path=["/System/cdp-items"])
pprint(r2)
The script is collecting the same data as the previous one, but via GNMI. The key focus is GNMI piece:
- You create an object submitting all the connectivity information to the host
- You need to provide the certificate to connect to the network device, which is in case of self-signed certificate exactly the same certificate you created earlier in the second step. It was called there grpc_test.pem. The easiest way to get is to go to Bash on your Cisco Nexus again and copy its content by copying the output of “cat /bootflash/grpc_test.pem“.
- As the certificate is self-signed, you would use the skip_verify feature, which we have recently added to pygnmi.
- Using Capabilities() and Get() RPCs you collect the relevant information.
Here is what we got:
2
3
4
5
6
7
8
9
10
11
12
13
14
15
16
17
18
19
20
21
22
23
24
25
26
27
28
29
30
31
32
33
34
Cannot get Subject Alternative Names: No <ObjectIdentifier(oid=2.5.29.17, name=subjectAltName)> extension was found
ssl_target_name_override is applied, should be used for testing only!
{'gnmi_version': '0.5.0',
'supported_encodings': ['json', 'proto'],
'supported_models': [{'name': 'Cisco-NX-OS-device',
'organization': 'Cisco Systems, Inc.',
'version': '2022-02-04'},
{'name': 'DME',
'organization': 'Cisco Systems, Inc.',
'version': ''},
{'name': 'Cisco-NX-OS-Syslog-oper',
'organization': 'Cisco Systems, Inc.',
'version': '2019-08-15'}]}
{'notification': [{'alias': None,
'atomic': False,
'prefix': None,
'timestamp': 1658700622635209825,
'update': [{'path': 'System/cdp-items',
'val': {'inst-items': {'adminSt': 'enabled',
'devIdType': 'none',
'holdIntvl': 180,
'if-items': {'If-list': [{'adminSt': 'enabled',
'id': 'eth1/61',
'nativeVlan': 1,
'operSt': 'down',
'operStQual': 'if-down',
'rsethIf-items': {'tDn': "/System/intf-items/phys-items/PhysIf-list[id='eth1/61']"}},
!
! OUTPUT IS TRUNCATED FOR BREVITY
!
'pnpStartVlan': 1,
'txFreq': 60,
'ver': 'v2'}}}]}]}
The road to get GNMI was quite longer, but it was successful. At the end, only that counts.
Our GitHub Repository
You can find these examples in our GitHub repository.
You can also watch and star the pyGNMI repository.
Lessons Learned
The first and foremost, never underestimate how long would it take to research a topic in a new environment, even if the topic is very well-known. We are developing pyGNMI for 2 years already and have run it on multiple platforms. However, each platforms have its own nuances how to enable the GNMI and to protect it with SSL. It took us quite a bit of time this time setup the trustpoint properly.
Another lesson we learned was quite an unexpected. Despite Cisco NX-OS 9.3.9, which we use in lab is relatively fresh operating system, it has GNMI of 0.5.0 version, which is very old. The latest version at the time of writing is 0.8.0 and the most widely spread is 0.7.0. In fact, we have never seen anything older than 0.7.0.
Summary
Cisco NX-OS supports both GNMI and NETCONF management APIs, which makes that we can manage it in the model-driven way. However, we haven’t yet analyzed its YANG modules in-depth to be able to answer the question, what exaclty we can configure and which data we can retrieve. This question we will answer in the upcoming blogposts. Take care and good bye.
Need Help? Contract Us
If you need a trusted and experienced partner to automate your network and IT infrastructure, get in touch with us.
P.S.
If you have further questions or you need help with your networks, we are happy to assist you, just send us a message. Also don’t forget to share the article on your social media, if you like it.
BR,
Anton Karneliuk