


Dear friend,
Today we’ll look into a question, which is raising quite often on various meetups related to network automation or various threads that is the addition of any automation components (say, NetBox) to the existing networking managing suit, where you already have some inventory (say, LibreNMS). We’ll take a look into multiple approaches and, as usual, will share some code snippets how you can do that.
2
3
4
5
retrieval system, or transmitted in any form or by any
means, electronic, mechanical or photocopying, recording,
or otherwise, for commercial purposes without the
prior permission of the author.
What Is Integration Between Different Automation Tools?
Integrating different automation tools is typically the most labor-intensive work, as it requires understanding of the tools you are integrating, their internal hierarchy and APIs capabilities. That is not even saying that you shall be proficient with a variety of technologies, such as REST API or GRPC API, JSON/Protobuf/XML, Postman and many other tools. That’s a lot, and may be not easy to start with.
The good news is that all these things you can learn at out Network Automation Training programs:
We offer the following training programs for you:
- Zero-to-Hero Network Automation Training
- High-scale automation with Nornir
- Ansible Automation Orchestration with Ansble Tower / AWX
- Expert-level training: Closed-loop Automation and Next-generation Monitoring
During these trainings you will learn the following topics:
- Success and failure strategies to build the automation tools.
- Principles of software developments and the most useful and convenient tools.
- Data encoding (free-text, XML, JSON, YAML, Protobuf).
- Model-driven network automation with YANG, NETCONF, RESTCONF, GNMI.
- Full configuration templating with Jinja2 based on the source of truth (NetBox).
- Best programming languages (Python, Bash) for developing automation
- The most rock-solid and functional tools for configuration management (Ansible) and Python-based automation frameworks (Nornir).
- Network automation infrastructure (Linux, Linux networking, KVM, Docker).
- Orchestration of automation workflows with AWX and its integration with NetBox, GitHub, as well as custom execution environments for better scalability.
- Collection network data via SNMP and streaming telemetry with Prometheus
- Building API gateways with Python leveraging Fast API
- Integration of alerting with Slack and your own APIs
- … and many more
Moreover, we put all mentions technologies in the context of real use cases, which our team has solved and are solving in various projects in the service providers, enterprise and data centre networks and systems across the Europe and USA. That gives you opportunity to ask questions to understand the solutions in-depts and have discussions about your own projects. And on top of that, each technology is provided with online demos and labs to master your skills thoroughly. Such a mixture creates a unique learning environment, which all students value so much. Join us and unleash your potential.
Brief Description
The beauty of using Open Source Software is that you have typically a huge option to choose from for every task you are aiming to do, as there are a lot of enthusiasts worldwide, who are willing to put some efforts in the development of software to solve some (predominantly their own) problems. That is also a downside of majority of the Open Source Software: they are often focused on specific use cases and their re-adoption to different use cases can be either very complicated or not possible.
That’s the reason why there is not a really big choice of outstanding Open Source Software, which are fit for purpose of network management and automation in the modern networks:
- NetBox is the de-facto the standard for source of truth for network and IT infrastructure. There are no other Open Source (neither commercial) software that are somewhere near NetBox’s capabilities.
- LibreNMS in its turn is one of the most popular RTG-based network monitoring systems, which is actively used in Enterprises, Service Providers, and Data Centre networks worldwide. In the niche of monitoring there are some competitors:
- From the perspective of traditional network and IT infrastructure monitoring, Zabbix can be used as well. It in general has similar capabilities as LibreNMS to poll network devices via SNMP and collect their syslog messages, though its original scope is monitoring of serves via installed agents.
- From the perspective of more application-centric and DevOps-ish approach, it is possible to use InfluxData suit (Telegraf, InfluxDB) or Prometheus suit (Prometheus) with visualization of data in Grafana. Having huge flexibility for integrations and automation, this approach is the most complicated as none of the aforementioned tools were developed for network monitoring and, therefore, there is a high amount of efforts you need to put into building such stack.
Check our blogposts about InfluxDB, Telegraf and Grafana
There is always a balance between capabilities of the platform and complexity to deploy and manage it. LibreNMS here is located more at the side of spectrum with where it is easy to deploy and manage the application, that is why it is so popular across the globe; however, its usefulness for automation or data analysis is quite low, that is why we need to add NetBox.
What is LibreNMS?
It is a traditional LAMP stack application, where LAMP stands for:
- Linux – operating system, where the application is running on.
- Apache – web service, which is used to provide access to the application’s front-end and back-end
- MySQL – database, which is used to store all the information related to this application. In case of LibreNMS, it stores both static data (e.g., devices inventory) as well as time-series data (interface counters polled via SNMP and syslog)
- PHP – programming language, which is the front-end and back-end of the application is written into.
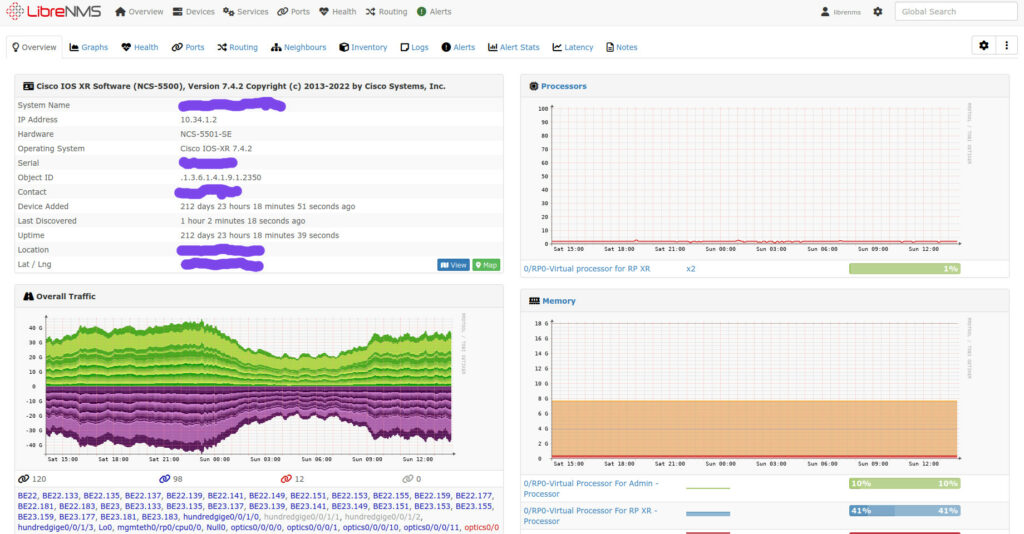
The main purpose of LibreNMS is contained in its name: NMS. So it a network management (though, monitoring is more suitable here) system, which allows you monitor in near-real time the state of your network devices leveraging the set of per-defined metrics such as utilization of network interfaces, CPU/memory utilization, etc. It polls the network devices using the standard set of SNMP MIBs, which sometimes may be incomplete if you need to poll information from the vendor-specific MIBs. In this case, you would need to install those extra MIBs on LibreNMS. Here is a sample view of a typical per-device view in LibreNMS:

In order to add the network device to LibreNMS, you would:
- Either add it manually using the Web-UI/CLI or API endpoint specifying IP address or FQDN how to reach it, hostname, SNMP credentials, etc
- Or add it automatically by configuring auto-discovery specifying the subnet ranges where to look for devices as well as SNMP credentials.
For the purpose of this blogpost, we assume that LibreNMS is already up and running and the company wants to add NetBox to its toolkit.
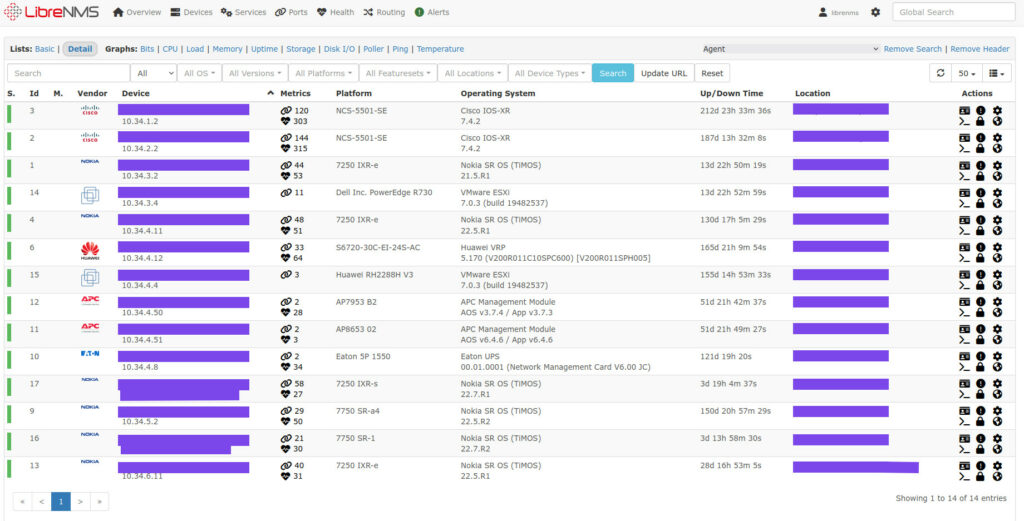
Besides the per-device view, you can build various dashboards with graphs from different network devices, etc. From the purpose of automation, we are really interested only in the inventory part:

Let’s see how can retrieve it programmatically.
Prepare for Integration
LibreNMS API
LibreNMS has some API. The reason why we use term “some” is because its capabilities compared to NetBox is very limited. Nevertheless, it is possible to retrieve the list of the network devices the LibreNMS is monitoring via this API using https://librenms.address/api/v0/devices endpoint.
In order to access that endpoint, you need to authenticate and authorize yourself, which is implemented in LibreNMS using token, which needs to be created first and then to be communicated in the header of each request using “X-Auth-Token” key. The easiest way to create token is via the WebUI (though you can do it via CLI as well):
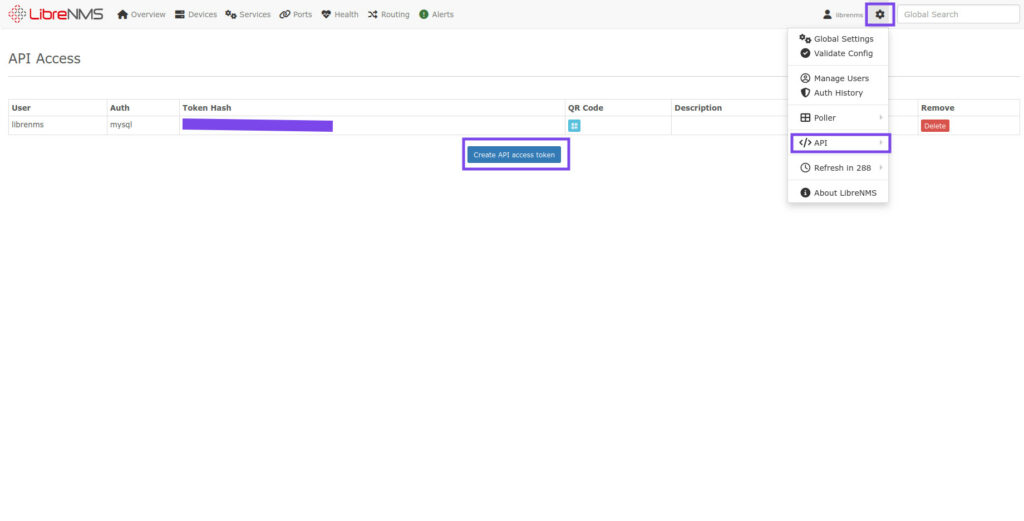
Once you have a token, you can go ahead and test your access to REST API:
2
3
4
5
6
7
8
9
10
11
12
13
14
15
16
17
18
19
20
21
22
23
24
25
26
27
28
29
30
31
32
33
34
35
36
37
38
39
40
41
42
43
44
45
46
47
48
49
50
51
52
53
54
55
56
57
58
59
60
61
62
63
64
65
66
67
68
% Total % Received % Xferd Average Speed Time Time Time Current
Dload Upload Total Spent Left Speed
100 30322 0 30322 0 0 154k 0 --:--:-- --:--:-- --:--:-- 154k
{
"status": "ok",
"devices": [
{
"device_id": 3,
"inserted": "2022-05-05 15:45:48",
"hostname": "10.34.1.2",
"sysName": "some_cool_hostname",
"display": "some_cool_hostname",
"ip": "",
"overwrite_ip": "",
"community": "public",
"authlevel": null,
"authname": null,
"authpass": null,
"authalgo": null,
"cryptopass": null,
"cryptoalgo": null,
"snmpver": "v2c",
"port": 161,
"transport": "udp",
"timeout": null,
"retries": null,
"snmp_disable": 0,
"bgpLocalAs": some_cool_asn,
"sysObjectID": ".1.3.6.1.4.1.9.1.2350",
"sysDescr": "Cisco IOS XR Software (NCS-5500), Version 7.4.2 Copyright (c) 2013-2022 by Cisco Systems, Inc.",
"sysContact": "some_cool_email",
"version": "7.4.2",
"hardware": "NCS-5501-SE",
"features": null,
"location_id": 2,
"os": "iosxr",
"status": 1,
"status_reason": "",
"ignore": 0,
"disabled": 0,
"uptime": 18403411,
"agent_uptime": 0,
"last_polled": "2022-12-04 14:46:33",
"last_poll_attempted": null,
"last_polled_timetaken": 45.11,
"last_discovered_timetaken": 141.01,
"last_discovered": "2022-12-04 13:02:21",
"last_ping": null,
"last_ping_timetaken": 51.2,
"purpose": "",
"type": "network",
"serial": "some_cool_serial",
"icon": "cisco.svg",
"poller_group": 0,
"override_sysLocation": 0,
"notes": null,
"port_association_mode": 1,
"max_depth": 0,
"disable_notify": 0,
"dependency_parent_id": null,
"dependency_parent_hostname": null,
"location": "some_cool_site",
"lat": 0.0,
"lng": 0.0
},
!
! FURTHER OUTPUT IS TRUNCATED FOR BREVITY
Enroll to our Network Automation Trainings to master REST API and Linux (e.g., curl/jq) skills
NetBox API
NetBox REST API is, in our eyes, an exceptional one: it is very feature reach, stable, functional and extensible (via plugins). That is the reason why we are in love with NetBox and use it for all our automation projects.
We have posted a lot about NetBox and its API already, so spend some time reading these blogs if you are not yet familiar with NetBox.
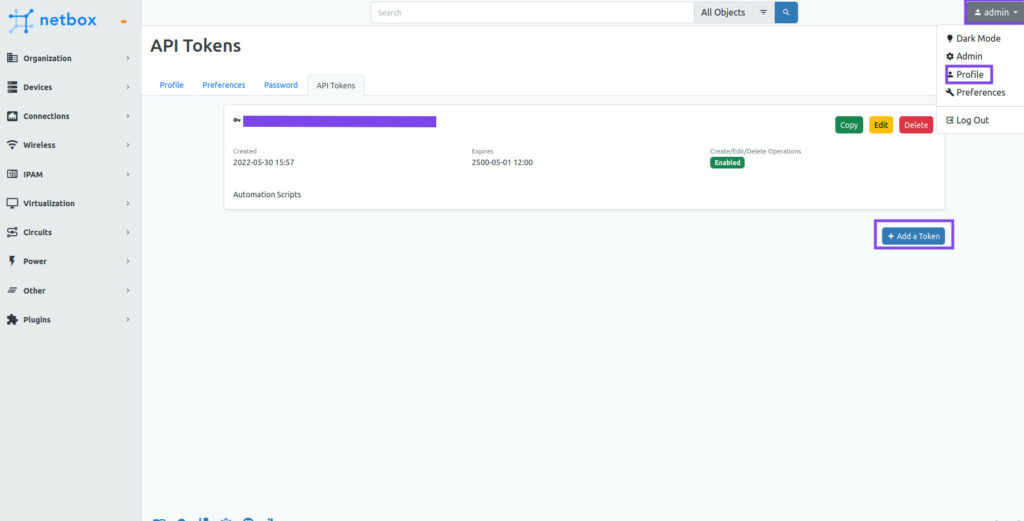
To access NetBox API you also need to create a token with corresponding permissions:
Enroll to Zero–to–Hero Network Automation Training to get up to speed with NetBox and learn how to build automation with Ansible and Python on top of it
Then you can get the list of network devices, which are existing in NetBox now.
2
3
4
5
6
7
8
9
10
11
12
13
14
15
16
17
18
19
20
21
22
23
24
25
26
27
28
29
30
31
32
33
34
35
36
37
38
39
40
41
42
43
44
45
46
47
48
49
50
51
52
53
54
55
56
57
58
59
60
61
62
63
64
65
66
67
68
69
70
71
72
73
74
75
76
77
78
79
80
81
82
83
84
85
86
87
88
89
90
91
92
93
94
95
96
97
98
99
% Total % Received % Xferd Average Speed Time Time Time Current
Dload Upload Total Spent Left Speed
100 8701 100 8701 0 0 25516 0 --:--:-- --:--:-- --:--:-- 25441
{
"count": 5,
"next": null,
"previous": null,
"results": [
{
"id": 3,
"url": "https://netbox.address/api/dcim/devices/3/",
"display": "some_cool_hostname",
"name": "some_cool_hostname",
"device_type": {
"id": 3,
"url": "https://netbox.address/api/dcim/device-types/3/",
"display": "NCS-5501-SE",
"manufacturer": {
"id": 1,
"url": "https://netbox.address/api/dcim/manufacturers/1/",
"display": "Cisco",
"name": "Cisco",
"slug": "cisco"
},
"model": "NCS-5501-SE",
"slug": "ncs-5501-se"
},
"device_role": {
"id": 1,
"url": "https://netbox.address/api/dcim/device-roles/1/",
"display": "Router",
"name": "Router",
"slug": "core-router"
},
"tenant": null,
"platform": {
"id": 1,
"url": "https://netbox.address/api/dcim/platforms/1/",
"display": "iosxr",
"name": "iosxr",
"slug": "iosxr"
},
"serial": "some_cool_serial",
"asset_tag": null,
"site": {
"id": 4,
"url": "https://netbox.address/api/dcim/sites/4/",
"display": "some_cool_site",
"name": "some_cool_site",
"slug": "some_cool_site"
},
"location": null,
"rack": {
"id": 2,
"url": "https://netbox.address/api/dcim/racks/2/",
"display": "Ilimit Equinix BA1 (0102)",
"name": "Ilimit Equinix BA1"
},
"position": 37,
"face": {
"value": "front",
"label": "Front"
},
"parent_device": null,
"status": {
"value": "active",
"label": "Active"
},
"airflow": null,
"primary_ip": {
"id": 13,
"url": "https://netbox.address/api/ipam/ip-addresses/13/",
"display": "10.34.1.2/24",
"family": 4,
"address": "10.34.1.2/24"
},
"primary_ip4": {
"id": 13,
"url": "https://netbox.address/api/ipam/ip-addresses/13/",
"display": "10.34.1.2/24",
"family": 4,
"address": "10.34.1.2/24"
},
"primary_ip6": null,
"cluster": null,
"virtual_chassis": null,
"vc_position": null,
"vc_priority": null,
"comments": "",
"local_context_data": null,
"tags": [],
"custom_fields": {},
"config_context": {},
"created": "2022-05-06T16:43:54.615345Z",
"last_updated": "2022-07-10T15:41:01.619582Z"
},
!
! FURTHER OUTPUT IS TRUNCATED FOR BREVITY
Approaches to Integrate LibreNMS and NetBox
As you can already guess, the way how we can and should integrate NetBox with LibreNMS (if we have LibreNMS and want to add NetBox or vice versa) is to rely on the APIs. Depending on what comes first, the order may be different.
Option #1. NetBox is a Source for LibreNMS
The easier scenario is when you first have NetBox and then add LibreNMS (or you do both tasks simultaneously). This scenario, the order of the operation will be the following:
- Add all the devices in the NetBox.
- If you are lucky enough to build a greenfield network these days, you should focus on modelling the entire network infrastructure in NetBox first and then to render the entire configuration based on that modelling. In our Zero-to-Hero Network Automation Training we teach you how do it.
- If you already have a network, you may need to populate NetBox using the discovery of the network. In our Zero-to-Hero Network Automation Training we teach you how do it as well.
- Add the network devices from NetBox to LibreNMS via API.
It is possible to implement some logic, where you will automatically add the device to LibreNMS as soon as you add it to NetBox leveraging webhooks.
Option #2. LibreNMS is a Source for NetBox
If you already have LibreNMS and is bringing NetBox later you can:
- Retrieve the list of network devices via REST API
- Prepare some items in NetBox via UI or REST API
- Add the information from LibreNMS to NetBox via REST API
- Run the discovery of Network and populate missing part
This approach is predominantly used in the brownfield deployment, exactly the case we have outlined in the title of this blogpost. There are a few considerations you need to keep in mind:
- NetBox is a very structured modelling tool. That means that in order to create a device, you need first at a bare minimum to create:
- manufacturer
- device type (i.e., primitive of the device model)
- device role
- site
- If you don’t have them created, the NetBox would raise an error
All of the aforementioned items you can create via REST API and, technically, you can do it during the same run, when you create network devices. However, it is not advisable as you won’t be able to define all the necessary parameters available in NetBox and your documentation will be vague, to say at least. Therefore, what we recommend is that you spend some time preparing the major artifacts with the sufficient amount of details. Then, during the import from LibreNMS you just “template” devices out of the prepared primitives providing the necessary variables.
In terms of discovery, there is no reasonable automated way out of box in the NetBox: it does support NAPALM drivers, however, its usage from NetBox is not very straightforward and NAPALM data model is fairly limited (see our remark about Open Source Software using particular use cases in the beginning of this blogpost). If your network device supports NETCONF or GNMI, you just should retrieve the configuration and populate NetBox with this information. If not, you would need to parse the information collected via CLI and parse it.
In our Zero-to-Hero Network Automation Training you will learn all possible ways to programmably retrieve the configuration from network devices running Cisco IOS XR, Nokia SR OS, Arista EOS and Cumulus Linux.
Example with Python
To show you where to start with NetBox and LibreNMS integration, we’ll create a simple script, which polls the inventory data from LibreNMS and NetBox and compares it outlining which changes need to be done in NetBox to add the same information as LibreNMS already have. Bear in mind, that NetBox may already have some data, if you do incremental imports; therefore, such summary is important.
The script will require two libraries, which are not part of the standard Python distribution. Install them:
2
3
4
5
requests
dictdiffer
$ pip install -r requirements.txt
Now, let’s take in the Python script itself:
2
3
4
5
6
7
8
9
10
11
12
13
14
15
16
17
18
19
20
21
22
23
24
25
26
27
28
29
30
31
32
33
34
35
36
37
38
39
40
41
42
43
44
45
46
47
48
49
50
51
52
53
54
55
56
57
58
59
60
61
62
63
64
65
66
67
68
69
70
from pprint import pprint
import requests
from dictdiffer import diff
# Statics
LIBRENMS_TOKEN = "123456abcd"
LIBRENMS_URL = "https://librenms.address"
NETBOX_TOKEN = "abcd123456"
NETBOX_URL = "https://netbox.address"
# Functions
def get_normalized_librenms(url: str, token: str) -> dict:
headers = {"X-Auth-Token": token}
non_normalized_data = requests.get(url=url, headers=headers).json()
result = {}
for device in non_normalized_data["devices"]:
result.update(
{
device["sysName"]: {
"mgmt_ip": device["hostname"],
"platform_type": device["hardware"],
"serial": device["serial"],
"site": device["location"],
"device_type": (
"router" if device["sysName"].startswith("cr") else "switch"
),
}
}
)
return result
def get_normalized_netbox(url: str, token: str) -> dict:
headers = {"Authorization": f"Token {token}"}
non_normalized_data = requests.get(url=url, headers=headers).json()
result = {}
for device in non_normalized_data["results"]:
result.update(
{
device["name"]: {
"mgmt_ip": device["primary_ip"]["address"].split("/")[0],
"platform_type": device["device_type"]["model"],
"serial": device["serial"],
"site": device["site"]["name"],
"device_type": device["device_role"]["name"].lower(),
}
}
)
return result
# Body
if __name__ == "__main__":
ldevices = get_normalized_librenms(
url=f"{LIBRENMS_URL}/api/v0/devices", token=LIBRENMS_TOKEN
)
ndevices = get_normalized_netbox(
url=f"{NETBOX_URL}/api/dcim/devices/", token=NETBOX_TOKEN
)
gap = list(diff(first=ndevices, second=ldevices))
pprint(gap)
It is relatively simple one and is not aimed to be used in prod as this is a sequential one and doesn’t rely on concurrency in any capacity. However, it is a good starting for you to understand the problem.
Here are the building blocks:
- Import the installed packages
- Function get_normalized_librenms() pulls from the LibreNMS the list of the monitored network devices and normalizes the output to some intermediate format.
- Function get_normalized_netbox() pulls from the NetBox the list of the monitored network devices and normalizes the output to some intermediate format. This normalization level is important as LibreNMS and NetBox have completely different API schemas and internal data structures. Therefore, in order we can compare what exists in LibreNMS against what exists in NetBox, we need to normalize both of the outputs to the same format
- Normalized data sets are put as an input to the diff() function which key by key compares two data sets and creates the generator, which we wrap into the list() to get the list of the differences.
Let’s see how the created python script works:
2
3
4
5
6
7
8
9
10
11
12
13
14
15
16
17
18
19
20
21
22
23
24
25
[('change',
['device-1.some_cool_network', 'serial'],
('wrong_serial_1', 'some_serial_1')),
('change', ['device-2.some_cool_network', 'serial'], ('', 'some_serial_2')),
('change',
['device-3.some_cool_network', 'site'],
('wrong_site_1', 'some_cool_site_1')),
('change', ['device-4.some_cool_network', 'serial'], ('', 'some_serial_3')),
('change',
['device-5.some_cool_network', 'serial'],
('wrong_serial_2', 'some_serial_4')),
('change',
['device-5.some_cool_network', 'device_type'],
('router', 'switch')),
('add',
'',
[('device-6.some_cool_network',
{'device_type': 'router',
'mgmt_ip': '10.34.2.2',
'platform_type': 'NCS-5501-SE',
'serial': 'some_serial_6',
'site': 'some_cool_site_3'}),
!
! FURTHER OUTPUT IS TRUNCATED FOR BREVITY
With this script you have a clear view what is missing in NetBox compared to LibreNMS and you can create its second part, which will add the entries to netbox using the same requests Python library.
Lessons Learned
You shall be careful upon building this integration, as sometimes data in LibreNMS may be not necessary properly represented. What do we mean by that? Some devices may have the IP address as its hostname, whilst others may have FQDN; some devices may have domain name as part of their hostname, whilst others others don’t. This is not problem of LibreNMS per se (though, it could be that devices are imported nod correctly); but it depends on each particular network operating system LibreNMS interacts with.
Summary
Integrating of different tools is one of the most complex and tricky parts of network automation; at the same time, quite often this is what ultimately defines success or failure of the entire network automation initiative. Adding N+1 tool is easy, ensuring that anyone will use it is much more difficult. That’s why integration is such a key: adding new useful functionality without the need for users to learn new tool is a sound step to a successful automation project. Take care and good bye!
Need Help? Contract Us
If you need a trusted and experienced partner to automate your network and IT infrastructure, get in touch with us.
P.S.
If you have further questions or you need help with your networks, we are happy to assist you, just send us a message. Also don’t forget to share the article on your social media, if you like it.
BR,
Anton Karneliuk