


Dear friend,
Today’s topic will be an unusual one. We will talk about some (of course) Python-related technology, which despite its existence for quite a while already, we have been always somewhat avoiding. It always seemed for me that Jupyter is not a right thing for network automation, especially when we talk proper software development, not simple scripts. I still stand this ground; however, I see now where Jupyter can be quite useful.
Is There Any Limit in Network Automation Tools?
Well. The truth is that there is no limit. In vast majority of cases, tools used in Network Automation are either ones coming from DevOps or from Software Development. Both of these areas are massive and are ever growing, what ultimately means that amount of tools for network automation is growing as well. Some of these tools are more suitable for network automation, some are less: it is possible to assess if the particular one is suitable for network automation only if you test , which is time consuming.
The good news is that we already created a selection of great network automation tools and technologies for you. We have carefully tested and put them together, so that you don’t have to spend your precious time on conducting tests on your own; instead, you rely on our expertise and focus on your business goals. To be able to do that, study with us:
We offer the following training programs for you:
- Zero-to-Hero Network Automation Training
- High-scale automation with Nornir
- Ansible Automation Orchestration with Ansble Tower / AWX
- Expert-level training: Closed-loop Automation and Next-generation Monitoring
During these trainings you will learn the following topics:
- Success and failure strategies to build the automation tools.
- Principles of software developments and the most useful and convenient tools.
- Data encoding (free-text, XML, JSON, YAML, Protobuf).
- Model-driven network automation with YANG, NETCONF, RESTCONF, GNMI.
- Full configuration templating with Jinja2 based on the source of truth (NetBox).
- Best programming languages (Python, Bash) for developing automation
- The most rock-solid and functional tools for configuration management (Ansible) and Python-based automation frameworks (Nornir).
- Network automation infrastructure (Linux, Linux networking, KVM, Docker).
- Orchestration of automation workflows with AWX and its integration with NetBox, GitHub, as well as custom execution environments for better scalability.
- Collection network data via SNMP and streaming telemetry with Prometheus
- Building API gateways with Python leveraging Fast API
- Integration of alerting with Slack and your own APIs
- … and many more
Moreover, we put all mentions technologies in the context of real use cases, which our team has solved and are solving in various projects in the service providers, enterprise and data centre networks and systems across the Europe and USA. That gives you opportunity to ask questions to understand the solutions in-depts and have discussions about your own projects. And on top of that, each technology is provided with online demos and labs to master your skills thoroughly. Such a mixture creates a unique learning environment, which all students value so much. Join us and unleash your potential.
Brief Description
In this blogpost we are continuing the discussion, which we have started in one of the previous blogposts, where we started study of Pandas with Python. We will touch Pandas in this blogpost as well; however, our main focus is slightly different: we will talk about Jupyter. Looking into the official website, we could find the following description:
Free software, open standards, and web services for interactive computing across all programming languages
The piece of software, which we are going to use, is called JupyterLab, which is described as:
JupyterLab is the latest web-based interactive development environment for notebooks, code, and data. Its flexible interface allows users to configure and arrange workflows in data science, scientific computing, computational journalism, and machine learning.
As you can read, it is all about interactivity in the first place, and then about science (data science, machine learning) and collaboration/sharing. If hold a moment and think about it, you, perhaps, can see why we have been avoiding Jupyter: network automation as such is not about interactivity (at least, not for user). Network automation is all about tools, which can be triggered via API GW or based on some other event and work autonomously. These Python tools can be interactive from the perspective of network device, where the execution of the code is driven based on the responses obtained from these network devices; however, there is no interactivity as such on the interface towards the user.
We have seen recently an interesting classification of approach to use Python:
- Software Development Mode. This is how we use Python for the purpose of traditional software development. That is how we develop tools and applications for network automation, web services and other things.
- Discovery/Exploratory Mode. This is how data analysts and data scientists are using Python to analyses the statistical data, perform the data transformations/visualizations, etc.
Despite the latter mode may seem simpler from the perspective of Python’s code itself, it requires more complicated setup of the environment to provide data scientists possibility to store intermediate results, provide detailed annotations in easy human readable formats including various text styles (e.g., using Markdown syntax).
This is where Jupyter comes to the stage. It allows to create such environment and truly explore something (e.g., some data) with Python and other programming languages. In our case, we will use Python of course.
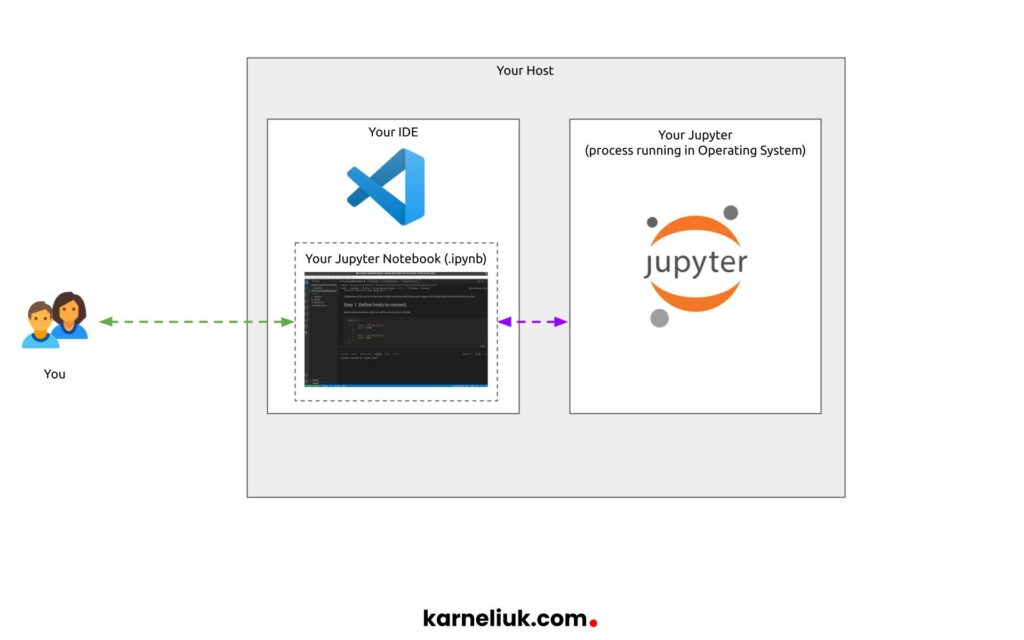
Jupyter is a real environment, or as it is officially called IDE – Integrated Development Environment. Once you install it, you may even log to its UI and start writing the Jupyter notebooks directly in the browser. However, we prefer to use VS Code, so we will use it instead. As we already brought a few new words, let’s ensure that we clarify the terminology:
- JupiterLab is a piece of software installed on your host to act as the development environment. It runs a small web service for you to use via browser or any other tool.
- BE VERY CAREFUL: Version of Python inside Jupiter Lab MAY be different to what you think it has as it may be different to version of Python at your host.
- Jupter Notebook is class of artifacts, which you create interactively. Thing about it as a Python script, but you create interleaving blocks with Python and markdown text. This Jupiter Notebook relies on Jupiter Lab software to execute Python and to store intermediate results of execution
- It is a file with .ipynb extension
- VS Code Jupyter extension is an extension to VS Code to permit simple integration with Jupyter Labs
Take a look how all these components are connected to each other:

Enroll to Zero-to-Hero Network Automation Training to learn more about VS Code, how to setup and how to use it.
Lab Setup
Despite primarily this lab is about Jupyter and Jupyter notebooks, as we claimed that we are going to use to interact with network devices via pyGNMI and process collected data with Pandas. As such, we need to add network devices to our lab:

The following hosts are used in the lab:
- Network Devices:
- Nokia vSIM with SR OS 21.10.R1
- Arista vEOS with EOS 4.28.1F
- Automation host:
- Ubuntu 22.04
- Python 3.9
- jupyterlab 3.5.2
- pandas 1.5.3
- pygnmi 0.8.9
Prepare Environment with Python, Jupyter, Pygnmi and Pandas
It is expected that you have Python installed. If you need help with that, watch this video
Once that is done, create the following files with required packages:
2
3
4
pygnmi
jupyterlab
pandas
Despite there are only 3 packages provided, their dependencies will be installed as well. Go ahead and create virtual environment and install packages:
2
3
$ source venv/bin/activate
(venv)$ pip install -r requirements.txt
Enroll to Zero-to-Hero Network Automation Training to master Python skills
Ensure that all the relevant packages are installed:
2
3
4
5
6
7
8
9
10
11
jupyter-events==0.6.3
jupyter_client==7.4.9
jupyter_core==5.1.3
jupyter_server==2.1.0
jupyter_server_terminals==0.4.4
jupyterlab==3.5.2
jupyterlab-pygments==0.2.2
jupyterlab_server==2.19.0
pandas==1.5.3
pygnmi==0.8.9
Usage
As mentioned before, Jupyter is a service running on your host. To check that it is running indeed, you can check the open ports associated with Python process:
2
3
4
5
6
7
LISTEN 0 100 127.0.0.1:34355 0.0.0.0:* users:(("python",pid=113073,fd=36))
LISTEN 0 100 127.0.0.1:9000 0.0.0.0:* users:(("python",pid=113073,fd=45))
LISTEN 0 100 127.0.0.1:9001 0.0.0.0:* users:(("python",pid=113073,fd=15))
LISTEN 0 100 127.0.0.1:9002 0.0.0.0:* users:(("python",pid=113073,fd=11))
LISTEN 0 100 127.0.0.1:9003 0.0.0.0:* users:(("python",pid=113073,fd=13))
LISTEN 0 100 127.0.0.1:9004 0.0.0.0:* users:(("python",pid=113073,fd=29))
These TCP ports in 9000 range are related to Jupyter. If you can see them, it means that your Jupyter is highly likely up running.
Sometimes, though, it may be clash with other applications listening for the port 9000 by default. One of the examples, ClickHouse database, which also uses 9000/TCP by default
Step #1. Start Creating Your Jupyter Notebook
Once the environment is settled, it is a time to start building the Jupyter Notebook. To do so, you simple need to create file with “.ipynb” extension:

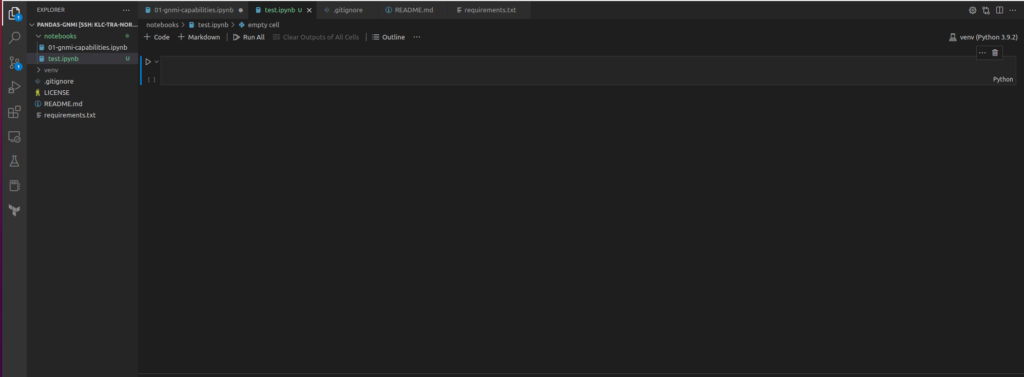
You will see in the top right corner the version of Python used in your virtual environment, which is supposed to be used in Jupyter notebook as well. You also see that you have created one Cell with Python interpreter. At a bare minimum there are three types of cell available for you in Jupyter:
- Cell with code, where you put your Python code, which you can execute directly in the Jupyter. You can edit content in such a cell.
- Cell with a text in Markdown syntax, which is normally used to provide some comments or explanation for your code. You can edit content in such a cell.
- Cell with results, which are generated during the execution of your code.
You can create first two types of cell in any sequence as long as it matches your idea. The cell with results appears automatically after each cell with code after your execute it if there is any result/output is associated. For example:
- If you create code cell with content “import json“, there will be no cell with results created, as there are no output of such code.
- However, if you create code will with content “print(‘some text’)“, the cell with the result will be generated.
Step #2. Objectives of Jupyter Notebook
With these ideas in mind, we start creating our Jupyter notebook. It’s objectives are:
- Ask from user credentials from network devices
- Connect to network devices via GNMI and retrieve the available GNMI capabilities
- Store this information and create a number of Pandas data frames with subset of data in each.
Step #3. Develop Jupyter Notebook to Collect Data from Network Devices with GNMI
We will provide here screenshots. Refer to the GitHub repository below to get the associated files.
First of all, let’s create a two cells with Markdown code to provide details we are going to do. After that, add the first Cell with Python code with the details of connectivity towards our Nokia SR OS and Arista EOS network functions:

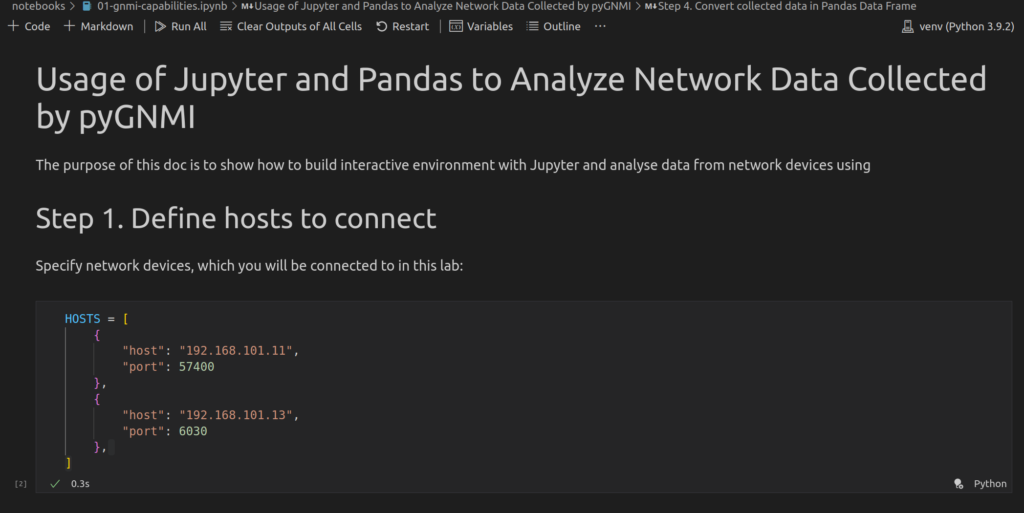
Left to the cell with Python code, you will see a a Play button. If you hover mouse over it, it will suggest that it is named “Execute Cell”. Once you press the button, the Python code will be executed. So, press it.
There is no output cell created, as there is no output is requested to be printed
Once this is done, you have the variable “HOSTS” created, which is stored in the backend in Jupyter. You can continue composing your notebook without need to re-run these code cell. The results of executed pieces of code are stored in the memory as long as you don’t close the file with your Jupyter notebook (this “.ipynb” file).
Write the second step, where we are retrieve credentials:

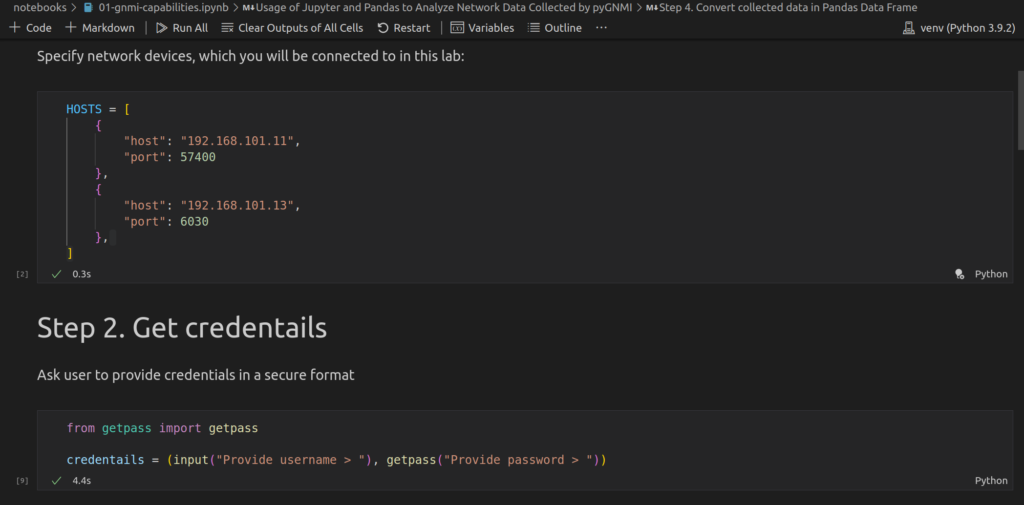
As in the previous case, we first create the cell with text in Markdown syntax to ensure that the reader will understand what the certain piece of code is doing.
Once you execute this piece of code, you will be asked to provide credentials dynamically:
For input instruction, the text you input will be visible:


However, for getpass.getpass(), it won’t be:


If you want to learn more about different Python libraries, join our Zero-to-Hero Network Automation Training to get up to speed with Python for Network Automation
As in the previous case, your provided credentials now are stored in the memory of Jupyter, so you can finally connect to network devices. To do that, you should use pygnmi library.
As in the previous cases, create one markdown cell with the details of what you intend to do followed up by the code cell:

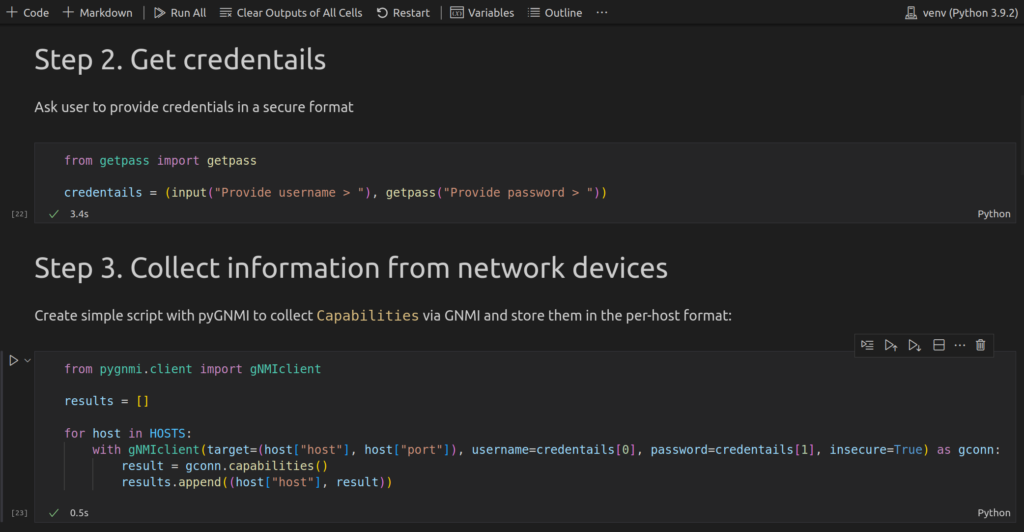
As you can start seeing, the code in cells is pretty much the same as you would normally do in Python. It is just happen to be split in blocks.
Once you execute this code, if you can reach network devices and credentials are accurate, you shall see the green check mark in the bottom left corner of the cell with code, as you have seen in the previous executions. However, if your credentials are wrong or you cannot reach network devices, you will see an error:

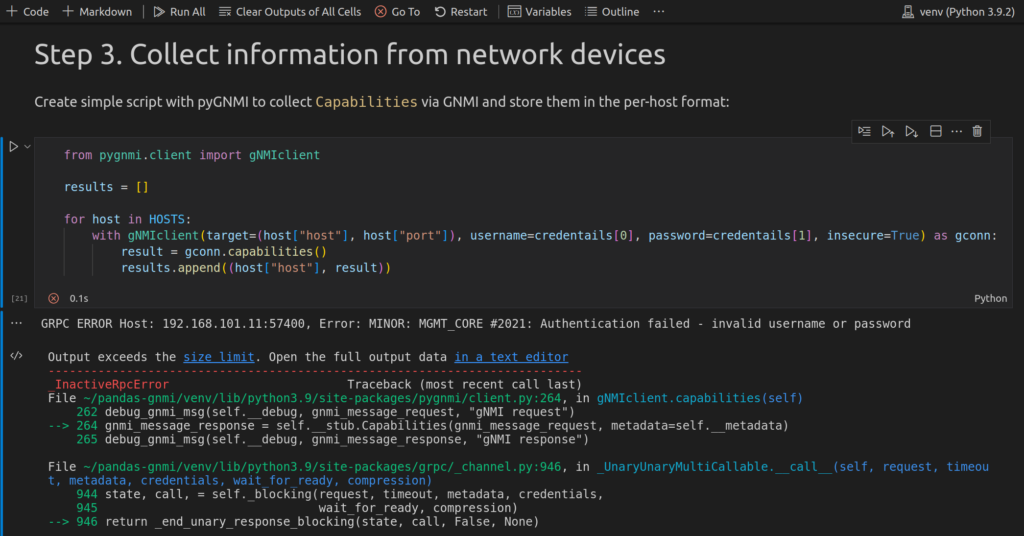
In the case above, you see all the tracebacks of the code, suggesting that credentials are wrong. These tracebacks are visible in this auto-generated cell with results.
When the credentials are accurate and you have successfully executed the code, you can see what’s in the content of your collected result variable by adding 2 more cells:
- with Markupdown comments
- with Python code

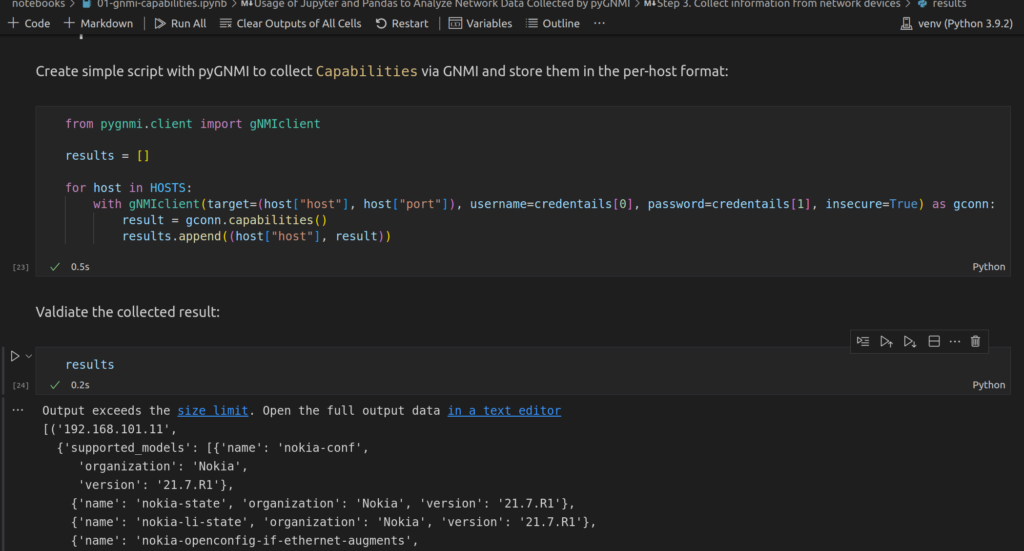
Data is collected and you can start exploring it with Pandas.
Step #4. Interactively Explore Data from Your Network Devices
There are three pieces of information is collected in GNMI Capabilities request:
- Supported YANG modules
- Supported encodings
- GNMI version
For each of these pieces of information, we will create dedicated data frame. Let’s start with the gnmi_version.
As you see, we create a few cells with code and a few with text: run them in the order of creation. You can try to run the second one before the first is run; however, you would get an error that you are trying to use not imported library. So the same rules are applied as to regular Python execution:

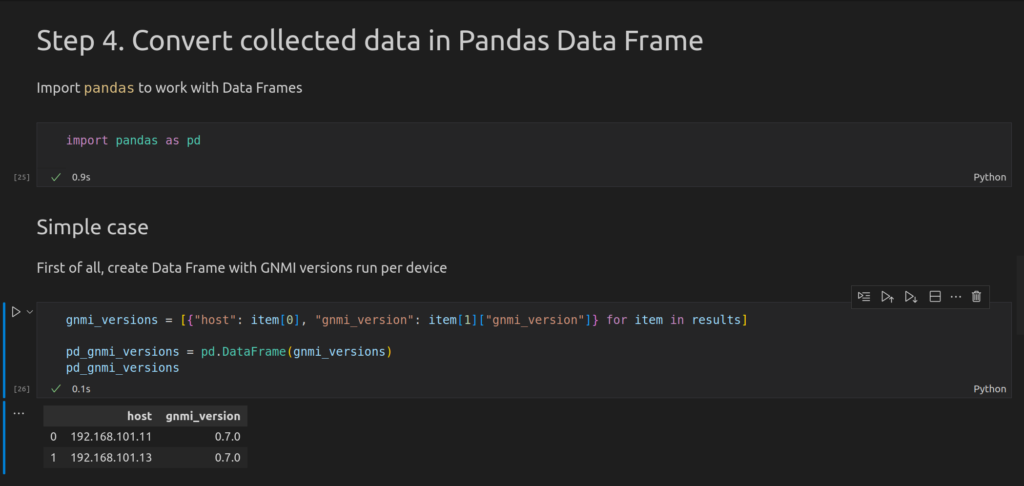
If Python list comprehension is not something you are familiar with, join Zero-to-Hero Network Automation training to master Python skills.
You can see as the result of this execution a simple table showing which GNMI version each of network devices is running.
The next case is more complicated:

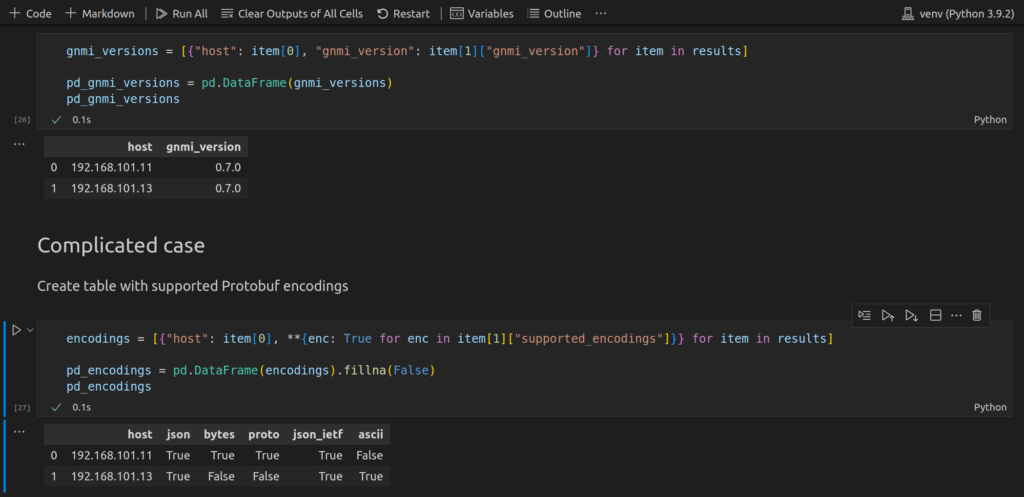
From the Python perspective, we use here the mix of list and dictionary comprehensions to unpack the nested dictionary with supported encodings, which is obtained via pygnmi from network devices. The name of keys (i.e., name of the supported GNMI encodings) will form headers of the table, whilst the value will be True.
As different devices have different list of supported encodings, it will be situations, that the value in the specific column will be missing for some devices. For example:
- There is no “ascii” key in the response from Nokia SR OS, whilst it present in Arista EOS.
- As such, the value in this column will be “True” for Arista EOS and “NaN” (no value) for Nokia SR OS
Per our table’s logic, if the value is missing, it automatically means that the specific encoding is not supported by the network device and, therefore, the value shall be False. To achieve that, we use method fillna() of Pandas DataFame, which allows us to fill in all the missing values with some defined one.
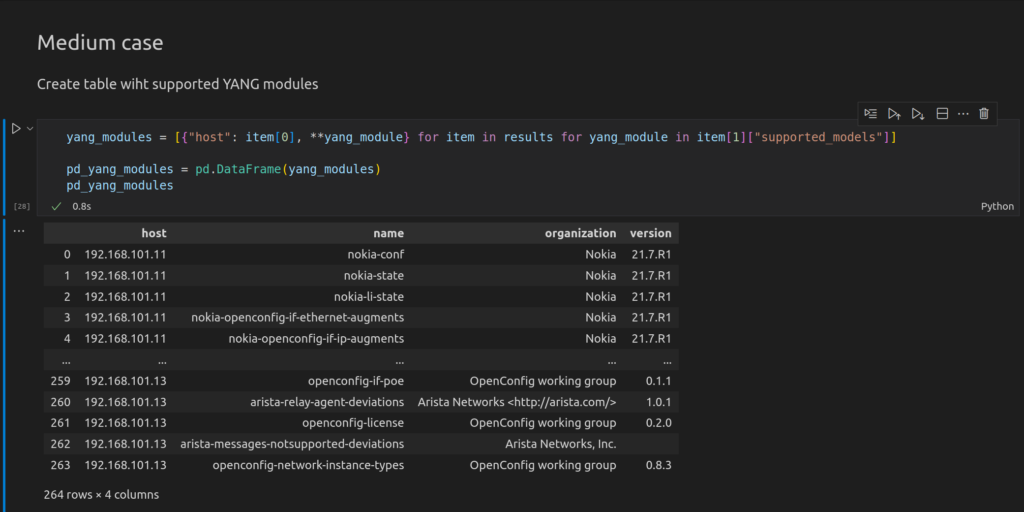
The last table will be a data frame with supported YANG modules. We will use the same approach we used in the previous case, which is a combination of list and dictionary comprehensions:

GitHub Repository
Check out the examples from this blogpost in our repository.
Lessons Learned
One of the interesting positive side effects of using markdown syntax to create text descriptions is the usage of headers. In markdown syntax, you defined the headers with hashtags in the way that amount of hashtags creates hierarchy:
- One hashtag is the topmost header
- Two hashtags is a sub-chapter in the block defined by one hashtag
- Three hashtags is a sub-chapter in the block defined by two hashtags
- … and so on
So usage of this hashtags allows us to create the hierarchy in the Jupyter notebook, so that you can expand/cut the information you need or don’t need at the moment:


Summary
With the approach above you can start using Pandas, which is a great tool for data analysis, in an interactive way with the help of Jupyter to see what is going in your network device. We shown here the GNMI and pygnmi, as it seems to be the framework for future. However, you can use any other type of structured data from your network devices, such as NETCONF and GNMI. In our Zero-to-Hero Network Automation Training you can learn all of them . Take care and good bye!
Need Help? Contract Us
If you need a trusted and experienced partner to automate your network and IT infrastructure, get in touch with us.
P.S.
If you have further questions or you need help with your networks, we are happy to assist you, just send us a message. Also don’t forget to share the article on your social media, if you like it.
BR,
Anton Karneliuk