

Dear friend,
This year I had a pleasure and privilege to attend KubeCon Europe 2023 and this was the first time I’ve heard about MicroK8s. That sounded interesting and I decided I shall experiment with it and write a blogpost; but it didn’t catch my attention to a degree that I put it on top of my list; instead, I’ve put it to back burner. The last week I was talking to a colleagues of mine, who told me that he needs to test something in his production Kubernetes at home. I was quite interested, what does the one mean by “production Kubernetes cluster at home” and it appeared to be MikroK8s. At this stage I though, I don’t have any more excuses, so I just should sit and write it.
Is Kubernetes Used in Network Automation?
It is, indeed. The last week when we posted a blog about starting programming in C we got an interesting discussion in LinkedIn about Go vs Python with one right-honorable gentleman, who rightfully suggested that one of the main weaknesses of Python is that it requires to install dependencies on the host before you can use application. However, to be brutally honest, many other applications, which are created in other languages, also require dependencies to be installed. This one of the major reasons, why containerization in general, and Kubernetes in particular, became that popular: to provide the immutable pre-built infrastructure for all the applications.
By the way, in our Zero-to-Hero Network Automation Training you will learn containerization and how to build container (Docker) images with your Python application. Come on-board.
We offer the following training programs for you:
- Zero-to-Hero Network Automation Training
- High-scale automation with Nornir
- Ansible Automation Orchestration with Ansble Tower / AWX
- Expert-level training: Closed-loop Automation and Next-generation Monitoring
During these trainings you will learn the following topics:
- Success and failure strategies to build the automation tools.
- Principles of software developments and the most useful and convenient tools.
- Data encoding (free-text, XML, JSON, YAML, Protobuf).
- Model-driven network automation with YANG, NETCONF, RESTCONF, GNMI.
- Full configuration templating with Jinja2 based on the source of truth (NetBox).
- Best programming languages (Python, Bash) for developing automation
- The most rock-solid and functional tools for configuration management (Ansible) and Python-based automation frameworks (Nornir).
- Network automation infrastructure (Linux, Linux networking, KVM, Docker).
- Orchestration of automation workflows with AWX and its integration with NetBox, GitHub, as well as custom execution environments for better scalability.
- Collection network data via SNMP and streaming telemetry with Prometheus
- Building API gateways with Python leveraging Fast API
- Integration of alerting with Slack and your own APIs
- … and many more
Moreover, we put all mentions technologies in the context of real use cases, which our team has solved and are solving in various projects in the service providers, enterprise and data centre networks and systems across the Europe and USA. That gives you opportunity to ask questions to understand the solutions in-depth and have discussions about your own projects. And on top of that, each technology is provided with online demos and labs to master your skills thoroughly. Such a mixture creates a unique learning environment, which all students value so much. Join us and unleash your potential.
Brief Description
As you can imagine based on the name, MicroK8s contains K8s, what stands for Kubernetes. Canonical claims that MicroK8s is a zero-ops production ready Kubernetes setup, which can be set up just in a matter of a few commands. Well, some ago we’ve taken a look how to setup the production ready Kubernetes cluster, and it was a little bit more complicated than just a few commands. So, where is the catch? Let’s take a look in the product description further and the use case, which Canonical emphasize:
- turning Kubernetes into lightweight development tool
- making Kubernetes available for use in minimal environments such as GitHub CI
- adapting Kubernetes for small-appliance IoT applications
From this perspective, it start becoming more sense. So MicroK8s seems to be build more for software developers to have a tiny but working Kubernetes setup, rather than proper high-available Kubernetes. Probably, meaning “production-ready” for us and for Canonical are very different. Anyway, relatively often I indeed need a quick way to set up Kubernetes to test some applications. In fact, some modern applications are simply not suitable to work anywhere outside the Kubernetes (Ansible Automation Controller – AWX here is a good example) and having Kubernetes cluster is simply unavoidable. The one could say that we always can spin up quickly a Kubernetes cluster in any public cloud (e.g., AWS, GCP, or Azure as we discussed). We indeed can do that and in certain circumstances this will be a desired way to do thing; however, we are facing extra costs, which if not managed carefully, can become ridiculously high very quickly. In addition to that, you will be dependent on network connectivity at least to get to such container. Therefore, having possibility to quickly spin up the Kubernetes to start using it for some functionality seems reasonable.
As the aforementioned idea is reasonable, it could be that someone else has already created it. In other words, what are the alternatives? There is at least two of them, which we are aware:
- Minikube. For many years this was an entry-level Kubernetes platform we have used. It is generally good, but if you needed to make your application available outside of it and expose via network, it was very a tricky task. By the way, we use it and teach how to set it up in our AWX training.
- Kind. We haven’t used it yet, but based on the description it does something similar to MikroK8s from Canonical. We may explore it in upcoming blogs.
Let’s dive into how to get MikroK8s set and how to deploy some application on it
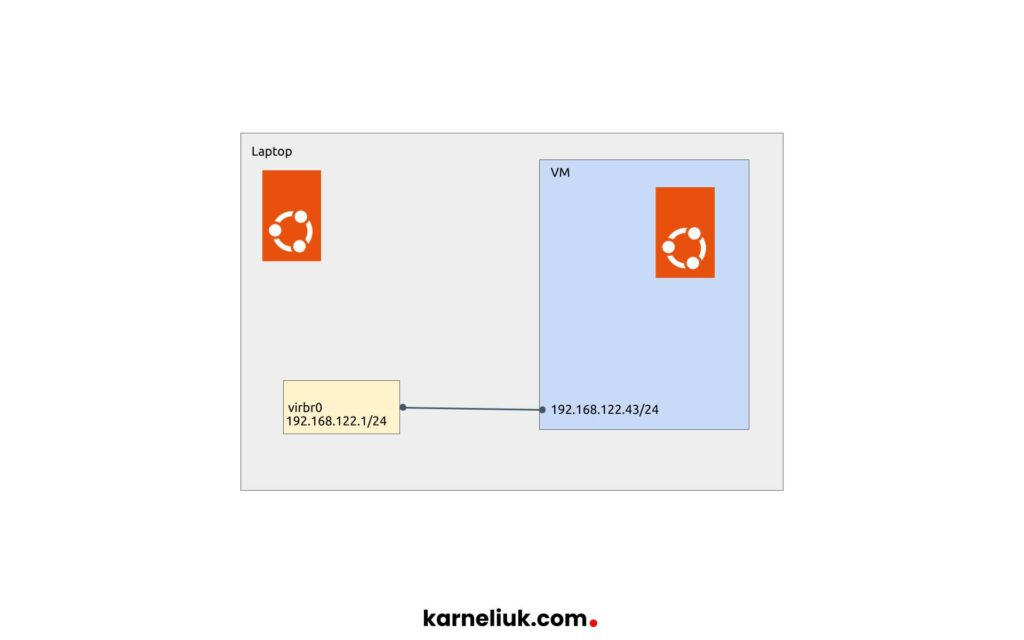
Lab Setup
The setup in this case is very simple. We just need a host running more or less recent version of Ubuntu. We use the current LTS version 22.04.

The installation we’ve used is minimal and we don’t have yet anything installed apart from minimal Ubuntu Linux server.
From the application perspective, we will deploy a web-service based on NGINX. The access to NGINX will be provided via Ingress following all the best practices.
Join Zero-to-Hero Network Automation Training to get foundational Linux knowledge.
Solution Implementation
The next steps explain in details how to set MikroK8s and to start using it. We in generally aim to rely on the official documentation with some additions needed for our application deployment.
Step 1. Installing MikroK8s
The official guide suggests that we shall install MicroK8s using the snap tool. Snap is an interesting, although yet not very popular, approach to distribute applications in Ubuntu Linux. To be frank, we haven’t seen it much outside of Ubuntu; however, in Ubuntu it is fairly popular. The documentation for snap suggests that it includes all the dependencies needed for application to work. That could be the reason, why this approach is chosen as Kubernetes requires quite a bit of different applications to be installed starting from container engine (e.g, podman, docker, etc).
To install MikroK8s with snap in Ubuntu Linux, run the following command:
Installation takes a few minutes, which is mainly the downloading of the snap; therefore, depending on the speed of your internet connectivity, it could take shorter or longer.
The final of the installation is signaled by this message in stdio (output in Linux CLI, sorry I’m now thinking in C terms):
And per official documentation that is about it. There is only one command required to run to see if the Kubernetes is up and running:
And… Apparently, we are getting an error:
2
3
4
5
6
7
You can either try again with sudo or add the user aaa to the 'microk8s' group:
sudo usermod -a -G microk8s aaa
sudo chown -R aaa ~/.kube
After this, reload the user groups either via a reboot or by running 'newgrp microk8s'.
Okay, we need to perform the aforementioned steps to get the MikroK8s off the ground. However, the later command will fail and we need first to create the directory for kube file:
2
3
$ sudo usermod -a -G microk8s aaa
$ sudo chown -R aaa ~/.kube
Reboot the VM and wait till it is back:
Once reboot is completed, repeat the command issued above:
2
3
4
5
6
7
8
9
10
11
12
13
14
15
16
17
18
19
20
21
22
23
24
25
26
27
28
29
microk8s is running
high-availability: no
datastore master nodes: 127.0.0.1:19001
datastore standby nodes: none
addons:
enabled:
dns # (core) CoreDNS
ha-cluster # (core) Configure high availability on the current node
helm # (core) Helm - the package manager for Kubernetes
helm3 # (core) Helm 3 - the package manager for Kubernetes
disabled:
cert-manager # (core) Cloud native certificate management
community # (core) The community addons repository
dashboard # (core) The Kubernetes dashboard
gpu # (core) Automatic enablement of Nvidia CUDA
host-access # (core) Allow Pods connecting to Host services smoothly
hostpath-storage # (core) Storage class; allocates storage from host directory
ingress # (core) Ingress controller for external access
kube-ovn # (core) An advanced network fabric for Kubernetes
mayastor # (core) OpenEBS MayaStor
metallb # (core) Loadbalancer for your Kubernetes cluster
metrics-server # (core) K8s Metrics Server for API access to service metrics
minio # (core) MinIO object storage
observability # (core) A lightweight observability stack for logs, traces and metrics
prometheus # (core) Prometheus operator for monitoring and logging
rbac # (core) Role-Based Access Control for authorisation
registry # (core) Private image registry exposed on localhost:32000
storage # (core) Alias to hostpath-storage add-on, deprecated
As you could see, this time output is much better than the first one, so we can move to the next step.
Step 2. Adding Extra Functionality (Add-Ons)
The Kubernetes setup by MikroK8s now doesn’t have many things, which come as part of the standard Kubernetes installation. In fact, it doesn’t have even DNS functionality per official documentation; however the DNS in particular is actually enabled. Anyway, we need to setup a dew Addons to our MikroK8s setup, what we achieve using using the addons. The command we’ve run in the previous step shows, which addons are already enabled and which we can add. Let’s install ingress and enable community, so that we can install cilium afterwards. Also, let’s add the dashboard to explore, which observability functionality comes out of the box:
The output of this command may seem familiar to you, if you worked with Kubernetes previously:
2
3
4
5
6
7
8
9
10
11
12
13
14
15
16
17
18
19
20
21
22
23
24
25
26
27
28
29
30
31
32
33
34
35
36
37
38
39
40
41
42
43
44
45
46
47
48
49
50
51
52
53
54
55
56
57
58
59
60
61
62
63
64
Infer repository core for addon dashboard
Infer repository core for addon ingress
WARNING: Do not enable or disable multiple addons in one command.
This form of chained operations on addons will be DEPRECATED in the future.
Please, enable one addon at a time: 'microk8s enable <addon>'
Cloning into '/var/snap/microk8s/common/addons/community'...
done.
Community repository is now enabled
Enabling Kubernetes Dashboard
Infer repository core for addon metrics-server
Enabling Metrics-Server
serviceaccount/metrics-server created
clusterrole.rbac.authorization.k8s.io/system:aggregated-metrics-reader created
clusterrole.rbac.authorization.k8s.io/system:metrics-server created
rolebinding.rbac.authorization.k8s.io/metrics-server-auth-reader created
clusterrolebinding.rbac.authorization.k8s.io/metrics-server:system:auth-delegator created
clusterrolebinding.rbac.authorization.k8s.io/system:metrics-server created
service/metrics-server created
deployment.apps/metrics-server created
apiservice.apiregistration.k8s.io/v1beta1.metrics.k8s.io created
clusterrolebinding.rbac.authorization.k8s.io/microk8s-admin created
[sudo] password for aaa:
Metrics-Server is enabled
Applying manifest
serviceaccount/kubernetes-dashboard created
service/kubernetes-dashboard created
secret/kubernetes-dashboard-certs created
secret/kubernetes-dashboard-csrf created
secret/kubernetes-dashboard-key-holder created
configmap/kubernetes-dashboard-settings created
role.rbac.authorization.k8s.io/kubernetes-dashboard created
clusterrole.rbac.authorization.k8s.io/kubernetes-dashboard created
rolebinding.rbac.authorization.k8s.io/kubernetes-dashboard created
clusterrolebinding.rbac.authorization.k8s.io/kubernetes-dashboard created
deployment.apps/kubernetes-dashboard created
service/dashboard-metrics-scraper created
deployment.apps/dashboard-metrics-scraper created
secret/microk8s-dashboard-token created
If RBAC is not enabled access the dashboard using the token retrieved with:
microk8s kubectl describe secret -n kube-system microk8s-dashboard-token
Use this token in the https login UI of the kubernetes-dashboard service.
In an RBAC enabled setup (microk8s enable RBAC) you need to create a user with restricted
permissions as shown in:
https://github.com/kubernetes/dashboard/blob/master/docs/user/access-control/creating-sample-user.md
Enabling Ingress
ingressclass.networking.k8s.io/public created
ingressclass.networking.k8s.io/nginx created
namespace/ingress created
serviceaccount/nginx-ingress-microk8s-serviceaccount created
clusterrole.rbac.authorization.k8s.io/nginx-ingress-microk8s-clusterrole created
role.rbac.authorization.k8s.io/nginx-ingress-microk8s-role created
clusterrolebinding.rbac.authorization.k8s.io/nginx-ingress-microk8s created
rolebinding.rbac.authorization.k8s.io/nginx-ingress-microk8s created
configmap/nginx-load-balancer-microk8s-conf created
configmap/nginx-ingress-tcp-microk8s-conf created
configmap/nginx-ingress-udp-microk8s-conf created
daemonset.apps/nginx-ingress-microk8s-controller created
Ingress is enabled
The vast majority of the output looks like application of Kubernetes manifests, which, in facts, happen under the hood.
Run the “mictok8s status” again and you see that the requested addons are already installed and also you see new possible addons out of community:
2
3
4
5
6
7
8
9
10
11
12
13
14
15
16
17
18
19
20
21
22
23
24
25
26
27
28
29
30
31
32
33
34
35
36
37
38
39
40
41
42
43
44
45
46
47
48
49
50
51
52
53
54
55
microk8s is running
high-availability: no
datastore master nodes: 127.0.0.1:19001
datastore standby nodes: none
addons:
enabled:
community # (core) The community addons repository
dashboard # (core) The Kubernetes dashboard
dns # (core) CoreDNS
ha-cluster # (core) Configure high availability on the current node
helm # (core) Helm - the package manager for Kubernetes
helm3 # (core) Helm 3 - the package manager for Kubernetes
ingress # (core) Ingress controller for external access
metrics-server # (core) K8s Metrics Server for API access to service metrics
disabled:
argocd # (community) Argo CD is a declarative continuous deployment for Kubernetes.
cilium # (community) SDN, fast with full network policy
dashboard-ingress # (community) Ingress definition for Kubernetes dashboard
easyhaproxy # (community) EasyHAProxy can configure HAProxy automatically based on ingress labels
fluentd # (community) Elasticsearch-Fluentd-Kibana logging and monitoring
gopaddle-lite # (community) Cheapest, fastest and simplest way to modernize your applications
inaccel # (community) Simplifying FPGA management in Kubernetes
istio # (community) Core Istio service mesh services
jaeger # (community) Kubernetes Jaeger operator with its simple config
kata # (community) Kata Containers is a secure runtime with lightweight VMS
keda # (community) Kubernetes-based Event Driven Autoscaling
knative # (community) Knative Serverless and Event Driven Applications
kwasm # (community) WebAssembly support for WasmEdge (Docker Wasm) and Spin (Azure AKS WASI)
linkerd # (community) Linkerd is a service mesh for Kubernetes and other frameworks
multus # (community) Multus CNI enables attaching multiple network interfaces to pods
nfs # (community) NFS Server Provisioner
ondat # (community) Ondat is a software-defined, cloud native storage platform for Kubernetes.
openebs # (community) OpenEBS is the open-source storage solution for Kubernetes
openfaas # (community) OpenFaaS serverless framework
osm-edge # (community) osm-edge is a lightweight SMI compatible service mesh for the edge-computing.
parking # (community) Static webserver to park a domain. Works with EasyHAProxy.
portainer # (community) Portainer UI for your Kubernetes cluster
shifu # (community) Kubernetes native IoT software development framework.
sosivio # (community) Kubernetes Predictive Troubleshooting, Observability, and Resource Optimization
traefik # (community) traefik Ingress controller
trivy # (community) Kubernetes-native security scanner
cert-manager # (core) Cloud native certificate management
gpu # (core) Automatic enablement of Nvidia CUDA
host-access # (core) Allow Pods connecting to Host services smoothly
hostpath-storage # (core) Storage class; allocates storage from host directory
kube-ovn # (core) An advanced network fabric for Kubernetes
mayastor # (core) OpenEBS MayaStor
metallb # (core) Loadbalancer for your Kubernetes cluster
minio # (core) MinIO object storage
observability # (core) A lightweight observability stack for logs, traces and metrics
prometheus # (core) Prometheus operator for monitoring and logging
rbac # (core) Role-Based Access Control for authorisation
registry # (core) Private image registry exposed on localhost:32000
storage # (core) Alias to hostpath-storage add-on, deprecated
As mentioned above, let’s add Cilium as well:
This time there is a bit of things happen in the output:
2
3
4
5
6
7
8
9
10
11
12
13
14
15
16
17
18
19
20
21
22
23
24
25
26
27
28
29
30
31
32
33
34
35
36
37
38
39
40
41
42
43
44
45
46
47
48
49
50
51
52
53
54
55
56
57
58
59
Infer repository core for addon helm3
Addon core/helm3 is already enabled
Ensure kube-apiserver --allow-privileged=true flag
[sudo] password for aaa:
Sorry, try again.
[sudo] password for aaa:
Ensure containerd cni bin_dir is OK
Disabling Calico CNI
poddisruptionbudget.policy "calico-kube-controllers" deleted
serviceaccount "calico-kube-controllers" deleted
serviceaccount "calico-node" deleted
configmap "calico-config" deleted
customresourcedefinition.apiextensions.k8s.io "bgpconfigurations.crd.projectcalico.org" deleted
customresourcedefinition.apiextensions.k8s.io "bgppeers.crd.projectcalico.org" deleted
customresourcedefinition.apiextensions.k8s.io "blockaffinities.crd.projectcalico.org" deleted
customresourcedefinition.apiextensions.k8s.io "caliconodestatuses.crd.projectcalico.org" deleted
customresourcedefinition.apiextensions.k8s.io "clusterinformations.crd.projectcalico.org" deleted
customresourcedefinition.apiextensions.k8s.io "felixconfigurations.crd.projectcalico.org" deleted
customresourcedefinition.apiextensions.k8s.io "globalnetworkpolicies.crd.projectcalico.org" deleted
customresourcedefinition.apiextensions.k8s.io "globalnetworksets.crd.projectcalico.org" deleted
customresourcedefinition.apiextensions.k8s.io "hostendpoints.crd.projectcalico.org" deleted
customresourcedefinition.apiextensions.k8s.io "ipamblocks.crd.projectcalico.org" deleted
customresourcedefinition.apiextensions.k8s.io "ipamconfigs.crd.projectcalico.org" deleted
customresourcedefinition.apiextensions.k8s.io "ipamhandles.crd.projectcalico.org" deleted
customresourcedefinition.apiextensions.k8s.io "ippools.crd.projectcalico.org" deleted
customresourcedefinition.apiextensions.k8s.io "ipreservations.crd.projectcalico.org" deleted
customresourcedefinition.apiextensions.k8s.io "kubecontrollersconfigurations.crd.projectcalico.org" deleted
customresourcedefinition.apiextensions.k8s.io "networkpolicies.crd.projectcalico.org" deleted
customresourcedefinition.apiextensions.k8s.io "networksets.crd.projectcalico.org" deleted
clusterrole.rbac.authorization.k8s.io "calico-kube-controllers" deleted
clusterrole.rbac.authorization.k8s.io "calico-node" deleted
clusterrolebinding.rbac.authorization.k8s.io "calico-kube-controllers" deleted
clusterrolebinding.rbac.authorization.k8s.io "calico-node" deleted
daemonset.apps "calico-node" deleted
deployment.apps "calico-kube-controllers" deleted
Enabling Cilium
Fetching cilium version v1.11.12.
% Total % Received % Xferd Average Speed Time Time Time Current
Dload Upload Total Spent Left Speed
0 0 0 0 0 0 0 0 --:--:-- --:--:-- --:--:-- 0
100 32.8M 0 32.8M 0 0 2597k 0 --:--:-- 0:00:12 --:--:-- 2223k
Deploying /var/snap/microk8s/5643/actions/cilium.yaml. This may take several minutes.
serviceaccount/cilium created
serviceaccount/cilium-operator created
secret/hubble-ca-secret created
secret/hubble-server-certs created
configmap/cilium-config created
clusterrole.rbac.authorization.k8s.io/cilium created
clusterrole.rbac.authorization.k8s.io/cilium-operator created
clusterrolebinding.rbac.authorization.k8s.io/cilium created
clusterrolebinding.rbac.authorization.k8s.io/cilium-operator created
service/hubble-peer created
Warning: spec.template.spec.affinity.nodeAffinity.requiredDuringSchedulingIgnoredDuringExecution.nodeSelectorTerms[1].matchExpressions[0].key: beta.kubernetes.io/os is deprecated since v1.14; use "kubernetes.io/os" instead
daemonset.apps/cilium created
deployment.apps/cilium-operator created
Waiting for daemon set "cilium" rollout to finish: 0 of 1 updated pods are available...
daemon set "cilium" successfully rolled out
Cilium is enabled
As you could see from the output above, the following events occured:
- Calico, which appears to be a default CNI for MikroK8s, is deleted. You can understand that as you see all projectcalico CRDs deleted.
- Once that is completed, Cilium CNI is installed with its additions including Hubble.
At this stage we are ready to deploy the application.
Beware that MikroK8s comes with its own version of kubectl and also it doesn’t install cilium CLI. If you wish to use it, you need to install it separately.
[UPD]: Ingress and Cilium didn’t work together out of the box, so I had to disable it using “microk8s disable cilium” what re-instantiated Calico CRDs. That’s very strange as Cilium with Ingress works nicely in our full fledged Kubernetes cluster. we’ll make another attempt later with MikroK8s to try to troubleshoot what’s going on and where the traffic is dropped.
Step 4. Observing MikroK8s
Let’s explore what we have available currently in our MikroK8s Kubernetes setup. MikroK8s comes with its own version of kubectl, so you don’t have to install it separately (you can do it though, if you prefer):
2
3
4
5
6
7
8
9
NAMESPACE NAME READY STATUS RESTARTS AGE
kube-system cilium-operator-bf4676d78-8rzkm 1/1 Running 1 (2m54s ago) 3m50s
kube-system kubernetes-dashboard-fc86bcc89-2n9dq 1/1 Running 1 (2m54s ago) 23m
kube-system dashboard-metrics-scraper-5cb4f4bb9c-qz24d 1/1 Running 1 (2m54s ago) 23m
kube-system coredns-7745f9f87f-dt9tn 1/1 Running 1 (2m54s ago) 3m2s
kube-system cilium-lzj98 1/1 Running 1 (2m54s ago) 3m50s
ingress nginx-ingress-microk8s-controller-tt8lk 1/1 Running 1 (2m54s ago) 23m
kube-system metrics-server-7747f8d66b-nz852 1/1 Running 1 (2m54s ago) 23m
Everything, what is installed, as you can identify based on names, comes from addons: coredns, cilium dashboard, etc. You could validate the node, you are running:
2
3
NAME STATUS ROLES AGE VERSION
microk8s-1 Ready <none> 45m v1.27.4
You could also spot above the “metric” pod running. That means you can use “kubectl top” command to get stats abotu CPU/memory utilisation in your Kubernetes cluster ad-hoc:
2
3
NAME CPU(cores) CPU% MEMORY(bytes) MEMORY%
microk8s-1 123m 3% 1873Mi 23%
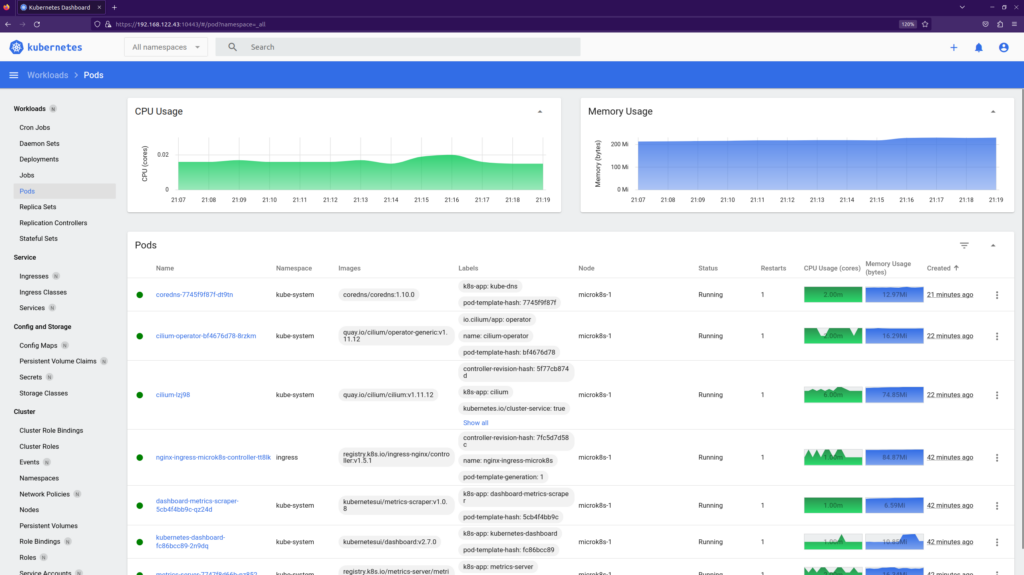
The final piece of observability we will touch here is the dashboard. To launch it, run the following command:
Your CLI will be locked for the period it runs.
You will see, what URL your Dashboard service is exported to and what is the token you shall use for authentication:
2
3
4
5
6
7
8
9
Checking if Dashboard is running.
Infer repository core for addon dashboard
Waiting for Dashboard to come up.
Trying to get token from microk8s-dashboard-token
Waiting for secret token (attempt 0)
Dashboard will be available at https://127.0.0.1:10443
Use the following token to login:
eyJhbGciOiJSUzI1NiIsImtpZCI6InR5bHNSVmc0cnBEY0ZoVThzbVk0djEyZGJJc3NLaHJuUGlFeVhvT3ZPYm8ifQ.eyJpc3MiOiJrdWJlcm5ldGVzL3NlcnZpY2VhY2NvdW50Iiwia3ViZXJuZXRlcy5pby9zZXJ2aWNlYWNjb3VudC9uYW1lc3BhY2UiOiJrdWJlLXN5c3RlbSIsImt1YmVybmV0ZXMuaW8vc2VydmljZWFjY291bnQvc2VjcmV0Lm5hbWUiOiJtaWNyb2s4cy1kYXNoYm9hcmQtdG9rZW4iLCJrdWJlcm5ldGVzLmlvL3NlcnZpY2VhY2NvdW50L3NlcnZpY2UtYWNjb3VudC5uYW1lIjoiZGVmYXVsdCIsImt1YmVybmV0ZXMuaW8vc2VydmljZWFjY291bnQvc2VydmljZS1hY2NvdW50LnVpZCI6IjNmZTRlZjk5LWUyODItNDQ4OC1iZDJiLTQ3ZDRjNGQ4ZmU2YiIsInN1YiI6InN5c3RlbTpzZXJ2aWNlYWNjb3VudDprdWJlLXN5c3RlbTpkZWZhdWx0In0.QRGn2Z3WOgF0kk2cfYJTlCUsoN8BpVExcse1zUwE8r5LO3r40MugPJ1J2PCZf703n0iEN7gP91oYaUflCICTD58APdgSsOmarmvisKjwPWwQh3mfec3XpT47IqWil_QyeyhcckKQl2F85WtY82boXf7j65jUvvM1oSG5Wb3PaXyk3OXK4k44DmMY82NfNmHv0crrGet-x1xlA5dRTmc4rOHunNT-ZqQfgXTlcyB9cAPBybyy3NsjVFDIo1r5Le0whu8op8pvGhHN-OUnWNLJGwuXNHMRziIJJI-DLxU-xD9bZK7MKPkJb2oOzLtrbfIii6VXZyKB386NPxblb-xefg
Although it suggested that service runs on 127.0.0.1, it runs in fact on 0.0.0.0:
2
LISTEN 0 4096 0.0.0.0:10443 0.0.0.0:* users:(("kubectl",pid=70293,fd=8))
That means that you can connect to the Kubernetes dashboard in your VM running Ubuntu Linux from outside of it:

Step 4. Deploying Application on MikroK8s
First of all, as Ingress enabled in our cluster already, we shall be able to get to it already:
2
3
4
5
6
7
8
<html>
<head><title>404 Not Found</title></head>
<body>
<center><h1>404 Not Found</h1></center>
<hr><center>nginx</center>
</body>
</html>
This is promising as this is a default NGINX Ingress message, when there is no specific destination found. What need to do now is just to create our manifest and to deploy it. Let’s do a simple one with NGINX web service:
2
3
4
5
6
7
8
9
10
11
12
13
14
15
16
17
18
19
20
21
22
23
24
25
26
27
28
29
30
31
32
33
34
35
36
37
38
39
40
41
42
43
44
45
46
47
48
49
50
51
52
53
54
55
56
57
58
59
60
61
62
63
64
65
66
67
apiVersion: v1
kind: Namespace
metadata:
name: test-app
---
apiVersion: apps/v1
kind: Deployment
metadata:
namespace: test-app
name: test-ws
labels:
app: nginx-ws
spec:
replicas: 1
selector:
matchLabels:
app: nginx-ws
template:
metadata:
labels:
app: nginx-ws
spec:
containers:
- name: test-ws
image: nginx
ports:
- containerPort: 80
protocol: TCP
---
apiVersion: v1
kind: Service
metadata:
name: test-ws-svc
namespace: test-app
labels:
app: nginx-ws
spec:
selector:
app: nginx-ws
type: ClusterIP
ports:
- port: 8080
targetPort: 80
protocol: TCP
---
apiVersion: networking.k8s.io/v1
kind: Ingress
metadata:
namespace: test-app
name: test-ws-ing
labels:
app: nginx-ws
spec:
ingressClassName: nginx
rules:
- host: test-ws.microk8s.karneliuk.com
http:
paths:
- path: /
pathType: Prefix
backend:
service:
name: test-ws-svc
port:
number: 8080
In this Kubernetes manifest we touch all the main parts:
- Creating a new Namespace
- Creating the Deployment with the application
- Explosing the application using Service.
- Providing access via HTTP using Ingress.
Apply this Kubernetes Manifest:
2
3
4
5
namespace/test-app created
deployment.apps/test-ws created
service/test-ws-svc created
ingress.networking.k8s.io/test-ws-ing created
And, moment of truth, is that working at all?..
2
3
4
5
6
7
8
9
10
11
12
13
14
15
16
17
18
19
20
21
22
23
24
<!DOCTYPE html>
<html>
<head>
<title>Welcome to nginx!</title>
<style>
html { color-scheme: light dark; }
body { width: 35em; margin: 0 auto;
font-family: Tahoma, Verdana, Arial, sans-serif; }
</style>
</head>
<body>
<h1>Welcome to nginx!</h1>
<p>If you see this page, the nginx web server is successfully installed and
working. Further configuration is required.</p>
<p>For online documentation and support please refer to
<a href="http://nginx.org/">nginx.org</a>.<br/>
Commercial support is available at
<a href="http://nginx.com/">nginx.com</a>.</p>
<p><em>Thank you for using nginx.</em></p>
</body>
</html>
That works, indeed!
Lessons Learned
Not all the technologies, which suppose to work together out of the box do so. In our main Kubernetes cluster, which we run in Karneliuk Cloud, we have Cilium co-existing with NGINX Ingress happily, which is not the case for MicroK8s. There are multiple reasons, why this could be the case, starting from outdated versions of cilium and/or NGINX in the MikroK8s snap till missing configuration. Be ready to spend some time on troubleshooting
Summary
Kubernetes is an essential tool for modern application delivery. There could be cases, where you don’t use it; but it is rather an exception than a rule these days. As such, having possibility to run Kubernetes locally directly at your devleoper’s laptop or server is an import value added capabilities. Based on this blogpost we have shown how you can get started with MikroK8s by Canoncal very quickly and start developing your Kubernetes apps. What we haven’t mentioned yet, is that MikroK8s have addon to run container registry, what allows you to publish your own container images locally without exposing them to any public ones. Everything in one box. Take care and good bye!
Need Help? Contract Us
If you need a trusted and experienced partner to automate your network and IT infrastructure, get in touch with us.
P.S.
If you have further questions or you need help with your networks, we are happy to assist you, just send us a message. Also don’t forget to share the article on your social media, if you like it.
BR,
Anton Karneliuk