

Hello my friend,
Talking to some our partners, they mentioned that they are extensively using the unit tests python libraries for the development of the software in Python. They are creating their applications in Django framework; therefore, they are using a built-in Django testing library, which is based on Python’s standard unittest. We start looking, how we can use that ourselves…
2
3
4
5
retrieval system, or transmitted in any form or by any
means, electronic, mechanical or photocopying, recording,
or otherwise, for commercial purposes without the
prior permission of the author.
Can This Help with Automated Network Assurance?
What do we, network engineers, do to quickly check that our network devices are reachable? We do ping. However, is that really good enough to check that your devices are OK? The one could say: I don’t even use a ping for that, as I rely on my NMS. This is also a good answer. In the same time, though, the vast majority of the NMS doesn’t contain all the details of network devices configuration and their operational data: e.g. all the details of OSPF and its LSDB, etc. So, what might be an option…
At our trainings, advanced network automation and automation with Nornir (2nd step after advanced network automation), we give you detailed knowledge of all the technologies relevant:
- Data encoding (free-text, XML, JSON, YAML, Protobuf)
- Model-driven network automation with YANG, NETCONF, RESTCONF, GNMI.
- Full configuration templating with Jinja2 based on the source of truth (NetBox).
- Best automation programming languages (Python, Bash), configuration management tools (Ansible) and automation frameworks (Nornir).
- Network automation infrastructure (Linux, Linux networking, KVM, Docker).
Expert level training on Network Automation is great. Lots of practice will take you beyond common DevNet topics and learning more about emerging technologies.
Michael Morgayle @ NextGenTek
Moreover, we put all mentions technologies in the context of the real use cases, which our team has solved and are solving in various projects in the service providers, enterprise and data centre networks and systems across the Europe and USA. That gives you opportunity to ask questions to understand the solutions in-depts and have discussions about your own projects. And on top of that, each technology is provided with online demos and you are doing the lab afterwards to master your skills. Such a mixture creates a unique learning environment, which all students value so much. Join us and unleash your potential.
Brief Description
Unit tests are automated tests, which are performed during the software development. Their main purpose is to quickly validate in an automated way, whether certain components of the software (e.g., function or an API endpoint) is working correctly. The way they work at a high level we can describe as such:
- Take certain synthetic input parameters
- Call the function or API endpoint
- Receive an output compare
- Compare the output with some predefined value and decide:
- If the received output matches the predefined value, the unit test is passed
- If it doesn’t, then the unit test is failed
In the software development those unit tests provide enormous benefits, as they allow you to see very quickly, what is working and what is not. For example, if some unit tests were passing successfully before introduction of a new feature and now they are failing, we’d focus on understanding what is going wrong and fixing those issue before releasing the new software in production to avoid unnecessary outages.
On the other hand, the tests are synthetic and they don’t necessary cover all possible user scenarios.
We started thinking about this in two directions:
- Obviously, it would be good to bring unit tests for the development of our own software products, such as pygnmi. This would help to be 100% sure that the new releases don’t have bugs or at least obvious bugs. It takes us manually about 10-15 minutes do tests against a single device (e.g. Nokia SR OS or Arista EOS). If the unit tests can bring this time down to a minute at max per device, it would be amazing.
- Another interesting option would be to create a certain test scenario, which tells at a high level, which are the desired states of the configuration (e.g., how many BGP neighbours, what are they (i.e., their IPv4 or IPv6 addresses) and what are their states) and in automated way to run it against the network infrastructure to quickly asses, whether it is OK (all tests are passed) or not.
The first scenario is more tailored to the software development; hence, we are unsure it would be interested to a wider audience. In the same time, the second scenario is somewhat more appealing, at least per our opinion, and this is something we would like to share with you.
Lab Setup
The lab setup for this exercise would be the same as we had previously for the our other pygnmi blogposts:

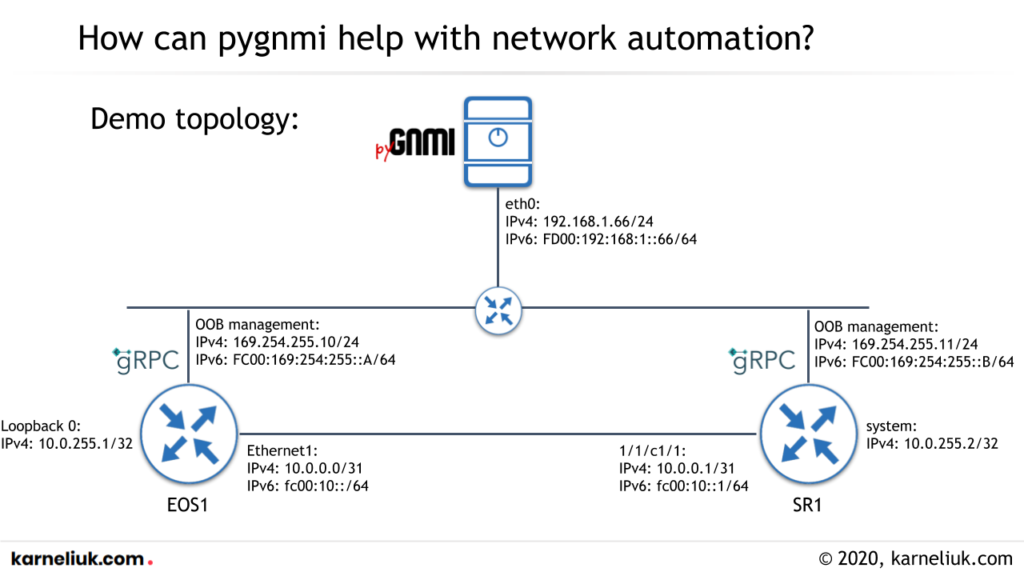
In this topology we have a host (for us it is a MAC laptop, but could be anything else) running the Python with pygnmi and pytest libraries. On the customer side, there are two routers:
- EOS1 running Arista EOS 4.25.0F
- SR1 running Nokia SR OS 20.10.R3
We talked a lot how pygnmi is working in your YouTube, so this time we’ll focus first on pytest.
Pytest Quick Overview
What is pytest? It is a Python library, which primary purpose is to create all sort of tests (e.g., unit tests we mentioned above), which are in fact created as user-defined functions in Python. The only difference is that user-defined functions created for pytest doesn’t have return, but rather having assert instruction, which is comparing some values (like if condition) and if they are equal, the test is PASSED, and if not, it is FAILED.
So the work flow is that:
Step #1
Install the pytest (and in our case pygnmi) to your laptop from PyPI:
2
$ pip install pytest
Join our Zero-to-Hero Network Automation Training to learn how to manage with Python and GNMI/YANG and OpenConfig your network with Cisco, Nokia, and Arista.
Step #2
Create the following files structure:
2
3
4
+--tests
+--test_xxx1.py
+--test_xxx2.py
The name your_project_directory is an arbitrary name and you can change it per your requirements, as well as xxx1 and xxx2 are the test names and can be modified as well. In the same time, the file with tests must be starting with test_ prefix, as well as the directory with tests shall be called tests.
Step #3
Create your tests using the following sample:
2
3
4
5
6
7
8
9
10
11
12
13
14
15
16
17
18
19
20
21
22
#!/usr/bin/env python
# Modules
from pygnmi.client import gNMIclient
import os
# User-defined functions (Tests)
def test_capabilities():
username_str = os.getenv("USER")
password_str = os.getenv("PASS")
hostname_str = os.getenv("HOST")
port_str = os.getenv("PORT")
path_cert_str = os.getenv("CERT")
with gNMIclient(target=(hostname_str, port_str), username=username_str,
password=password_str, path_cert=path_cert_str) as gc:
result = gc.capabilities()
assert "supported_models" in result
assert "supported_encodings" in result
assert "gnmi_version" in result
The example may look complicated but in reality it does the following:
- Each test is a user-defined function, which doesn’t take any arguments as input neither having a return keyword
- You import the modules you need into this file as you do in any other python script
- Closer to the end of the function you put assert statement
In this specific case we are importing creds from the system environment, connect to the node(s) using the pygnmi and check if we can see the keys supported_models, supported_encodings, gnmi_version in a response message received from the gNMI speaking host. This basically checking if gNMI functionality is working at all.
Let’s now take a look how we can do more network-oriented tests.
Using Pytest with Pygnmi and OpenConfig YANG Modules
Per our opinion, OpenConfig is the best set up YANG models. If all the vendors have implemented it without deviations, this networking would have been much better, easier and interoperable. However, we are where we are. There are two main issues with OpenConfig these days:
- Vendors don’t implement that fully. E.g. Nokia SR OS has less than 50% of all OpenConfig modules implemented
- Vendors add custom deviations and/or augmentations, which makes the process of configuration network devices using OpenConfig in multi vendor networks a bit complicated (still way better than NAPALM though).
In our Zero-to-Hero Network Automation Training we explain in-depth YANG and OpenConfig vs Vendor-native modules
Scenario Description
In our test scenario we would check on Nokia SR OS and Arista EOS based routers that:
- All interfaces are up.
- BFD session between EOS1 and SR is up and running.
- BGP session between EOS1 and SR1 is up and running.
- We will use OpenConfig YANG model for that.
Using OpenConfig YANG model in Arista EOS is easy, as this is the only available YANG model, whereas in Nokia SR OS you’d need configure the items (e.g., interfaces or BGP in OpenConfig models).
Here is the same EOS1 configuration:
2
3
4
5
6
7
8
9
10
11
12
13
14
15
16
17
18
19
20
21
22
23
24
25
26
interface Ethernet1
no switchport
ip address 10.0.0.0/31
bfd interval 1000 min-rx 1000 multiplier 3
!
interface Loopback0
ip address 10.0.255.11/32
!
route-map RP_AS65022_IN permit 10
!
route-map RP_AS65022_OUT permit 10
!
router bgp 65011
router-id 10.0.255.11
neighbor 10.0.0.1 remote-as 65022
neighbor 10.0.0.1 bfd
neighbor 10.0.0.1 maximum-routes 12000
!
address-family ipv4
neighbor 10.0.0.1 activate
neighbor 10.0.0.1 route-map RP_AS65022_IN in
neighbor 10.0.0.1 route-map RP_AS65022_OUT out
network 10.0.255.11/32
!
end
Configuration of SR1 is much longer (as it is configured in the real OpenConfig):
2
3
4
5
6
7
8
9
10
11
12
13
14
15
16
17
18
19
20
21
22
23
24
25
26
27
28
29
30
31
32
33
34
35
36
37
38
39
40
41
42
43
44
45
46
47
48
49
50
51
52
53
54
55
56
57
58
59
60
61
62
63
64
65
66
67
68
69
70
71
72
73
74
75
76
77
78
79
80
81
82
83
84
85
86
87
88
89
90
91
92
93
94
95
96
97
98
99
100
101
102
103
104
105
106
107
108
109
110
111
112
113
114
115
116
117
118
119
120
121
122
123
124
125
126
127
128
129
130
131
132
133
134
135
136
137
138
139
140
141
142
143
144
145
146
147
148
149
150
151
152
153
154
155
156
157
158
159
160
161
162
163
164
165
166
167
168
169
170
171
172
173
174
175
176
177
178
179
180
181
182
183
184
185
186
187
188
189
190
191
192
193
194
195
196
197
198
199
200
bfd {
interfaces {
interface "1/1/c1/1.0" {
config {
id "1/1/c1/1.0"
enabled true
desired-minimum-tx-interval 1000000
required-minimum-receive 1000000
detection-multiplier 3
}
interface-ref {
config {
interface 1/1/c1/1
subinterface 0
}
}
}
}
}
interfaces {
interface system {
config {
name system
type softwareLoopback
enabled true
}
subinterfaces {
subinterface 0 {
config {
index 0
enabled true
}
ipv4 {
addresses {
address 10.0.255.22 {
config {
ip 10.0.255.22
prefix-length 32
}
}
}
}
}
}
}
interface 1/1/c1/1 {
config {
name 1/1/c1/1
type ethernetCsmacd
mtu 1514
enabled true
}
subinterfaces {
subinterface 0 {
config {
index 0
description "to_EOS1"
enabled true
}
ipv4 {
addresses {
address 10.0.0.1 {
config {
ip 10.0.0.1
prefix-length 31
}
}
}
}
}
}
}
}
network-instances {
network-instance "Base" {
config {
name "Base"
type DEFAULT_INSTANCE
router-id 10.0.255.22
}
interfaces {
interface "1/1/c1/1.0" {
config {
id "1/1/c1/1.0"
interface 1/1/c1/1
subinterface 0
associated-address-families [IPV4]
}
}
interface "system.0" {
config {
id "system.0"
interface system
subinterface 0
associated-address-families [IPV4]
}
}
}
protocols {
protocol BGP name "0" {
config {
identifier BGP
name "0"
}
bgp {
global {
config {
as 65022
router-id 10.0.255.22
}
afi-safis {
afi-safi IPV4_UNICAST {
config {
afi-safi-name IPV4_UNICAST
enabled true
}
}
}
}
neighbors {
neighbor 10.0.0.0 {
config {
peer-group "eBGP_PEERS"
neighbor-address 10.0.0.0
enabled true
peer-as 65011
}
}
}
peer-groups {
peer-group "eBGP_PEERS" {
config {
peer-group-name "eBGP_PEERS"
}
apply-policy {
config {
import-policy ["RP_AS65022_IN"]
export-policy ["RP_AS65022_OUT"]
}
}
afi-safis {
afi-safi IPV4_UNICAST {
config {
afi-safi-name IPV4_UNICAST
enabled true
}
}
}
enable-bfd {
config {
enabled true
}
}
}
}
}
}
}
}
}
routing-policy {
policy-definitions {
policy-definition "RP_AS65022_IN" {
config {
name "RP_AS65022_IN"
}
statements {
statement "10" {
config {
name "10"
}
actions {
config {
policy-result ACCEPT_ROUTE
}
}
}
}
}
policy-definition "RP_AS65022_OUT" {
config {
name "RP_AS65022_OUT"
}
statements {
statement "10" {
config {
name "10"
}
actions {
config {
policy-result ACCEPT_ROUTE
}
}
}
}
}
}
}
}
Let’s now create a testing scenario.
Developing Solution
The gNMI specification defines the Get() RPC for collecting the information from network devices. It contains the Path() list, which may include multiple resource paths to poll data in a single request. As such, there are two possible approaches how to implement the desired scenario:
- Make a single request for 3 resources (interfaces, BFD, and BGP) and do many asserts in a single test. This reduces the IO; however, the the granularity of the test would be lower.
- Make a 3 requests (one per resources) and do 3 separate tests. In this case there are more IO involved; however, we can better asses each configuration part in greater details.
We will take a second route for out tests.
Test #1. Checking gNMI operation
The test looks like very simple:
2
3
4
5
6
7
8
9
10
11
12
13
14
15
16
17
18
19
20
21
22
# Modules
from pygnmi.client import gNMIclient
import os
import re
# Vars
target_ip = "169.254.255.10"
target_port = 57400
# Tests
def test_gnmi_connecivity():
username = os.getenv("PYGNMI_USER")
password = os.getenv("PYGNMI_PASS")
with gNMIclient(target=(target_ip, target_port), username=username,
password=password, insecure=True) as gc:
result = gc.capabilities()
assert "gnmi_version" in result
assert "supported_encodings" in result
assert "supported_models" in result
We store some local variables such as IP addresses and gNMI port in the file with tests as variables for simplicity. If you like you can put them in a separate file (e.g., .py or .json or .yaml) and import during the execution. Besides that, as said earlier, we are importing some Python modules: pygnmi, re and os. Finally we create a test called test_gnmi_connecivity (the user-defined function MUST start with test_ prefix):
- We import the username and password from Linux environment
- We make a gNMI Capabilities call to device
- we are searching if standard fields present in the response to validate that gNMI works
Same test we do for Nokia SR OS in a separate file test_nokia.py
Test #2. Interfaces
We continue to creating tests in the same file:
2
3
4
5
6
7
8
9
10
11
12
13
14
15
16
17
!
! OUTPUT IS TRUNCATED FOR BREVITY
!
def test_openconfig_interfaces():
username = os.getenv("PYGNMI_USER")
password = os.getenv("PYGNMI_PASS")
with gNMIclient(target=(target_ip, target_port), username=username,
password=password, insecure=True) as gc:
gc.capabilities()
result = gc.get(path=["/openconfig-interfaces:interfaces"])
for entry_dict in result['notification'][0]['update'][0]['val']['openconfig-interfaces:interface']:
if re.match(r'.*ethernetCsmacd.*', entry_dict["config"]["type"]):
assert entry_dict["state"]["admin-status"] == entry_dict["state"]["oper-status"]
We continue with the similar logic:
- Taking the credentials from Linux environment.
- Making a Capabilities call to get the proper encoding and then collecting information about interfaces.
- In the collected interfaces we are checking that for all physical interfaces their operational states equal their. administrative state (obviously, you can define your rules in here; e.g., you can compare with some central database such as NetBox).
At our Zero-to-Hero Network Automation Training you will learn how to use NetBox for documentation and automation of your network.
For Nokia SR OS the test would be almost the same. However, there s a difference in the received gNMI response and the path for Nokia would be:
Check the provided GitHub link at the end of this blogpost.
Test #3. BFD
In the running versions of SW (Nokia SR OS 20.3.R3 and Arista EOS 4.25.0F), Nokia has better coverage of OpenConfig BFD YANG module. Namely, in the operational part it contains information about the BFD peer and register protocol, whereas Arista EOS doesn’t. Let’s compare SR1 respones to gc.get(path=[‘/openconfig-bfd:bfd’]):
And EOS1 response to the same request:
Probably, in a newer version of Arista EOS (e.g., 4.26.0.1F) this output is augment, we haven’t tested that.
Therefore, we will provide a test for Nokia SR OS here:
2
3
4
5
6
7
8
9
10
11
12
13
14
15
16
17
18
19
20
21
!
! OUTPUT TRUNCATED FOR BREVITY
!
def test_openconfig_bfd():
username = os.getenv("PYGNMI_USER")
password = os.getenv("PYGNMI_PASS")
with gNMIclient(target=(target_ip, target_port), username=username,
password=password, insecure=True) as gc:
gc.capabilities()
result = gc.get(path=["/openconfig-bfd:bfd"])
for entry_dict in result['notification'][0]['update'][0]['val']['interfaces']['interface']:
assert "peers" in entry_dict
assert "peer" in entry_dict["peers"]
assert len(entry_dict["peers"]["peer"]) > 0
for bfd_peer_dict in entry_dict["peers"]["peer"]:
assert bfd_peer_dict["state"]["session-state"] == "UP"
We already described the part on collecting creds and making call. From the validation perspective:
- We check if we have peers.
- We check that peers are in the UP state.
We don’t create any OpenConfig BFD test for Arista as in our version it won’t reflect the real state.
Test #4. BGP
Final BGP test:
2
3
4
5
6
7
8
9
10
11
12
13
14
15
16
17
18
19
20
!
! OUTPUT TRUNCATED FOR BREVITY
!
def test_openconfig_bgp():
username = os.getenv("PYGNMI_USER")
password = os.getenv("PYGNMI_PASS")
with gNMIclient(target=(target_ip, target_port), username=username,
password=password, insecure=True) as gc:
gc.capabilities()
result = gc.get(path=["/openconfig-network-instance:network-instances"])
for entry_dict in result['notification'][0]['update'][0]['val']['network-instance'][0]['protocols']['protocol']:
if re.match(r'.*BGP.*', entry_dict["identifier"]):
assert len(entry_dict["bgp"]["neighbors"]["neighbor"]) > 0
for bgp_neighbor_dict in entry_dict["bgp"]["neighbors"]["neighbor"]:
assert bgp_neighbor_dict["state"]["session-state"] == "ESTABLISHED"
From the validation perspective:
- Looking for the BGP protocol configured
- Checking that there are configured peers
- Checking that all pees are in the ESTABLISHED state
Same test we have for Arista EOS with slightly modified gNMI paths to match its OpenConfig YANG modules
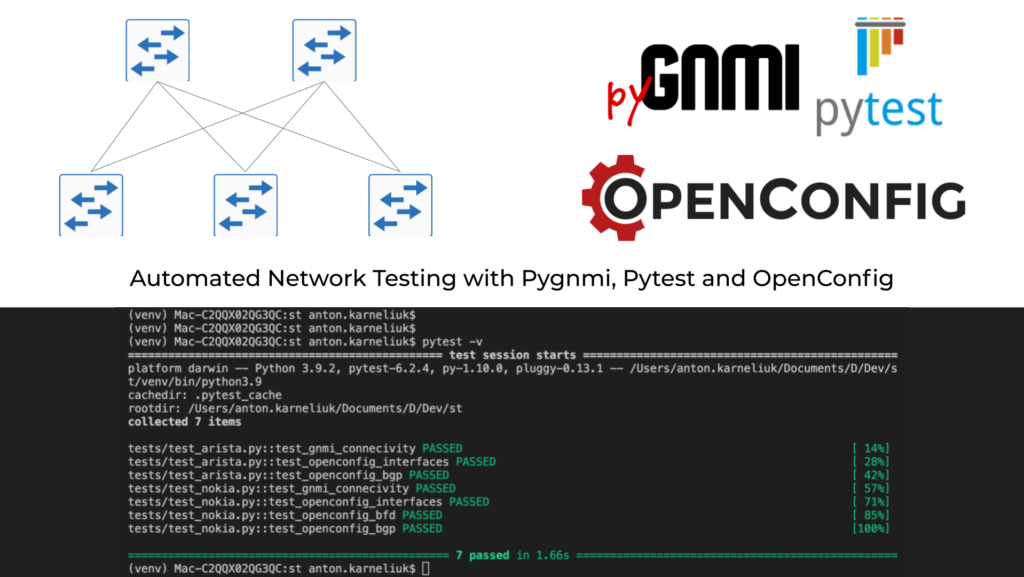
Testing and Validation
Both our test files relying pygnmi and OpenConfig are prepared and we can run test of our topology using the pytest. It is very simple:
2
3
4
5
6
7
8
9
10
11
12
13
14
15
16
=============================================== test session starts ===============================================
platform darwin -- Python 3.9.2, pytest-6.2.4, py-1.10.0, pluggy-0.13.1 -- /Users/anton.karneliuk/Documents/D/Dev/st/venv/bin/python3.9
cachedir: .pytest_cache
rootdir: /Users/anton.karneliuk/Documents/D/Dev/st
collected 7 items
tests/test_arista.py::test_gnmi_connecivity PASSED [ 14%]
tests/test_arista.py::test_openconfig_interfaces PASSED [ 28%]
tests/test_arista.py::test_openconfig_bgp PASSED [ 42%]
tests/test_nokia.py::test_gnmi_connecivity PASSED [ 57%]
tests/test_nokia.py::test_openconfig_interfaces PASSED [ 71%]
tests/test_nokia.py::test_openconfig_bfd PASSED [ 85%]
tests/test_nokia.py::test_openconfig_bgp PASSED [100%]
================================================ 7 passed in 1.66s ================================================
As you can see, just in 1.66 second we validate if our network is properly configured and operational. You can say that tests were relatively simple, and that would be true. However, now you have ideas, we believe, how you can build your own test scenarios. If any assert statement sees False as a result of comparison, the test will be FAILED.
If You Prefer Video
You can watch this demo on our YouTube channel:

Examples in GitHub
You can find this and other examples in our GitHub repository.
Lessons Learned
We have adopted the pytest framework to do the unit tests for all our products we are developing to speed up the development and reduce the bugs. The benefits are amazing: less bugs before release of the new version of pygnmi and other tools, less time spend on testing. In fact, the time spent on creating unit tests (5 hours) already saved a lot of hours of testing for us.
Conclusion
Validating the network and in general your IT infrastructure is a crucial contributor to the stability and predictable operations. You can use at ad-hoc to scan health of your network or as part of the change management process, where you take a snapshot of the operational state of the network before and after the change and compare them. Looking forward gNMI becomes more popular in the networking world. As such, you can rely more on that to do all sort of network device management and pygnmi being an open source Python library will help you a lot. Even more you can benefit from it if you use pygmi in workflows with other Python tools, such as proposed scenario with pytest. Take care and good bye.
Support us
P.S.
If you have further questions or you need help with your networks, we are happy to assist you, just send us a message. Also don’t forget to share the article on your social media, if you like it.
BR,
Anton Karneliuk