Hello my friend,
This is the third and the last article about REST API basics. In the previous articles, you have learned how to collect information and create/delete new entries. Today you will learn how to modify existing entries.
2
3
4
5
retrieval system, or transmitted in any form or by any
means, electronic, mechanical or photocopying, recording,
or otherwise, for commercial purposes without the
prior permission of the author.
Disclaimer
This article is a continuation of the two previous: GET and POST/DELETE. You should start with that to get the full picture.
What are we going to test?
You will learn how to use two requests:
- PATCH for modifying information for existing entries
- PUT for modifying information for existing entries
As you might remember, the interaction with the REST API is described by CRUD model, what stands for Create, Read, Update, and Delete. In this concept, Update operation is represented by PATCH and PUT HTTP methods. Later in this article you will figure out what is the difference between PATCH and PUT. It is significant.
To put the context, we will use the Digital Ocean NetBox (link) as an application to be managed over REST API.
Software version
The following software components are used in this lab.
Management host:
- CentOS 7.5.1804 with python 2.7.5
- Ansible 2.8.0
- Docker-CE 18.09
- Containerized NetBox
Enabler and monitoring infrastructure:
- Base Linux image for container: Alpine Linux 3.9
- DHCP: ISC DHCP 4.4.1-r2
- DNS: ISC BIND 9.12.3_p4-r2
- FTP: VSFTPD 3.0.3-r6
- HTTP: NGINX 1.14.2-r1
- Data collection: InfluxData Telegraf 1.10.3
- Data storage: InfluxData TSDB 1.7.6
- Data visualisation: Grafana 6.1.6
- Data analytics: InfluxData Kapacitor 1.5.1
The Data Centre Fabric:
- Nokia SR OS 16.0.R7 [guest VNF]
- Arista EOS 4.21.1.1F [guest VNF]
- Cisco IOS XR 6.5.1 [guest VNF]
- Cumulus Linux 3.7.5 [guest VNF]
More details about Data Centre Fabric you may find in the previous articles.
Topology
As this article is the third one out of the series, it continue using the same topology, as it was before:
2
3
4
5
6
7
8
9
10
11
12
13
14
15
16
17
18
19
20
21
22
23
24
25
26
27
28
29
30
31
| /\/\/\/\/\/\/\/\/\/\/\/\/\/\/\/\ |
| +-----------------+ +-----------------+ / +------+ +------+ Docker cloud \ |
| | de+bln+spine+101| (c)karneliuk.com // Data Centre Fabric | de+bln+spine+201| / |TELEG1| |TELEG2| +------+ \ |
| | (Cisco IOS XRv) | | (Nokia VSR) | \ +------+ +------+ +---+ DHCP | / |
| | Lo0: .1 | | system: .2 | / |.8 |.9 | .2+------+ \ |
| | BGP AS: 65000 | | BGP AS: 65000 | \ +-------------+ / |
| +-------+---------+ IP^4: 192.168.1.0/24 +--------+--------+ \ 172.17.0.0/16 | +------+ \ |
| | IPv6: fc00:de:1:ffff::/64 | \+------------+ +---+ DNS | / |
| | MgmtEth0/CPU0/0 | MgmtEth0/CPU0/0| Management +----+ .3+------+ \ |
| | .25/:25 | .26/:26 | host |.1 | / |
| | | +------+-----+ | +------+ \ |
| | | | \ +---+ FTP | / |
| | | | ens33\ | .4+------+ \ |
| +-------------------+--------------+---------------------------------+-------------+-------------------+---+ .137 \ | / |
| | | | | :137 / | +------+ \ |
| | | | | \ +---+ HTTP | / |
| | | | | \ | .5+------+ \ |
| | eth0 | eth0 | Management1 | Management1/ | / |
| | .21/:21 | .22/:22 | .23/:23 | .24/:24 \ | +------+ \ |
| | | | | / +---+INFLUX| / |
| +------------------+ +---------+--------+ +---------+--------+ +---------+--------+ \ | .6+------+ \ |
| | de+bln+leaf+111 | | de+bln+leaf+112 | | de+bln+leaf+211 | | de+bln+leaf+212 | / | / |
| | (Cumulus VX) | | (Cumulus VX) | | (Arista vEOS) | | (Arista vEOS) | \ | +------+ \ |
| | lo: .101 | | lo: .102 | | Lo0: .104 | | Lo0: .105 | / +---+GRAFAN| / |
| | BGP AS: 65101 | | BGP AS: 65102 | | BGP AS: 65104 | | BGP AS: 65105 | \ | .7+------+ \ |
| +------------------+ +------------------+ +------------------+ +------------------+ / | +------+ / |
| \ +---+KAPACI| \ |
| \ .10+------+ / |
| \/\/\/\/\/\/\/ |
+--------------------------------------------------------------------------------------------------------------------------------------------------+
You can use any hypervisor of your choice (KVM, VMWare Player/ESXI, etc) to run guest VNFs. For KVM you can use corresponding cheat sheet for VM creation.
The Data Centre Fabric (or the Service Provider Fabric) isn’t involved in the communication between the applications for this particular scenario, that’s why you don’t see any logical topology.
And yes, all the topologies and initial configuration for the lab you can take from my GitHub.
As said earlier, this blogpost isn’t stand-alone. Read the initial one to get the details about the lab setup.
PATCH vs PUT
At a glance, it could look a bit misleading that there are two requests (PATCH and PUT) performing the same task. But there is a significant difference between then.
To be frank, the difference so huge, that sometimes you can break some application in production, if you don’t consider that.
According to the documentation, HTTP method PATCH performs partial update. The term “partial update” means that you need to place in the body of your request only the information, you want to add or change in the existing entry. The information, that you don’t want to modify somehow, you just don’t mention in your message. If you are familiar with the NETCONF, you can think about PATCH as the following construction:
In a nutshell, you merge key/value pairs in the request with the ones you have in. So, the PATCH method works as follows:
- If there is key matching already existing one, the existing is overridden with its new value.
- If the key in your request doesn’t match any key in the requested resource (URI), then it is just added to the object with its value.
- If there is any key in the requested resource (URI), which doesn’t have a match with the keys in your request (e.g., you don’t have them in your request), the key retains it original value.
The explanation above provides you hints, why PATCH is called partial update. Actually, you update the resource only selectively.
The HTTP method PUT works in a different way. You can think about it as a full updatein comparison with the PATCH, though officially it’s called just update. The PUT request requires you to provide all the key/value pairs relevant to the object. It’s logic could be described as follows:
- If there is key matching already existing one, the existing is overridden with its new value. It is same as PATCH.
- If the key in your request doesn’t match any key in the requested resource (URI), then it is just added to the object with its value. It is same as PATCH.
- If there is any key in the requested resource (URI), which doesn’t have a match with the keys in your request (e.g., you don’t have them in your request), remove the key/value pair from the resource or put it to the default value. It is different to PATCH.
As you can imagine, the third step in the logic creates a tremendous difference, because you can break the operation of your application if you forget to add some key/value pairs to your PUT request. We can compare REST API operation PUT to the one we have in NETCONF:
By this time, you can start thinking that you will use only PATCH method rather than PUT. Well, this might be applicable in certain cases. On the other hand, some applications explicitly require PUT requests for their operation. For instance, the management of Cisco IOS XE or Arista EOS devices over REST API requires you to utilize PUT requests upon interface configuration.
#1. PATCH request with Ansible
The details about the variables and so on, read in the previous article.
We start with the PATCH HTTP method using Ansible, as usual in the beginning. And as usual, we need to start with the details of the PATCH request in REST API, which is part of the NetBox:
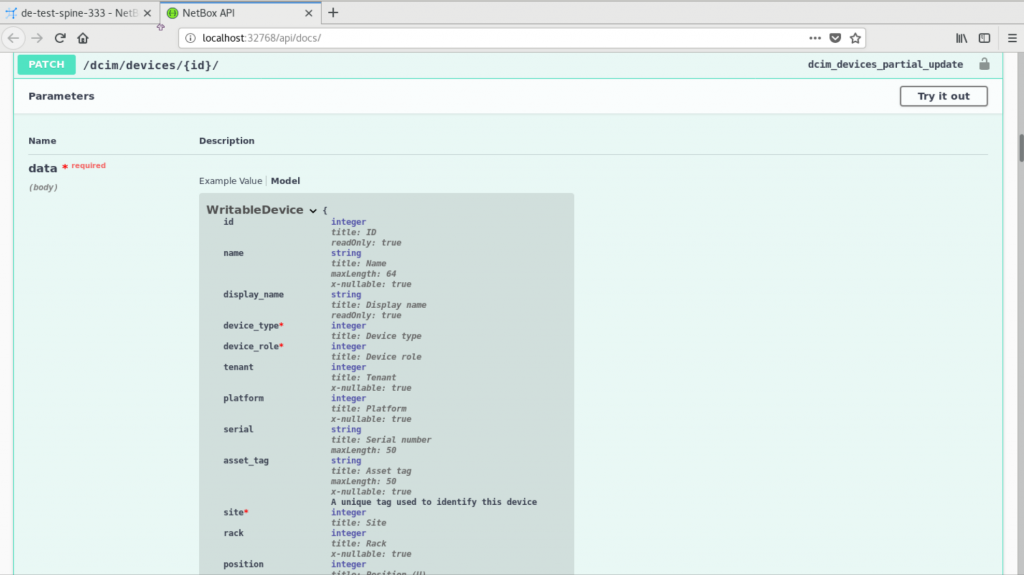
Here is we meet interesting caveat, where the information in the documentation is not fully correct. You might spot that keys device_type and device_role are marked with the red asterisk meaning that these fields are mandatory. They are mandatory for POST as you have learned and will be mandatory for the PUT request as you will learn. But in reality, these fields aren’t necessary for the PATCH request unless you want to change those parameters. The current status of the entry we are going to update looks like as flows:
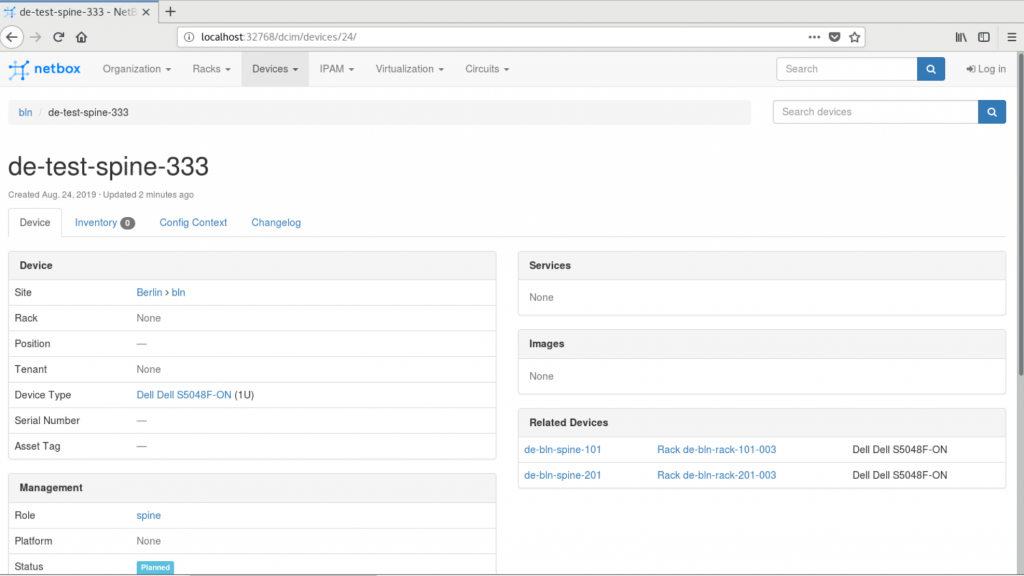
This resource was created in the previous article.
The status of the device is “Planned”, the rack is “None”, and there is no serial number documented. These three fields (and one more) we are going change using HTTP PATCH method. To accomplish that we use the following Ansible playbook containing task with uri module:
2
3
4
5
6
7
8
9
10
11
12
13
14
15
16
17
18
19
20
21
22
23
24
25
26
27
28
29
30
31
32
33
34
35
---
- hosts: localhost
connection: local
gather_facts: no
# Setting vars for this App
vars:
destination_host: localhost
destination_port: 32768
netbox_token: 0123456789abcdef0123456789abcdef01234567
# Running tasks
tasks:
- name: REST API CALL / PATCH
uri:
url: http://{{ destination_host }}:{{ destination_port }}/{{ resource_path }}/{{ id }}/
method: PATCH
headers:
Authorization: "Token {{ netbox_token }}"
body_format: json
body:
status: 1
serial: "SN:00:11:22:33:44"
rack: 3
tags:
- "pimped"
ignore_errors: yes
register: rest_post
vars:
resource_path: api/dcim/devices
id: 24
...
The only really mandatory field in this request is the id, because it is pointing to the resource. In the body part we define only those keys, which we want to modify. The rack is a resource itself, that’s why its key value is id. The same is with the status key, which must be provided in values mapped to actual status names. The serial key has an arbitrary string value, which contains the serial number of your device. Additionally, we will tag the device with some values from the tags array.
Let’s execute this Ansible playbook and check the results:
2
3
4
5
6
7
8
9
PLAY [localhost] ********************************************************************************************************************************************
TASK [REST API CALL / PATCH] ********************************************************************************************************************************
ok: [localhost]
PLAY RECAP **************************************************************************************************************************************************
localhost : ok=1 changed=0 unreachable=0 failed=0 skipped=0 rescued=0 ignored=0
You can spot that the execution of the playbook consisting of one task is super straightforward. On the other hand, as along the results are matching our expectation, it doesn’t matter how simple the playbook is, does it? Let’s verify the effect of the playbook’s execution:
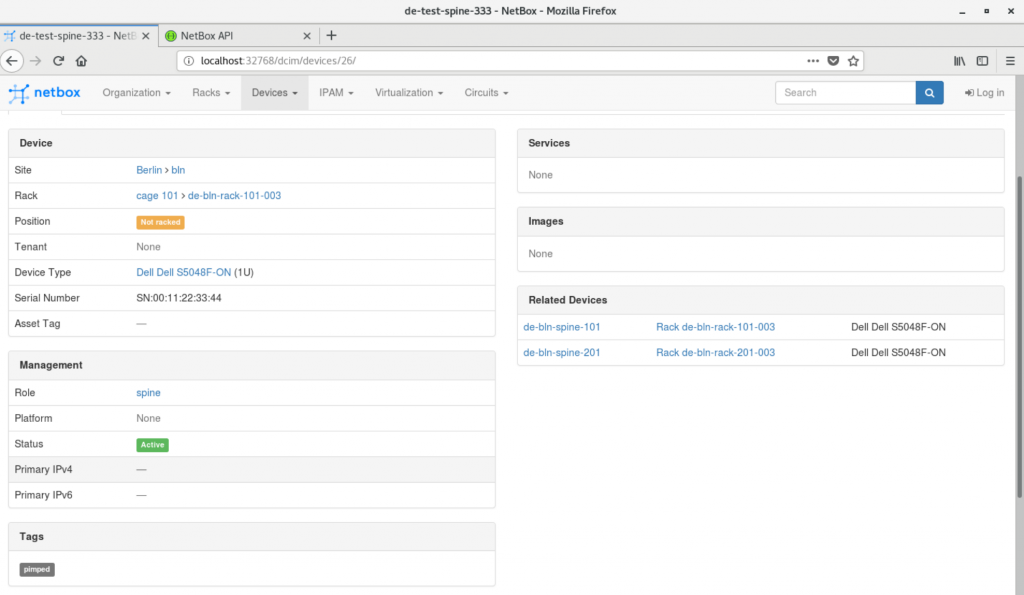
You can see some inconsistency across the device_id in the screenshots caused by the fact that the playbook was developed over several iterations.
Now the device is documented to be installed in a particular rack, and it has a serial number assigned. You can also see that the device has changed its status from “Planed” to “Active”. And finally, there is a tag “pimped”.
I’ve just recently seen the show “pimp my ride” on the TV, so decided to name tag in such a way.
Coming back to the point, where API documentation for PATCH request was discussed, you can see that, besides id, none of the required parameters were in the message body.
The PATCH method is covered, so we can move on towards the PUT request.
#2. PUT request with Ansible
To remind you, HTTP method PUT also performs update, but it is kind of replacement rather than incremental update. Though, we must admit, the logic of PUT in NetBox a bit deviates from the standard PUT logic with full replacement. First of all, let’s take a look at the documentation:
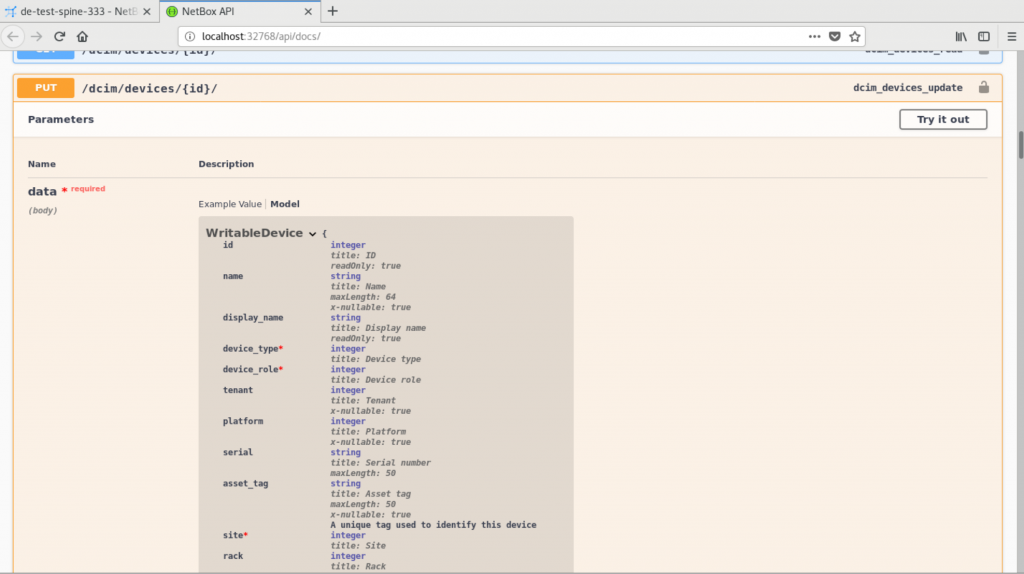
In this case the keys marked with the asterisk are really mandatory. If you don’t set them intentionally or not intentionally, your PUT request will break. To verify this, let’s create a PUT request in a way we did that for the PATCH:
2
3
4
5
6
7
8
9
10
11
12
13
14
15
16
17
18
19
20
21
22
23
24
25
26
27
28
29
30
31
---
- hosts: localhost
connection: local
gather_facts: no
# Setting vars for this App
vars:
destination_host: localhost
destination_port: 32768
netbox_token: 0123456789abcdef0123456789abcdef01234567
# Running tasks
tasks:
- name: REST API CALL / PUT
uri:
url: http://{{ destination_host }}:{{ destination_port }}/{{ resource_path }}/{{ id }}/
method: PUT
headers:
Authorization: "Token {{ netbox_token }}"
body_format: json
body:
status: 3
ignore_errors: yes
register: rest_post
vars:
resource_path: api/dcim/devices
id: 24
...
You may spot that I omit the required parameters in the PUT request and mention only the status key, which I want to change. What do you think? Will such a PUT request work? The only option to answer this question is to test it:
2
3
4
5
6
7
8
9
10
PLAY [localhost] ********************************************************************************************************************************************
TASK [REST API CALL / PUT] **********************************************************************************************************************************
fatal: [localhost]: FAILED! => {"allow": "GET, PUT, PATCH, DELETE, HEAD, OPTIONS", "ansible_facts": {"discovered_interpreter_python": "/usr/bin/python"}, "api_version": "2.5", "changed": false, "connection": "close", "content": "{"device_type":["This field is required."],"device_role":["This field is required."],"site":["This field is required."]}", "content_length": "120", "content_type": "application/json", "date": "Mon, 26 Aug 2019 11:19:22 GMT", "elapsed": 0, "json": {"device_role": ["This field is required."], "device_type": ["This field is required."], "site": ["This field is required."]}, "msg": "Status code was 400 and not [200]: HTTP Error 400: Bad Request", "redirected": false, "server": "nginx", "status": 400, "url": "http://localhost:32768/api/dcim/devices/32/", "vary": "Accept, Cookie, Origin", "x_frame_options": "SAMEORIGIN"}
...ignoring
PLAY RECAP **************************************************************************************************************************************************
localhost : ok=1 changed=0 unreachable=0 failed=0 skipped=0 rescued=0 ignored=1
It is not working. The reason for that, as you can see, is the missing information in the required fields. That is exactly the way how the PUT request deviates from the PATCH. In PUT, like in POST, we need to define values at least for all required keys. Moreover, these values will be used to override the existing values. But there is some specific with the PUT in NetBox, which you will learn in a minute.
For now, let’s adapt the PUT request by putting all the required keys (the values are the same as earlier in POST):
2
3
4
5
6
7
8
9
10
11
12
13
14
15
16
17
18
19
20
21
22
23
24
25
26
27
28
29
30
31
32
33
34
---
- hosts: localhost
connection: local
gather_facts: no
# Setting vars for this App
vars:
destination_host: localhost
destination_port: 32768
netbox_token: 0123456789abcdef0123456789abcdef01234567
# Running tasks
tasks:
- name: REST API CALL / PUT
uri:
url: http://{{ destination_host }}:{{ destination_port }}/{{ resource_path }}/{{ id }}/
method: PUT
headers:
Authorization: "Token {{ netbox_token }}"
body_format: json
body:
device_type: 3
device_role: 3
site: 1
status: 3
ignore_errors: yes
register: rest_post
vars:
resource_path: api/dcim/devices
id: 24
...
The only difference to the previous Ansible playbook with PUT request is that we have added three required fields. Let’s test such a PUT request:
2
3
4
5
6
7
8
9
PLAY [localhost] ********************************************************************************************************************************************
TASK [REST API CALL / PUT] **********************************************************************************************************************************
ok: [localhost]
PLAY RECAP **************************************************************************************************************************************************
localhost : ok=1 changed=0 unreachable=0 failed=0 skipped=0 rescued=0 ignored=0
This time it is successful. The question is, how our resource (data entry about the created network device) looks like:
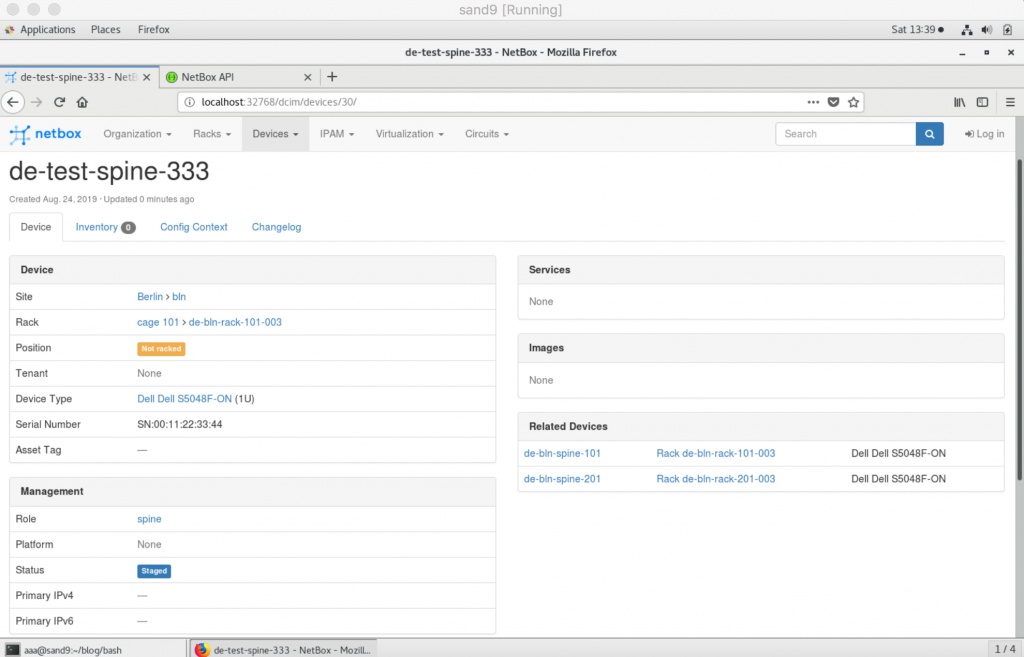
You can see that the status of the device has changed, as it was requested. The required parameters are the same, as we put the same values in the PUT request. What is interesting in the PUT implementation in the NetBox, is that it doesn’t touch the non-required parameters. According to the logic of the PUT, they must be overridden or set to the default value, which is not the case here. Probably, this logic might change in future, but for now it works as described.
So far you have learned how to perform POST and PUT HTTP methods with Ansible to update your resources.
#3. PATCH and PUT requests with Bash
The detailed explanation about the Bash implementation, read in the previous article.
PATCH HTTP method:
2
3
4
5
6
7
8
9
10
11
12
13
14
15
16
17
#!/bin/bash
# Variables
URL="localhost"
PORT=32768
TOKEN=0123456789abcdef0123456789abcdef01234567
METHOD="PATCH"
RESOURCE="api/dcim/devices"
ID="30"
# BODY
RESULT=$(curl -i -X ${METHOD} ${URL}:${PORT}/${RESOURCE}/${ID}/ \
--header "Authorization: Token ${TOKEN}" \
--header "Content-Type: application/json" \
--data '{"status": 1, "serial": "SN:00:11:22:33:44", "rack": 3, "tags": ["pimped"]}')
echo ${RESULT}
PUT HTTP method:
2
3
4
5
6
7
8
9
10
11
12
13
14
15
16
17
#!/bin/bash
# Variables
URL="localhost"
PORT=32768
TOKEN=0123456789abcdef0123456789abcdef01234567
METHOD="PATCH"
RESOURCE="api/dcim/devices"
ID="30"
# BODY
RESULT=$(curl -i -X ${METHOD} ${URL}:${PORT}/${RESOURCE}/${ID}/ \
--header "Authorization: Token ${TOKEN}" \
--header "Content-Type: application/json" \
--data '{"device_type": 3, "device_role": 3, "site": 1, "status": 3}')
echo ${RESULT}
#4. PATCH and PUT requests with Postman
The detailed explanation about the Postman implementation, read in the previous article.
PATCH HTTP method:
2
3
4
5
6
7
8
9
10
11
12
13
14
15
16
17
18
19
20
21
22
23
24
25
26
27
28
29
30
31
32
33
34
35
36
"name": "Partially update device in NetBox",
"request": {
"method": "PATCH",
"header": [
{
"key": "Content-Type",
"value": "application/json",
"type": "text"
},
{
"key": "Authorization",
"value": "Token {{netbox_token}}",
"type": "text"
}
],
"body": {
"mode": "raw",
"raw": "{\n\t"status": 1,\n\t"serial": "SN:00:11:22:33:44",\n\t"rack": 3,\n\t"tags": [\n\t\t"pimped"\n\t]\n}"
},
"url": {
"raw": "http://{{destination_host}}:{{destination_port}}/{{resource_path}}/{{device_id}}/",
"protocol": "http",
"host": [
"{{destination_host}}"
],
"port": "{{destination_port}}",
"path": [
"{{resource_path}}",
"{{device_id}}",
""
]
}
},
"response": []
}
PUT HTTP method:
2
3
4
5
6
7
8
9
10
11
12
13
14
15
16
17
18
19
20
21
22
23
24
25
26
27
28
29
30
31
32
33
34
35
36
"name": "Update device in NetBox",
"request": {
"method": "PUT",
"header": [
{
"key": "Content-Type",
"type": "text",
"value": "application/json"
},
{
"key": "Authorization",
"type": "text",
"value": "Token {{netbox_token}}"
}
],
"body": {
"mode": "raw",
"raw": "{\n\t"device_type": 3,\n\t"device_role": 3,\n\t"site": 1,\n\t"status": 3\n}"
},
"url": {
"raw": "http://{{destination_host}}:{{destination_port}}/{{resource_path}}/{{device_id}}/",
"protocol": "http",
"host": [
"{{destination_host}}"
],
"port": "{{destination_port}}",
"path": [
"{{resource_path}}",
"{{device_id}}",
""
]
}
},
"response": []
}
#5. PATCH and PUT requests with Python
The detailed explanation about the Python implementation, read in the previous article.
PATCH HTTP method:
2
3
4
5
6
7
8
9
10
11
12
13
14
15
16
17
18
19
20
21
22
23
24
25
26
27
28
29
30
31
32
33
34
35
36
37
38
39
40
41
42
43
44
45
46
47
48
49
# Modules
import requests
import json
# Varibles
destination_url = 'localhost'
destination_port = 32768
resource_path = 'api/dcim/devices'
device_id = '31'
netbox_token = '0123456789abcdef0123456789abcdef01234567'
# Functions
def rest_api_patch(active_url, active_port, active_resource,
active_token, active_id):
resource_path = "http://{}:{}/{}/{}/".format(active_url, active_port,
active_resource, active_id)
all_headers = {
'Authorization': 'Token {}'.format(active_token),
'Content-Type': 'application/json'
}
data_body = {
'name': 'de-test-spine-333',
'device_type': 3,
'device_role': 3,
'site': 1,
'status': 1,
'serial': 'SN:00:11:22:33:44',
'rack': 3,
'tags': [
'pimped'
]
}
rest_response = requests.patch(url=resource_path,
headers=all_headers,
data=json.dumps(data_body))
return rest_response.json()
# Body
if __name__ == '__main__':
reply = rest_api_patch(destination_url, destination_port,
resource_path, netbox_token, device_id)
print(reply)
PUT HTTP method:
2
3
4
5
6
7
8
9
10
11
12
13
14
15
16
17
18
19
20
21
22
23
24
25
26
27
28
29
30
31
32
33
34
35
36
37
38
39
40
41
42
43
# Modules
import requests
import json
# Varibles
destination_url = 'localhost'
destination_port = 32768
resource_path = 'api/dcim/devices'
device_id = '31'
netbox_token = '0123456789abcdef0123456789abcdef01234567'
# Functions
def rest_api_patch(active_url, active_port, active_resource,
active_token, active_id):
resource_path = "http://{}:{}/{}/{}/".format(active_url, active_port,
active_resource, active_id)
all_headers = {
'Authorization': 'Token {}'.format(active_token),
'Content-Type': 'application/json'
}
data_body = {
'device_type': 3,
'device_role': 3,
'site': 1,
'status': 3
}
rest_response = requests.patch(url=resource_path,
headers=all_headers,
data=json.dumps(data_body))
return rest_response.json()
# Body
if __name__ == '__main__':
reply = rest_api_patch(destination_url, destination_port,
resource_path, netbox_token, device_id)
print(reply)
All the provided scripts you can find on my GitHub.
Lessons learned
The main lessons learned I’ve taken from writing this article, don’t blindly trust the documentation. Even if the documentation is official. There is nothing wrong to send more parameters in the PATCH request than required, unless you don’t break something unintentionally. Sending only relevant parameters can help to make your code clean and doing exactly what you need.
Conclusion
So far, we have covered all main aspects of working with the REST API. You know how to perform Create, Read, Update (link) and Delete resources, which is basis for network automation and all modern applications in general built using microservices architecture. The next article will be again about network technologies. There will be something special only for you, my friend! Take care and goodbye!
Support us
P.S.
If you have further questions or you need help with your networks, I’m happy to assist you, just send me message (https://karneliuk.com/contact/). Also don’t forget to share the article on your social media, if you like it.
BR,
Anton Karneliuk


