Hello my friend,
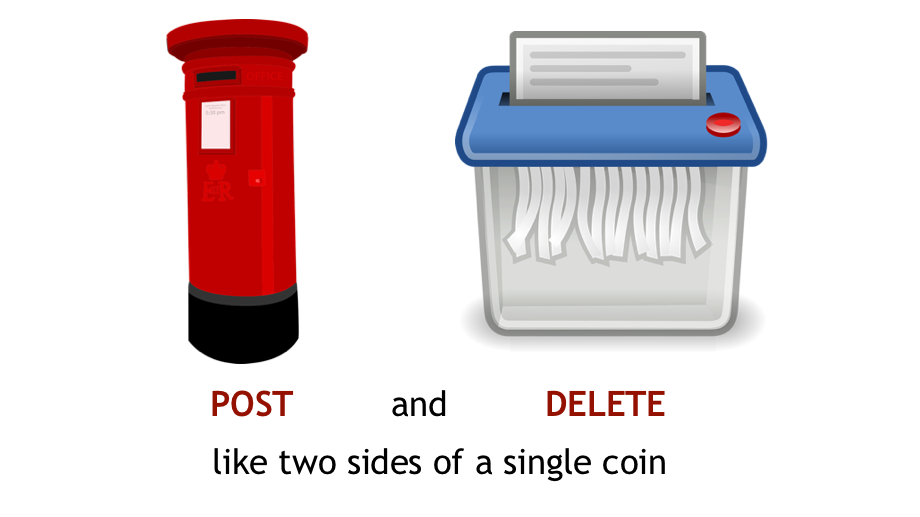
In the previous blogpost, we started the exciting journey in the world of REST API, where you have learned how to collect the information using GET method. Today you will learn how to create the objects using POST method and remove them using DELETE.
2
3
4
5
retrieval system, or transmitted in any form or by any
means, electronic, mechanical or photocopying, recording,
or otherwise, for commercial purposes without the
prior permission of the author.
Disclaimer
This article is a continuation of the previous one. You should start with that to get the full picture.
What are we going to test?
You will learn how to use two requests
- POST for adding new information
- DELETE for removing the entries
As you might remember, the interaction with the REST API is described by CRUD model, what stands for Create, Read, Update, and Delete. In this concept, HTTP POST method represents Create and DELETE represents Delete operaions.
To put the context, Digital Ocean NetBox and Docker are the applications, which we will manage over the REST API.
Software version
The following software components are used in this lab.
Management host:
- CentOS 7.5.1804 with python 2.7.5
- Ansible 2.8.0
- Docker-CE 18.09
- Containerized NetBox
Enabler and monitoring infrastructure:
- Base Linux image for container: Alpine Linux 3.9
- DHCP: ISC DHCP 4.4.1-r2
- DNS: ISC BIND 9.12.3_p4-r2
- FTP: VSFTPD 3.0.3-r6
- HTTP: NGINX 1.14.2-r1
- InfluxData Telegraf: 1.10.3
- InfluxData TSDB: 1.7.6
- Grafana: 6.1.6
- InfluxData Kapacitor: 1.5.1
The Data Centre Fabric:
- Nokia SR OS 16.0.R7 [guest VNF]
- Arista EOS 4.21.1.1F [guest VNF]
- Cisco IOS XR 6.5.1 [guest VNF]
- Cumulus Linux 3.7.5 [guest VNF]
More details about Data Centre Fabric you may find in the previous articles.
Topology
Exactly in the same way you have seen in the previous article, we focus only on the management topology, as we are dealing with the communication towards applications in the containers or to Docker itself:
2
3
4
5
6
7
8
9
10
11
12
13
14
15
16
17
18
19
20
21
22
23
24
25
26
27
28
29
30
31
| /\/\/\/\/\/\/\/\/\/\/\/\/\/\/\/\ |
| +-----------------+ +-----------------+ / +------+ +------+ Docker cloud \ |
| | de+bln+spine+101| (c)karneliuk.com // Data Centre Fabric | de+bln+spine+201| / |TELEG1| |TELEG2| +------+ \ |
| | (Cisco IOS XRv) | | (Nokia VSR) | \ +------+ +------+ +---+ DHCP | / |
| | Lo0: .1 | | system: .2 | / |.8 |.9 | .2+------+ \ |
| | BGP AS: 65000 | | BGP AS: 65000 | \ +-------------+ / |
| +-------+---------+ IP^4: 192.168.1.0/24 +--------+--------+ \ 172.17.0.0/16 | +------+ \ |
| | IPv6: fc00:de:1:ffff::/64 | \+------------+ +---+ DNS | / |
| | MgmtEth0/CPU0/0 | MgmtEth0/CPU0/0| Management +----+ .3+------+ \ |
| | .25/:25 | .26/:26 | host |.1 | / |
| | | +------+-----+ | +------+ \ |
| | | | \ +---+ FTP | / |
| | | | ens33\ | .4+------+ \ |
| +-------------------+--------------+---------------------------------+-------------+-------------------+---+ .137 \ | / |
| | | | | :137 / | +------+ \ |
| | | | | \ +---+ HTTP | / |
| | | | | \ | .5+------+ \ |
| | eth0 | eth0 | Management1 | Management1/ | / |
| | .21/:21 | .22/:22 | .23/:23 | .24/:24 \ | +------+ \ |
| | | | | / +---+INFLUX| / |
| +------------------+ +---------+--------+ +---------+--------+ +---------+--------+ \ | .6+------+ \ |
| | de+bln+leaf+111 | | de+bln+leaf+112 | | de+bln+leaf+211 | | de+bln+leaf+212 | / | / |
| | (Cumulus VX) | | (Cumulus VX) | | (Arista vEOS) | | (Arista vEOS) | \ | +------+ \ |
| | lo: .101 | | lo: .102 | | Lo0: .104 | | Lo0: .105 | / +---+GRAFAN| / |
| | BGP AS: 65101 | | BGP AS: 65102 | | BGP AS: 65104 | | BGP AS: 65105 | \ | .7+------+ \ |
| +------------------+ +------------------+ +------------------+ +------------------+ / | +------+ / |
| \ +---+KAPACI| \ |
| \ .10+------+ / |
| \/\/\/\/\/\/\/ |
+--------------------------------------------------------------------------------------------------------------------------------------------------+
You can use any hypervisor of your choice (KVM, VMWare Player/ESXI, etc) to run guest VNFs. For KVM you can use corresponding cheat sheet for VM creation.
The Data Centre Fabric (or the Service Provider Fabric) isn’t involved in the communication between the applications for this particular scenario, that’s why you don’t see any logical topology.
As always, the topologies and initial configuration files you can find on my GitHub.
Preparation of the applications
As said earlier, this blogpost isn’t stand-alone. Read the initial one (link) to get the details about the lab setup.
#1. POST request with Ansible
This method is used to create a new data entry over the REST API. There are various use cases, which you can implement. To give you some details, we will cover two of them:
- Launch the container on the Docker.
- Create the new data entry (device description) in the NetBox.
We start with the first case.
The details about the variables and so on, read in the previous article.
To launch the Docker container using REST API, we can use the following Ansible playbook:
2
3
4
5
6
7
8
9
10
11
12
13
14
15
16
17
18
19
20
21
22
23
24
25
26
27
28
29
---
- hosts: localhost
connection: local
gather_facts: no
# Setting vars for this App
vars:
destination_host: localhost
destination_port: 2375
# Running tasks
tasks:
- name: REST API CALL / POST
uri:
url: http://{{ destination_host }}:{{ destination_port }}/{{ resource_path }}
method: POST
register: rest_post
ignore_errors: yes
vars:
resource_path: containers/dcf_dhcp/start
- name: DEBUG / GOT INFO
debug:
msg: "{{ rest_post }}"
when: rest_post.status == 204
...
The Ansible core module we are using called uri, which is the module to interact with the Web services. As it comes from the name of this paragraph, we speak about POST method, that’s why you see “method: POST” within the uri configuration.
The next important point is the variable resource_path, where the action is defined: you see the last node in the path is “start”, what is equal to local shell command “docker container xxx start”. You can change it to any other action, such as kill, restart, stop, and so on. The good thing is that regardless of the action you want to do with the container, the method will be always POST.
There is one more thing you need to pay attention to. And that is where you need to start digging into details of the REST API implementation per application. Ansible expects that the respond code to the POST will be OK (HTTP 200), whereas the Docker responds with the code 204 upon success. That is the reason, why the task with uri should include “ignore_errors: yes” statement. In the second task we just match that code was 204 to verify everything is correct.
Let’s first of all, we check that there is no container with the name dcf_dhcp is running:
2
CONTAINER ID IMAGE COMMAND CREATED STATUS PORTS NAMES
Now we execute the Ansible playbook with the HTTP POST request towards Docker REST API:
2
3
4
5
6
7
8
9
10
11
12
13
14
15
16
17
18
19
20
21
22
23
24
25
26
27
28
29
30
31
32
33
34
35
PLAY [localhost] ***************************************************************************************************************************
TASK [REST API CALL / POST] ****************************************************************************************************************
fatal: [localhost]: FAILED! => {"ansible_facts": {"discovered_interpreter_python": "/usr/bin/python"}, "api_version": "1.40", "changed": false, "connection": "close", "content": "", "cookies": {}, "cookies_string": "", "date": "Sat, 27 Jul 2019 10:31:19 GMT", "docker_experimental": "false", "elapsed": 0, "msg": "Status code was 204 and not [200]: OK (unknown bytes)", "ostype": "linux", "redirected": false, "server": "Docker/19.03.1 (linux)", "status": 204, "url": "http://localhost:2375/containers/dcf_dhcp/start"}
...ignoring
TASK [DEBUG / GOT INFO] ********************************************************************************************************************
ok: [localhost] => {
"msg": {
"ansible_facts": {
"discovered_interpreter_python": "/usr/bin/python"
},
"api_version": "1.40",
"changed": false,
"connection": "close",
"content": "",
"cookies": {},
"cookies_string": "",
"date": "Sat, 27 Jul 2019 10:31:19 GMT",
"docker_experimental": "false",
"elapsed": 0,
"failed": true,
"msg": "Status code was 204 and not [200]: OK (unknown bytes)",
"ostype": "linux",
"redirected": false,
"server": "Docker/19.03.1 (linux)",
"status": 204,
"url": "http://localhost:2375/containers/dcf_dhcp/start"
}
}
PLAY RECAP *********************************************************************************************************************************
localhost : ok=2 changed=0 unreachable=0 failed=0 skipped=0 rescued=0 ignored=1
As explained, the first task has a fatal error, as the HTTP response is 204, not the 200. Nevertheless, due to instruction to ignore errors, the execution is continued and our check for 204code is successful.
Let’s verify the state of the container:
2
3
CONTAINER ID IMAGE COMMAND CREATED STATUS PORTS NAMES
989f86dd8ea3 akarneliuk/dcf_dhcp "/usr/sbin/dhcpd -4 …" 6 weeks ago Up 10 seconds dcf_dhcp
So far so good, and we can move to the second case, where we create the new entry in the Digital Ocean NetBox.
The details about the authorisation header were covered in the previous article, so they aren’t explained here again.
The key difference is the presence of the body in the POST request, which we haven’t covered previously. The reason is very easy: when we create something, we need provide information, what we create. As we create a new device entry in the NetBox, we need to construct the body in a proper way, using JSON structure the NetBox accepts. The following Ansible playbook is used for that:
2
3
4
5
6
7
8
9
10
11
12
13
14
15
16
17
18
19
20
21
22
23
24
25
26
27
28
29
30
31
32
33
34
35
36
37
38
39
---
- hosts: localhost
connection: local
gather_facts: no
# Setting vars for this App
vars:
destination_host: localhost
destination_port: 32768
netbox_token: 0123456789abcdef0123456789abcdef01234567
# Running tasks
tasks:
- name: REST API CALL / POST
uri:
url: http://{{ destination_host }}:{{ destination_port }}/{{ resource_path }}
method: POST
headers:
Authorization: "Token {{ netbox_token }}"
body_format: json
body:
name: de-test-spine-333
device_type: 3
device_role: 3
site: 1
status: 1
ignore_errors: yes
register: rest_post
vars:
resource_path: api/dcim/devices/
- name: DEBUG / GOT INFO
debug:
msg: "{{ rest_post.json }}"
when: rest_post.status == 201
...
You can spot here two new keys inside the uri task: body_format and body. The first one defines the format, to which the body should be converted, whereas the body itself contains the input parameters. In this case, body_format is JSON, what instructs Ansible to convert YAML structure of the body to JSON. The body itself is dependent on the REST API structure of the application (Digital Ocean NetBox this time). That’s why, to understand what you need to put into body, you need to consult REST API documentation:
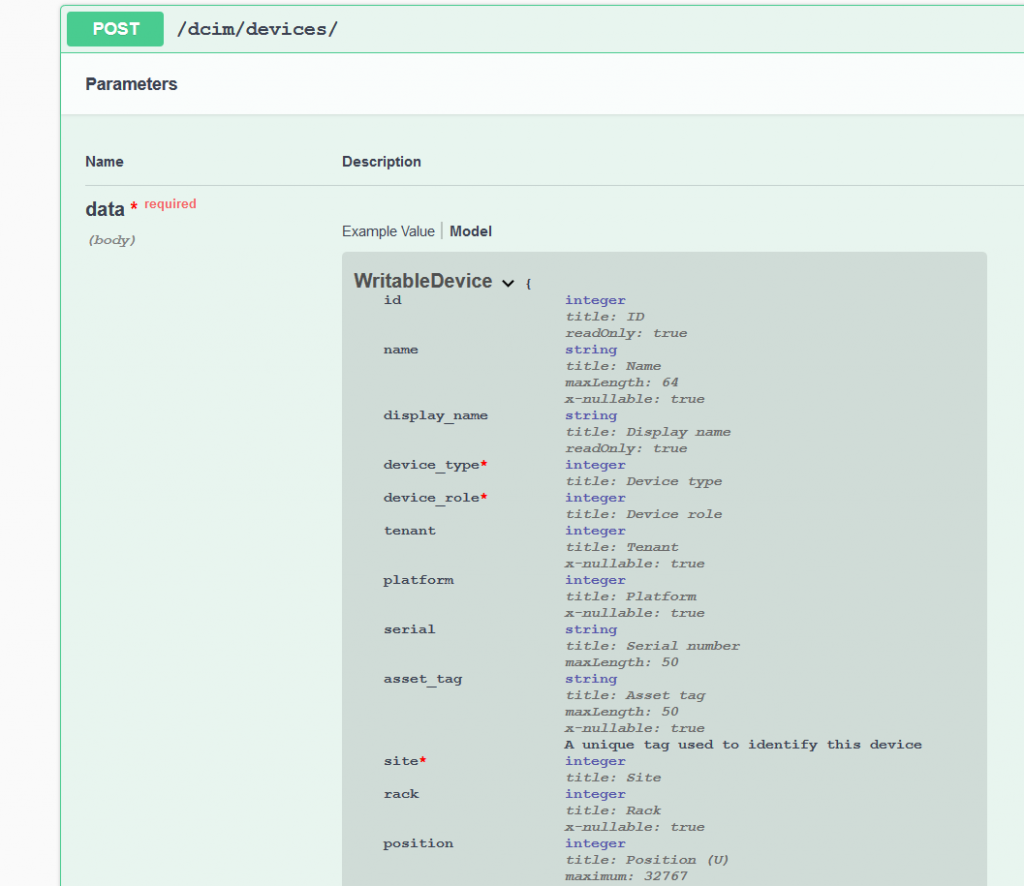
For more details, how to access NetBox REST API documentation, read the corresponding article, please.
In the provided documentation you see, that some keys are mandatory, whereas the some are not. You can also see the type of the value, which you need to provide for a specific key. So, you need to star with the mandatory keys and then put the optional, which you need.
In NetBox specific case, the device_type, device_roleand siteare mandatory keys. Hence, you see them in the Ansible playbook above. What is also crucial, these keys are provided as integers, so you need to know the IDs of the related items. Thea easiest way to get these IDs, to execute GET request to the application.
This is one of the reasons, why we have started with the GET.
The now, when you now the idea behind this POST request, we can verify it works correct:
2
3
4
5
6
7
8
9
10
11
12
13
14
15
16
17
18
19
20
21
22
23
24
25
26
27
28
29
30
31
32
33
34
35
36
37
38
39
40
41
42
43
44
45
46
47
48
49
50
51
52
53
54
55
56
57
58
59
60
61
62
63
64
65
66
67
68
PLAY [localhost] ***************************************************************************************************************************
TASK [REST API CALL / POST] ****************************************************************************************************************
fatal: [localhost]: FAILED! => {"allow": "GET, POST, HEAD, OPTIONS", "ansible_facts": {"discovered_interpreter_python": "/usr/bin/python"}, "api_version": "2.5", "changed": false, "connection": "close", "content": "{"id":21,"name":"de-test-spine-333","display_name":"de-test-spine-333","device_type":{"id":3,"url":"http://localhost:32768/api/dcim/device-types/3/","manufacturer":{"id":3,"url":"http://localhost:32768/api/dcim/manufacturers/3/","name":"Dell","slug":"dell"},"model":"Dell S5048F-ON","slug":"dell-s5048f-on","display_name":"Dell Dell S5048F-ON"},"device_role":{"id":3,"url":"http://localhost:32768/api/dcim/device-roles/3/","name":"spine","slug":"spine"},"tenant":null,"platform":null,"serial":"","asset_tag":null,"site":{"id":1,"url":"http://localhost:32768/api/dcim/sites/1/","name":"bln","slug":"bln"},"rack":null,"position":null,"face":null,"parent_device":null,"status":{"value":1,"label":"Active"},"primary_ip":null,"primary_ip4":null,"primary_ip6":null,"cluster":null,"virtual_chassis":null,"vc_position":null,"vc_priority":null,"comments":"","local_context_data":null,"tags":[],"created":"2019-07-27","last_updated":"2019-07-27T12:34:34.476298Z"}", "content_length": "953", "content_type": "application/json", "cookies": {}, "cookies_string": "", "date": "Sat, 27 Jul 2019 12:34:34 GMT", "elapsed": 0, "json": {"asset_tag": null, "cluster": null, "comments": "", "created": "2019-07-27", "device_role": {"id": 3, "name": "spine", "slug": "spine", "url": "http://localhost:32768/api/dcim/device-roles/3/"}, "device_type": {"display_name": "Dell Dell S5048F-ON", "id": 3, "manufacturer": {"id": 3, "name": "Dell", "slug": "dell", "url": "http://localhost:32768/api/dcim/manufacturers/3/"}, "model": "Dell S5048F-ON", "slug": "dell-s5048f-on", "url": "http://localhost:32768/api/dcim/device-types/3/"}, "display_name": "de-test-spine-333", "face": null, "id": 21, "last_updated": "2019-07-27T12:34:34.476298Z", "local_context_data": null, "name": "de-test-spine-333", "parent_device": null, "platform": null, "position": null, "primary_ip": null, "primary_ip4": null, "primary_ip6": null, "rack": null, "serial": "", "site": {"id": 1, "name": "bln", "slug": "bln", "url": "http://localhost:32768/api/dcim/sites/1/"}, "status": {"label": "Active", "value": 1}, "tags": [], "tenant": null, "vc_position": null, "vc_priority": null, "virtual_chassis": null}, "msg": "Status code was 201 and not [200]: OK (953 bytes)", "p3p": "CP="ALL DSP COR PSAa PSDa OUR NOR ONL UNI COM NAV"", "redirected": false, "server": "nginx", "status": 201, "url": "http://localhost:32768/api/dcim/devices/", "vary": "Accept, Cookie, Origin", "x_frame_options": "SAMEORIGIN"}
...ignoring
TASK [DEBUG / GOT INFO] ********************************************************************************************************************
ok: [localhost] => {
"msg": {
"asset_tag": null,
"cluster": null,
"comments": "",
"created": "2019-07-27",
"device_role": {
"id": 3,
"name": "spine",
"slug": "spine",
"url": "http://localhost:32768/api/dcim/device-roles/3/"
},
"device_type": {
"display_name": "Dell Dell S5048F-ON",
"id": 3,
"manufacturer": {
"id": 3,
"name": "Dell",
"slug": "dell",
"url": "http://localhost:32768/api/dcim/manufacturers/3/"
},
"model": "Dell S5048F-ON",
"slug": "dell-s5048f-on",
"url": "http://localhost:32768/api/dcim/device-types/3/"
},
"display_name": "de-test-spine-333",
"face": null,
"id": 21,
"last_updated": "2019-07-27T12:34:34.476298Z",
"local_context_data": null,
"name": "de-test-spine-333",
"parent_device": null,
"platform": null,
"position": null,
"primary_ip": null,
"primary_ip4": null,
"primary_ip6": null,
"rack": null,
"serial": "",
"site": {
"id": 1,
"name": "bln",
"slug": "bln",
"url": "http://localhost:32768/api/dcim/sites/1/"
},
"status": {
"label": "Active",
"value": 1
},
"tags": [],
"tenant": null,
"vc_position": null,
"vc_priority": null,
"virtual_chassis": null
}
}
PLAY RECAP *********************************************************************************************************************************
localhost : ok=2 changed=0 unreachable=0 failed=0 skipped=0 rescued=0 ignored=1
The ignore_errors and HTTP response code dependencies are explained earlier. Just remember, 200 OK is not always given, even when everything is OK.
You can see that in the registered output of the Ansible’s playbook execution, you get the details about the created object. All the IDs, provided in the body, are properly matched in the database and returned as full objects (ID + further details).
Pay attention to the ID of the created devices, as you will need it shortly in the next point.
Once the object is created, we can view it in the Web UI:
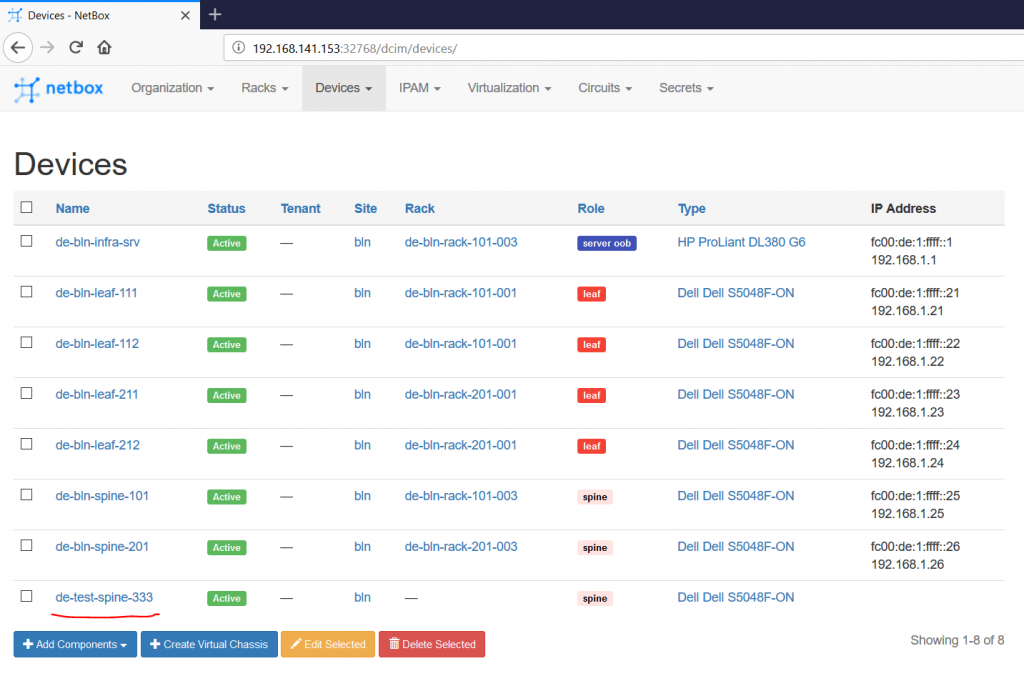
You have just created the entry in the application over REST API! Well done!
#2. DELETE request with Ansible
So far you have learned about two operations types out of four CRUD actions: Create (POST) and Read (GET). Now you will learn the third one, which is called Delete (HTTP method DELETE). As it comes from the method name, it aims to remove the unnecessary information from the application/database. That’s why it is similar to the GET in terms that you need to provide only URL without the body.
In case of the NetBox, we have built-in REST API documentation (link), which shows us the proper resource path used in the DELETE request:
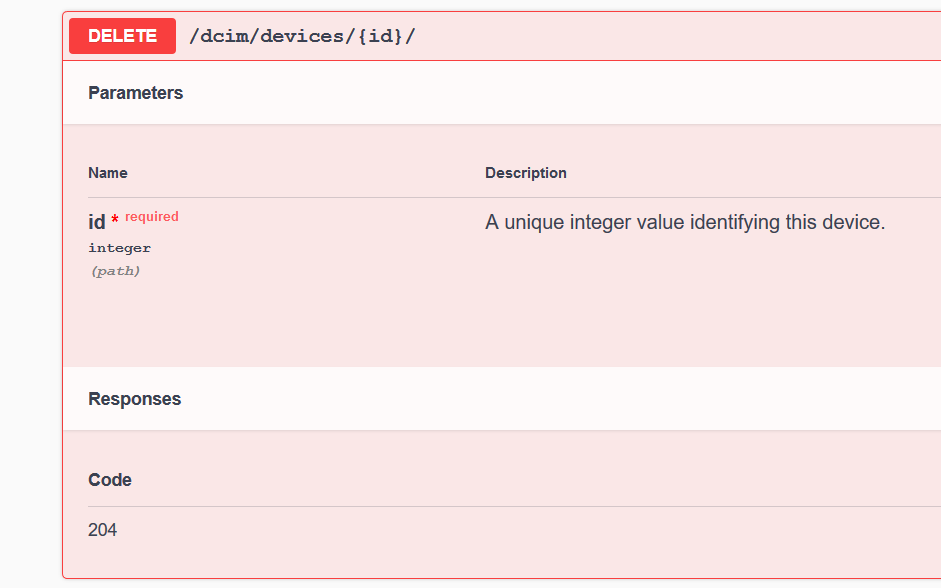
Using this documentation, the following the Ansible playbook is composed. It aims to delete the device created in the Digital Ocean NetBox created above:
2
3
4
5
6
7
8
9
10
11
12
13
14
15
16
17
18
19
20
21
22
23
24
25
26
27
28
29
30
31
32
33
---
- hosts: localhost
connection: local
gather_facts: no
# Setting vars for this App
vars:
destination_host: localhost
destination_port: 32768
netbox_token: 0123456789abcdef0123456789abcdef01234567
# Running tasks
tasks:
- name: REST API CALL / DELETE
uri:
url: http://{{ destination_host }}:{{ destination_port }}/{{ resource_path }}{{ id }}
method: DELETE
headers:
Authorization: "Token {{ netbox_token }}"
ignore_errors: yes
register: rest_delete
vars:
resource_path: api/dcim/devices/
id: 21/
- name: DEBUG / GOT INFO
debug:
msg: "{{ rest_delete }}"
when: rest_delete.status == 204
...
As you have read above, you need to note the ID of the created device in order to be able to delete it. Alternatively, you can create a GET request, which will extract the JSON data including ID for a certain hostname. Then you can automatically take the ID and put it to the delete task. Pay attention that id should end with the slash symbol “/”, otherwise you will get an error.
Let’s try to execute the playbook:
2
3
4
5
6
7
8
9
10
11
12
13
14
15
16
17
18
19
20
21
22
23
24
25
26
27
28
29
30
31
32
33
34
35
36
37
38
PLAY [localhost] ****************************************
TASK [REST API CALL / DELETE] ***********************************
fatal: [localhost]: FAILED! => {"allow": "GET, PUT, PATCH, DELETE, HEAD, OPTIONS", "ansible_facts": {"discovered_interpreter_python": "/usr/bin/python"}, "api_version": "2.5", "changed": false, "connection": "close", "content": "", "content_length": "0", "cookies": {}, "cookies_string": "", "date": "Mon, 05 Aug 2019 19:37:46 GMT", "elapsed": 0, "msg": "Status code was 204 and not [200]: OK (0 bytes)", "p3p": "CP="ALL DSP COR PSAa PSDa OUR NOR ONL UNI COM NAV"", "redirected": false, "server": "nginx", "status": 204, "url": "http://localhost:32768/api/dcim/devices/22/", "vary": "Accept, Cookie, Origin", "x_frame_options": "SAMEORIGIN"}
...ignoring
TASK [DEBUG / GOT INFO] ******************************************
ok: [localhost] => {
"msg": {
"allow": "GET, PUT, PATCH, DELETE, HEAD, OPTIONS",
"ansible_facts": {
"discovered_interpreter_python": "/usr/bin/python"
},
"api_version": "2.5",
"changed": false,
"connection": "close",
"content": "",
"content_length": "0",
"cookies": {},
"cookies_string": "",
"date": "Mon, 05 Aug 2019 19:37:46 GMT",
"elapsed": 0,
"failed": true,
"msg": "Status code was 204 and not [200]: OK (0 bytes)",
"p3p": "CP="ALL DSP COR PSAa PSDa OUR NOR ONL UNI COM NAV"",
"redirected": false,
"server": "nginx",
"status": 204,
"url": "http://localhost:32768/api/dcim/devices/22/",
"vary": "Accept, Cookie, Origin",
"x_frame_options": "SAMEORIGIN"
}
}
PLAY RECAP *******************************************************
localhost : ok=2 changed=0 unreachable=0 failed=0 skipped=0 rescued=0 ignored=1
As it was already explained, Ansible expects to get code 200/OK, and if it gets another one, it raises error. Using ignore_errors key we allow the playbook to be executed further. The second steps assures that the execution was successful.
To perform the final verification, we check the Web-UI of the NetBox:
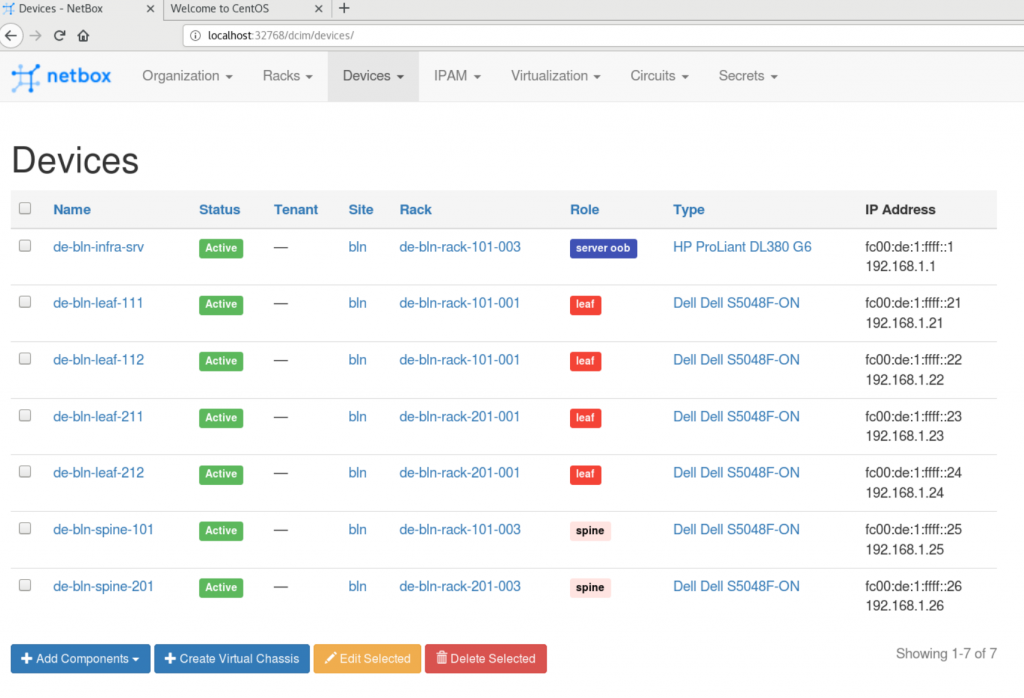
You can spot that the recently created device is removed. That confirms that the POST request works as proper and we can move further.
#3. POST and DELETE requests with Bash
The detailed explanation about the Bash implementation, read in the previous article.
To save your reading time and to reduce the length of the article, here you can see the corresponding Bash scripts doing the same job, described into Ansible part.
POST request towards Docker to launch the container:
2
3
4
5
6
7
8
9
10
11
12
13
14
#!/bin/bash
# Variables
URL="localhost"
PORT=2375
METHOD="POST"
RESOURCE="containers"
CONTAINER_NAME="dcf_dhcp"
ACTION="kill"
# BODY
RESULT=$(curl -i -X ${METHOD} ${URL}:${PORT}/${RESOURCE}/${CONTAINER_NAME}/${ACTION})
echo ${RESULT}
POST request towards Digital Ocean NetBox to create the resources:
2
3
4
5
6
7
8
9
10
11
12
13
14
15
16
#!/bin/bash
# Variables
URL="localhost"
PORT=32768
TOKEN=0123456789abcdef0123456789abcdef01234567
METHOD="POST"
RESOURCE="api/dcim/devices/"
# BODY
RESULT=$(curl -i -X ${METHOD} ${URL}:${PORT}/${RESOURCE} \
--header "Authorization: Token ${TOKEN}" \
--header "Content-Type: application/json" \
--data '{"name": "de-test-spine-333", "device_type": 3, "device_role": 3, "site": 1, "status": 2}')
echo ${RESULT}
DELETE request towards Digital Ocean NetBox to delete the resources:
2
3
4
5
6
7
8
9
10
11
12
13
14
15
#!/bin/bash
# Variables
URL="localhost"
PORT=32768
TOKEN=0123456789abcdef0123456789abcdef01234567
METHOD="DELETE"
RESOURCE="api/dcim/devices/"
ID="18/"
# BODY
RESULT=$(curl -i -X ${METHOD} ${URL}:${PORT}/${RESOURCE}${ID} \
--header "Authorization: Token ${TOKEN}")
echo ${RESULT}
#4. POST and DELETE requests with Postman
The detailed explanation about the Postman implementation, read in the previous article.
To save your reading time and to reduce the length of the article, here you can see the corresponding Postman scripts doing the same job, described into Ansible part.
POST request towards Docker to launch the container:
2
3
4
5
6
7
8
9
10
11
12
13
14
15
16
17
18
19
20
21
"name": "http://{{destination_host}}:{{destination_port}}/{{resource_path}}/{{container_name}}/kill",
"request": {
"method": "POST",
"header": [],
"url": {
"raw": "http://{{destination_host}}:{{destination_port}}/{{resource_path}}/{{container_name}}/start",
"protocol": "http",
"host": [
"{{destination_host}}"
],
"port": "{{destination_port}}",
"path": [
"{{resource_path}}",
"{{container_name}}",
"start"
]
}
},
"response": []
},
POST request towards Digital Ocean NetBox to create the resources:
2
3
4
5
6
7
8
9
10
11
12
13
14
15
16
17
18
19
20
21
22
23
24
25
26
27
28
29
30
31
32
33
34
"name": "http://{{destination_host}}:{{destination_port}}/{{resource_path}}",
"request": {
"method": "POST",
"header": [
{
"key": "Content-Type",
"value": "application/json",
"type": "text"
},
{
"key": "Authorization",
"value": "Token {{netbox_token}}",
"type": "text"
}
],
"body": {
"mode": "raw",
"raw": "{\n\t"name": "de-test-spine-333",\n\t"device_type": 3,\n\t"device_role": 3,\n\t"site": 1,\n\t"status": 2\n}"
},
"url": {
"raw": "http://{{destination_host}}:{{destination_port}}/{{resource_path}}",
"protocol": "http",
"host": [
"{{destination_host}}"
],
"port": "{{destination_port}}",
"path": [
"{{resource_path}}"
]
}
},
"response": []
},
DELETE request towards Digital Ocean NetBox to delete the resources:
2
3
4
5
6
7
8
9
10
11
12
13
14
15
16
17
18
19
20
21
22
23
24
25
"name": "http://{{destination_host}}:{{destination_port}}/{{resource_path}}{{ID}}",
"request": {
"method": "DELETE",
"header": [
{
"key": "Authorization",
"value": "Token {{netbox_token}}",
"type": "text"
}
],
"url": {
"raw": "http://{{destination_host}}:{{destination_port}}/{{resource_path}}{{ID}}",
"protocol": "http",
"host": [
"{{destination_host}}"
],
"port": "{{destination_port}}",
"path": [
"{{resource_path}}{{ID}}"
]
}
},
"response": []
}
#5. POST and DELETE requests with Python
The detailed explanation about the Python implementation, read in the previous article.
To save your reading time and to reduce the length of the article, here you can see the corresponding Python scripts doing the same job, described into Ansible part.
POST request towards Docker to launch the container:
2
3
4
5
6
7
8
9
10
11
12
13
14
15
16
17
18
19
20
21
22
23
24
25
26
27
28
29
30
# Modules
import requests
# Varibles
destination_url = 'localhost'
destination_port = 2375
resource_path = 'containers'
container_name = 'dcf_dhcp'
action = 'kill'
# Functions
def rest_api_post(active_url, active_port, active_resource,
active_container, active_action):
resource_path = "http://%s:%s/%s/%s/%s" % (active_url, active_port,
active_resource,
active_container,
active_action)
rest_response = requests.post(url=resource_path)
return rest_response
# Body
if __name__ == '__main__':
reply = rest_api_post(destination_url, destination_port,
resource_path, container_name, action)
print(reply)
POST request towards Digital Ocean NetBox to create the resources:
2
3
4
5
6
7
8
9
10
11
12
13
14
15
16
17
18
19
20
21
22
23
24
25
26
27
28
29
30
31
32
33
34
35
36
37
38
39
40
41
42
43
# Modules
import requests
import json
# Varibles
destination_url = 'localhost'
destination_port = 32768
resource_path = 'api/dcim/devices/'
netbox_token = '0123456789abcdef0123456789abcdef01234567'
# Functions
def rest_api_post(active_url, active_port, active_resource,
active_token):
resource_path = "http://%s:%s/%s" % (active_url, active_port,
active_resource)
all_headers = {
'Authorization': 'Token %s' % active_token,
'Content-Type': 'application/json'
}
data_body = {
'name': 'de-test-spine-333',
'device_type': 3,
'device_role': 3,
'site': 1,
'status': 2
}
rest_response = requests.post(url=resource_path,
headers=all_headers,
data=json.dumps(data_body))
return rest_response.json()
# Body
if __name__ == '__main__':
reply = rest_api_post(destination_url, destination_port,
resource_path, netbox_token)
print(reply)
DELETE request towards Digital Ocean NetBox to delete the resources:
2
3
4
5
6
7
8
9
10
11
12
13
14
15
16
17
18
19
20
21
22
23
24
25
26
27
28
29
30
31
32
33
34
35
# Modules
import requests
import json
# Varibles
destination_url = 'localhost'
destination_port = 32768
resource_path = 'api/dcim/devices/'
netbox_token = '0123456789abcdef0123456789abcdef01234567'
delete_id = '20/'
# Functions
def rest_api_delete(active_url, active_port, active_resource,
active_token):
resource_path = "http://%s:%s/%s" % (active_url, active_port,
active_resource)
all_headers = {
'Authorization': 'Token %s' % active_token
}
rest_response = requests.delete(url=resource_path,
headers=all_headers)
return rest_response
# Body
if __name__ == '__main__':
summary_resource = "%s%s" % (resource_path, delete_id)
reply = rest_api_delete(destination_url, destination_port,
summary_resource, netbox_token)
print(reply)
All the provided scripts you can find on my GitHub.
Lessons learned
The trickest part for me was the Python script, which creates the data entry in the Digital Ocean NetBox. The reason for that was the necessity to convert the dictionary data structure into proper format using json.dumps function.
Conclusion
We are almost done with the CRUD operations for the REST API: Create, Read and Delete operations are now familiar to you in Ansible, Bash, Postman and Python. In the next article we’ll cover two options for Update. Take care and good bye!
Support us
P.S.
If you have further questions or you need help with your networks, I’m happy to assist you, just send me message. Also don’t forget to share the article on your social media, if you like it.
BR,
Anton Karneliuk

